
Imagine opening your kitchen oven and being greeted by the rich, chocolatey aroma of freshly baked brownies—there’s just something joyful about that smell, right? It fills your whole house with the promise of gooey, fudgy goodness. The first time I baked these Mini Heart Brownies for a Galentine’s celebration, the sight of those adorable heart shapes (all lined up, glossy and perfect) made my heart skip a beat. I paused, spatula in hand, and just smiled because I knew I’d stumbled onto something special—something that would make my friends feel loved and a little spoiled.
Honestly, I wish I’d discovered this Mini Heart Brownie Board recipe years ago. Back when I was knee-high to a grasshopper, my grandma used to cut brownies into squares and sprinkle them with powdered sugar. But these? They’re a full-blown Pinterest dream come true—bite-sized, heart-shaped, and ready for dipping, dunking, and decorating. I first made them on a rainy weekend, trying to recreate a treat I saw at a fancy bakery (spoiler: mine were even better). The reaction from my friends was priceless. My bestie couldn’t stop sneaking brownies off the board, and my sister declared, “These are dangerous!”—and, well, she’s not wrong.
This Mini Heart Brownie Board isn’t just for Galentine’s Day, either. It’s perfect for potlucks, sweet after-school treats, or to brighten up your Pinterest cookie board. Whether you’re celebrating with your closest friends or just looking to treat yourself to some pure, nostalgic comfort, this recipe fits the bill. I’ve tested it more times than I can count (in the name of research, of course), and it’s now a staple for family gatherings, gifting, and cozy movie nights. Trust me, it feels like a warm hug in dessert form—you’re going to want to bookmark this one.
Why You’ll Love This Recipe
Let me tell you, after years of baking brownies (and eating way more than my fair share), this Mini Heart Brownie Board stands out for so many reasons. Not only is it a visual showstopper—hello, Instagram-worthy hearts—but it hits the mark for taste and simplicity. Here’s why you’ll fall head over heels for this recipe:
- Quick & Easy: Comes together in under 40 minutes, so you won’t be stuck in the kitchen all day. Perfect for last-minute parties or spontaneous cravings.
- Simple Ingredients: No fancy chocolate or oddball pantry items required. Chances are, you already have everything you need.
- Perfect for Celebrations: Whether it’s Galentine’s Day, birthdays, or a cozy night in, this board is the ultimate centerpiece. It’s playful, festive, and encourages sharing.
- Crowd-Pleaser: Kids and adults alike go wild for these mini brownies. I’ve never seen leftovers (and let’s face it, you won’t either).
- Unbelievably Delicious: The texture is fudgy with a crackly top, and the flavor is pure, deep chocolate—just the way a brownie should be.
What makes this Mini Heart Brownie Board different from all the other brownie recipes? For starters, the batter uses melted chocolate and cocoa powder for double chocolate depth, and a touch of espresso powder to amplify the flavor (don’t worry, you can’t taste the coffee—it just makes the chocolate pop). The heart-shaped cutter guarantees perfectly adorable pieces, and the board format means you can get creative with toppings, dips, and decorations. I even tested swapping in gluten-free flour and dairy-free butter, and it worked like a charm—so everyone can join in.
This isn’t just another brownie recipe. It’s the kind that makes you close your eyes after that first bite. It’s comfort food, but with a fun twist—faster, cuter, and every bit as satisfying. Great for impressing your pals without breaking a sweat, or turning a simple get-together into something memorable.
What Ingredients You Will Need
This Mini Heart Brownie Board recipe keeps things simple yet indulgent. Every ingredient plays a role in creating those rich, fudgy bites and making your Galentine’s celebration extra sweet. Let’s break it down so you know exactly what to grab from your pantry or the store.
- For the Brownie Batter:
- 1/2 cup (115g) unsalted butter, melted (for richness)
- 3/4 cup (150g) granulated sugar
- 1/4 cup (50g) packed light brown sugar (adds chewiness)
- 2 large eggs, room temperature
- 1 teaspoon vanilla extract (pure vanilla, if you can—makes a big difference)
- 2/3 cup (80g) all-purpose flour (swap with gluten-free blend if needed)
- 1/3 cup (35g) unsweetened cocoa powder (I like Ghirardelli or Hershey’s—go with your favorite)
- 1/4 teaspoon espresso powder (optional, but trust me, it deepens the chocolate flavor)
- 1/4 teaspoon salt
- 3 ounces (85g) semi-sweet chocolate, melted (chips or chopped bar—use dairy-free chocolate if needed)
- For Toppings & Decorations:
- Powdered sugar (for dusting)
- Sprinkles (go wild—pink, red, heart-shaped, or whatever fits your vibe)
- Chocolate chips, white chocolate chips, or candy melts (for dipping)
- Fresh berries (raspberries and strawberries are perfect for color and tart contrast)
- Mini marshmallows (cute and fun for the board!)
- Optional: caramel sauce, chocolate sauce, or strawberry sauce for drizzling
- For the Board:
- Assorted cookies (shortbread, wafer rolls, or anything crunchy)
- Small bowls for dipping sauces or extras
- Edible flowers or mint leaves (totally optional, but they make the board pop for photos)
Ingredient tips: Use real butter for maximum flavor and fudginess. If you want to go dairy-free, Earth Balance works well. For the chocolate, a good bar (chopped) gives that glossy finish, but chips are a solid backup. If you’re making this for a crowd with allergies, swap in your favorite gluten-free flour or dairy-free chocolate. In summer, fresh berries add brightness, but in winter, freeze-dried strawberries are a fun twist. The toppings are mix-and-match—make the board totally yours!
Equipment Needed
You won’t need a fancy kitchen setup for this Mini Heart Brownie Board, which is part of its charm. Here’s what you’ll want on hand:
- 8×8-inch (20×20 cm) square baking pan (nonstick is best—easier release!)
- Parchment paper (makes cleanup a breeze and ensures your hearts come out clean)
- Mixing bowls (one large, one medium)
- Whisk and spatula (I love using a silicone spatula for scraping every last bit of batter)
- Heart-shaped cookie cutter (about 2 inches/5 cm wide; metal works best for clean cuts)
- Wire cooling rack (for rapid cooling and easy decorating)
- Serving board or platter (wooden boards look gorgeous for Pinterest photos, but any large plate works)
- Small bowls for dips and toppings
If you don’t have a heart-shaped cutter, you can use any small cookie cutter or even cut out hearts freehand with a knife (just go slow). For baking pans, if yours isn’t nonstick, give it a little extra parchment coverage. Maintenance tip: I always hand-wash my cutters to keep them sharp. Budget hack—check dollar stores for cute cutters and boards, especially around Valentine’s season.
Preparation Method
Let’s get down to the nitty-gritty! Here’s how to make the most adorable Mini Heart Brownie Board for your Galentine’s celebration. Each step comes with a few tips I’ve learned along the way, so you’ll nail it on your first try.
- Preheat and Prep:
- Preheat your oven to 350°F (175°C). Line your 8×8-inch (20×20 cm) baking pan with parchment paper, leaving a slight overhang for easy lifting later. (Trust me, this trick saves you from brownie disasters!)
- Melt Chocolate and Butter:
- In a microwave-safe bowl, melt 3 ounces (85g) semi-sweet chocolate and 1/2 cup (115g) unsalted butter in 20-second bursts, stirring until smooth. Let it cool slightly. (If you overheat, the chocolate can seize—so watch carefully.)
- Mix Wet Ingredients:
- In a large bowl, whisk together 3/4 cup (150g) granulated sugar, 1/4 cup (50g) light brown sugar, and the melted chocolate-butter mixture. Add 2 large eggs and 1 teaspoon vanilla extract; whisk until glossy and combined. (It should look thick and shiny.)
- Combine Dry Ingredients:
- In a separate bowl, sift together 2/3 cup (80g) all-purpose flour, 1/3 cup (35g) unsweetened cocoa powder, 1/4 teaspoon espresso powder, and 1/4 teaspoon salt. (Sifting keeps the texture smooth and lump-free.)
- Fold Together:
- Gently fold the dry ingredients into the wet with a spatula. Don’t overmix—just until you don’t see streaks of flour. (Overmixing can make brownies tough.)
- Bake:
- Pour batter into the prepared pan and smooth the top. Bake for 18–22 minutes, or until a toothpick inserted in the center comes out with moist crumbs (not wet batter). (Ovens vary—start checking at 18 minutes!)
- Cool Completely:
- Lift the brownies out using the parchment and let them cool on a wire rack for at least 30 minutes. (If you rush this, the hearts will fall apart—patience pays off.)
- Cut Into Hearts:
- Use your heart-shaped cutter to punch out as many brownies as you can (usually 12–16, depending on size). Gather scraps and serve them as “brownie bites”—no waste! If hearts stick, gently push them out with a toothpick.
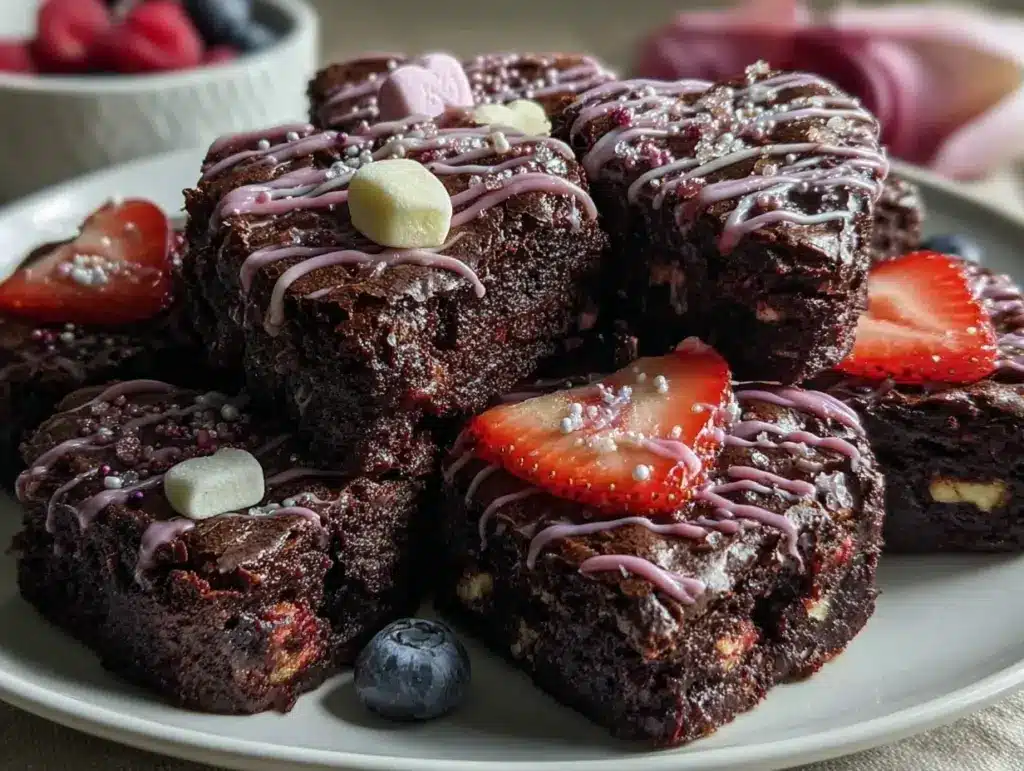
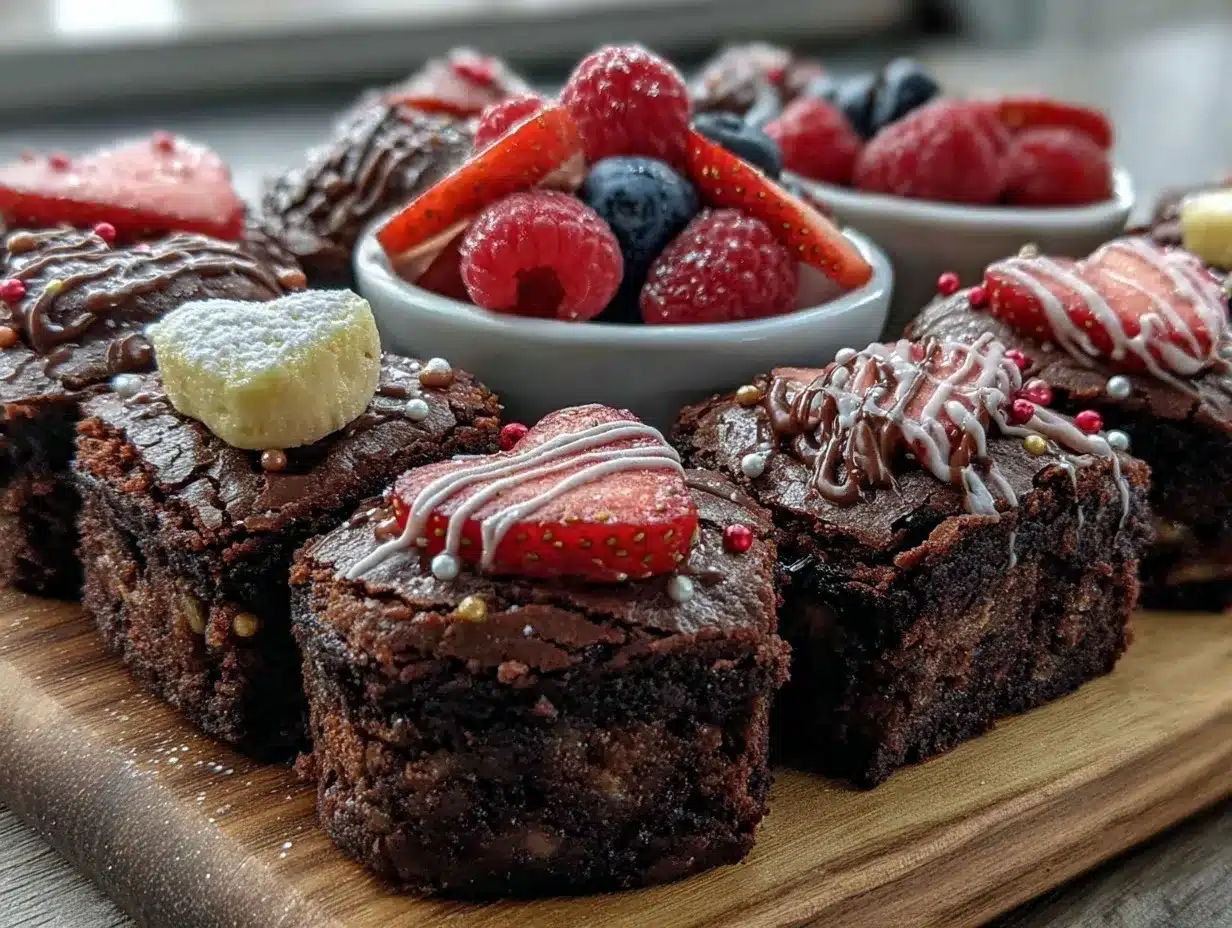
- Decorate:
- Dust with powdered sugar, top with sprinkles, dip in melted chocolate, or drizzle with caramel or strawberry sauce. (Let your inner artist loose—no rules!)
- Arrange the Board:
- Place hearts on your serving board, filling in gaps with berries, marshmallows, cookies, and bowls of dipping sauces. Add edible flowers or mint for extra flair. (Try a “rainbow” layout for extra Pinterest points!)
Prep notes: If you prefer extra-fudgy brownies, underbake by a minute or two. For crispier edges, use a metal pan. If your cutter sticks, chill brownies for 10 minutes—they firm up beautifully. The scraps? Honestly, they disappear faster than the hearts.
Cooking Tips & Techniques
Over the years, I’ve learned a few tricks to make this Mini Heart Brownie Board totally foolproof. Here are my top tips and techniques:
- Don’t Overmix: Once the flour goes in, mix just until combined. Overmixing = tough brownies, and nobody wants that!
- Watch the Baking Time: Brownies can go from fudgy to dry in a blink. Start checking a couple minutes early. Toothpick test: moist crumbs are perfect, wet batter means more time.
- Use Good Chocolate: The flavor of your brownies depends on the chocolate you use. I’ve tried fancy bars and regular chips—both work, but a good-quality chocolate makes a difference.
- Chill Before Cutting: If you want clean, sharp hearts, refrigerate the baked brownies for 10–15 minutes. It firms them up and helps the cutter glide through.
- Grease Your Cutter: A quick dip in hot water or a spritz of oil helps prevent sticking.
- Toppings Tip: Let melted chocolate cool slightly before dipping—too hot and it’ll melt the brownies, too cold and it won’t coat smoothly.
- Multitasking: Prep your toppings and board layout while the brownies bake. This saves time and keeps things fun.
- Consistency Matters: Measure flour with a spoon and level off for accuracy. Too much flour makes brownies cakey.
Honestly, I’ve messed up brownies by overbaking, using old cocoa, or rushing the cooling step. Every time, I learned to slow down and trust the process. With these tips, you’ll get perfect brownies—soft, chewy, and ready to steal the show.
Variations & Adaptations
One of my favorite things about this Mini Heart Brownie Board is how customizable it is. Here are some easy ways to switch things up for different tastes or dietary needs:
- Gluten-Free: Swap the all-purpose flour for a 1:1 gluten-free baking blend. I’ve used Bob’s Red Mill and King Arthur with great results—no gritty texture!
- Dairy-Free: Use a dairy-free butter substitute (like Earth Balance) and dairy-free chocolate chips. The brownies stay super fudgy.
- Nutty Twist: Fold in 1/2 cup (60g) chopped walnuts or pecans for crunch. Or, swirl in almond butter before baking for nutty richness.
- Seasonal Flair: In summer, top with fresh berries and a dollop of whipped cream. In winter, add crushed peppermint candies or mini marshmallows.
- Spicy Kick: Add 1/4 teaspoon cinnamon and a pinch of cayenne for Mexican chocolate vibes. It’s a fun surprise!
- Vegan Option: Replace eggs with flax eggs (2 tablespoons ground flaxseed + 5 tablespoons water, mixed and rested for 5 minutes). The texture will be a bit softer, but still delicious.
I’ve tried most of these adaptations myself, especially the gluten-free and vegan versions for friends with allergies. The nutty twist is my personal favorite—adds a little grown-up flavor to the mix. No matter which way you go, the board is always a hit!
Serving & Storage Suggestions
For the ultimate Galentine’s experience, serve your Mini Heart Brownie Board at room temperature. Arrange the hearts on a wooden board or platter for that “Pinterest-perfect” look, filling in with fresh berries, cookies, and dips. Pair with a chilled strawberry lemonade or hot chocolate—both go so well with chocolatey brownies.
If you’ve got leftovers (I mean, it’s rare!), store the brownies in an airtight container at room temperature for up to 3 days. For longer storage, pop them in the fridge for up to a week—they actually taste even fudgier after a day or two. You can also freeze the hearts: wrap in plastic wrap and store in a zip-top bag for up to a month. Defrost at room temp or microwave for 10–15 seconds. If you want to reheat, a few seconds in the microwave brings back that fresh-from-the-oven warmth.
Flavor tip: The chocolate flavor deepens overnight, so if you make them ahead, they’ll taste even richer the next day. Just keep toppings separate until serving so everything stays crisp and colorful.
Nutritional Information & Benefits
Each mini heart brownie comes in at about 100–120 calories, with 5g fat, 15g carbs, and 2g protein (depending on your ingredients and toppings). The recipe is naturally nut-free unless you add nuts, and can be made gluten- or dairy-free with simple swaps.
Cocoa powder is rich in antioxidants and can even boost your mood—chocolate on Galentine’s Day, anyone? Eggs add a bit of protein, and berries bring vitamin C and fiber. If you’re watching sugar or carbs, try using a lower-sugar chocolate and cutting back a bit on the brown sugar.
Allergen notes: Contains eggs, wheat, and dairy (unless adapted). If you or your guests have allergies, use the substitutions above. Personally, I love that this board can be tweaked for almost any dietary need—so everyone gets to celebrate!
Conclusion
So there you have it—the Mini Heart Brownie Board recipe that’s perfect for Galentine’s celebrations, family gatherings, or just treating yourself to something sweet. It’s cute, incredibly tasty, and honestly, it brings people together (and let’s be real, that’s what good food is all about).
Don’t be afraid to make it your own—switch up the toppings, try a new variation, and let your creativity shine. This recipe is one of my favorites because it’s easy, fun, and always brings big smiles. Every time I make it, I feel like I’m passing along a little bit of joy and nostalgia.
If you try this Mini Heart Brownie Board, let me know in the comments! Share your photos, swap ideas, and tell me how you adapted it for your own crew. Wishing you lots of laughter, chocolate, and happy memory-making. You’ve got this—happy baking!
FAQs
How do I prevent brownies from sticking to the cutter?
Grease your cutter with a bit of oil or dip it in hot water between cuts. If the brownies are too soft, chill them in the fridge for 10–15 minutes before cutting.
Can I use boxed brownie mix for this recipe?
Absolutely! If you’re short on time, boxed mix works well. Just bake as directed, then follow the same steps for cutting and decorating.
What’s the best way to make these brownies gluten-free?
Replace the all-purpose flour with a 1:1 gluten-free baking blend. I’ve had great results with Bob’s Red Mill and King Arthur brands.
How far in advance can I make the Mini Heart Brownie Board?
You can bake the brownies 1–2 days ahead. Store them airtight, then decorate and assemble the board just before serving for the freshest look and flavor.
Can I freeze the brownie hearts?
Yes! Wrap each heart tightly in plastic wrap and store in a freezer bag for up to one month. Defrost at room temp and add toppings right before serving.
Pin This Recipe!


Mini Heart Brownie Board
These adorable mini heart brownies are rich, fudgy, and perfect for Galentine’s Day or any celebration. Cut into heart shapes and served on a festive board with toppings and dips, they’re a fun, shareable treat that’s easy to customize for any crowd.
- Total Time: 40 minutes
- Yield: 12–16 mini heart brownies 1x
Ingredients
- 1/2 cup (115g) unsalted butter, melted
- 3/4 cup (150g) granulated sugar
- 1/4 cup (50g) packed light brown sugar
- 2 large eggs, room temperature
- 1 teaspoon vanilla extract
- 2/3 cup (80g) all-purpose flour (or gluten-free blend)
- 1/3 cup (35g) unsweetened cocoa powder
- 1/4 teaspoon espresso powder (optional)
- 1/4 teaspoon salt
- 3 ounces (85g) semi-sweet chocolate, melted (chips or chopped bar; dairy-free if needed)
- Powdered sugar (for dusting)
- Sprinkles (pink, red, heart-shaped, or your choice)
- Chocolate chips, white chocolate chips, or candy melts (for dipping)
- Fresh berries (raspberries and strawberries)
- Mini marshmallows
- Optional: caramel sauce, chocolate sauce, or strawberry sauce for drizzling
- Assorted cookies (shortbread, wafer rolls, or crunchy cookies)
- Small bowls for dipping sauces or extras
- Edible flowers or mint leaves (optional, for garnish)
Instructions
- Preheat your oven to 350°F (175°C). Line an 8×8-inch baking pan with parchment paper, leaving an overhang for easy lifting.
- In a microwave-safe bowl, melt the semi-sweet chocolate and unsalted butter in 20-second bursts, stirring until smooth. Let cool slightly.
- In a large bowl, whisk together granulated sugar, light brown sugar, and the melted chocolate-butter mixture. Add eggs and vanilla extract; whisk until glossy and combined.
- In a separate bowl, sift together flour, cocoa powder, espresso powder, and salt.
- Gently fold the dry ingredients into the wet mixture with a spatula until just combined. Do not overmix.
- Pour the batter into the prepared pan and smooth the top. Bake for 18–22 minutes, or until a toothpick inserted in the center comes out with moist crumbs.
- Lift the brownies out using the parchment and let them cool on a wire rack for at least 30 minutes.
- Use a heart-shaped cookie cutter to cut out as many brownies as possible (about 12–16). Serve scraps as brownie bites.
- Decorate the hearts: dust with powdered sugar, add sprinkles, dip in melted chocolate, or drizzle with caramel or strawberry sauce.
- Arrange the brownie hearts on a serving board, filling gaps with berries, marshmallows, cookies, and bowls of dipping sauces. Garnish with edible flowers or mint leaves if desired.
Notes
For extra-fudgy brownies, underbake by a minute or two. Chill brownies before cutting for clean shapes. Use gluten-free flour and dairy-free butter/chocolate for allergy-friendly versions. Toppings and decorations are fully customizable—get creative! Brownie scraps make great bites for snacking.
- Prep Time: 15 minutes
- Cook Time: 20 minutes
- Category: Dessert
- Cuisine: American
Nutrition
- Serving Size: 1 mini heart brownie
- Calories: 110
- Sugar: 10
- Sodium: 40
- Fat: 5
- Saturated Fat: 3
- Carbohydrates: 15
- Fiber: 1
- Protein: 2
Keywords: brownies, heart brownies, Galentine’s Day, dessert board, chocolate, easy brownies, party dessert, Valentine’s Day, gluten-free brownies, dairy-free brownies


