

Imagine the warmth of your kitchen, sunlight streaming through the window, and the sweet aroma of chocolate and strawberries swirling together in the air. That’s exactly the sensory wonderland that comes alive every time I bake my Chocolate-Covered Strawberry Stuffed Scones. The first time I pulled a batch from the oven, the scent alone made me pause mid-step—seriously, it was one of those “drop everything and take it all in” moments. I was instantly hooked, and honestly, I haven’t looked back since.
My introduction to these scones was pure serendipity—years ago, on a rainy Saturday, I was trying to recreate that nostalgic combo of chocolate-dipped strawberries for a brunch with friends. What came out of my oven was magic: tender scones with a juicy strawberry center, all wrapped up in melty chocolate. My family couldn’t stop sneaking them off the cooling rack (and I can’t really blame them). Each bite is a balance of crumbly, fragrant pastry, tart berries, and that chocolatey hug. It’s dangerously easy to eat a few before you realize it.
There’s a certain comfort in recipes that remind you of simpler days—when I was knee-high to a grasshopper, my grandma used to make strawberry jam scones for special occasions. I like to think these are her classic scones, all grown up and ready for a party. They’re perfect for brightening up your Pinterest brunch board, impressing your book club, or just sneaking a sweet treat for yourself on a lazy Sunday. If you’re searching for a show-stopping bake sale entry or something special for Mother’s Day, trust me, you want to bookmark this one. After many rounds of “testing” (in the name of research, of course), this recipe is now a staple for family gatherings and gifting. It feels like a warm hug, and I genuinely hope it brings you as much joy as it does for us.
Why You’ll Love This Chocolate-Covered Strawberry Stuffed Scones Recipe
Let’s be honest—some recipes are just too fussy, but this one? It’s pure joy in a pastry shell. I’ve baked scones for years, both as a professional baker and a busy mom, and I can say with confidence: these scones deliver every time. Here’s why you’ll be reaching for this recipe again and again:
- Quick & Easy: These scones come together in just about 15 minutes of hands-on time. Perfect for when you want something special but don’t have all day to fuss with dough.
- Simple Ingredients: Nothing fancy here—just pantry staples, fresh strawberries, and good chocolate. You probably have everything you need already in your kitchen.
- Perfect for Brunch or Special Occasions: These scones are a crowd-pleaser for baby showers, holiday mornings, or when you want to treat someone you love.
- Kid and Adult Approved: My kids beg for these, and every adult who’s tried them asks for the recipe. They’re the kind of treat that brings everyone to the table.
- Unbelievably Delicious: The combination of fluffy scone, gooey chocolate, and sweet-tart strawberries is next-level comfort food. You get that classic chocolate-covered strawberry vibe in every bite.
What sets these apart? It’s the way the chocolate melts around the berries inside the scone—almost like a hidden truffle. I’ve played with mixing the chocolate into the dough, but stuffing them makes all the difference. The technique is simple, but the payoff is huge. I use a touch of heavy cream and a bit of vanilla to keep the scones rich without being heavy, and the sugar is just enough to balance out the tartness of the strawberries (not cloyingly sweet, promise).
This isn’t your average scone—each one is stuffed with a little surprise, which is half the fun. Whether you’re baking for a special occasion or just want to make a regular morning feel like a celebration, these Chocolate-Covered Strawberry Stuffed Scones are the answer. They’re cozy, nostalgic, and just a bit decadent—honestly, I wish someone had handed me this recipe years ago.
What Ingredients You Will Need
This Chocolate-Covered Strawberry Stuffed Scones recipe leans on simple, familiar ingredients that create a flavor-packed pastry without any fancy shopping trips. Here’s what you’ll need to whip up a batch of scones that will have everyone reaching for seconds:
- For the Scone Dough:
- 2 cups (250g) all-purpose flour (King Arthur or Gold Medal work great)
- 1/4 cup (50g) granulated sugar (adds just the right sweetness)
- 1 tablespoon baking powder (for that signature scone rise)
- 1/2 teaspoon kosher salt
- 6 tablespoons (85g) unsalted butter, cold and cubed (the colder, the flakier the scone—keep it in the fridge until you’re ready)
- 1/2 cup (120ml) heavy cream, plus extra for brushing (for richness and moisture)
- 1 large egg (room temperature is best for blending in smoothly)
- 1 teaspoon pure vanilla extract (I love Nielsen-Massey for deep flavor)
- For the Filling:
- 1 cup (150g) fresh strawberries, hulled and diced (pick ripe but firm berries for best results—if strawberries are out of season, frozen can work in a pinch, just thaw and blot dry)
- 3 ounces (85g) semi-sweet chocolate, chopped or chips (Ghirardelli or Guittard are my go-tos; use dark chocolate for a bittersweet version)
- For the Topping:
- 2 tablespoons turbinado sugar (optional, for a sparkly crunch on top)
- Extra melted chocolate for drizzling (totally optional, but it looks gorgeous!)
You can swap the all-purpose flour with a 1:1 gluten-free blend if needed. For dairy-free, use coconut cream and a vegan butter substitute. If you don’t have turbinado sugar, just sprinkle a little regular sugar on top. For the chocolate, milk or white chocolate works if you prefer things sweeter. In the summertime, you might add a handful of fresh raspberries to the mix. I always recommend picking strawberries that are just slightly under-ripe—they hold up better during baking and don’t make the dough soggy.
Equipment Needed
Baking scones doesn’t require a ton of fancy tools—here’s what you’ll need for this Chocolate-Covered Strawberry Stuffed Scones recipe:
- Large Mixing Bowl: For bringing the dough together. Glass or stainless steel both work (I use a trusty old Pyrex bowl).
- Pastry Cutter or Fork: For cutting the butter into the flour. If you don’t have a cutter, two butter knives do fine in a pinch.
- Measuring Cups and Spoons: Accuracy matters, especially with baking powder and flour. A kitchen scale is even better for consistent results.
- Box Grater (optional): If your butter is extra hard, you can grate it instead of cubing—it blends in like a dream.
- Baking Sheet: Lined with parchment paper or a silicone baking mat for easy cleanup.
- Small Bowl: For whisking the egg and cream.
- Bench Scraper or Large Knife: For shaping and slicing the scone dough into wedges.
- Pastry Brush: For brushing the tops with cream.
- Wire Cooling Rack: Essential for letting the scones cool without getting soggy bottoms.
If you don’t have a pastry cutter, your hands work too—just work quickly to keep the butter cold. For budget-friendly gear, check out your local discount stores; I’ve found some of my favorite tools there. And honestly, as long as you have a big bowl and a baking sheet, you’re pretty much set. Just keep your equipment clean and dry for the best scone texture (damp bowls can make things sticky).
How to Make Chocolate-Covered Strawberry Stuffed Scones
-
Prep Your Ingredients (10 minutes):
Start by measuring out all your ingredients. Dice the strawberries into small pieces—nothing bigger than a blueberry, so you don’t end up with soggy pockets. Chop your chocolate if you’re not using chips. Keep the butter in the fridge until you’re ready to use it.
-
Mix the Dry Ingredients:
In your large mixing bowl, whisk together 2 cups (250g) flour, 1/4 cup (50g) sugar, 1 tablespoon baking powder, and 1/2 teaspoon salt. This helps distribute the baking powder evenly so every scone rises nicely.
-
Cut in the Butter (5 minutes):
Add the cold, cubed butter to the flour mixture. Use your pastry cutter, fork, or fingertips to work the butter in until you have pea-sized crumbs—think lumpy, not sandy. The key is keeping some larger butter bits for flakiness. If your kitchen is warm, pop the bowl in the fridge for a few minutes before moving on.
-
Combine Wet Ingredients:
In a small bowl, whisk together 1/2 cup (120ml) heavy cream, 1 large egg, and 1 teaspoon vanilla. Pour this mixture over the flour-butter mixture. Stir gently with a fork or spatula until just combined—don’t overmix. The dough will look a bit shaggy (that’s perfect).
-
Gently Fold in Strawberries (2 minutes):
Add diced strawberries and gently fold them into the dough. Don’t crush them—you want little pockets of berry in every bite. If the dough is too sticky, sprinkle with a tablespoon of flour.
-
Shape and Stuff with Chocolate (8 minutes):
Turn the dough out onto a lightly floured surface. Pat into a 7-8 inch (18-20cm) circle, about 1 inch (2.5cm) thick. Cut the circle into 8 wedges using a bench scraper or large knife.
Take each wedge, flatten it slightly, and press a few chocolate pieces into the center. Fold the dough over to enclose the chocolate, then reshape into a triangle. Seal the edges so the chocolate doesn’t leak out during baking. Place scones on your prepared sheet, about 2 inches apart.
-
Chill the Scones (10-15 minutes, optional but recommended):
If you have time, pop the tray in the freezer for 10-15 minutes. This helps the scones hold their shape and gives you a taller, fluffier result.
-
Bake:
Preheat your oven to 400°F (200°C). Brush the tops of the scones with a little extra cream and sprinkle with turbinado sugar if using. Bake for 20-22 minutes, or until golden brown and set. The tops should be firm and the bottoms lightly browned.
-
Cool and Drizzle:
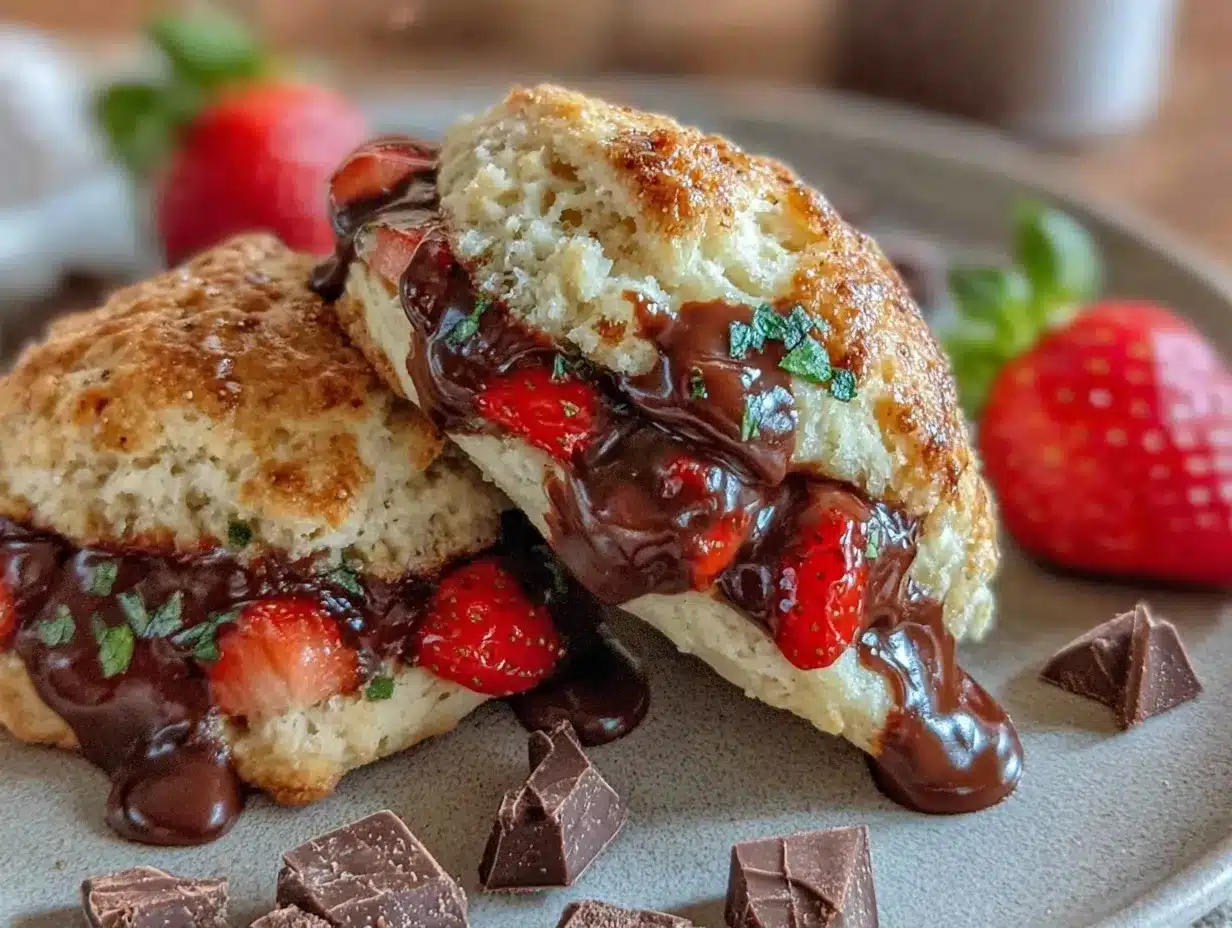
Let scones cool on the pan for 5 minutes, then transfer to a wire rack. Once cool, drizzle with melted chocolate if you like. The scones are best eaten the same day, but I won’t judge if you sneak one while they’re still warm—the centers will be gooey and irresistible.
Troubleshooting tips: If your dough feels too dry, add a splash more cream. If it’s too wet, dust with a little extra flour. Don’t skip chilling if you want that bakery look! And always seal the chocolate well inside each scone to avoid leaks. Trust me, even imperfect scones taste amazing.
Top Tips & Techniques for Perfect Scones
- Keep Everything Cold: The colder your butter and cream, the flakier your scones. If your kitchen is warm, chill your bowl and utensils too—it makes a difference.
- Don’t Overmix: Scone dough should just come together. Overworking activates the gluten, making the texture tough. I learned this the hard way after a few “chewy” batches early on.
- Chill Before Baking: Even quick 10 minutes in the freezer gives scones a better rise and shape. It’s the secret behind those tall, bakery-style scones you see on Instagram.
- Cut, Don’t Twist: When slicing the dough, push straight down with your knife or bench scraper. Twisting seals the edges and prevents a good rise.
- Seal in the Chocolate: Press the dough edges together well so no chocolate leaks out. If a little does, just call it “rustic”—it’ll still taste amazing.
- Use Fresh Berries Carefully: Too much juice can make the dough sticky. If your strawberries are especially juicy, pat them dry with a paper towel first.
- Batch Testing: If you’re doubling the recipe, bake in separate batches so the scones don’t crowd the pan. Overcrowding means uneven baking (found that out the hard way!).
- Finishing Touch: The sugar on top is optional but adds a lovely crunch. And don’t skip that chocolate drizzle if you’re going for wow-factor.
Honestly, I’ve made scones that were flat as a pancake and some that spread into a cookie shape. It’s all part of the process! The beauty of this recipe is that it’s forgiving—just keep practicing, and you’ll have bakery-worthy scones in no time.
Variations & Adaptations
One of the best things about this Chocolate-Covered Strawberry Stuffed Scones recipe is how easy it is to tweak for different tastes, seasons, and dietary needs. Here are some of my favorite spins:
- Gluten-Free: Substitute the all-purpose flour with a cup-for-cup gluten-free baking blend. The texture is nearly identical—I’ve made them for friends with celiac, and they disappear just as fast!
- Vegan/Dairy-Free: Use coconut cream in place of heavy cream, a vegan butter alternative, and a flax egg (1 tablespoon ground flaxseed mixed with 2.5 tablespoons water) instead of a real egg. Swap chocolate for a dairy-free brand like Enjoy Life.
- Different Fruits: Try raspberries, blueberries, or blackberries instead of strawberries. In winter, diced pears or dried cherries work beautifully.
- Nutty Addition: Toss in a handful of chopped toasted hazelnuts or almonds with the chocolate for extra crunch.
- Lemon Zest: Add a teaspoon of lemon zest to the dough for a citrusy lift (pairs beautifully with strawberries and chocolate).
- Mini Scones: Cut the dough into 16 smaller wedges and bake for 12-14 minutes for bite-sized treats—perfect for parties or kids’ lunchboxes.
Personally, I love making a batch with white chocolate and adding a pinch of cardamom for a spring brunch. It’s fun to experiment—once you’ve nailed the base recipe, the sky’s the limit! Just keep an eye on the moisture if changing fruits or flours, and don’t be afraid to get creative.
Serving & Storage Suggestions
These scones shine when served slightly warm, so I recommend enjoying them fresh from the oven or reheated gently. Arrange them on a pretty platter with extra fresh strawberries and a drizzle of melted chocolate for a Pinterest-worthy brunch spread. Pair with a pot of strong coffee or a glass of cold milk for the ultimate treat.
If you have leftovers (which is rare around here), let scones cool completely before storing. Place in an airtight container at room temperature for up to 2 days, or refrigerate for 3-4 days. For longer storage, wrap each scone tightly and freeze for up to 2 months—just thaw at room temp or microwave for 20-25 seconds. To refresh, pop scones in a 300°F (150°C) oven for 5-7 minutes. The flavors actually deepen overnight, making day-two scones just as irresistible.
For special occasions, I’ll add a dusting of powdered sugar or a dollop of whipped cream. These scones also make a charming edible gift—just wrap in parchment and tie with twine for a sweet homemade touch.
Nutritional Information & Benefits
Each Chocolate-Covered Strawberry Stuffed Scone (out of 8) is approximately:
- Calories: 320
- Fat: 16g
- Carbs: 40g
- Protein: 5g
- Sugar: 17g
Strawberries bring a dose of vitamin C and antioxidants, while dark chocolate adds a little heart-healthy flavonoid action. Using real butter and cream gives you a rich flavor, though you can lighten things up with Greek yogurt or coconut cream if desired. This recipe is nut-free as written (just watch your chocolate for cross-contamination if allergies are a concern) and can be adapted for gluten-free diets. As with all treats, moderation is key, but these scones are worth every bite in my book!
Conclusion
If you’re ready to treat yourself (or a whole room of loved ones) to something special, these Chocolate-Covered Strawberry Stuffed Scones are a must-bake. They’re simple enough for a beginner, impressive enough for guests, and flexible for all sorts of tweaks and adaptations. I love this recipe because it’s a little bit nostalgia, a little bit indulgence, and a whole lot of delicious—plus, it never fails to make people smile.
Don’t be afraid to play around with flavors or fillings—make it your own! If you bake a batch, I’d love to hear how they turned out. Leave a comment below, share your photos, or tag me on social media with your creations. Here’s to more warm, chocolatey, strawberry-filled moments in your kitchen. Happy baking, friends!
Frequently Asked Questions
Can I use frozen strawberries in this scones recipe?
Yes! Thaw frozen strawberries first, blot dry with paper towels, and dice before adding. This helps avoid extra moisture that could make the dough too wet.
What’s the best chocolate to use for the filling?
Semi-sweet chocolate works great, but feel free to use dark, milk, or even white chocolate depending on your preference. Chopped bars melt better than chips but both will do the trick.
Why did my scones turn out flat?
Usually, this happens if the butter wasn’t cold enough or the dough was overworked. Next time, chill your shaped scones before baking and handle the dough as little as possible.
How do I make these scones gluten-free?
Swap the all-purpose flour for a 1-for-1 gluten-free flour blend. Keep an eye on the dough’s texture and add a splash more cream if it feels dry.
Can I prepare the scone dough in advance?
Yes, you can shape the scones and refrigerate them overnight. Bake straight from the fridge, adding an extra 1-2 minutes to the baking time. Fresh-baked scones first thing in the morning—what could be better?
Pin This Recipe!


Chocolate-Covered Strawberry Stuffed Scones
Tender, bakery-style scones stuffed with juicy strawberries and melty chocolate, perfect for brunch or special occasions. Each bite delivers a nostalgic chocolate-covered strawberry experience in a flaky, rich pastry.
- Total Time: 37 minutes
- Yield: 8 scones 1x
Ingredients
- 2 cups (250g) all-purpose flour
- 1/4 cup (50g) granulated sugar
- 1 tablespoon baking powder
- 1/2 teaspoon kosher salt
- 6 tablespoons (85g) unsalted butter, cold and cubed
- 1/2 cup (120ml) heavy cream, plus extra for brushing
- 1 large egg
- 1 teaspoon pure vanilla extract
- 1 cup (150g) fresh strawberries, hulled and diced
- 3 ounces (85g) semi-sweet chocolate, chopped or chips
- 2 tablespoons turbinado sugar (optional, for topping)
- Extra melted chocolate for drizzling (optional)
Instructions
- Prep your ingredients: Measure everything out. Dice strawberries into small pieces and chop chocolate if needed. Keep butter cold until ready to use.
- Mix dry ingredients: In a large mixing bowl, whisk together flour, sugar, baking powder, and salt.
- Cut in the butter: Add cold, cubed butter to the flour mixture. Use a pastry cutter, fork, or fingertips to work the butter in until you have pea-sized crumbs.
- Combine wet ingredients: In a small bowl, whisk together heavy cream, egg, and vanilla. Pour over the flour-butter mixture and stir gently until just combined.
- Gently fold in strawberries: Add diced strawberries and gently fold into the dough. If dough is too sticky, sprinkle with a tablespoon of flour.
- Shape and stuff with chocolate: Turn dough onto a lightly floured surface. Pat into a 7-8 inch circle, about 1 inch thick. Cut into 8 wedges. Flatten each wedge, press chocolate pieces into the center, fold dough over to enclose chocolate, and reshape into a triangle. Seal edges well.
- Place scones on a prepared baking sheet, about 2 inches apart.
- Chill the scones (optional but recommended): Freeze tray for 10-15 minutes for taller, fluffier scones.
- Bake: Preheat oven to 400°F (200°C). Brush tops with extra cream and sprinkle with turbinado sugar if using. Bake for 20-22 minutes, until golden brown and set.
- Cool and drizzle: Let scones cool on pan for 5 minutes, then transfer to wire rack. Drizzle with melted chocolate if desired. Enjoy warm or at room temperature.
Notes
Keep butter and cream cold for flakier scones. Don’t overmix the dough. Chilling shaped scones before baking helps them rise taller. Seal chocolate well inside each scone to prevent leaks. Pat strawberries dry if very juicy. For gluten-free, use a 1:1 blend; for dairy-free, substitute coconut cream and vegan butter. Scones are best enjoyed fresh but can be stored airtight for up to 2 days or frozen for 2 months.
- Prep Time: 15 minutes
- Cook Time: 22 minutes
- Category: Brunch
- Cuisine: American
Nutrition
- Serving Size: 1 scone
- Calories: 320
- Sugar: 17
- Sodium: 250
- Fat: 16
- Saturated Fat: 10
- Carbohydrates: 40
- Fiber: 2
- Protein: 5
Keywords: chocolate, strawberry, scones, brunch, easy, stuffed scones, Mother's Day, bake sale, breakfast, pastry


