
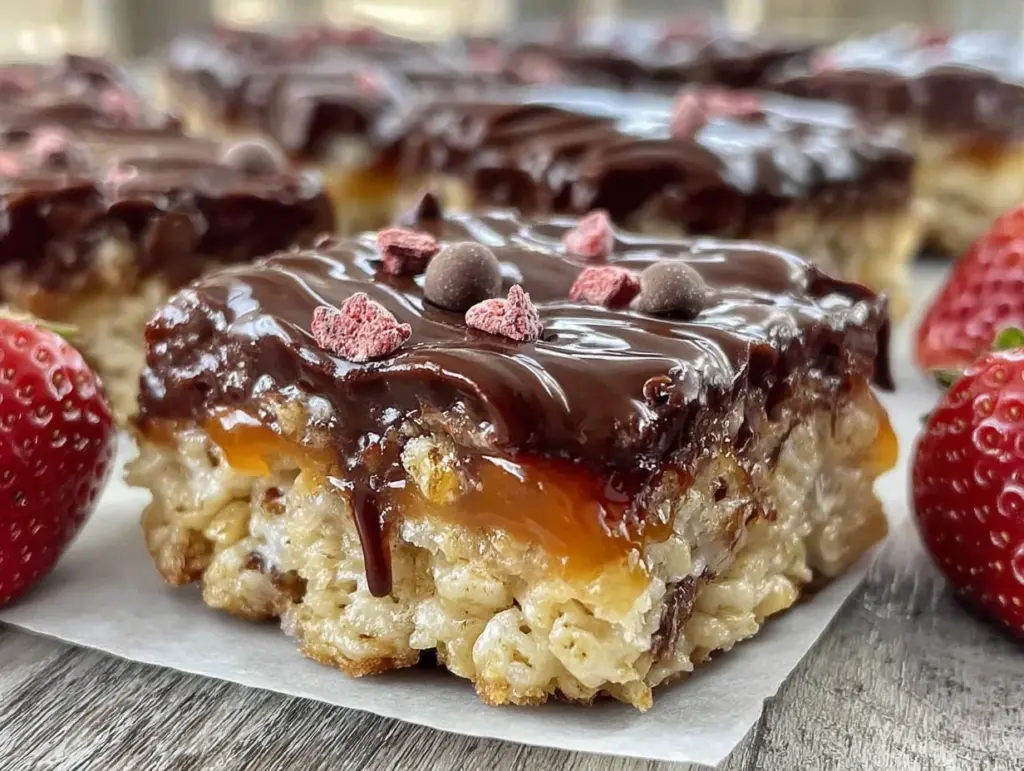
Imagine this: You walk into your kitchen, and the air fills instantly with the sweet scent of ripe strawberries mingling with creamy chocolate and warm, toasty oats. The gentle crackle of crisped rice echoes as you slice through a pan of freshly made Crispy Chocolate-Covered Strawberry Crisp Squares. There’s a little shimmer from the chocolate shell, a pop of ruby red berry peeking through, and a golden, buttery crumb that promises a satisfying crunch. Honestly, the first time I pulled a batch of these squares from the fridge, I barely let them set before sneaking a corner piece. That bite—cool chocolate, chewy strawberry, and those crispy layers—stopped me in my tracks. It was the kind of moment where you pause, take a deep breath, and just smile because you know you’re onto something truly special.
My love for chocolate-covered strawberries runs deep (who doesn’t have a memory of sticky fingers from dipping them at family gatherings?). But years ago, after a rainy Saturday spent baking with my grandma, I started fiddling with the idea of combining that classic flavor with the homey crunch of a crisp bar. You know what? It was dangerously easy—and after a few tweaks, my family was hooked. I caught my kids sneaking bites off the cooling rack and my partner stashing a few slices for late-night snacks. No one could resist them, and, frankly, I can’t blame them. These squares have become a staple for birthdays, potlucks, and those “just because” moments that call for a sweet treat. They’re pure, nostalgic comfort—like a warm hug, but with chocolate and strawberries.
If you’re looking for a Pinterest-worthy dessert that’ll make your friends swoon, brighten up your next bake sale, or just bring a little joy to your weeknight, you’re in the right place. I’ve tested these squares more times than I care to admit (all in the name of research, of course), and every time, they deliver that sweet, crispy, chocolatey magic. Bookmark this one—you’ll be glad you did!
Why You’ll Love These Crispy Chocolate-Covered Strawberry Crisp Squares
Let’s face it: There are a lot of dessert bar recipes out there. But after making, tweaking, and taste-testing these Crispy Chocolate-Covered Strawberry Crisp Squares dozens of times (with plenty of input from picky eaters and sweet-toothed grown-ups), I can tell you—this one stands out from the crowd. Here’s why:
- Quick & Easy: These squares come together in about 30 minutes, plus a chill in the fridge. Perfect for when you need a last-minute dessert or a sweet fix after dinner.
- Simple Ingredients: Everything you need is probably in your pantry or fridge already—no fancy shopping trips required. Chocolate chips, rice cereal, oats, butter, strawberries, and a few basics.
- Perfect for Sharing: These bars slice up beautifully, making them ideal for potlucks, bake sales, birthday parties, or a sweet snack for the kids’ lunchboxes.
- Crowd-Pleaser: The combo of crispy, chewy, and chocolatey hits every dessert lover’s sweet spot. I’ve never brought these somewhere and come home with leftovers (not once!).
- Unbelievably Delicious: The rich chocolate shell, tart-sweet strawberry layer, and buttery crisp base are pure comfort food. It’s the kind of treat that makes you close your eyes after the first bite and just sigh with happiness.
What makes my version different? For starters, I use freeze-dried strawberries for a jammy, punchy flavor without the sogginess of fresh berries. The crisp base gets extra love from a mix of oats and crispy rice cereal—so every bite is light, crunchy, and just sweet enough. And instead of a standard chocolate topping, I swirl in a little coconut oil for a snappier shell that doesn’t shatter. It’s a little detail, but trust me, it makes all the difference.
These bars aren’t just good—they’re the kind of treat that makes regular days feel like a celebration. They check all the boxes for a dessert that looks impressive, eats like a dream, and fits every occasion. Whether you want to wow guests without breaking a sweat, treat yourself after a long day, or sneak an afternoon snack, these squares deliver. I hope you love them as much as my family does!
What Ingredients You Will Need for Crispy Chocolate-Covered Strawberry Crisp Squares
You won’t believe how a handful of simple ingredients can turn into something this delicious! Here’s what you’ll need for these crispy chocolate-strawberry treats (and a few tips I’ve picked up along the way):
- For the Crisp Base:
- 3 cups (75g) crispy rice cereal (like Rice Krispies; any generic brand works too)
- 1 cup (90g) old-fashioned rolled oats (gives a chewy texture; quick oats work in a pinch)
- 1/2 cup (115g) unsalted butter, melted (for richness and binding)
- 1/3 cup (110g) honey or light corn syrup (keeps things sticky and sweet—use agave for a vegan option)
- 1/4 cup (50g) brown sugar (for a deep, caramel note)
- Pinch of salt (brings out all the flavors!)
- For the Strawberry Layer:
- 1 1/2 cups (30g) freeze-dried strawberries, crushed (they pack a punch—look for them in the snack aisle or online)
- 1/2 cup (120g) strawberry jam or preserves (I like Bonne Maman, but homemade is great if you have it)
- For the Chocolate Topping:
- 1 1/3 cups (225g) semi-sweet chocolate chips (milk or dark chocolate is fine; use dairy-free chips for vegan)
- 2 tablespoons (30ml) coconut oil (makes the chocolate shell glossy and easy to slice; can sub with butter or leave out if needed)
Extra Tips: If you can’t find freeze-dried strawberries, you can use dried strawberries chopped fine (though the flavor won’t be as punchy). For a gluten-free version, double-check that your oats and rice cereal are certified gluten-free. And if you love nuts, toss in a handful of toasted sliced almonds with the cereal—it’s a nice twist!
I’ve tried a few brands of crispy rice cereal, and honestly, Trader Joe’s and Kellogg’s work best for texture. If you want a less sweet bar, reduce the brown sugar a little and use a low-sugar jam. The recipe is pretty forgiving, so don’t stress if you need to swap a thing or two!
Equipment Needed
You don’t need a fancy kitchen to whip up these bars—just a few basic tools (and maybe a little elbow grease):
- 8×8-inch (20x20cm) square baking pan (if you double the recipe, a 9×13-inch pan works too—just watch the thickness)
- Parchment paper (makes lifting the bars out a breeze—seriously, don’t skip this!)
- Mixing bowls (one large for the base, one medium for melting chocolate)
- Microwave-safe bowl or double boiler (for melting chocolate; stovetop with a heatproof bowl works too)
- Measuring cups and spoons (accuracy makes for perfect bars every time)
- Spatula (rubber or silicone is best for mixing and smoothing layers)
- Small saucepan (for melting butter and honey if you prefer not to use the microwave)
- Sharp knife (for clean slices—run it under hot water between cuts for best results)
If you only have a metal pan, line it well with parchment to prevent sticking. For those without a microwave, the stovetop method works just fine. I’ve made these in a glass Pyrex and a cheap metal pan—both turned out great (just keep an eye on the chilling time, as metal chills faster). Maintenance tip: Wash your spatula and bowl right after using, or the sticky cereal mixture will be a pain to clean. Trust me, I’ve learned that the hard way!
How to Make Crispy Chocolate-Covered Strawberry Crisp Squares

-
Prepare Your Pan:
Line an 8×8-inch (20x20cm) pan with parchment paper, leaving some overhang for easy lifting. Lightly grease with butter or nonstick spray if you want extra insurance. This step saves you from prying crispy bars out later! -
Mix the Crisp Base:
In a large bowl, combine 3 cups (75g) crispy rice cereal, 1 cup (90g) rolled oats, and a pinch of salt. Set aside.
In a small saucepan (or microwave-safe bowl), melt 1/2 cup (115g) unsalted butter. Stir in 1/3 cup (110g) honey and 1/4 cup (50g) brown sugar. Heat over medium-low, stirring until the sugar dissolves and the mixture is smooth (about 2 minutes). Don’t let it boil too hard—just a gentle simmer. -
Combine and Press:
Pour the warm butter-honey mixture over the dry ingredients. Mix quickly with a spatula until everything is evenly coated (it’ll look sticky and shiny—if you see dry patches, keep mixing).
Scrape the mixture into your prepared pan and press it down firmly with the back of a spatula or your hands (damp fingers help prevent sticking). Make sure to press into the corners so the layer is compact and even. If you don’t press firmly enough, the squares may crumble later. -
Add the Strawberry Layer:
Crush 1 1/2 cups (30g) freeze-dried strawberries into small pieces (not powder—some texture is good!). Sprinkle evenly over the crisp base.
Dollop 1/2 cup (120g) strawberry jam over the top and gently spread to cover the strawberries. If the jam is stiff, microwave for 10 seconds to loosen it up. Try not to press too hard—you want swirls, not a soupy mess. -
Make the Chocolate Topping:
In a microwave-safe bowl, combine 1 1/3 cups (225g) chocolate chips and 2 tablespoons (30ml) coconut oil. Microwave in 20-second bursts, stirring between each, until smooth and glossy (about 1 minute total). If using a double boiler, melt gently over simmering water.
Pour the chocolate over the strawberry layer and tilt the pan to cover evenly. Use a spatula to smooth it out (add a little swirl if you’re feeling fancy). -
Chill and Set:
Refrigerate the pan for at least 2 hours, or until the chocolate is firm and the base is set. (Overnight is fine, too—just cover with foil or wrap to keep things fresh.) If you’re in a rush, the freezer will work in about 30-40 minutes, but the bars may be a bit harder to slice. -
Slice and Serve:
Lift the bars out using the parchment overhang. Use a sharp knife (run it under hot water for clean cuts) to slice into 16 squares or 12 generous bars. If the chocolate cracks, let the pan sit at room temp for 5 minutes before cutting.
Troubleshooting: If your base feels loose or crumbly, you may not have pressed firmly enough. Just chill longer—it often firms up! If the chocolate gets dull or streaky, it’s probably moisture—don’t worry, it’ll still taste amazing. And if you want perfect layers, take your time spreading each one (it’s worth it for those Pinterest pics!).
Personal tip: I like to sprinkle a few extra crushed strawberries and a pinch of flaky salt on top before chilling—just for a little sparkle and a pop of flavor.
Cooking Tips & Techniques for Perfect Crisp Squares
After making these bars more times than I can count, I’ve picked up a few tricks (and had a few flops, too). Here’s what I wish I’d known from the start:
- Press, Don’t Squash: Press the crisp base firmly, but don’t flatten it into a brick! You want a solid base that still has a little airiness for a nice crunch.
- Don’t Overload with Jam: Too much jam will make the bars soggy or ooze when sliced. Stick to the amount listed, and spread gently for that perfect swirl.
- Chocolate Melting 101: Always melt chocolate in short bursts and stir well. Overheating can seize it up—if this happens, add a splash more coconut oil and whisk until smooth.
- Room Temp Slicing: Let the chilled pan sit out for 5-10 minutes before slicing for clean edges and less cracking.
- Layer Order Matters: Make sure the base is cool before adding the strawberry and chocolate layers; otherwise, everything can melt together into a sticky mess.
- Batch Baking: Doubling the recipe? Use a 9×13-inch pan and increase the chill time by 30 minutes. Watch the thickness—if too thick, the bars get hard to bite.
- Personal Oops: Once I tried using fresh strawberries, and the bars turned soggy after a day. Stick to freeze-dried for that punch of flavor and crisp texture!
- Multitasking: While the base is chilling, prep your chocolate and crush the strawberries. It keeps things moving and you’re not stuck waiting around.
- Consistency: Use a kitchen scale for best results, especially for the dry ingredients. It makes a difference for texture and sweetness.
Honestly, the biggest thing is not to stress the small stuff. Even the “mistakes” taste pretty great—just call them rustic and serve with a wink!
Variations & Adaptations
One of the best things about this recipe is how easy it is to make it your own. Here are a few of my favorite twists (and a couple I’ve tested when the pantry was looking sparse):
- Gluten-Free: Choose certified gluten-free oats and rice cereal, and you’re golden. I’ve done this for friends with celiac, and no one could tell the difference.
- Nutty Crunch: Add 1/2 cup (60g) toasted sliced almonds or chopped pecans to the base for a deeper flavor and a hint of richness.
- Berry Swap: Try freeze-dried raspberries or blueberries instead of strawberries for a fun flavor twist. Blueberry and dark chocolate is surprisingly addictive!
- Vegan Option: Use plant-based butter, agave syrup, and dairy-free chocolate chips. Swap the honey for maple syrup if you like a deeper sweetness.
- White Chocolate Topping: Melt white chocolate chips with a teaspoon of coconut oil and drizzle over the set chocolate for a bakery-style look (my kids call these “fancy squares”).
- Allergen-Friendly: Use sunflower seed butter instead of regular butter for a nut-free, school-safe treat. Make sure your chocolate is allergy-friendly, too.
- No-Coconut: If coconut oil isn’t your thing, just leave it out or swap for a neutral oil or a little extra butter. The chocolate will be a touch firmer but still delicious.
I once added a handful of mini marshmallows to the base for a “rocky road” version—messy, but my kids went wild! Truly, this recipe is your canvas—have fun with it and don’t be afraid to mix things up for the season or your cravings.
Serving & Storage Suggestions
These bars are at their best chilled, so I like to serve them straight from the fridge for a snappy chocolate top and a crisp, chewy bite. If you want a softer texture, let them sit out for 10-15 minutes.
- Presentation: Slice into squares and stack on a pretty platter. For Pinterest-worthy flair, sprinkle with extra freeze-dried strawberries or a dusting of powdered sugar.
- Pairings: These pair beautifully with a cup of coffee, cold milk, or a glass of bubbly for a fancy dessert moment. Try serving with vanilla ice cream for a true showstopper.
- Storage: Store in an airtight container in the fridge for up to one week. They rarely last that long at my house! For longer storage, freeze squares (layered with parchment) for up to 2 months. Thaw in the fridge overnight.
- Reheating: No need to reheat, but if you like a softer bar, microwave for 10 seconds. The chocolate will soften just enough for a melty bite.
- Flavor Over Time: The flavors deepen after a day, so these are a great make-ahead treat for parties or gifting.
Honestly, I keep a stash in the freezer for “emergencies”—they’re just as good cold, and you never know when a craving will hit!
Nutritional Information & Benefits
Each square (out of 16) is around 180 calories, with 3g protein, 6g fat, 30g carbohydrates, and about 2g fiber. Thanks to the oats and freeze-dried strawberries, you get a little dose of whole grains and antioxidants in every bite.
These bars contain gluten (unless you use certified gluten-free oats and cereal) and dairy (unless you use vegan swaps). They’re nut-free as written, but always check your brands if allergies are a concern. The berries supply vitamin C, and the dark chocolate offers a bit of magnesium and, let’s face it, a boost for your mood!
From a wellness perspective, I love that these bars are portioned and not overly sweet. They’re a treat you can feel good about sharing with your family—no artificial dyes or weird preservatives, just honest, delicious ingredients. Enjoy in moderation, and they’ll fit right into any balanced dessert rotation.
Conclusion
If you’re searching for a dessert that’s simple, stunning, and full of nostalgic comfort, these Crispy Chocolate-Covered Strawberry Crisp Squares are the answer. They’re crunchy, chewy, and chocolatey, with a burst of real strawberry flavor in every bite. The best part? You can make them with pantry staples and a few minutes of hands-on time—no complicated steps or specialty ingredients required.
I come back to this recipe again and again, whether I’m making treats for a school party, filling up my freezer for a rainy day, or just brightening a friend’s day with a sweet surprise. There’s something about the way the chocolate snaps and the strawberries sing that turns an ordinary moment into something a little bit magical.
Give these a try, and don’t be afraid to put your own twist on them—swap the berries, change the chocolate, or add a handful of nuts. I’d love to hear how yours turn out! Drop a comment below, share your photos, or let me know your favorite adaptation. Happy baking, dessert lover—and remember, a little chocolate and strawberry can turn any day around.
Frequently Asked Questions
Can I use fresh strawberries instead of freeze-dried?
Fresh strawberries add too much moisture and will make the bars soggy. Stick to freeze-dried for the best texture and flavor punch. If you only have dried strawberries, chop them fine as a substitute.
How do I make these gluten-free?
Use certified gluten-free oats and crispy rice cereal. Double-check your chocolate chips and other ingredients to make sure they’re gluten-free as well.
What’s the best way to store these squares?
Keep them in an airtight container in the fridge for up to one week. For longer storage, freeze with parchment between layers—they’ll last up to two months.
Can I make these vegan?
Yes! Use plant-based butter, agave or maple syrup instead of honey, and dairy-free chocolate chips. Check your strawberry jam for hidden animal products, just in case.
Why is my base crumbly?
If your base is falling apart, it probably wasn’t pressed firmly enough or the mixture was too dry. Next time, mix thoroughly and press well into the pan. A little extra honey or butter can also help bind it together if needed.
Pin This Recipe!

Crispy Chocolate-Covered Strawberry Crisp Squares
These easy dessert bars combine the nostalgic flavors of chocolate-covered strawberries with a crispy, chewy oat and rice cereal base, topped with a glossy chocolate shell. Perfect for potlucks, bake sales, or a sweet snack, they come together quickly with pantry staples and deliver a satisfying crunch in every bite.
- Total Time: 2 hours 30 minutes (including chilling)
- Yield: 16 squares 1x
Ingredients
- 3 cups crispy rice cereal (such as Rice Krispies)
- 1 cup old-fashioned rolled oats
- 1/2 cup unsalted butter, melted
- 1/3 cup honey or light corn syrup (or agave for vegan)
- 1/4 cup brown sugar
- Pinch of salt
- 1 1/2 cups freeze-dried strawberries, crushed
- 1/2 cup strawberry jam or preserves
- 1 1/3 cups semi-sweet chocolate chips
- 2 tablespoons coconut oil
Instructions
- Line an 8×8-inch pan with parchment paper, leaving some overhang for easy lifting. Lightly grease if desired.
- In a large bowl, combine crispy rice cereal, rolled oats, and a pinch of salt.
- In a small saucepan or microwave-safe bowl, melt butter. Stir in honey and brown sugar. Heat over medium-low, stirring until smooth and sugar dissolves (about 2 minutes).
- Pour the warm butter-honey mixture over the dry ingredients. Mix quickly until evenly coated.
- Scrape the mixture into the prepared pan and press down firmly with a spatula or damp hands to create an even layer.
- Crush freeze-dried strawberries into small pieces and sprinkle evenly over the crisp base.
- Dollop strawberry jam over the top and gently spread to cover the strawberries.
- In a microwave-safe bowl, combine chocolate chips and coconut oil. Microwave in 20-second bursts, stirring between each, until smooth and glossy (about 1 minute total). Alternatively, melt gently over a double boiler.
- Pour the melted chocolate over the strawberry layer and tilt the pan to cover evenly. Smooth with a spatula.
- Refrigerate for at least 2 hours, or until the chocolate is firm and the base is set. (Freezer for 30-40 minutes if in a rush.)
- Lift the bars out using the parchment overhang. Slice into 16 squares or 12 bars with a sharp knife (run under hot water for clean cuts).
Notes
For gluten-free, use certified gluten-free oats and rice cereal. Vegan option: use plant-based butter, agave or maple syrup, and dairy-free chocolate chips. Press the base firmly for best texture. Let bars sit at room temp for 5-10 minutes before slicing for clean cuts. Sprinkle extra crushed strawberries and flaky salt on top before chilling for added flavor and presentation.
- Prep Time: 15 minutes
- Cook Time: 15 minutes
- Category: Dessert
- Cuisine: American
Nutrition
- Serving Size: 1 square (1/16 of re
- Calories: 180
- Sugar: 16
- Sodium: 60
- Fat: 6
- Saturated Fat: 4
- Carbohydrates: 30
- Fiber: 2
- Protein: 3
Keywords: chocolate, strawberry, crisp squares, dessert bars, easy dessert, bake sale, potluck, kid-friendly, no-bake, pantry staples


