
One rainy weekend, I found myself staring at a bag of flour thinking, “Bread baking? Too complicated.” Honestly, I’d always been intimidated by the whole kneading, proofing, and shaping routine. But then my neighbor casually mentioned a “no knead bread” she whipped up in her Dutch oven, and I was skeptical. Could bread really come out crispy and golden without all that elbow grease? Curiosity got the better of me.
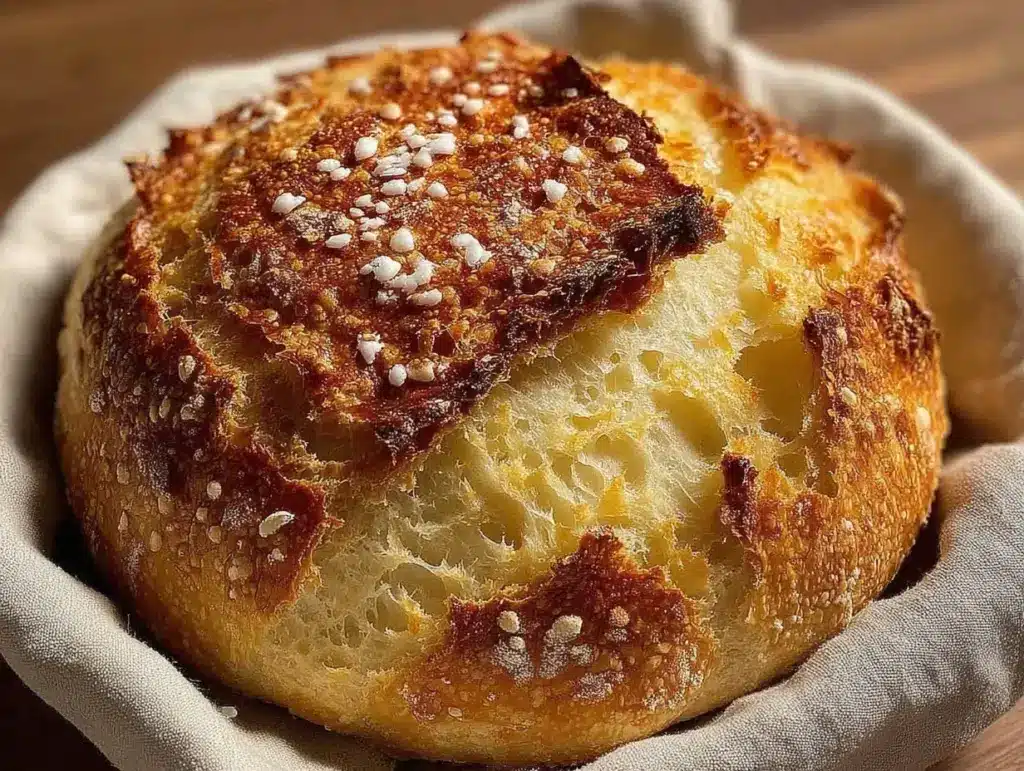
The first time I tried this Easy Crispy Dutch Oven No Knead Bread recipe, I barely believed my eyes. The crust crackled beautifully as I sliced into it, and the crumb was soft yet airy—exactly what I’d hoped for but never thought I’d pull off at home. It was like magic, but grounded in simple science and patience. I’ve since made this bread so often it’s practically a ritual—perfect for those lazy afternoons when you want fresh bread but don’t want to wrestle with dough.
There’s something quietly satisfying about pulling a hot, rustic loaf from the oven, smelling the toasty aroma fill the kitchen, and knowing you barely had to lift a finger. This recipe stuck with me because it’s honest bread-making—no frills, no stress, just pure comfort with a crispy crust that’s somehow both rustic and refined. You know that moment when you realize you’ve nailed something you once thought impossible? That’s what this bread does for me every time.
Why You’ll Love This Recipe
- Quick & Easy: This recipe comes together in just 10 minutes of hands-on time, then you let the dough do its thing overnight.
- Simple Ingredients: Flour, yeast, salt, water—no fancy stuff needed. Chances are you already have everything in your pantry.
- Perfect for Beginners: No need to knead or fuss, making it ideal if you’re new to bread baking or short on time.
- Crispy Crust, Soft Crumb: Thanks to the Dutch oven method, you get a crust that snaps and crackles, paired with an airy, moist interior.
- Versatile: Great for sandwiches, toast, or just eating straight with butter—this bread fits almost any mood or meal.
- Impress Without Stress: Whether you’re hosting friends or treating yourself, this bread looks and tastes like you spent hours on it, but really, it’s foolproof.
What sets this recipe apart is the magic of slow fermentation paired with the Dutch oven’s trapping of steam, which creates that bakery-worthy crust at home—without kneading or complicated techniques. I’ve tried countless no-knead recipes, but this one hits the sweet spot with the perfect balance of crispiness and chewiness every single time.
What Ingredients You Will Need
This recipe uses simple, wholesome ingredients to deliver bold flavor and satisfying texture without the fuss. You’ll find these are mostly pantry staples that won’t require extra trips to the store.
- All-purpose flour (3 cups / 360 grams) – I prefer King Arthur for consistent texture.
- Active dry yeast (1/4 teaspoon) – Just a pinch to get the fermentation going gently.
- Salt (1 1/2 teaspoons) – Essential for flavor; kosher salt works great here.
- Warm water (1 1/2 cups / 360 ml) – Around 110°F (43°C), not too hot to avoid killing the yeast.
Optional additions if you want to experiment:
- Whole wheat flour (replace up to 1 cup for nuttier flavor)
- Herbs or garlic powder (1-2 teaspoons) – For a savory twist.
- Olive oil (1 tablespoon) – Adds moisture and richness, though not required.
If you ever want a gluten-free version, swapping out flour for a gluten-free blend won’t work quite the same here because of the gluten development, but you can try a mix recommended for baking breads with some added xanthan gum for structure.
Equipment Needed
- Dutch oven (5 to 6-quart size) – This is the key to getting that crispy crust. I use a cast iron one with an enamel coating, which heats evenly and is easy to clean.
- Mixing bowl – Large enough to hold the dough comfortably as it rises. A glass or stainless steel bowl works fine.
- Measuring cups and spoons – Precision helps, but a little wiggle room is okay here.
- Wooden spoon or spatula – For mixing the dough gently.
- Parchment paper – Makes transferring the dough easier and prevents sticking.
If you don’t have a Dutch oven, a heavy oven-safe pot with a tight-fitting lid can substitute, but the crust may not be quite as crisp. For budget-friendly options, thrift stores often carry cast iron pots that work beautifully.
Preparation Method

- Mix the dry ingredients: In your large mixing bowl, combine 3 cups (360 g) of all-purpose flour, 1/4 teaspoon of active dry yeast, and 1 1/2 teaspoons of salt. Stir them together so everything is evenly distributed. This step takes about 2 minutes.
- Add the water: Pour in 1 1/2 cups (360 ml) of warm water—around 110°F (43°C). Use a wooden spoon or spatula to stir until a shaggy, sticky dough forms. It will look rough and a bit uneven, but that’s perfect. This part takes 3 to 5 minutes.
- Cover and let it rest: Cover the bowl loosely with plastic wrap or a kitchen towel. Let the dough sit at room temperature for 12 to 18 hours—overnight works well. You’ll know it’s ready when the surface is bubbly and swollen. Don’t rush this; the long rest is what builds flavor and texture.
- Preheat your oven and Dutch oven: About 30 minutes before baking, place your Dutch oven (with lid) in the oven and preheat to 450°F (230°C). This makes sure the pot is screaming hot for that crust magic.
- Shape the dough: Lightly flour a work surface and dump the dough onto it. Fold it over itself a few times to form a rough ball—no kneading needed, just gentle shaping. Place a square of parchment paper under the dough for easy transfer.
- Bake the bread: Carefully remove the hot Dutch oven from the oven. Lift the dough with the parchment and place it inside. Cover with the lid and bake for 30 minutes.
- Finish baking uncovered: After 30 minutes, remove the lid and bake another 15 to 20 minutes. This lets the crust get deep golden and crispy. The loaf should sound hollow when tapped and have an internal temperature of about 205°F (96°C).
- Cool before slicing: Transfer the bread to a wire rack and let it cool for at least 1 hour. This step is crucial—cutting too soon makes the crumb gummy.
Tip: If your dough feels too sticky to handle, dust your hands lightly with flour but resist adding too much, or the bread may turn dense. The dough is forgiving, so trust the process and be patient.
Cooking Tips & Techniques
- Patience is your best friend: The long fermentation builds flavor and texture without kneading. It’s tempting to rush, but slow wins here.
- Use warm water, not hot: Too hot water kills the yeast; too cold slows fermentation. Aim for about 110°F (43°C).
- Don’t skip preheating the Dutch oven: This is what creates the steam environment for a crispy crust. A cold pot won’t give the same rise or crust.
- Handle the dough gently: You want to keep those air bubbles intact to get a light crumb.
- Watch your oven temperature: Every oven is different, so if your bread browns too fast, tent it with foil.
- Let cooling happen fully: Bread lovers often mess this up—the crumb needs to set before slicing.
One time, I accidentally left the dough rising too long and it was almost overproofed. The bread still baked up fine, but the crumb was a bit denser. It reminded me that this recipe is forgiving but best enjoyed within the timing guidelines.
Variations & Adaptations
- Whole Wheat Version: Swap 1 cup of all-purpose flour with whole wheat for a nuttier, earthier loaf. Expect a denser crumb and richer flavor.
- Herbed Bread: Add 1-2 teaspoons of dried rosemary, thyme, or garlic powder to the dry ingredients for a savory twist.
- Gluten-Free Adaptation: Use a gluten-free flour blend designed for baking and add 1/2 teaspoon xanthan gum to help with structure. Note: The texture will be different, more crumbly but still tasty.
- Seeded Loaf: Mix in 1/4 cup of sunflower seeds, flaxseeds, or sesame seeds for crunch and nutrition.
- Alternate Cooking Method: If no Dutch oven, try baking on a preheated baking stone with a pan of hot water below for steam. Results vary but still delicious.
Personally, I once added chopped olives and rosemary to make a Mediterranean-inspired loaf that was a hit at a casual dinner party. It’s fun to tweak this basic recipe to suit your mood and kitchen supplies.
Serving & Storage Suggestions
This bread is best enjoyed fresh and warm—slice it thick and slather with butter or your favorite jam. It also pairs beautifully with soups, stews, or a simple salad for a wholesome meal.
To store, wrap the cooled loaf in a linen kitchen towel and keep it at room temperature for up to 2 days. Avoid plastic wrap if you want to keep the crust crisp.
For longer storage, slice and freeze the bread in a resealable bag. Toast slices directly from the freezer for a fresh-baked feel any time.
Reheating works best by warming slices at 350°F (175°C) for about 5-7 minutes or popping them in the toaster oven. You’ll notice the flavors deepen a bit after a day or two, making it perfect for next-day sandwiches.
Nutritional Information & Benefits
One slice (about 60 grams) of this Easy Crispy Dutch Oven No Knead Bread contains approximately:
| Calories | 160 |
|---|---|
| Carbohydrates | 32g |
| Protein | 5g |
| Fat | 1g |
| Fiber | 1g |
This bread provides a good source of energy from carbs and a modest protein boost from the flour. Using whole wheat flour boosts fiber and micronutrients. It’s free from dairy and eggs, making it suitable for many dietary needs. The simple ingredients mean no preservatives or additives—just honest, homemade goodness.
Conclusion
This Easy Crispy Dutch Oven No Knead Bread recipe is a game-changer, especially if you’ve ever felt overwhelmed by bread baking. It’s approachable, forgiving, and consistently delicious with minimal effort. I love how it fits into my busy life yet yields bakery-quality results that impress family and friends alike.
Feel free to tweak it to your taste or pantry, and don’t hesitate to experiment with herbs or flours. The best part is that you end up with a loaf that’s genuinely satisfying—crispy crust, tender crumb, and all the comfort you need.
If you try it, I’d love to hear how it turns out or any creative spins you put on it. Baking bread this way makes the kitchen feel a little cozier, and I hope it does the same for you.
FAQs
Can I use instant yeast instead of active dry yeast?
Yes, you can substitute instant yeast in the same amount. It may speed up fermentation slightly, so keep an eye on the dough.
What if I don’t have a Dutch oven? Will the bread still turn out?
You can bake on a preheated baking stone or heavy pan with a water tray for steam, but the crust won’t be quite as crisp. A Dutch oven is ideal for best results.
How long can I store this bread?
Store at room temperature wrapped in a kitchen towel for up to 2 days or freeze sliced for up to 3 months.
Why does my bread sometimes come out dense?
Common causes are underproofing, too much flour when shaping, or using cold water. Make sure to let the dough rise fully and handle it gently.
Can I add mix-ins like nuts or dried fruit?
Yes! Fold in about 1/2 cup of your chosen mix-ins after the initial mixing step for extra flavor and texture.
Pin This Recipe!


Easy Crispy Dutch Oven No Knead Bread Recipe Perfect for Beginners
A simple no-knead bread recipe baked in a Dutch oven that yields a crispy crust and soft, airy crumb. Perfect for beginners and requires minimal hands-on time.
- Total Time: 12 hours 55 minutes to 18 hours 55 minutes
- Yield: 1 loaf (about 8 servings) 1x
Ingredients
- 3 cups (360 grams) all-purpose flour
- 1/4 teaspoon active dry yeast
- 1 1/2 teaspoons salt
- 1 1/2 cups (360 ml) warm water (around 110°F / 43°C)
- Optional: up to 1 cup whole wheat flour (to replace all-purpose flour for nuttier flavor)
- Optional: 1-2 teaspoons herbs or garlic powder
- Optional: 1 tablespoon olive oil
- Optional for gluten-free: gluten-free flour blend and 1/2 teaspoon xanthan gum
- Optional mix-ins: 1/2 cup nuts, dried fruit, or seeds
Instructions
- In a large mixing bowl, combine 3 cups (360 g) all-purpose flour, 1/4 teaspoon active dry yeast, and 1 1/2 teaspoons salt. Stir to evenly distribute.
- Pour in 1 1/2 cups (360 ml) warm water (about 110°F / 43°C). Stir with a wooden spoon or spatula until a shaggy, sticky dough forms, about 3 to 5 minutes.
- Cover the bowl loosely with plastic wrap or a kitchen towel and let the dough rest at room temperature for 12 to 18 hours until bubbly and swollen.
- About 30 minutes before baking, preheat your oven to 450°F (230°C) with the Dutch oven (with lid) inside.
- Lightly flour a work surface and turn the dough out onto it. Fold it over itself a few times to form a rough ball. Place the dough on a square of parchment paper.
- Carefully remove the hot Dutch oven from the oven. Lift the dough with the parchment paper and place it inside the Dutch oven. Cover with the lid.
- Bake covered for 30 minutes.
- Remove the lid and bake uncovered for an additional 15 to 20 minutes until the crust is deep golden and crispy. The loaf should sound hollow when tapped and reach an internal temperature of about 205°F (96°C).
- Transfer the bread to a wire rack and cool for at least 1 hour before slicing.
Notes
Use warm water around 110°F (43°C) to avoid killing the yeast. Preheat the Dutch oven to create steam for a crispy crust. Let the dough rest for 12 to 18 hours for best flavor and texture. Cool bread fully before slicing to avoid gummy crumb. If dough is too sticky, dust hands lightly with flour but avoid adding too much.
- Prep Time: 10 minutes
- Cook Time: 45 minutes
- Category: Bread
- Cuisine: American
Nutrition
- Serving Size: 1 slice (about 60 gr
- Calories: 160
- Fat: 1
- Carbohydrates: 32
- Fiber: 1
- Protein: 5
Keywords: no knead bread, Dutch oven bread, easy bread recipe, crispy crust bread, beginner bread recipe, homemade bread, no knead, rustic bread


