

It was one of those evenings where dinner plans fell apart—takeout just didn’t sound good, and the fridge was looking pretty bare. Honestly, I was just about ready to settle for plain toast when a quick glance at the spice rack sparked an idea. I remembered a bag of Italian herbs I’d bought ages ago, still unopened, and some shredded cheese hiding in the back of the fridge. On a whim, I tossed together a simple dough with those ingredients, hoping for something edible. What came out was this unexpectedly fluffy, savory Italian herb and cheese bread that quickly became a household favorite.
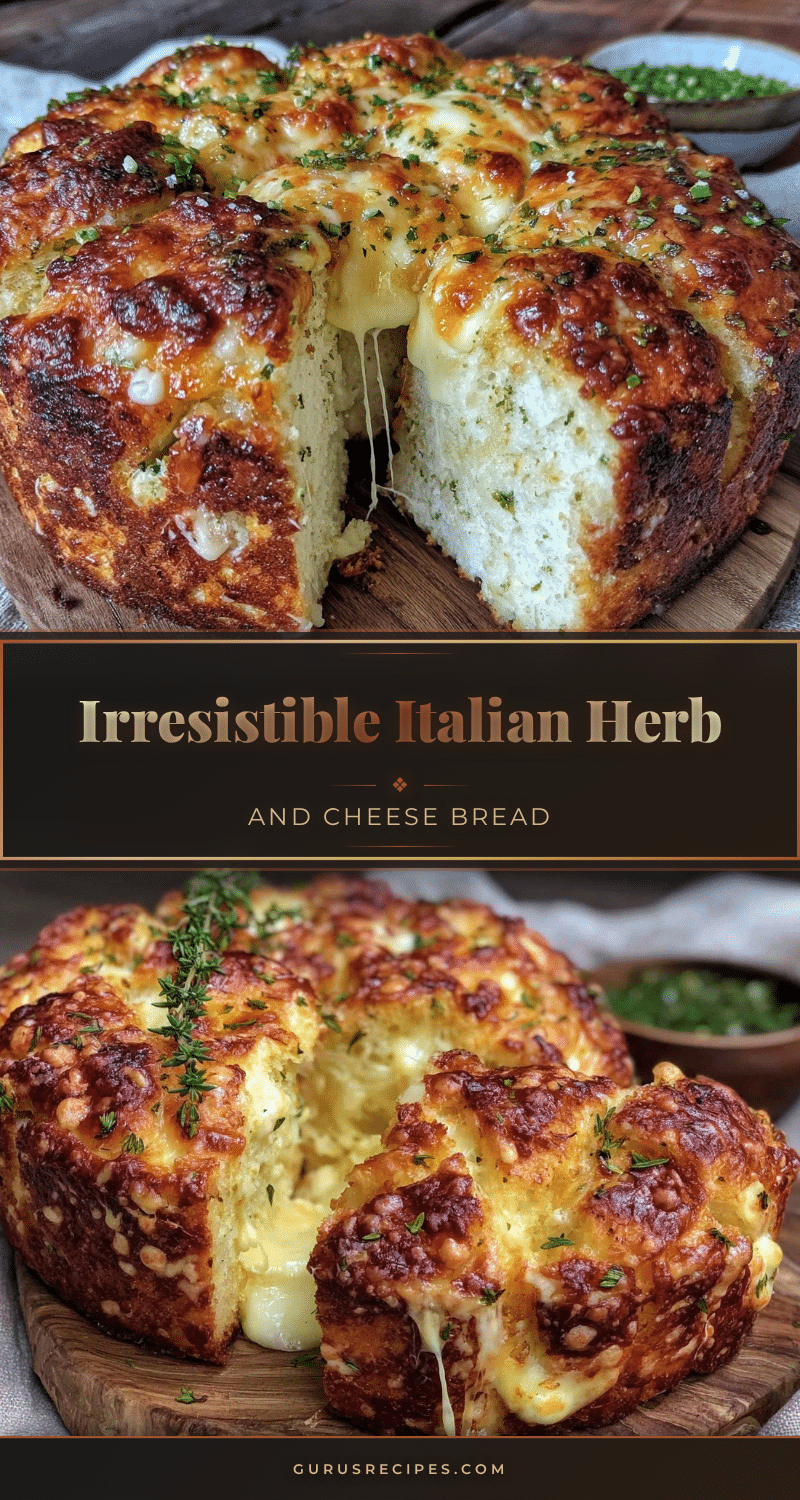
The crust was golden, the inside tender and airy, with bursts of fragrant herbs and melty cheese in every bite. I was honestly surprised—this wasn’t just “edible,” it was downright delicious. Since then, I’ve made this bread more times than I can count, tweaking it here and there but never straying far from that original simple, comforting formula. It’s the kind of bread that feels like company even when you’re eating solo, and it’s perfect for everything from snack time to dinner accompaniment.
What stuck with me, beyond the taste, was how easy it was to pull together without fuss—no fancy ingredients, no intimidating steps. Just good bread, the kind that makes you pause and appreciate the little things: warm, soft, and packed with flavor. If you ever find yourself staring at your kitchen wondering what to make, this savory Italian herb and cheese bread with fluffy texture might just be your new go-to.
Why You’ll Love This Recipe
- Quick & Easy: Comes together in under 2 hours from start to finish, perfect for busy weeknights or whenever you want fresh bread without the wait.
- Simple Ingredients: Uses pantry staples like all-purpose flour, dried herbs, and shredded cheese—no need for specialty stores.
- Perfect for Any Occasion: Works beautifully as a side for soups and salads, a snack on its own, or even a sandwich base for casual meals.
- Crowd-Pleaser: The cheesy, herby aroma fills the kitchen and wins over both kids and adults every time.
- Unbelievably Delicious: The secret to its fluffy texture lies in a mix of active yeast and a gentle kneading technique, making for bread that’s light yet satisfying.
This isn’t just another herb bread recipe. What makes this one special is the balance between the fragrant Italian herbs and the cheesy pockets that melt in your mouth. I’ve used a mix of oregano, basil, and thyme to give depth without overpowering, and the cheese—usually mozzarella with a bit of parmesan—adds that gooey richness you didn’t know you needed. Honestly, after making this several times, I’m convinced it’s the perfect comfort bread that’s both rustic and refined.
Plus, you don’t have to be a bread pro to get it right here. The method is straightforward, and I’ve included tips to help you avoid the common pitfalls like dense texture or flat loaves. It’s one of those recipes that feels like a little kitchen win every time you pull it out of the oven.
What Ingredients You Will Need
This recipe uses simple, wholesome ingredients to deliver bold flavor and satisfying texture without the fuss. Most of these are pantry staples, and there’s room for easy swaps depending on what you have on hand.
- All-purpose flour – 3 cups (360g), for the perfect balance of structure and softness
- Active dry yeast – 2 ¼ teaspoons (1 packet), the magic behind the fluffy rise
- Sugar – 1 tablespoon, to feed the yeast and add a hint of sweetness
- Warm water – 1 cup (240ml), around 110°F (43°C), to activate the yeast
- Olive oil – 2 tablespoons, adds moisture and a subtle fruity note
- Salt – 1 ½ teaspoons, enhances the flavors and balances the dough
- Italian herb blend – 2 teaspoons (oregano, basil, thyme, rosemary), dried or fresh finely chopped (fresh herbs intensify aroma!)
- Shredded mozzarella cheese – 1 cup (about 100g), for gooey pockets throughout the bread
- Grated Parmesan cheese – ½ cup (about 50g), for an extra sharp, savory kick
- Optional: minced garlic – 1 teaspoon, for a subtle savory depth
For best results, I usually recommend using a good-quality mozzarella—like part-skim shredded mozzarella from brands such as Galbani or BelGioioso. The Parmesan can be pre-grated or freshly grated; freshly grated will give you a better flavor punch.
If you want a gluten-free version, swapping the flour for a 1-to-1 gluten-free blend works okay but expect a slightly different texture. For dairy-free, try a plant-based shredded cheese substitute, though the flavor won’t be quite the same.
Equipment Needed
- Large mixing bowl: For combining the dough ingredients comfortably.
- Wooden spoon or silicone spatula: For initial mixing before kneading.
- Measuring cups and spoons: Accurate measurements are key for yeast breads.
- Stand mixer with dough hook (optional): Makes kneading easier but hand kneading works perfectly fine too.
- Baking sheet or loaf pan: Depending on your preferred bread shape.
- Kitchen towel or plastic wrap: For covering the dough while it rises.
- Oven thermometer (optional): Helpful to check the oven temperature for consistent baking.
Personally, I don’t always pull out the stand mixer for this recipe since the dough is soft and forgiving enough for hand kneading. Plus, kneading by hand gives you a better feel for when the dough is just right (slightly tacky but not sticky). If you use a stand mixer, keep an eye on the dough so it doesn’t over-knead—it only needs about 5 minutes on medium speed.
Preparation Method

- Activate the yeast: In your large mixing bowl, combine 1 cup (240ml) of warm water (about 110°F/43°C) with 1 tablespoon sugar and 2 ¼ teaspoons active dry yeast. Stir gently and let sit for 5-10 minutes until foamy and bubbly. If it doesn’t foam, your yeast might be dead—start over with fresh yeast.
- Mix the dry ingredients: While yeast activates, whisk together 3 cups (360g) all-purpose flour, 1 ½ teaspoons salt, and 2 teaspoons Italian herb blend in a separate bowl.
- Combine wet and dry: Add 2 tablespoons olive oil (plus optional minced garlic if using) to the yeast mixture, then gradually add the flour mixture. Stir with a wooden spoon or spatula until the dough begins to come together—it will be soft and slightly sticky.
- Knead the dough: Turn the dough onto a floured surface and knead gently for about 8-10 minutes, or until smooth and elastic. If the dough is too sticky, sprinkle a little flour, but avoid adding too much, or the bread will be dense. Alternatively, knead with a stand mixer using the dough hook on medium speed for 5 minutes.
- First rise: Lightly oil a clean bowl, place the dough inside, and cover with a kitchen towel or plastic wrap. Let it rise in a warm spot for 1 to 1 ½ hours, or until doubled in size. (If your kitchen is cool, you can preheat your oven to 200°F (93°C), turn it off, and let the dough rise inside.)
- Add cheese: Once risen, gently punch down the dough, then fold in 1 cup shredded mozzarella and ½ cup grated Parmesan cheese until distributed evenly.
- Shape and second rise: Shape the dough into a round or oval loaf and place it on a baking sheet lined with parchment paper or in a greased loaf pan. Cover loosely and let rise again for 30-45 minutes until puffy.
- Bake: Preheat your oven to 375°F (190°C). Bake the bread for 25-30 minutes until the crust is golden brown and the loaf sounds hollow when tapped on the bottom. If the top browns too quickly, tent loosely with foil.
- Cool before slicing: Let the bread cool on a wire rack for at least 20 minutes to set the crumb and avoid a gummy texture when cutting.
Pro tip: If you want an extra fragrant crust, brush the loaf with olive oil and sprinkle a pinch of additional Italian herbs before baking. The aroma will fill your kitchen and make the bread look even more inviting.
Cooking Tips & Techniques
Working with yeast dough can feel intimidating at first, but this recipe makes it manageable, especially with a few tricks I’ve learned along the way. First off, temperature matters—a quick rise depends on warm water that’s not too hot. Too hot, and your yeast dies; too cold, and it won’t activate properly. I usually test water with my finger or a kitchen thermometer.
Kneading is another key moment. You want the dough to be elastic and slightly tacky but not sticky enough to stick to your hands or surface extensively. If it sticks like crazy, dust your work surface lightly with flour, but resist the urge to overload the dough with flour or the bread will come out dense and dry.
When folding in the cheese, be gentle. Overmixing at this stage can deflate your dough and kill the fluffiness. Just fold it in with your hands or a spatula until it’s evenly spread.
Finally, don’t rush the rising times. The first rise is crucial for fluffiness. If you’re short on time, you can speed it up by placing the dough in a slightly warm spot, but patience pays off big time here.
Variations & Adaptations
- Herb swaps: Try rosemary and sage for a more piney, woodsy flavor, or add fresh chopped parsley and chives for brightness.
- Cheese variations: Swap mozzarella for provolone or smoked gouda for a richer, smoky taste. For a sharper edge, add crumbled feta or blue cheese in small amounts.
- Whole wheat version: Replace half the all-purpose flour with whole wheat flour for a nuttier flavor and added fiber. You may need to add a tablespoon or two more water to keep the dough moist.
- Garlic lovers: Incorporate roasted garlic cloves into the dough or brush the top with garlic butter before baking.
- Vegan adaptation: Use plant-based cheese and substitute olive oil for butter if desired. Make sure your yeast is vegan-friendly (most are). The texture will be slightly different but still delicious.
One of my favorite tweaks has been adding a handful of sun-dried tomatoes chopped finely into the dough, which gives a sweet-tart surprise in each bite. It’s become a personal twist I make when I want something a little different but still comforting.
Serving & Storage Suggestions
This savory Italian herb and cheese bread shines best served warm, fresh from the oven. Slice it thick or thin—both work—and enjoy it plain or with a swipe of butter. It pairs wonderfully with soups like tomato basil or minestrone, and makes a great base for bruschetta or paninis.
To store, wrap the cooled bread tightly in plastic wrap or place it in an airtight container. It stays fresh at room temperature for about 2 days. For longer storage, slice and freeze the bread in a zip-top bag for up to 3 months. Toast slices straight from the freezer for a quick, fresh-tasting snack.
Reheating in the oven at 350°F (175°C) for 10 minutes revives the crust nicely without drying the bread out. You’ll find that the herby aroma intensifies after a day or two, making leftover slices even more flavorful.
Nutritional Information & Benefits
Each serving of this herb and cheese bread provides a good source of carbohydrates for energy, along with protein and calcium from the cheese. The olive oil contributes heart-healthy monounsaturated fats, and the herbs add a touch of antioxidants and flavor without extra calories.
This recipe is naturally vegetarian and can be adapted for gluten-free or vegan diets with simple swaps. Keep in mind, it contains dairy and gluten, so it’s not suitable for those with allergies or intolerances to these ingredients.
From a wellness perspective, making bread at home lets you control the ingredients and avoid unnecessary preservatives or additives. Plus, the herbs contribute subtle anti-inflammatory benefits, making this treat a bit more wholesome than your average store-bought loaf.
Conclusion
There’s something deeply satisfying about pulling a warm loaf of savory Italian herb and cheese bread from the oven—a simple joy that’s hard to beat. This recipe has stuck with me because it’s reliable, comforting, and flexible enough to make your own. Whether you’re an experienced baker or just looking to try something new, it’s a delicious way to bring a bit of Italy into your kitchen without fuss.
Feel free to tweak the herbs or cheeses to match your taste, and don’t be shy about experimenting with add-ins to keep things interesting. At the end of the day, it’s all about enjoying the process and, of course, the bread itself. Let me know what variations you try—I’m always curious how this recipe evolves in different kitchens!
Here’s to cozy baking and plenty of cheesy, herby bread moments ahead.
FAQs
Can I use fresh herbs instead of dried in this recipe?
Yes! Fresh herbs can be used and will give a brighter, more vibrant flavor. Use about three times the amount of fresh herbs as dried, and chop them finely before adding.
How do I know if my yeast is still good?
Proof the yeast by mixing it with warm water and sugar. If it foams and bubbles within 5-10 minutes, it’s active. If not, it’s best to get a new packet.
Can I make this bread without a stand mixer?
Absolutely! Hand kneading works just fine. It takes a bit longer and gives you a better feel for the dough’s texture.
What’s the best way to store leftover bread?
Wrap it tightly and keep it at room temperature for up to 2 days. For longer storage, freeze slices in a zip-top bag and toast or warm them as needed.
Can I add other ingredients like nuts or seeds?
Yes, adding nuts or seeds can add texture and flavor. Toast them lightly first for best results. Just fold them in during the cheese incorporation step.
Pin This Recipe!

Savory Italian Herb and Cheese Bread
A quick and easy homemade bread featuring a fluffy texture with fragrant Italian herbs and gooey pockets of mozzarella and Parmesan cheese. Perfect as a snack or dinner accompaniment.
- Total Time: 1 hour 50 minutes
- Yield: 1 loaf (about 8 servings) 1x
Ingredients
- 3 cups (360g) all-purpose flour
- 2 ¼ teaspoons (1 packet) active dry yeast
- 1 tablespoon sugar
- 1 cup (240ml) warm water (about 110°F/43°C)
- 2 tablespoons olive oil
- 1 ½ teaspoons salt
- 2 teaspoons Italian herb blend (oregano, basil, thyme, rosemary), dried or fresh finely chopped
- 1 cup (about 100g) shredded mozzarella cheese
- ½ cup (about 50g) grated Parmesan cheese
- Optional: 1 teaspoon minced garlic
Instructions
- Activate the yeast: In a large mixing bowl, combine 1 cup warm water (about 110°F/43°C) with 1 tablespoon sugar and 2 ¼ teaspoons active dry yeast. Stir gently and let sit for 5-10 minutes until foamy and bubbly.
- Mix the dry ingredients: While yeast activates, whisk together 3 cups all-purpose flour, 1 ½ teaspoons salt, and 2 teaspoons Italian herb blend in a separate bowl.
- Combine wet and dry: Add 2 tablespoons olive oil (plus optional minced garlic if using) to the yeast mixture, then gradually add the flour mixture. Stir with a wooden spoon or spatula until the dough begins to come together—it will be soft and slightly sticky.
- Knead the dough: Turn the dough onto a floured surface and knead gently for about 8-10 minutes, or until smooth and elastic. If the dough is too sticky, sprinkle a little flour, but avoid adding too much. Alternatively, knead with a stand mixer using the dough hook on medium speed for 5 minutes.
- First rise: Lightly oil a clean bowl, place the dough inside, and cover with a kitchen towel or plastic wrap. Let it rise in a warm spot for 1 to 1 ½ hours, or until doubled in size.
- Add cheese: Once risen, gently punch down the dough, then fold in 1 cup shredded mozzarella and ½ cup grated Parmesan cheese until distributed evenly.
- Shape and second rise: Shape the dough into a round or oval loaf and place it on a baking sheet lined with parchment paper or in a greased loaf pan. Cover loosely and let rise again for 30-45 minutes until puffy.
- Bake: Preheat oven to 375°F (190°C). Bake the bread for 25-30 minutes until the crust is golden brown and the loaf sounds hollow when tapped on the bottom. Tent with foil if top browns too quickly.
- Cool before slicing: Let the bread cool on a wire rack for at least 20 minutes to set the crumb and avoid a gummy texture when cutting.
Notes
Use warm water around 110°F to activate yeast properly. Knead dough until smooth and elastic but avoid adding too much flour to keep bread fluffy. Fold in cheese gently to maintain dough rise. For a fragrant crust, brush with olive oil and sprinkle extra herbs before baking. Store bread wrapped at room temperature for 2 days or freeze slices for up to 3 months.
- Prep Time: 20 minutes
- Cook Time: 30 minutes
- Category: Bread
- Cuisine: Italian
Nutrition
- Serving Size: 1 slice (about 1/8 o
- Calories: 180
- Sugar: 2
- Sodium: 320
- Fat: 6
- Saturated Fat: 2.5
- Carbohydrates: 26
- Fiber: 1
- Protein: 7
Keywords: Italian herb bread, cheese bread, homemade bread, savory bread, mozzarella bread, Parmesan bread, easy bread recipe, fluffy bread


