
“Hey, you bringing lunch today?” my coworker asked just as I was scrambling to pack something quick for our team picnic. Honestly, I hadn’t planned much—just some leftovers thrown together. But then I remembered this mason jar taco salad I’d been playing with all week. It’s funny how the simplest idea—layering all the fresh taco ingredients in a jar—turned into my go-to picnic lifesaver. I was skeptical at first, thinking how could a salad in a jar actually hold up and taste good after a couple of hours in the sun? Turns out, it’s not just good, it’s a total crowd-pleaser.
What sold me was how each layer stayed fresh and crunchy, and the dressing at the bottom kept everything flavorful without sogginess. I brought it along to that picnic, and people kept asking for the recipe, even trying to sneak a peek inside the jar before digging in. It was a small moment of satisfaction—knowing that this easy, portable meal made the day a little tastier and less stressful. Plus, there’s something oddly satisfying about peeling back each layer and tasting every ingredient separately before mixing it all up.
That week, I made the Fresh Mason Jar Layered Taco Salad not once, but three times—each with a little tweak here or there. It’s become my secret weapon for picnic lunches, road trips, or even just a quick, fresh dinner when I’m not in the mood for fuss. It’s colorful, fresh, and packed with that classic taco flavor, but without the mess or the need for plates. And honestly, it’s just fun to eat out of a jar. So yeah, this recipe stuck with me—because it’s practical, tasty, and a bit playful, all rolled into one.
There’s a quiet joy in knowing that you can grab a jar, twist off the lid, and be greeted by layers of bright veggies, hearty beans, and zesty dressing. It’s a reminder that sometimes, the easiest meals are the best ones to come back to.
Why You’ll Love This Recipe
This Fresh Mason Jar Layered Taco Salad recipe isn’t just another salad—it’s a fresh take on picnic lunches that makes prepping, packing, and eating a breeze. Here’s why it’s quickly become a favorite in my kitchen and hopefully yours too:
- Quick & Easy: You can have this layered taco salad ready in about 15 minutes, which is perfect for busy days or last-minute plans.
- Simple Ingredients: No need for fancy or hard-to-find items. Most ingredients are pantry staples or fresh produce you can grab at any market.
- Perfect for Picnics: Since it’s packed in a mason jar, it’s super portable and mess-free—ideal for outdoor lunches, potlucks, or even lunch at your desk.
- Crowd-Pleaser: I’ve made this for friends and family, and everyone loves how colorful and flavorful it is—kids included!
- Unbelievably Delicious: The layering technique keeps everything crisp and fresh, while the zesty taco seasoning and creamy dressing bring all the comfort and flavor you want.
What sets this recipe apart is the way the ingredients are layered thoughtfully to keep textures and flavors intact. The dressing at the bottom means no soggy lettuce, and the beans and seasoned beef stay perfectly separated until you’re ready to mix. Plus, I swap in fresh lime juice and cilantro for a bright twist that makes it feel homemade but special.
It’s the kind of recipe that makes you close your eyes for a second after the first bite, savoring all those fresh, bold flavors. It’s also a great way to impress guests without sweating the details, or just enjoy a no-fuss meal that feels like a treat.
What Ingredients You Will Need
This recipe uses simple, wholesome ingredients to deliver bold taco flavor and satisfying texture without fuss. Most are easy to find, and you can tweak a few to suit your pantry or preferences.
- For the Taco Meat Layer:
- 1 lb (450 g) ground beef or turkey (lean, for less grease)
- 1 packet taco seasoning or 2 tbsp homemade blend (cumin, chili powder, smoked paprika, garlic powder)
- 1/4 cup (60 ml) water
- For the Bean Layer:
- 1 can (15 oz/425 g) black beans, drained and rinsed
- 1/2 tsp ground cumin (for extra flavor)
- Salt and pepper to taste
- For the Vegetable Layers:
- 1 cup (100 g) cherry tomatoes, halved
- 1 cup (150 g) corn kernels (fresh or thawed frozen)
- 1 cup (50 g) shredded romaine lettuce or mixed greens
- 1/2 cup (50 g) shredded sharp cheddar cheese
- 1/4 cup (25 g) diced red onion (optional)
- 1/4 cup (15 g) fresh cilantro leaves, roughly chopped
- For the Dressing:
- 1/3 cup (80 ml) plain Greek yogurt (or sour cream)
- 2 tbsp lime juice (freshly squeezed)
- 1 tbsp olive oil
- 1 tsp honey or agave syrup
- 1 clove garlic, minced
- Salt and pepper to taste
- Optional Toppings:
- 1/4 cup (30 g) crushed tortilla chips (add just before eating for crunch)
- 1 avocado, diced (add fresh for serving)
- Jalapeño slices (for extra heat)
For best results, I recommend using freshly ground taco seasoning or a trusted brand like McCormick for consistent flavor. The Greek yogurt adds creaminess without heaviness, but feel free to swap with a dairy-free option if needed. In summer, I love swapping cherry tomatoes for fresh diced mango for a sweet twist that pairs beautifully with the spices.
Equipment Needed
- Large skillet or frying pan for cooking the taco meat
- Mixing bowl for the dressing
- Measuring cups and spoons for precise seasoning and dressing ratios
- Mason jars (16 oz/500 ml size works best for layering)
- Knife and cutting board for prepping veggies
- Colander or strainer for rinsing beans and veggies
If you don’t have mason jars, any airtight container that can hold the layers without squishing works fine too. I’ve even used wide-mouth jars, which make layering and eating easier. For quick cleanup, I love using a silicone spatula to scrape out the last bits of dressing and salad from the jar.
Preparation Method
- Cook the Taco Meat: Heat a large skillet over medium-high heat. Add 1 lb (450 g) ground beef or turkey and cook, breaking it up with a spoon, until fully browned (about 6-8 minutes). Drain excess fat if needed. Stir in taco seasoning and 1/4 cup (60 ml) water. Simmer for 3-4 minutes until sauce thickens slightly. Remove from heat and let cool for a few minutes.
- Prepare the Beans: While the meat cools, rinse 1 can (15 oz/425 g) black beans under cold water. Toss with 1/2 tsp cumin, salt, and pepper. Set aside.
- Make the Dressing: In a small bowl, whisk together 1/3 cup (80 ml) Greek yogurt, 2 tbsp fresh lime juice, 1 tbsp olive oil, 1 tsp honey, minced garlic, and a pinch of salt and pepper. Taste and adjust seasoning as needed. This zesty dressing keeps the salad fresh and flavorful.
- Prep the Veggies: Halve cherry tomatoes, shred lettuce, dice onion, and chop cilantro. Prepare any optional toppings like avocado or jalapeño slices now.
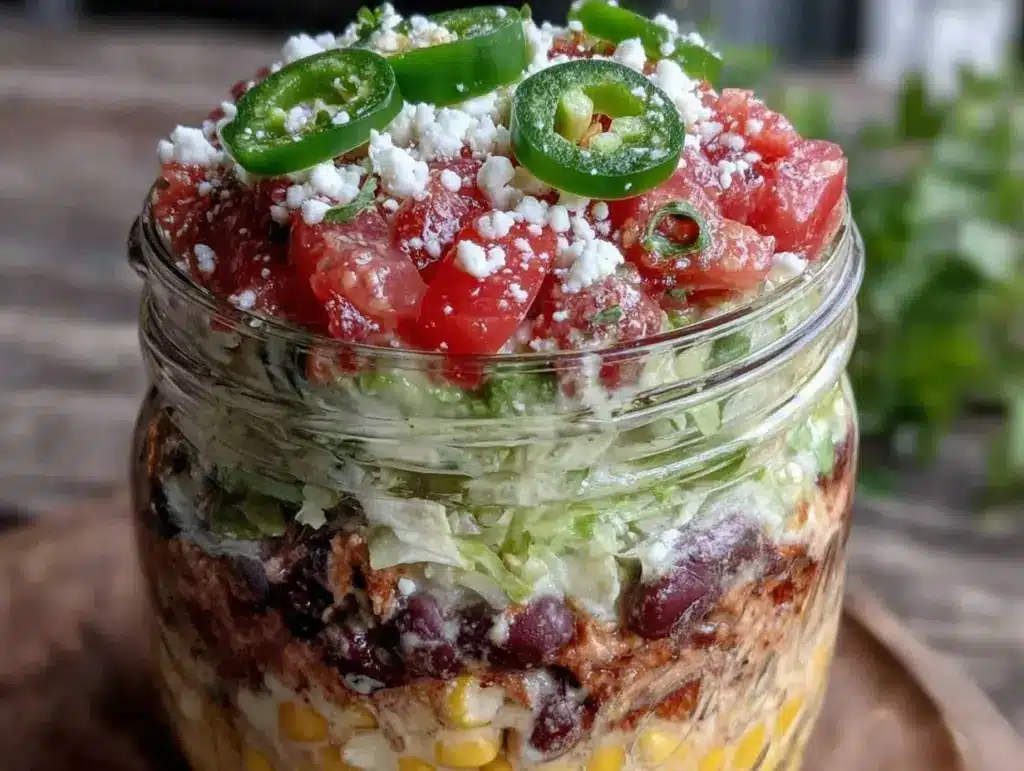
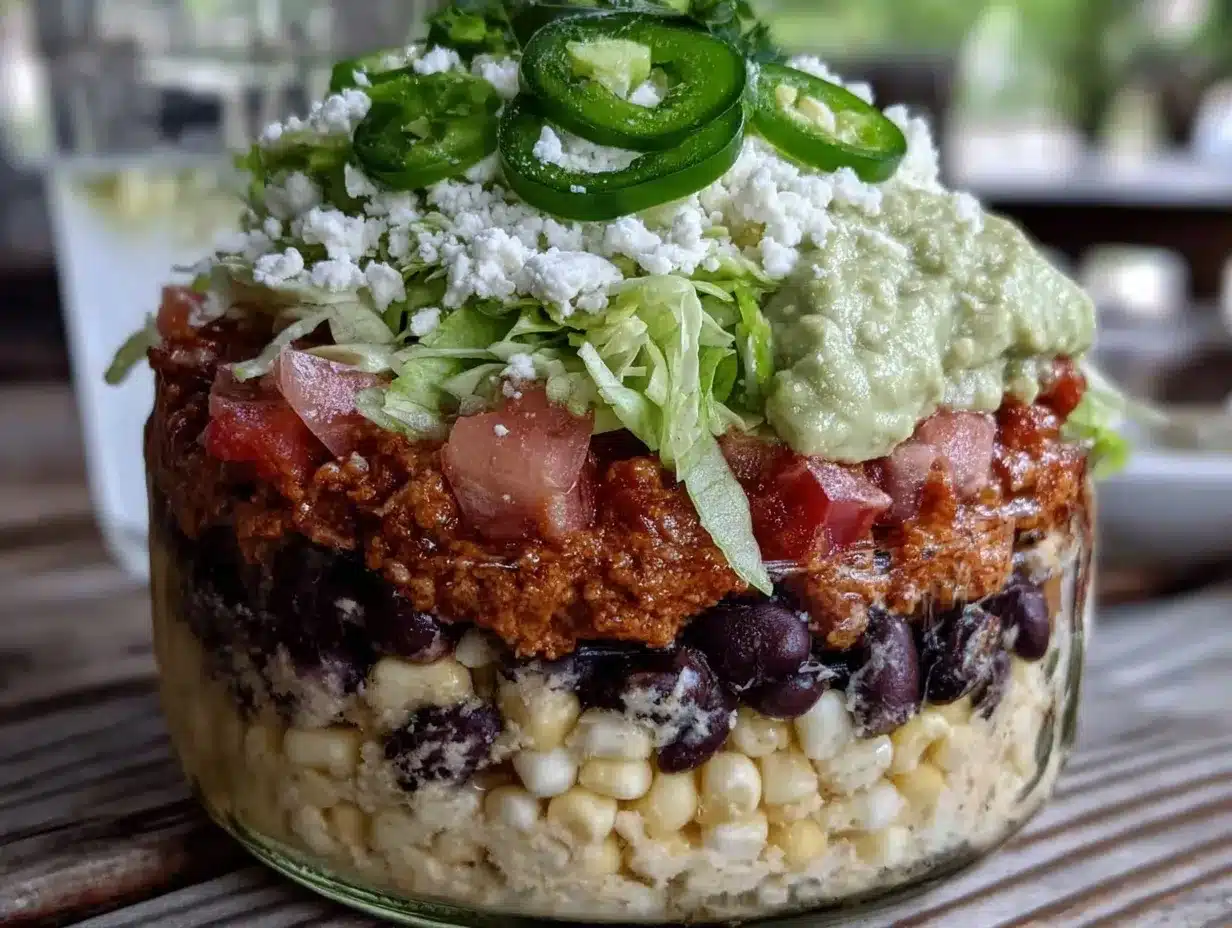
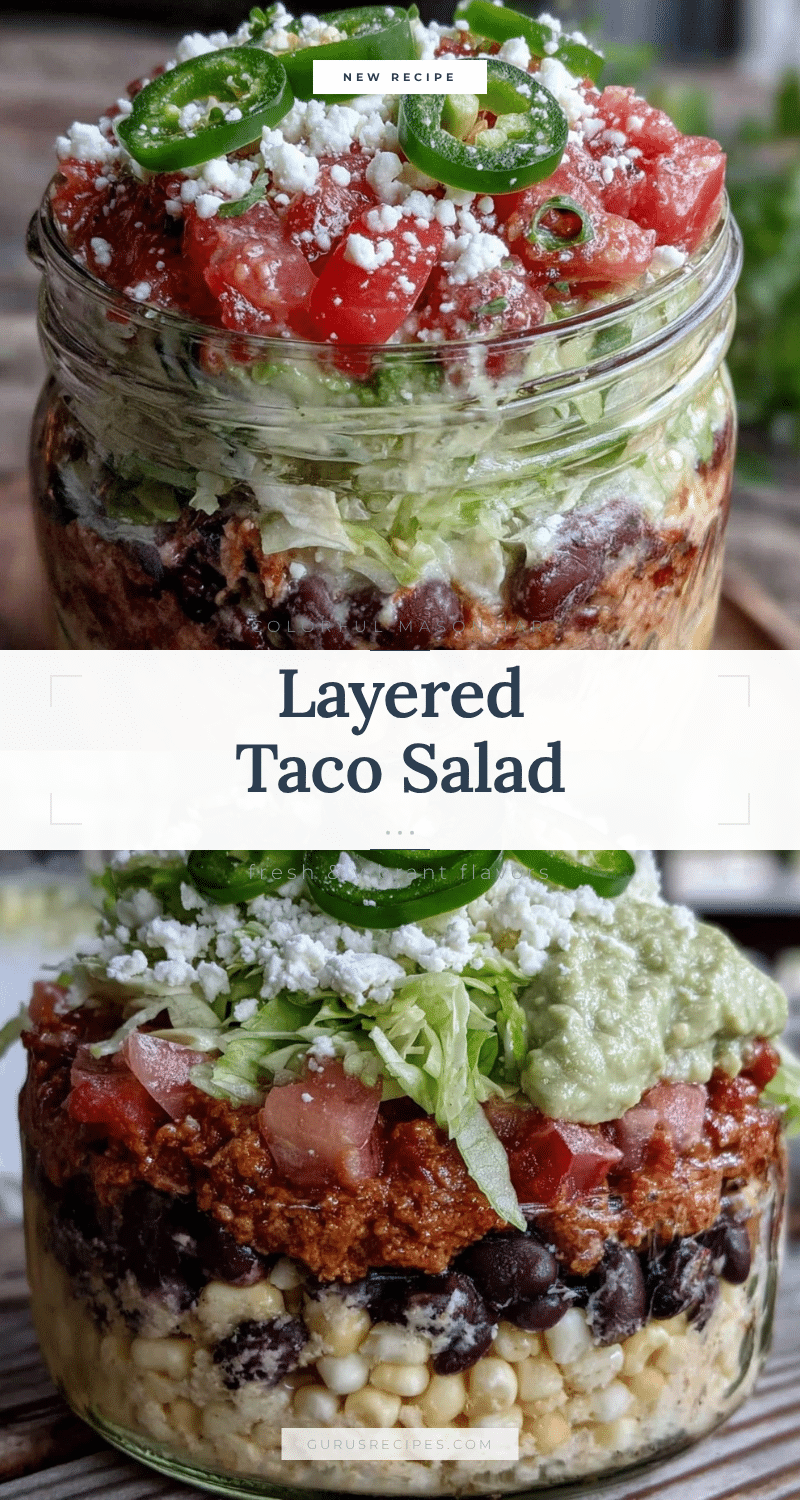
- Layer the Salad: Start with 2-3 tbsp of dressing at the bottom of each 16 oz (500 ml) mason jar. Add 1/4 cup (60 g) cooked taco meat, pressing down gently. Next, layer 1/4 cup (60 g) seasoned black beans, then 1/4 cup (50 g) corn kernels. Follow with cherry tomatoes, diced red onion, shredded cheese, and finally shredded lettuce. Top with cilantro and keep any crunchy tortilla chips or avocado separate until serving to avoid sogginess.
- Seal and Store: Screw on lids tightly and refrigerate until ready to enjoy. These jars hold well for up to 2 days, making them perfect for meal prep or picnic lunches.
Pro tip: If you notice your lettuce wilting, add an extra layer of shredded cabbage for crunch or pack the lettuce separately. Also, layering heavier ingredients below lighter greens helps keep everything crisp until mealtime.
Cooking Tips & Techniques
When making this Fresh Mason Jar Layered Taco Salad, timing and layering are key to success. Cooking the meat just right—browned but not dried out—keeps every bite juicy. I learned early on that skipping the step to drain excess fat can make the salad greasy, so don’t skip that.
For the beans, rinsing them removes excess starch and helps with digestion, plus prevents the salad from becoming too heavy. I like adding a pinch of cumin to the beans to tie all the flavors together—makes a subtle difference you might not expect.
Layering is an art here: dressing at the bottom, sturdy layers next, and delicate greens on top. This stops the salad from getting soggy, which is a common problem with layered salads. Don’t be tempted to mix it all up before packing; the magic is in the reveal at mealtime.
One time, I forgot to pack the crushed tortilla chips separately and added them in the jar. By lunch, they were soggy and sad—lesson learned! Keep crunchy toppings dry and add just before eating.
Another tip: if you’re short on time, you can swap cooked taco meat for seasoned canned beans or even rotisserie chicken for a shortcut. Multitasking by chopping veggies while the meat cooks saves precious minutes.
Variations & Adaptations
One of the best things about this layered taco salad is how easy it is to customize. Here are a few variations I’ve tried (and loved):
- Vegetarian Version: Skip the meat and add extra black beans or swap in seasoned lentils. You can also crumble some firm tofu cooked with taco spices for a plant-based protein.
- Seasonal Twist: In warmer months, swap corn for grilled zucchini or fresh diced mango for a sweet contrast. In cooler months, consider roasted sweet potatoes for a cozy touch.
- Spicy Kick: Add diced jalapeños or a splash of hot sauce to the dressing for more heat. Chipotle powder in the meat mix also adds smoky depth.
- Gluten-Free Adjustments: This recipe is naturally gluten-free, but just check your taco seasoning blend to avoid any hidden gluten. For topping, use gluten-free tortilla chips or crushed nuts.
- Creative Twist: I once added a layer of cooked quinoa beneath the beans for extra texture and protein—turned out surprisingly tasty and filling.
Serving & Storage Suggestions
Serve this Fresh Mason Jar Layered Taco Salad chilled or at room temperature. Just before eating, shake the jar vigorously to mix all the layers and coat everything in that flavorful dressing. If you want to keep things a bit neater, transfer the contents to a bowl and toss gently.
This salad pairs brilliantly with light, refreshing drinks like iced tea or a sparkling water with lime. For a more substantial picnic, consider pairing it with a warm, crusty bread like the easy crispy no-knead rosemary sea salt bread, which adds a lovely savory contrast.
Store leftovers in the fridge with lids tightly sealed for up to 2 days. Avoid adding crunchy toppings like chips or avocado until ready to serve to maintain texture. When reheating taco meat for another meal, warm gently in a skillet to keep it juicy. Flavors tend to meld and mellow wonderfully if you give the salad a quick rest in the fridge overnight.
Nutritional Information & Benefits
This Fresh Mason Jar Layered Taco Salad is a balanced meal packed with protein, fiber, and fresh veggies. Each serving (about one jar) provides roughly 350-400 calories, depending on the meat and toppings used.
- Protein: Ground beef or turkey combined with black beans offers a satisfying protein boost, great for muscle repair and energy.
- Fiber & Vitamins: The corn, tomatoes, and romaine bring fiber, vitamin C, and antioxidants essential for overall health.
- Healthy Fats: Olive oil in the dressing and optional avocado add heart-healthy fats.
- Low Carb & Gluten-Free Options: Easily adapted for low-carb diets by skipping corn and tortilla chips, and naturally gluten-free if using certified seasonings.
From a wellness perspective, swapping heavy dressings for Greek yogurt-based ones helps keep this salad light but creamy, making it a satisfying choice without the guilt.
Conclusion
This Fresh Mason Jar Layered Taco Salad is a little gem I keep coming back to because it’s practical, flavorful, and just plain fun to eat. It’s easy to customize and perfect for those days when you want something fresh but fuss-free. Whether you’re heading to a picnic, packing a lunch, or just craving a vibrant meal, this recipe has your back.
Feel free to tweak the layers to suit your taste buds or pantry supplies. I love hearing how readers make it their own, so don’t hesitate to share your favorite variations or tips.
At the end of the day, it’s a recipe that reminds me that good food doesn’t have to be complicated, and sometimes, the best meals come layered with a little creativity and a lot of heart.
FAQs About Fresh Mason Jar Layered Taco Salad
How long can I store the mason jar taco salad in the fridge?
It stays fresh for up to 2 days when sealed tightly. Keep crunchy toppings separate and add just before eating.
Can I make this salad vegan or vegetarian?
Absolutely! Swap the meat for extra beans, lentils, or seasoned tofu. Use a dairy-free yogurt for the dressing if needed.
What’s the best way to keep the salad from getting soggy?
Layer the dressing at the bottom and place leafy greens at the top. Keep crunchy toppings like chips separate until serving.
Can I prepare these salads ahead for a party or picnic?
Yes, they’re perfect for prepping a day ahead. Just store in the fridge and add any delicate toppings right before serving.
What can I use if I don’t have mason jars?
Any airtight container or lunchbox with compartments works well. Just be mindful of layering to keep the salad fresh and crisp.
Pin This Recipe!

Fresh Mason Jar Layered Taco Salad Recipe Easy Picnic Lunch Idea
A fresh, colorful, and portable layered taco salad packed in mason jars, perfect for picnics, road trips, or quick dinners. The layering technique keeps ingredients crisp and flavorful without sogginess.
- Total Time: 25 minutes
- Yield: 4 servings 1x
Ingredients
- 1 lb ground beef or turkey (lean)
- 1 packet taco seasoning or 2 tbsp homemade blend (cumin, chili powder, smoked paprika, garlic powder)
- 1/4 cup water
- 1 can (15 oz) black beans, drained and rinsed
- 1/2 tsp ground cumin
- Salt and pepper to taste
- 1 cup cherry tomatoes, halved
- 1 cup corn kernels (fresh or thawed frozen)
- 1 cup shredded romaine lettuce or mixed greens
- 1/2 cup shredded sharp cheddar cheese
- 1/4 cup diced red onion (optional)
- 1/4 cup fresh cilantro leaves, roughly chopped
- 1/3 cup plain Greek yogurt (or sour cream)
- 2 tbsp lime juice (freshly squeezed)
- 1 tbsp olive oil
- 1 tsp honey or agave syrup
- 1 clove garlic, minced
- Salt and pepper to taste
- Optional toppings: 1/4 cup crushed tortilla chips, 1 avocado diced, jalapeño slices
Instructions
- Heat a large skillet over medium-high heat. Add ground beef or turkey and cook, breaking it up with a spoon, until fully browned (6-8 minutes). Drain excess fat if needed.
- Stir in taco seasoning and 1/4 cup water. Simmer for 3-4 minutes until sauce thickens slightly. Remove from heat and let cool.
- Rinse black beans under cold water. Toss with ground cumin, salt, and pepper. Set aside.
- In a small bowl, whisk together Greek yogurt, lime juice, olive oil, honey, minced garlic, salt, and pepper. Adjust seasoning to taste.
- Halve cherry tomatoes, shred lettuce, dice onion, and chop cilantro. Prepare optional toppings like avocado or jalapeño slices.
- Layer the salad in 16 oz mason jars starting with 2-3 tbsp dressing at the bottom, then 1/4 cup cooked taco meat, 1/4 cup seasoned black beans, 1/4 cup corn kernels, cherry tomatoes, diced red onion, shredded cheese, and shredded lettuce. Top with cilantro.
- Keep crunchy toppings like tortilla chips and avocado separate until serving to avoid sogginess.
- Seal jars tightly and refrigerate up to 2 days until ready to eat.
Notes
Use freshly ground taco seasoning or a trusted brand for best flavor. Keep dressing at the bottom and greens on top to avoid sogginess. Add crunchy toppings like tortilla chips and avocado just before serving. Can substitute meat with beans, lentils, or tofu for vegetarian/vegan versions. Store sealed jars in fridge up to 2 days.
- Prep Time: 15 minutes
- Cook Time: 10 minutes
- Category: Main Course
- Cuisine: Mexican
Nutrition
- Serving Size: One 16 oz mason jar
- Calories: 350400
- Sugar: 6
- Sodium: 600
- Fat: 15
- Saturated Fat: 5
- Carbohydrates: 30
- Fiber: 8
- Protein: 25
Keywords: mason jar salad, taco salad, picnic lunch, layered salad, easy lunch, portable meal, healthy taco salad


