
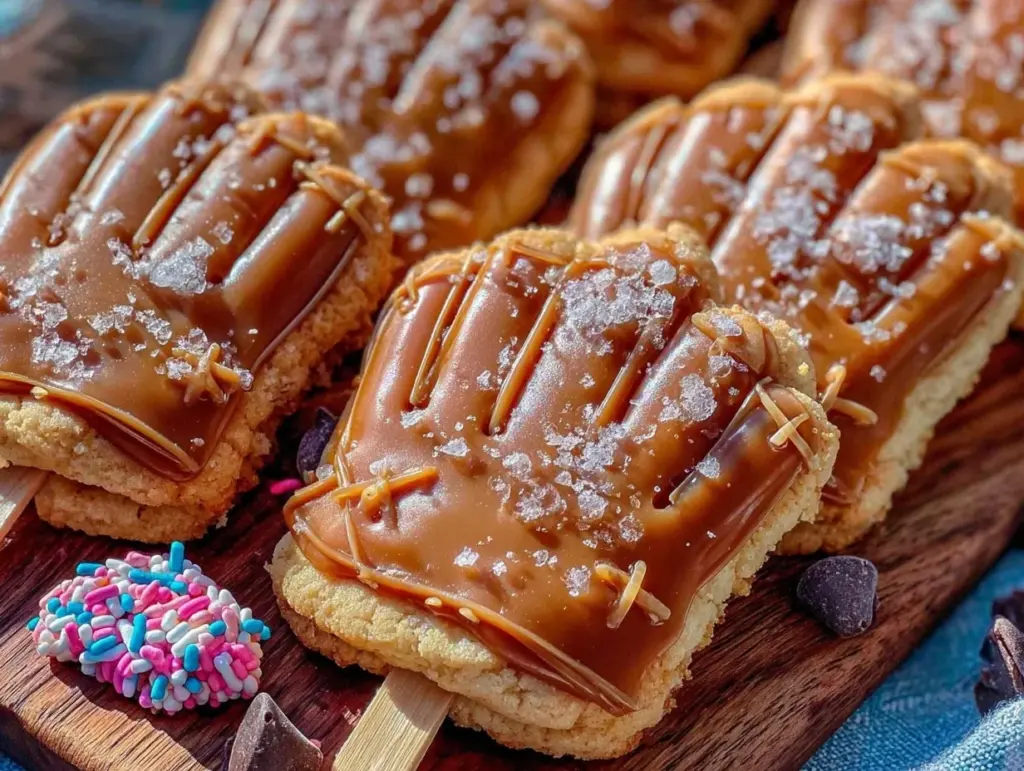
“Hey, you think we can make cookies that look like baseball mitts for the game tomorrow?” That text popped up from my kid’s coach late one evening, and honestly, I wasn’t sure if I had time to turn that into a real snack. But you know how it goes—sometimes those last-minute, half-joking ideas end up becoming the best memories. The next day, I found myself rolling out dough with a mix of skepticism and excitement, shaping each cookie pop like a tiny mitt, complete with those signature finger lines. The kitchen smelled like buttery vanilla, and the kids were buzzing about the treats even before the game started.
What struck me was how these Fun Homemade Baseball Mitt-Shaped Cookie Pops turned from a playful experiment into a team favorite. They weren’t just snacks; they were little trophies on sticks, perfect for celebrating wins or easing losses. I never imagined how something so simple could bring everyone together in that way. The mitt shape makes them feel special, and honestly, I caught myself making them multiple times that week—not just for games but for afternoon treats, too.
These cookie pops have stuck with me because they’re fun, approachable, and just a little bit nostalgic. They remind me of those carefree days spent cheering on the team, sharing laughs, and indulging in sweet moments that feel bigger than the score. If you’re looking for a homemade team snack idea that’s easy, playful, and sure to get smiles, you might find these just as irresistible as I do.
Why You’ll Love This Recipe
Making these baseball mitt-shaped cookie pops isn’t just about baking; it’s about creating a little celebration on a stick that everyone will enjoy. Through countless trials and tweaks, I’ve landed on a recipe that’s as simple as it is fun. Here’s why you’ll love having this one in your kitchen repertoire:
- Quick & Easy: These come together in about 30 minutes of prep plus baking, great for those busy game days or last-minute team get-togethers.
- Simple Ingredients: No need for fancy or hard-to-find items—just pantry basics you probably already have on hand.
- Perfect for Team Snacks: Whether it’s a little league game or a backyard baseball party, these cookie pops add a whimsical touch that kids and adults appreciate.
- Crowd-Pleaser: The buttery, soft cookies with just the right amount of sweetness always get rave reviews—and the mitt shape sparks plenty of smiles and conversations.
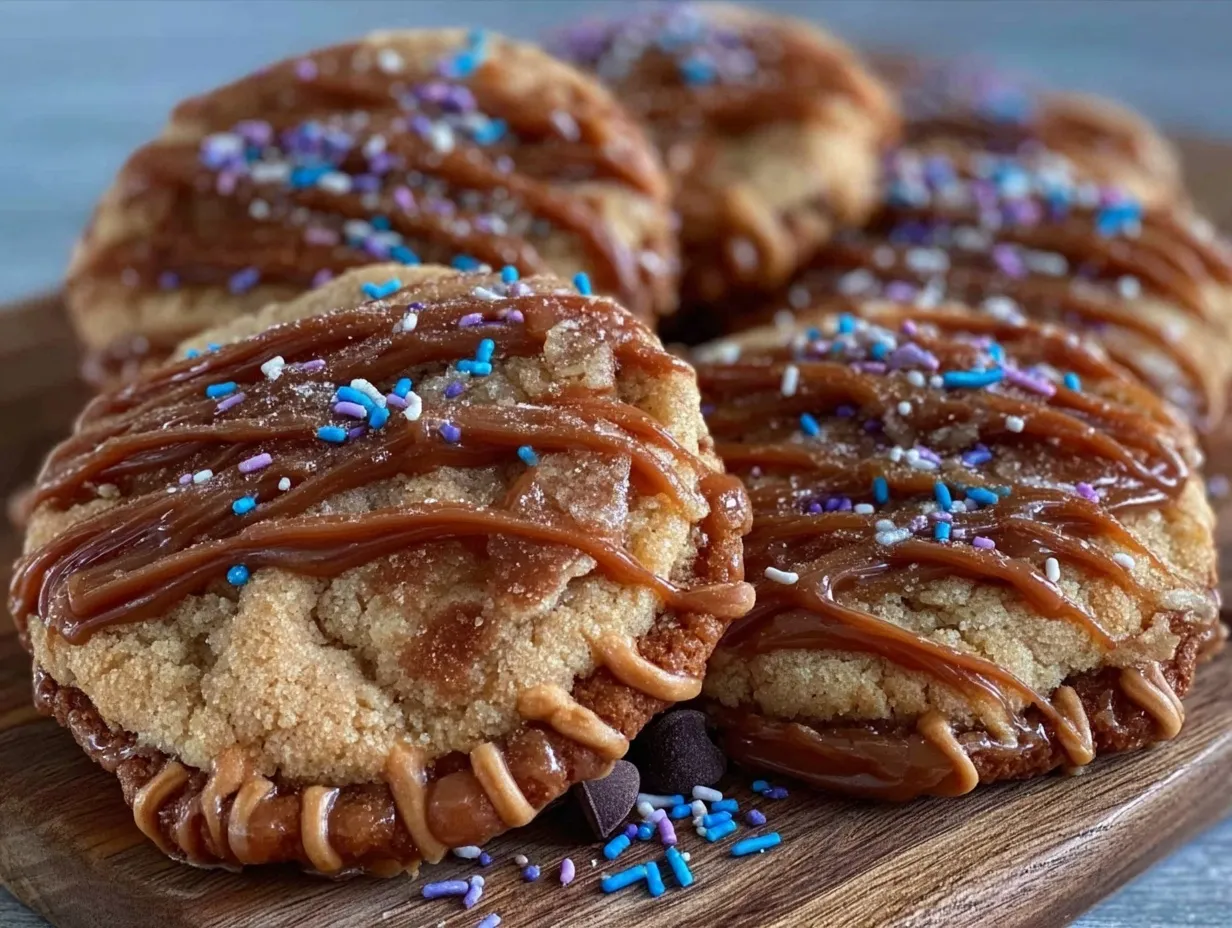
- Creative & Customizable: The design is a playful twist on classic sugar cookies, and you can personalize them with colored icing or sprinkles to match your team’s colors.
- Memorable Treat: These aren’t your everyday cookies. The mitt shape makes them feel like a little trophy, perfect for celebrating the spirit of the game.
What sets this recipe apart is the balance between simplicity and charm. Instead of complicated cutters or fancy frosting techniques, you get a homemade feel with a creative shape that’s surprisingly easy to pull off. It’s a recipe that invites you to get a bit playful in the kitchen while still delivering that familiar, comforting cookie flavor. Honestly, after trying these, you might find yourself bringing these pops along to every game day snack table—because who can say no to cookies that double as team spirit?
What Ingredients You Will Need
This recipe uses straightforward ingredients that come together to create a buttery, soft cookie perfect for shaping and decorating. Each ingredient plays a role in delivering that tender texture and subtle sweetness without any fuss. Plus, these are pantry staples, so no detours to specialty stores.
- All-purpose flour – 2 ¾ cups (345 g), for that classic cookie structure
- Baking powder – 1 teaspoon, helps the cookies rise just enough
- Salt – ½ teaspoon, balances the sweetness
- Unsalted butter – 1 cup (227 g), softened (I prefer Land O Lakes for a rich flavor)
- Granulated sugar – 1 cup (200 g), for the perfect sweetness
- Large eggs – 1, room temperature for better mixing
- Pure vanilla extract – 1 teaspoon, adds warm, inviting aroma
- Light brown sugar – ¼ cup (50 g), packed, for a subtle molasses undertone
- Milk – 2 tablespoons (30 ml), for a softer dough (use dairy-free milk if needed)
- Cookie sticks or lollipop sticks – about 12, to turn cookies into pops
- Royal icing or colored glaze – optional, for decorating the mitt and finger details
Pro tip: If you want to make these gluten-free, try swapping the all-purpose flour with a 1:1 gluten-free baking flour blend. I’ve also made these with almond flour, but the texture gets a bit denser. For dairy-free, replace butter with vegan margarine and milk with almond or oat milk.
For decorating, I like mixing a little powdered sugar with milk and food coloring to keep it simple. But if you want more precision, royal icing works beautifully—it dries firm and lets you pipe the mitt’s stitching and finger details with ease.
Equipment Needed
- Mixing bowls: One large for the dough and a smaller one if you make glaze or icing.
- Electric mixer or stand mixer: Helpful for creaming butter and sugar smoothly, but a sturdy whisk and elbow grease work too.
- Measuring cups and spoons: For precise ingredient amounts—accurate measuring makes a big difference here.
- Baking sheet: A rimmed cookie sheet lined with parchment paper or a silicone mat prevents sticking and promotes even baking.
- Rolling pin: Essential for flattening dough to the right thickness (about ¼ inch or 6 mm).
- Sharp knife or cookie cutter: Since the mitt shape is a bit custom, I use a small sharp knife to cut the shape freehand, but you can print a template and use to trace.
- Cooling rack: Allows cookies to cool completely before decorating or serving.
- Optional piping bags and tips: For detailed icing work on the mitt’s stitching.
If you don’t have a rolling pin, a wine bottle or smooth glass works surprisingly well. And if you’re on a budget, investing in a good silicone baking mat is worth it—it lasts forever and beats parchment paper in the long run.
Preparation Method
- Preheat your oven to 350°F (175°C). Line two baking sheets with parchment paper or silicone mats. This is key for easy cookie release and even baking.
- Mix dry ingredients: In a medium bowl, whisk together 2 ¾ cups (345 g) all-purpose flour, 1 teaspoon baking powder, and ½ teaspoon salt. Set aside.
- Cream butter and sugars: In a large bowl, using an electric mixer or by hand, beat 1 cup (227 g) softened unsalted butter with 1 cup (200 g) granulated sugar and ¼ cup (50 g) packed light brown sugar until light and fluffy—about 3 to 4 minutes. This step is where the magic for soft texture begins.
- Add egg and vanilla: Beat in 1 large egg and 1 teaspoon pure vanilla extract until combined. The batter will smell heavenly at this point.
- Incorporate dry ingredients and milk: Gradually add the flour mixture to the butter mixture, alternating with 2 tablespoons (30 ml) milk. Mix until just combined. Avoid overmixing or the cookies could get tough.
- Form the cookie mitts: Turn the dough out onto a lightly floured surface. Roll it to about ¼ inch (6 mm) thickness. Using a sharp knife, cut out baseball mitt shapes. If you like, print a mitt template to trace for uniformity. Place the cookie sticks gently into the base of each mitt, pressing slightly to secure, but be careful not to poke through.
- Bake: Arrange the cookie pops on baking sheets, spacing them 2 inches apart. Bake for 10–12 minutes or until the edges are just starting to turn golden. The cookies will look soft but will firm up as they cool.
- Cool completely: Transfer cookies to a cooling rack and let them cool fully before decorating. This prevents icing from melting or sliding off.
- Decorate: Use royal icing or colored glaze to pipe the mitt’s finger lines, stitching, and details. You can keep it simple with just a few lines or go all out with team colors. Let icing dry fully before stacking or serving.
Tip: If the dough feels too sticky to roll, chill it in the fridge for 15–20 minutes. Also, avoid overbaking to keep the cookie pops tender enough to bite but sturdy enough to hold their shape.
Cooking Tips & Techniques
When it comes to these baseball mitt-shaped cookie pops, a few kitchen tricks can make all the difference. First, the key is in the dough consistency. The dough should be soft enough to roll but firm enough to hold shape. If it’s too warm, pop it in the fridge for a bit before rolling.
Shaping can seem intimidating at first, but remember, the charm is in the hand-crafted look. Don’t stress perfect mitts—each cookie will have its own character. I usually freehand the shape with a small sharp knife, focusing on the rounded mitt with finger separations. Tracing a printed mitt outline under parchment paper can help if you want uniformity.
One mistake I made early on was pushing the cookie sticks too deep before baking. The dough expands slightly, and if the sticks aren’t secure, they can loosen or poke through. Insert sticks gently at the base just before baking. If you want extra security, you can wait to insert sticks after baking by gently poking holes and inserting sticks once cookies are cooled.
For decorating, I recommend thinning royal icing with a tiny bit of water for smooth piping. Use a small round tip or even a zip-top bag with a tiny corner snipped off. If you’re short on time or patience, colored glaze made from powdered sugar, milk, and food coloring works great and dries with a nice sheen.
Lastly, timing is everything. Bake one sheet at a time if your oven runs hot or uneven so cookies bake evenly. While one batch cools, prep the next. This multitasking keeps the rhythm smooth and stress low, especially on game day.
Variations & Adaptations
These cookie pops are a canvas waiting for your creativity. I’ve tried different versions depending on the occasion and dietary needs:
- Chocolate Chip Mitts: Add ½ cup (90 g) mini chocolate chips to the dough for a classic twist that’s always a hit with kids.
- Gluten-Free Version: Swap all-purpose flour with a 1:1 gluten-free blend like Bob’s Red Mill. Add a teaspoon of xanthan gum if your blend lacks it to keep cookies together.
- Vegan Mitts: Replace butter with vegan margarine and use a flax egg (1 tbsp ground flax + 3 tbsp water) instead of a chicken egg. Use dairy-free milk and decorate with vegan icing.
- Seasonal Colors: Match your team’s colors in the icing or sprinkles for a personalized touch. Red and blue work great for patriotic games or summer leagues.
- Peanut-Free Option: Use sunflower seed butter instead of butter for nut allergies, which also adds a subtle nutty flavor.
One variation I adore is sprinkling a little cinnamon sugar on top before baking—adds a warm, cozy undertone perfect for cooler evening games.
Serving & Storage Suggestions
Serve these cookie pops at room temperature, ideally fresh out of the decorating drying phase. They make for excellent handheld treats that kids can enjoy between innings without the fuss of plates or forks. Present them standing in a mason jar or a decorated box for easy grab-and-go.
They pair wonderfully with classic game day drinks like lemonade or iced tea, and if you’re planning a bigger spread, consider serving with savory snacks like crispy garlic chicken for a balance of sweet and savory flavors.
Store leftover cookie pops in an airtight container at room temperature for up to 3 days. For longer storage, freeze them in a single layer on a baking sheet and then transfer to freezer bags for up to a month. To thaw, leave at room temperature for about an hour.
When reheating, avoid the microwave as it can soften the cookies too much and mess with the icing. Instead, warm briefly in a low oven (around 300°F or 150°C) for 3–4 minutes to refresh their texture without melting decorations.
Interestingly, the icing flavors tend to mellow and blend a bit overnight, making the taste even richer the next day—so if you’re prepping ahead, these cookies will still shine.
Nutritional Information & Benefits
Each baseball mitt-shaped cookie pop contains approximately 150-170 calories depending on size and decoration. They provide a moderate amount of carbohydrates from the flour and sugar, some fat from the butter, and a small amount of protein from the egg.
Key ingredients like butter and eggs contribute essential nutrients like vitamin A and choline, while the vanilla extract adds flavor without calories. This recipe is naturally free from artificial preservatives and colors if you choose natural food coloring or simple glaze.
If you opt for gluten-free or vegan adaptations, these cookie pops can fit into common dietary restrictions, making them accessible for many team members. Just be mindful of nut allergies if using almond flour or nut-based substitutes.
From a wellness perspective, these cookie pops are a fun treat that fits well into balanced eating—perfect for celebrating wins or enjoying as a reward after practice without going overboard.
Conclusion
These Fun Homemade Baseball Mitt-Shaped Cookie Pops are more than just a sweet snack—they’re a playful way to bring the team together and add a bit of homemade charm to any game day. The recipe’s simplicity and adaptable nature make it a go-to for busy parents or snack-savvy hosts who want to impress without stress.
I love these cookie pops because they carry a bit of magic—turning everyday ingredients into something personal and memorable. Whether you’re baking for a whole team or just your little slugger, these mitt-shaped treats capture the fun spirit of baseball in every bite.
Give them a try, tweak the decorations to your liking, and share how they scored with your crew. I’d love to hear your stories and see your creative takes on this recipe!
FAQs
Can I make the cookie dough ahead of time?
Yes! You can prepare the dough up to 2 days in advance and keep it refrigerated. Bring it to room temperature before rolling and cutting.
What if I don’t have cookie sticks?
No worries! You can serve these as regular cookies without sticks, or use sturdy pretzel rods or even clean wooden skewers as alternatives.
How do I prevent the cookie sticks from falling out?
Insert the sticks gently before baking so the dough holds them as it bakes. Avoid pushing too deep. Alternatively, poke holes after baking and insert sticks once cookies cool.
Can I decorate these with frosting instead of royal icing?
You can, but frosting may not dry as firm and could be messier for pops. A simple glaze or royal icing works best for details and durability.
Are these cookies suitable for freezing?
Yes! Freeze baked and decorated cookie pops in a single layer, then store in airtight bags for up to 1 month. Thaw at room temperature before serving.
Pin This Recipe!

Baseball Mitt-Shaped Cookie Pops
Fun homemade cookie pops shaped like baseball mitts, perfect for team snacks and game day treats. These buttery, soft cookies are easy to make and customizable with icing or glaze.
- Total Time: 40-42 minutes
- Yield: About 12 cookie pops 1x
Ingredients
- 2 ¾ cups (345 g) all-purpose flour
- 1 teaspoon baking powder
- ½ teaspoon salt
- 1 cup (227 g) unsalted butter, softened
- 1 cup (200 g) granulated sugar
- ¼ cup (50 g) packed light brown sugar
- 1 large egg, room temperature
- 1 teaspoon pure vanilla extract
- 2 tablespoons (30 ml) milk (dairy or dairy-free)
- About 12 cookie sticks or lollipop sticks
- Royal icing or colored glaze (optional, for decorating)
Instructions
- Preheat your oven to 350°F (175°C). Line two baking sheets with parchment paper or silicone mats.
- In a medium bowl, whisk together the flour, baking powder, and salt. Set aside.
- In a large bowl, beat the softened butter with granulated sugar and light brown sugar until light and fluffy, about 3 to 4 minutes.
- Beat in the egg and vanilla extract until combined.
- Gradually add the flour mixture to the butter mixture, alternating with milk. Mix until just combined; avoid overmixing.
- Turn dough onto a lightly floured surface and roll to about ¼ inch (6 mm) thickness.
- Cut out baseball mitt shapes using a sharp knife or template.
- Insert cookie sticks gently into the base of each mitt, being careful not to poke through.
- Place cookie pops on baking sheets spaced 2 inches apart.
- Bake for 10–12 minutes until edges start to turn golden but cookies remain soft.
- Transfer cookies to a cooling rack and cool completely before decorating.
- Decorate with royal icing or colored glaze to add mitt finger lines and stitching details. Let icing dry fully before serving.
Notes
If dough is too sticky, chill in fridge for 15–20 minutes before rolling. Insert sticks gently before baking to avoid loosening. For gluten-free, use 1:1 gluten-free flour blend and add xanthan gum if needed. For dairy-free, substitute butter with vegan margarine and milk with plant-based milk. Decorate with royal icing or simple glaze. Avoid overbaking to keep cookies tender but sturdy.
- Prep Time: 30 minutes
- Cook Time: 10-12 minutes
- Category: Snack
- Cuisine: American
Nutrition
- Serving Size: 1 cookie pop
- Calories: 150170
- Sugar: 12
- Sodium: 90
- Fat: 7
- Saturated Fat: 4
- Carbohydrates: 22
- Fiber: 0.5
- Protein: 2
Keywords: baseball mitt cookies, cookie pops, team snack, homemade cookies, game day treats, baseball party, sugar cookies


