
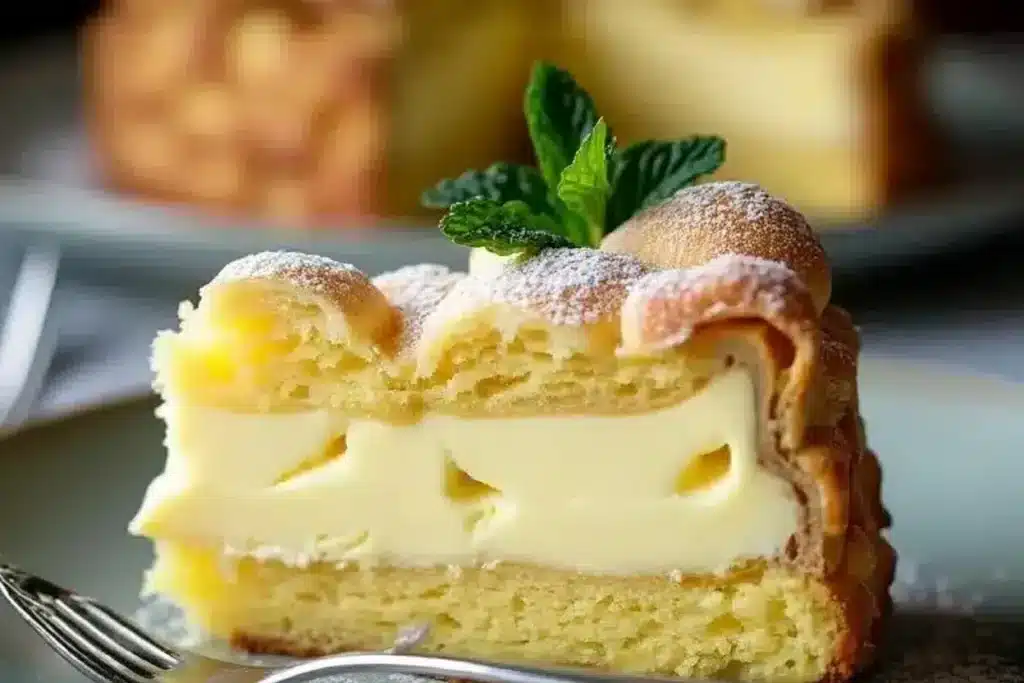
If you’ve never had Karpatka before, let me introduce you to what might just become your new favorite dessert! This Polish cream cake combines a light, flaky choux pastry with a rich and silky custard filling. Imagine biting into something that’s both creamy and airy, with just the right amount of sweetness. Trust me, once you try this irresistible Karpatka recipe, you’ll wonder how you ever lived without it.
Karpatka, or Polish Carpathian Cream Cake, is a dessert that’s as fun to look at as it is to eat. The signature peaks and valleys of the pastry resemble the Carpathian Mountains, which is where the name comes from. It’s a dessert that’s impressive enough for holidays but simple enough to make on a cozy weekend. Ready to dive in?
The Story Behind Karpatka
Karpatka is a traditional Polish dessert that has roots in the country’s love for custard-filled pastries. It’s essentially an easier, more rustic version of the French mille-feuille but with a uniquely Polish twist. Instead of using puff pastry, Karpatka relies on choux pastry, which gives it that distinctive mountainous appearance once baked.
Growing up, Karpatka was a staple at family gatherings. My grandmother would always make it for Easter or Christmas, and I’d eagerly wait for my slice. The rich custard filling paired with the delicate pastry felt like a little slice of heaven. Even now, the smell of the dough baking in the oven takes me straight back to her kitchen.
Over time, the recipe has evolved. Some versions incorporate powdered sugar on top, while others use a glaze. The custard filling can be tweaked too—some use vanilla, others add a hint of lemon. No matter how you make it, Karpatka remains a beloved classic in Polish homes, especially because it’s not overly complicated to prepare.
Ingredients for Irresistible Karpatka
Let’s break down the ingredients for this easy Polish cream cake. Each one plays a vital role in creating the perfect balance of textures and flavors.
For the Choux Pastry:
- 1 cup (240 ml) water: Essential for creating steam, which helps the pastry puff up.
- 1/2 cup (115 g) unsalted butter: Adds richness and flavor to the dough.
- 1 cup (130 g) all-purpose flour: The base of the pastry—make sure to measure it accurately.
- 4 large eggs: They provide structure and help the dough rise beautifully.
- 1/4 tsp salt: Just a pinch to balance the flavors.
For the Custard Filling:
- 2 cups (480 ml) whole milk: For a creamy, rich custard.
- 1/2 cup (100 g) granulated sugar: Adds sweetness—adjust to taste if you prefer less sugar.
- 4 large egg yolks: These make the custard velvety and rich.
- 1/4 cup (30 g) cornstarch: Helps thicken the custard to the perfect consistency.
- 1 tsp vanilla extract: For that classic, aromatic flavor.
- 1/4 cup (55 g) unsalted butter: Adds a silky finish.
Optional Garnish:
- Powdered sugar for dusting
Ingredient Tips:
When making the custard, I recommend using high-quality vanilla extract—it makes a noticeable difference! If you’re out of cornstarch, you can substitute it with the same amount of all-purpose flour, but the custard may be slightly less smooth. For the pastry, don’t skip the salt; it enhances the overall flavor.
Equipment You’ll Need
Here’s what you’ll need to make Karpatka:
- Medium saucepan: For preparing both the choux dough and custard.
- Mixing bowls: A few for different components.
- Whisk: Essential for a lump-free custard.
- Baking sheet: Line it with parchment paper for easy cleanup.
- Electric mixer: Optional, but helpful for beating the eggs into the dough.
- Offset spatula: Makes spreading the custard even easier.
If you don’t have an electric mixer, don’t worry—old-fashioned elbow grease will work just fine! And for the baking sheet, make sure it’s large enough to accommodate your pastry layers.
How to Make Karpatka
- Prepare the choux pastry: In a medium saucepan, combine the water, butter, and salt. Bring to a boil, then reduce the heat to low and stir in the flour until the mixture forms a ball. Let it cool for 5 minutes.
- Add the eggs: One at a time, beat the eggs into the dough. You can use an electric mixer or a wooden spoon. The dough should be smooth and glossy.
- Bake the pastry: Preheat your oven to 400°F (200°C). Spread the dough into two even layers on parchment-lined baking sheets. Bake for 25–30 minutes or until golden and puffed.
- Make the custard: In a saucepan, heat the milk until warm. In a bowl, whisk the sugar, egg yolks, cornstarch, and vanilla. Slowly whisk the warm milk into the egg mixture, then return it to the saucepan. Cook over medium heat until thickened. Stir in the butter and let cool.
- Assemble the cake: Place one layer of pastry on a serving plate. Spread the custard evenly on top, then cover it with the second layer of pastry. Dust with powdered sugar.
- Chill and serve: Refrigerate the cake for at least 2 hours before slicing. This allows the custard to set beautifully.
Pro tip: If your custard looks lumpy, don’t panic! Just strain it through a fine-mesh sieve to smooth it out.
Cooking Tips for Perfect Karpatka
Getting the perfect Karpatka requires a bit of finesse, but don’t worry—I’ve got you covered.
- Don’t open the oven door: While the pastry is baking, resist the urge to peek! The sudden drop in temperature can cause it to deflate.
- Cool the pastry completely: Before assembling, make sure the pastry layers are fully cooled. Otherwise, the custard might melt.
- Chill the custard: For easier spreading, let the custard chill in the fridge for at least 30 minutes.
- Use a serrated knife: To slice the cake cleanly, a serrated knife works best. It cuts through the delicate pastry without squishing the custard.
Variations and Adaptations
Karpatka is delightfully versatile, so feel free to experiment!
- Lemon custard: Add a teaspoon of lemon zest to the custard for a bright, citrusy flavor.
- Chocolate glaze: Skip the powdered sugar and drizzle melted chocolate on top instead.
- Gluten-free version: Use a 1:1 gluten-free flour blend for the pastry and cornstarch for the custard.
I once tried adding a layer of raspberry jam under the custard, and it was amazing! The tartness balanced the sweetness perfectly.
Serving and Storage Suggestions
Karpatka is best served chilled, straight from the fridge. It pairs wonderfully with a cup of coffee or tea. For a fancier presentation, sprinkle the top with powdered sugar right before serving.
To store, cover the cake tightly and refrigerate for up to 3 days. If you’d like to freeze it, wrap individual slices in plastic wrap and store them in an airtight container for up to 1 month. Just thaw in the fridge before enjoying.
Reheating isn’t necessary since Karpatka is meant to be served cold, but the custard flavors do deepen after a day in the fridge, making leftovers even better!
Nutritional Information and Benefits
While Karpatka is definitely a treat, it does have a few redeeming qualities! The eggs and milk in the custard provide protein and calcium, and the moderate sweetness means it’s not overly indulgent. Each slice (based on 12 servings) has approximately:
- Calories: 280
- Fat: 15g
- Carbohydrates: 30g
- Protein: 6g
Of course, this isn’t a dessert you’d eat every day, but it’s perfect for special occasions or when you’re craving something homemade and comforting.
Why You’ll Love This Recipe
Karpatka is one of those desserts that feels like a labor of love, but it’s not as complicated as it looks. The combination of textures—the light, crispy pastry and silky custard—makes every bite a delight. Plus, it’s a recipe that connects me to my heritage and brings back cherished memories of family gatherings.
I’d love to hear how your Karpatka turns out! If you try this recipe, let me know in the comments, or share your photos on social media. Don’t forget to pin this recipe for later, and happy baking!
FAQs About Karpatka
Can I make Karpatka ahead of time?
Yes, you can! It’s best made a day in advance so the custard has time to set.
What’s the best way to store Karpatka?
Keep it covered in the fridge for up to 3 days. It’s not ideal for room temperature storage.
Can I use store-bought custard?
You can, but homemade custard gives the best flavor and texture.
Why did my pastry deflate?
It’s likely due to opening the oven door too soon. Make sure to bake it fully before checking.
Can I double the recipe?
Absolutely! Just make sure to bake the pastry in batches if your oven isn’t large enough.


