
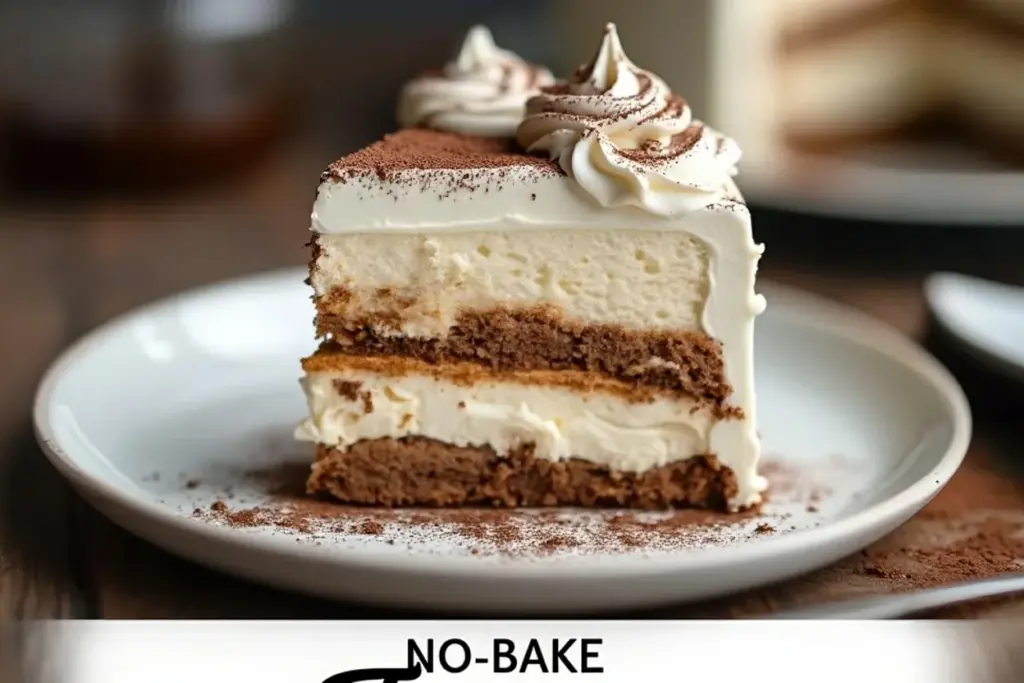
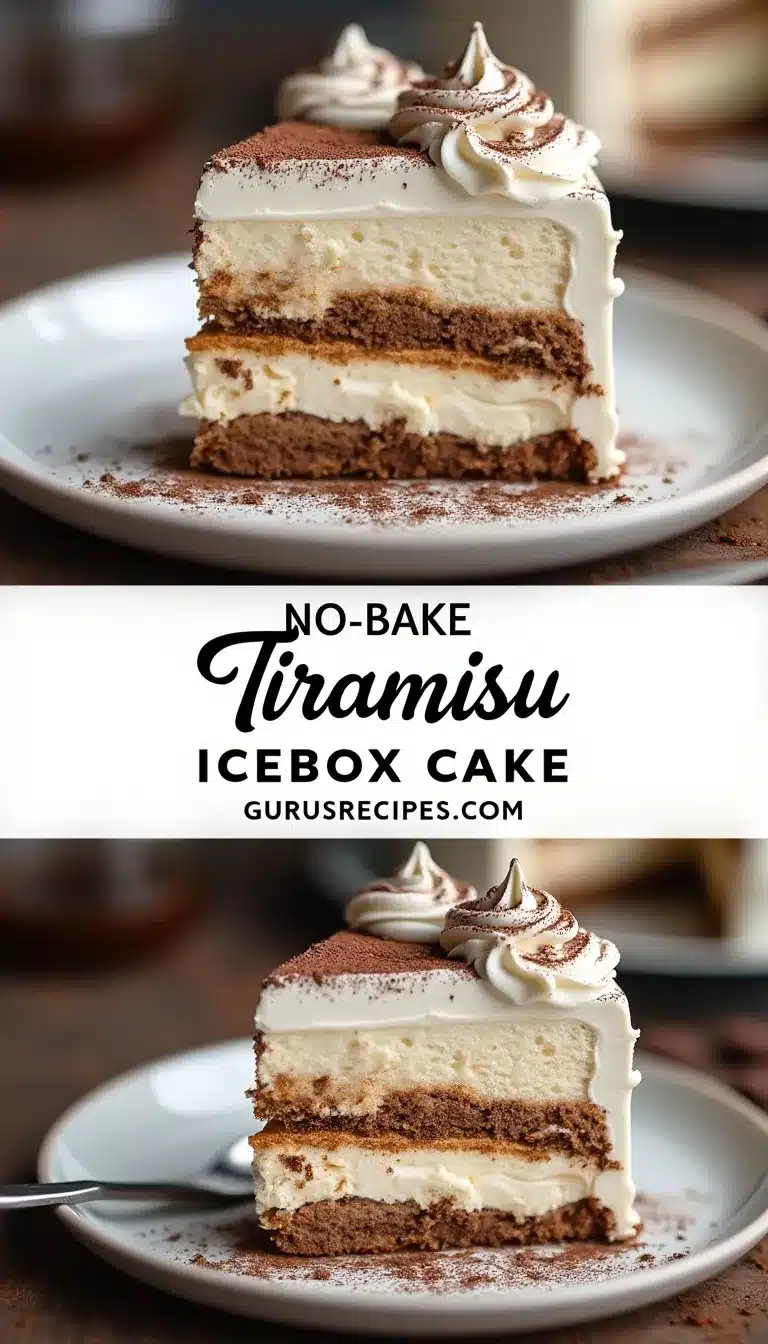
One bite of this no-bake tiramisu icebox cake and you’ll understand why it’s my summer go-to. Imagine layers of pillowy marshmallow cream, espresso-soaked ladyfingers, and a cloud of whipped mascarpone—no oven required. The first time I whipped this up, I was desperate for a show-stopping dessert that didn’t leave my kitchen looking like a disaster zone (you know how it is). The best part? This dessert tastes like you spent hours on it, but honestly, it’s so easy you could make it with one hand tied behind your back.
My love affair with tiramisu started in a tiny café in Rome, but it wasn’t until I discovered the magic of icebox cakes that I figured out how to bring that creamy, coffee-kissed flavor home—without the fuss. This no-bake tiramisu icebox cake takes the classic Italian favorite and gives it a laid-back makeover. The marshmallow layer adds a subtle sweetness and velvety texture, while the espresso gives you that perfect pick-me-up. Whether you’re hosting brunch, feeding a crowd, or just need something sweet after dinner, this dessert fits the bill every time.
I’ve made this recipe more times than I can count, and it’s never let me down. It’s ideal for busy families, tired parents (who still want to impress), or anyone who wants a little taste of Italy at home—minus the jet lag. If you love classic tiramisu but hate the idea of raw eggs or turning on the oven, trust me, this is the recipe you’ve been waiting for. The no-bake tiramisu icebox cake is all about flavor, fun, and way less effort than you’d expect. So, apron on or off, let’s make dessert the easiest part of your day.
Why You’ll Love This No-Bake Tiramisu Icebox Cake
- Zero Baking Required: Ditch the oven and keep your kitchen blissfully cool—this cake sets in the fridge, not the oven.
- Dreamy Texture: Thanks to the marshmallow layer, you get a soft-as-clouds bite that melts in your mouth, layered with the slight chew of ladyfingers.
- Coffee Shop Flavors: Deep espresso notes mingle with creamy mascarpone and a hint of cocoa—like your favorite café treat, but homemade (and easier).
- Perfect for Parties: Make it a day ahead, slice and serve straight from the fridge—no last-minute stress. It feeds a crowd and always gets rave reviews (seriously, I’ve had guests ask for seconds before I even sit down).
- Customizable for Any Occasion: Dress it up for holidays, birthdays, or just a random Tuesday night treat. It’s as pretty as it is practical.
- Kid-Friendly and Grown-Up Approved: The marshmallow layer softens the espresso’s edge, making it approachable for younger palates (decaf works, too!).
- Reliable Results: After testing this recipe about a dozen times, I can say with confidence: it always sets up beautifully and slices like a dream.
Unlike traditional tiramisu, this no-bake tiramisu icebox cake skips the fuss of separating eggs or whipping up a zabaglione. You just layer, chill, and eat. The marshmallow cream is my secret twist—it gives the whole dessert a light, almost mousse-like texture without making it too sweet. Plus, if you’ve ever worried about raw eggs in tiramisu, you can rest easy here.
This dessert is the kind that makes you close your eyes after the first bite. It’s comfort food reimagined—fast, fuss-free, and still totally satisfying. I’ve served it at family gatherings, book clubs, and even brought it to a picnic once (pro-tip: keep it chilled until serving). The compliments never stop coming. If you want a dessert that impresses without stress, this no-bake tiramisu icebox cake is your new best friend.
What Ingredients You Will Need
This recipe uses simple, wholesome ingredients to deliver bold flavor and that signature tiramisu texture—no fancy shopping trips required. Most of these are pantry or fridge staples, and you can swap in a few things if you need to (I’ll share my tricks!).
- Ladyfingers (about 24, 200g): Classic, crisp Italian ladyfingers (savoiardi) are best. If you can’t find them, plain vanilla wafers work in a pinch (but the texture will be a bit softer).
- Espresso or Strong Coffee (1 cup, 240ml): Use freshly brewed espresso for bold flavor, or strong drip coffee. Decaf is totally fine if you’re serving kids.
- Mascarpone Cheese (1 cup, 225g): Rich and creamy, this is essential for that authentic tiramisu flavor. If you can’t find mascarpone, use full-fat cream cheese, but let it come to room temp first.
- Heavy Whipping Cream (1 cup, 240ml): Whips up fluffy and light—don’t skimp here! I like to use organic cream for the best texture.
- Marshmallow Creme or Fluff (1 cup, 250g): This is the secret ingredient! It adds sweetness and that irresistibly soft texture. I usually grab Jet-Puffed or a store-brand version.
- Powdered Sugar (1/2 cup, 60g): Sifts in smoothly—no grainy texture. Adjust to taste if you like it a bit sweeter or less so.
- Pure Vanilla Extract (2 teaspoons): Rounds out the flavors. Real vanilla makes a difference here.
- Unsweetened Cocoa Powder (for dusting): Just a sprinkle on top adds that classic tiramisu finish. Use Dutch-processed for a deeper color, but any unsweetened variety works.
- Optional: Dark chocolate shavings, a splash of liqueur (like Kahlúa or amaretto), or a pinch of instant espresso powder for extra oomph.
Ingredient Tips:
- If your mascarpone is a little firm, let it sit out for 30 minutes before mixing—it’ll blend better.
- Use cold whipping cream for fluffier peaks.
- To keep things gluten-free, sub in gluten-free ladyfingers or even layers of gluten-free graham crackers.
- For a lighter version, try light cream cheese and a lower-sugar marshmallow fluff.
- Looking for a dairy-free twist? Use coconut whipped cream and a dairy-free cream cheese substitute—the flavor will be different, but still delicious.
I’ve tried a bunch of brands and usually stick with BelGioioso for mascarpone and Lavazza for espresso, but honestly, use what you have. The beauty of this no-bake tiramisu icebox cake is that it’s forgiving and flexible—just the way I like my desserts.
Equipment Needed
- 8×8-inch (20x20cm) Baking Dish or Similar: A glass or ceramic dish works best so you can see the pretty layers. You can use a trifle bowl or even a loaf pan in a pinch—just adjust the layering as needed.
- Electric Mixer or Stand Mixer: For whipping the cream and mascarpone together. A sturdy whisk and some elbow grease can work if you don’t mind a workout.
- Mixing Bowls: At least one large and one medium. Stainless steel or glass bowls are my go-tos because they chill quickly and keep cream cold.
- Rubber Spatula: To fold and spread the layers smoothly. I once tried using a spoon, but honestly, the spatula makes things way easier.
- Measuring Cups and Spoons: For accuracy—especially with cream and coffee.
- Fine Mesh Sieve: For dusting cocoa powder evenly on top. If you don’t have one, a tea strainer works great too.
Alternatives & Tips:
- If you only have a 9×9-inch (23x23cm) dish, your layers will be a bit thinner but still yummy.
- For individual servings, assemble in mason jars or pretty glasses—great for parties!
- I recommend washing your beaters and bowls between whipping cream and mixing mascarpone—keeps everything fluffy.
- Budget-friendly: No need for fancy mixers—handheld electric beaters from the thrift store have saved me more than once!
How to Make No-Bake Tiramisu Icebox Cake
- Brew the espresso or coffee: Make 1 cup (240ml) of strong espresso or coffee. Let it cool to room temperature. (Hot coffee will make the ladyfingers too soggy.)
- Whip the cream: In a large bowl, pour 1 cup (240ml) heavy whipping cream. Beat with an electric mixer on medium-high until stiff peaks form (about 2–3 minutes). Set aside.
- Prepare the mascarpone mixture: In another bowl, combine 1 cup (225g) mascarpone cheese, 1 cup (250g) marshmallow creme, 1/2 cup (60g) powdered sugar, and 2 teaspoons vanilla extract. Beat until smooth and creamy (about 1–2 minutes). (If the mascarpone seems lumpy, just keep mixing—it’ll smooth out.)
- Fold in the whipped cream: Gently fold the whipped cream into the mascarpone mixture with a rubber spatula. Don’t overmix—you want it fluffy.
- Layer the ladyfingers: Quickly dip each ladyfinger into the cooled coffee (about 1–2 seconds per side—too long and they’ll fall apart!). Arrange a single layer over the bottom of your dish. You may need to break some to fit the edges.
- Add the cream layer: Spread half the mascarpone-marshmallow mixture evenly over the ladyfingers. Use the spatula to nudge it right to the edges.
- Repeat: Add another layer of dipped ladyfingers, followed by the remaining mascarpone-marshmallow cream. Smooth the top nicely—it’ll look extra inviting once dusted.
- Chill: Cover the dish tightly with plastic wrap or a lid. Refrigerate for at least 6 hours, or overnight if possible. (Overnight is best for perfect sliceable layers, but I’ve gotten away with 4 hours in a pinch.)
- Finish with cocoa: Right before serving, sift a generous layer of cocoa powder over the top. Add chocolate shavings if you feel fancy.
- Slice and serve: Cut into squares using a sharp knife wiped clean between slices. Serve cold, and watch it disappear!
Prep Notes: If your cream isn’t whipping, try chilling your bowl and beaters first. If the mascarpone mixture looks loose, a quick 10-minute chill in the fridge firms it right up. If the ladyfingers are too crunchy after chilling, let the cake rest at room temp for 10 minutes before serving.
Personal Tip: I always taste my coffee before dipping the ladyfingers—sometimes I add a teaspoon of sugar or a splash of coffee liqueur for extra flavor. And if you’re short on time, you can even assemble this cake in single-serving cups—no slicing needed!
Cooking Tips & Techniques
- Don’t Oversoak the Ladyfingers: The trickiest part is the dunk. Too much coffee and they’ll turn mushy; too little and you miss that signature tiramisu flavor. Quick dips—literally 1–2 seconds—are all you need.
- Keep Everything Cold: Cold ingredients whip up fluffier, and the cake sets better. I once made the mistake of letting my whipped cream sit out—ended up soupy. Now, I chill my bowls and keep my cream cold until the last second.
- Layer Evenly: Use a spatula to spread the mascarpone-marshmallow cream evenly to every corner. This helps each bite have the right balance of creamy and cakey layers.
- Chill Time is Key: Don’t cheat the chill. The longer it rests, the more the flavors meld and the ladyfingers soften to that perfect, cake-like texture.
- For Clean Slices: Wipe your knife between cuts and use a thin, sharp blade. Trust me, it makes all the difference for pretty squares.
- Adjust Sweetness: Marshmallow fluff can vary in sweetness. Taste your mascarpone mixture before layering and adjust with a sprinkle more powdered sugar if you like.
Personal Failures & Fixes: The first time I made this, I let the ladyfingers soak too long and ended up with tiramisu soup. Lesson learned: quick dips only! Also, once my mascarpone was too cold and wouldn’t blend smoothly—I let it sit out for 10 minutes and it mixed up perfectly.
Multitasking Tip: While the coffee cools, whip up the cream and mascarpone mixture. You’ll be amazed how quickly it all comes together. For extra consistency, always use full-fat dairy—low-fat just doesn’t hold up as well in the fridge.
Variations & Adaptations
- Alcohol-Free: Skip any liqueur and use decaf coffee for a kid-friendly version. I do this when making it for family gatherings with little ones.
- Gluten-Free: Swap in gluten-free ladyfingers or even gluten-free graham crackers. The texture changes a bit, but it’s still delicious and totally safe for gluten-sensitive friends.
- Berry Tiramisu Icebox Cake: Add a layer of sliced strawberries or raspberries between the ladyfinger and cream layers. In the summer, I love tossing in a handful of blueberries for a fresh twist.
- Chocolate Lover’s Version: Use chocolate ladyfingers or add a layer of chocolate ganache in the middle. You can even sprinkle mini chocolate chips on top for more texture.
- Dairy-Free: Try coconut cream and a dairy-free cream cheese substitute. The flavor is coconut-forward, but it’s still rich and satisfying. Marshmallow fluff is usually dairy-free, but double-check your brand.
- Personal Favorite: I sometimes add a splash of amaretto or dark rum to the coffee for a grown-up kick—just a tablespoon or two. It gives the cake a lovely depth without overpowering the other flavors.
Feel free to mix and match flavors, swap in whatever you have on hand, or get creative with the toppings. No-bake tiramisu icebox cake is meant to be fun, fuss-free, and totally customizable.
Serving & Storage Suggestions
Serving: This no-bake tiramisu icebox cake is best served cold, straight from the fridge. For parties, I like to dust the top with extra cocoa powder and add chocolate curls or a sprinkle of espresso powder. Slice into neat squares and serve on a pretty platter or in individual dessert bowls.
Pairings: Coffee or espresso is an obvious match, but it also pairs beautifully with dessert wines, a simple glass of milk, or even a scoop of vanilla gelato on the side (if you’re feeling extra indulgent!).
Storage: Cover leftovers tightly and store in the refrigerator for up to 4 days. The flavors get even better as it sits! If you want to freeze it, wrap individual slices in plastic wrap, then foil, and freeze up to 1 month. Thaw overnight in the fridge before serving—texture will be a little softer, but still tasty.
Reheating: No reheating needed (yay!). Just let it sit out for 5–10 minutes if it’s very firm from the fridge for the creamiest texture.
Flavor Tip: The longer it chills, the more the flavors meld. Sometimes I sneak a slice on day two—it’s even dreamier!
Nutritional Information & Benefits
Estimated Nutrition (per serving, 1/9 of the pan):
- Calories: 310
- Fat: 18g
- Carbohydrates: 32g
- Protein: 4g
- Sugar: 19g
Key Benefits: The no-bake tiramisu icebox cake is a source of calcium thanks to mascarpone and cream, and you get a little pick-me-up from the espresso. If you use gluten-free ladyfingers, it’s safe for celiac diets. You can also adjust the sweetness and dairy content for your own needs.
Potential allergens include dairy, eggs (in some ladyfingers), and gluten. Always check your labels if you’re making this for someone with sensitivities. Personally, I love that this recipe is lighter than traditional tiramisu (no egg yolks, less sugar) but still totally hits the spot.
Conclusion
This no-bake tiramisu icebox cake is proof that dessert doesn’t have to be complicated to be amazing. It’s rich, creamy, and packed with flavor—yet so simple, you’ll want to make it on repeat. Whether you’re a tiramisu purist or just love a good marshmallow dessert, this recipe is going to become a fast favorite.
Don’t be afraid to play with the flavors to suit your family. Every time I make it, I remember why I love sharing food that’s both easy and unforgettable. If you try it, let me know how it goes—drop a comment, share your twist, or snap a picture for Pinterest. There’s nothing better than seeing your kitchen wins!
So grab your ingredients, call a friend or two, and treat yourself to a slice of this irresistible, effortless delight. Happy no-baking!
Frequently Asked Questions
Can I make no-bake tiramisu icebox cake ahead of time?
Absolutely! In fact, it’s even better if you make it the day before. The flavors meld, and the texture sets up beautifully overnight in the fridge.
Can I use cream cheese instead of mascarpone?
Yes, full-fat cream cheese works well if you can’t find mascarpone. Let it come to room temperature before mixing for the smoothest results.
Is this dessert safe for kids?
It can be! Use decaf coffee or even hot chocolate for dipping the ladyfingers to keep it kid-friendly. Skip any alcohol for little ones.
How do I keep the ladyfingers from getting soggy?
Dunk each ladyfinger quickly—just 1–2 seconds in the coffee. If they’re too soft before layering, they’ll turn mushy during chilling.
Can I freeze leftovers?
Yes! Wrap slices tightly in plastic and foil, then freeze for up to one month. Thaw in the fridge overnight before serving. The texture softens a bit, but it’s still delicious.

No-Bake Tiramisu Icebox Cake
This easy no-bake tiramisu icebox cake layers espresso-soaked ladyfingers, fluffy marshmallow mascarpone cream, and a dusting of cocoa for a show-stopping dessert—no oven required. It’s the perfect fuss-free treat for summer parties, brunches, or whenever you crave a taste of Italy at home.
- Total Time: 6 hours 20 minutes (includes chilling)
- Yield: 9 servings 1x
Ingredients
- 24 ladyfingers (about 7 oz or 200g)
- 1 cup (8 oz or 240ml) espresso or strong coffee, cooled
- 1 cup (8 oz or 225g) mascarpone cheese, room temperature
- 1 cup (8 oz or 240ml) heavy whipping cream, cold
- 1 cup (8 oz or 250g) marshmallow creme or fluff
- 1/2 cup (2 oz or 60g) powdered sugar
- 2 teaspoons pure vanilla extract
- Unsweetened cocoa powder, for dusting
- Optional: Dark chocolate shavings, splash of liqueur (Kahlúa or amaretto), pinch of instant espresso powder
Instructions
- Brew 1 cup of strong espresso or coffee and let it cool to room temperature.
- In a large bowl, whip the heavy cream with an electric mixer on medium-high until stiff peaks form (about 2–3 minutes). Set aside.
- In another bowl, beat together mascarpone cheese, marshmallow creme, powdered sugar, and vanilla extract until smooth and creamy (about 1–2 minutes).
- Gently fold the whipped cream into the mascarpone mixture with a rubber spatula until just combined and fluffy.
- Quickly dip each ladyfinger into the cooled coffee for 1–2 seconds per side. Arrange a single layer of dipped ladyfingers in the bottom of an 8×8-inch baking dish.
- Spread half of the mascarpone-marshmallow mixture evenly over the ladyfingers.
- Repeat with another layer of dipped ladyfingers and the remaining cream mixture. Smooth the top.
- Cover tightly and refrigerate for at least 6 hours, preferably overnight, to set.
- Before serving, dust the top generously with unsweetened cocoa powder and add chocolate shavings if desired.
- Slice into squares with a sharp knife (wiping between cuts) and serve cold.
Notes
For best results, use cold cream and chill your mixing bowls before whipping. Don’t oversoak the ladyfingers—quick dips prevent sogginess. The cake slices best after chilling overnight. For gluten-free, use gluten-free ladyfingers. For a kid-friendly version, use decaf coffee or hot chocolate for dipping. Adjust sweetness to taste by adding more or less powdered sugar. Store leftovers tightly covered in the fridge for up to 4 days or freeze individual slices for up to 1 month.
- Prep Time: 20 minutes
- Cook Time: 0 minutes
- Category: Dessert
- Cuisine: Italian-American
Nutrition
- Serving Size: 1/9 of 8x8-inch pan
- Calories: 310
- Sugar: 19
- Sodium: 120
- Fat: 18
- Saturated Fat: 11
- Carbohydrates: 32
- Protein: 4
Keywords: no-bake, tiramisu, icebox cake, marshmallow, mascarpone, summer dessert, easy dessert, coffee dessert, Italian dessert, kid-friendly, party dessert


