
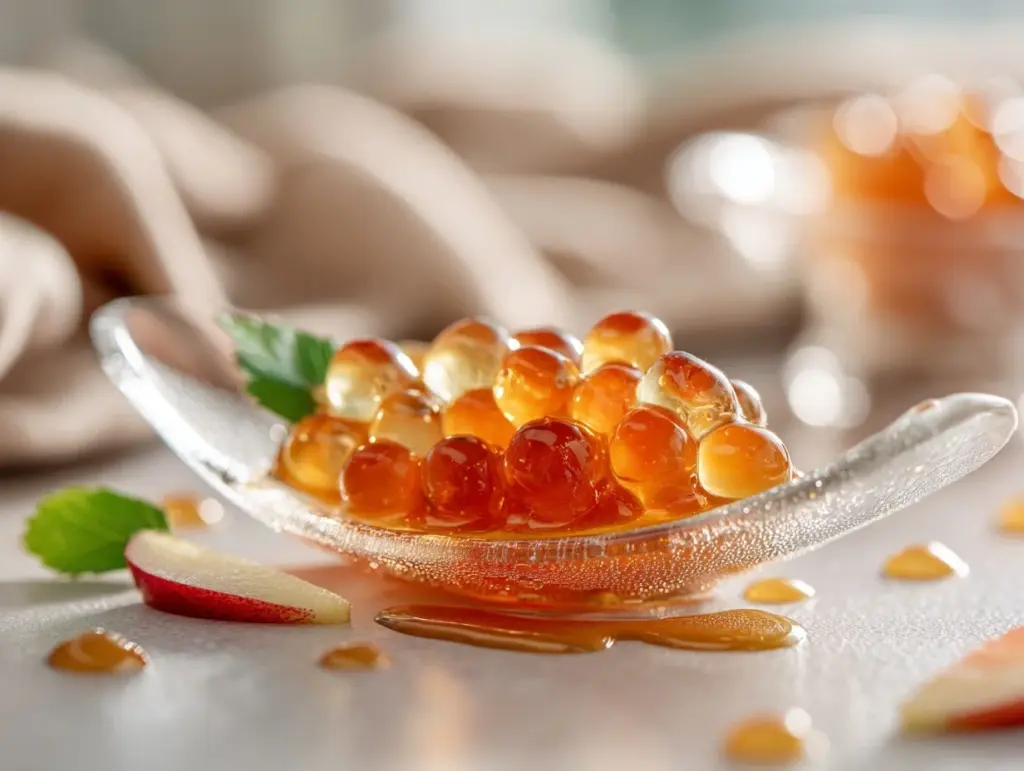
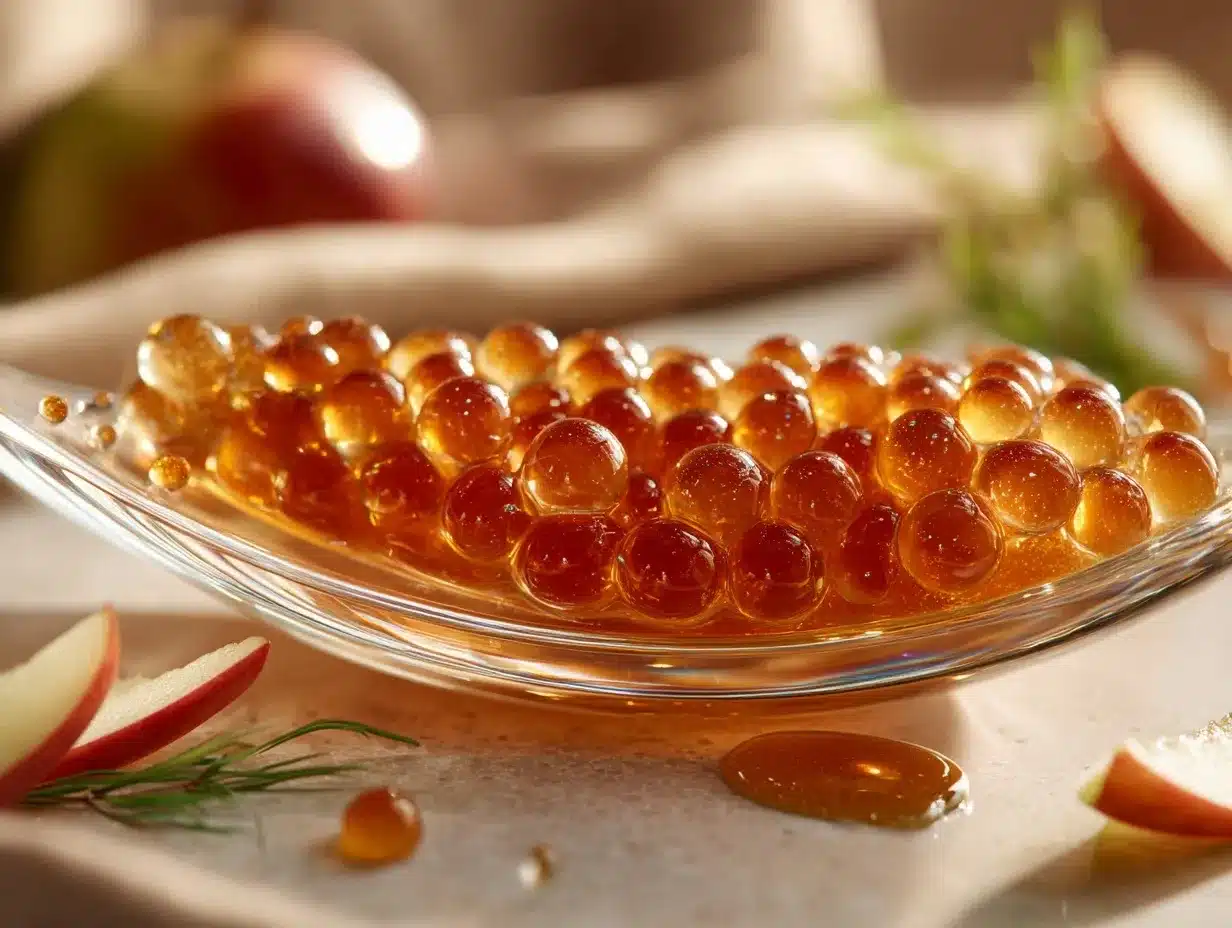
Imagine tiny, shimmering pearls bursting with the sweet-tart flavor of apple cider—sounds like magic, right? Trust me, these Apple Cider Caviar Pearls are the kind of thing that turns a simple dessert into a showstopper. The first time I made them, I felt like a mad scientist in the kitchen, and honestly, I couldn’t stop grinning at the results. This recipe is surprisingly easy to pull off, and it adds a gourmet twist to everything from cakes to cocktails. Whether you’re hosting a fancy dinner or just want to impress yourself, this is the recipe that’ll have people asking, “How did you do that?”
The technique behind these edible pearls is rooted in molecular gastronomy—a fancy name for playing with food science—but don’t worry, you don’t need a lab coat or expensive gadgets. With just a few ingredients and some basic equipment, you’ll be crafting these stunning little gems in no time. Ready to add a touch of elegance to your kitchen repertoire? Let’s dive into the details!
Why You’ll Love This Recipe
- Simple to Make: You only need a handful of ingredients and basic tools, and the results are absolutely stunning.
- Versatile: These Apple Cider Caviar Pearls can be used to garnish desserts, drinks, or even savory dishes for a unique twist.
- Impressive: They look like they came straight out of a gourmet restaurant, but you made them in your own kitchen!
- Fun and Creative: Making these pearls feels a bit like a science experiment, and trust me, it’s so satisfying.
- Flavor-packed: The natural sweetness and tang of apple cider shine through in every bite-sized pearl.
What sets this recipe apart is its blend of simplicity and sophistication. You don’t need advanced cooking skills to pull it off, but the results look like you spent hours crafting them. Plus, the flavor is completely customizable—swap out the apple cider for other liquids like pomegranate juice or even champagne for a twist!
What Ingredients You Will Need
This recipe uses straightforward ingredients that you can easily find at most grocery stores. Here’s what you’ll need:
- Apple cider: Go for a high-quality, unfiltered cider for the best flavor.
- Agar-agar powder: A plant-based thickening agent that’s key to forming the pearls.
- Vegetable oil: Use a neutral oil like canola or sunflower; it should be chilled beforehand.
- Water: Just a small amount to dissolve the agar-agar powder.
- Sugar (optional): Depending on the sweetness of your cider, you might want a teaspoon or two for extra balance.
If you’re looking to switch things up, you can substitute the apple cider with other liquids like cranberry juice or even herbal tea. Just make sure the liquid has a strong flavor to shine through in the pearls.
Equipment Needed
Don’t worry—you won’t need any fancy equipment for this recipe. Here’s what you’ll need:
- Small saucepan: Perfect for heating the apple cider mixture.
- Dropper or syringe: Essential for creating those tiny pearls. If you don’t have one, you can use a pipette or even a teaspoon with careful pouring.
- Mixing bowl: Use this to hold the chilled vegetable oil.
- Fine mesh sieve: For straining the pearls after they form.
- Glass jar or container: Ideal for chilling the vegetable oil beforehand.
Pro tip: Make sure your vegetable oil is ice-cold—it helps the pearls solidify instantly when dropped into the oil. I usually pop mine in the freezer for about 30 minutes before starting.
Preparation Method
- Chill the vegetable oil: Pour the oil into a glass jar or container and place it in the freezer for at least 30 minutes. The colder the oil, the better the pearls will form.
- Prepare the apple cider mixture: In a small saucepan, combine the apple cider with agar-agar powder and optional sugar. Stir well to dissolve the agar-agar completely.
- Heat the mixture: Bring the apple cider mixture to a boil over medium heat, stirring continuously. Once it boils, reduce the heat and simmer for 1-2 minutes to activate the agar-agar.
- Cool slightly: Remove the saucepan from the heat and let the mixture cool for about 5 minutes. It should still be liquid but not too hot.
- Form the pearls: Using a dropper or syringe, gently drop small amounts of the cider mixture into the chilled vegetable oil. Watch as the drops turn into perfect little pearls!
- Strain and rinse: Carefully pour the oil and pearls through a fine mesh sieve. Rinse the pearls under cold water to remove any residual oil.
- Store and serve: Transfer the caviar pearls to a clean container. They’re ready to garnish your favorite dishes or desserts!
It’s a good idea to work quickly when forming the pearls, as the cider mixture will start to set as it cools. If it thickens too much, gently reheat it to liquefy again.
Cooking Tips & Techniques
- Keep the oil cold: The vegetable oil needs to be icy cold for the pearls to solidify properly. Don’t skip the chilling step!
- Use a steady hand: Dropping the cider mixture into the oil requires a bit of patience and precision. A dropper or syringe makes this much easier.
- Work in batches: If you’re making a large amount of pearls, it’s better to divide the cider mixture into batches to prevent it from setting too quickly.
- Experiment with flavors: Don’t limit yourself to apple cider! Try other liquids like fruit juices, coffee, or even cocktails for unique pearls.
- Clean up carefully: Agar-agar can be a bit sticky, so rinse your equipment immediately after use to make cleaning easier.
Variations & Adaptations
Here are a few ways to customize this recipe:
- Different liquids: Swap out apple cider for cranberry juice, orange juice, or even champagne for special occasions.
- Sugar-free version: Skip the sugar entirely for a naturally sweet result from the apple cider.
- Savory twist: Use broth or balsamic vinegar instead of cider to create pearls for savory dishes.
I once made a batch with pomegranate juice, and the vibrant color plus the tart flavor were absolutely stunning on a holiday cheesecake!
Serving & Storage Suggestions
These Apple Cider Caviar Pearls are best served chilled. Here are some ideas:
- Desserts: Use them to garnish cakes, tarts, or panna cotta for a gourmet touch.
- Drinks: Float them in cocktails like champagne or sparkling cider for a fun twist.
- Savory dishes: Add them to salads or cheese plates for a pop of flavor and texture.
To store, keep the pearls in an airtight container in the fridge for up to 3 days. Avoid freezing them, as it can affect their texture. If needed, rinse them in cold water before serving to refresh their appearance.
Nutritional Information & Benefits
Here’s a quick breakdown of the nutritional perks:
- Low-calorie: These pearls are light and won’t weigh down your desserts or dishes.
- Plant-based: Agar-agar is a vegan alternative to gelatin, making this recipe suitable for most diets.
- No artificial additives: Made with natural apple cider, these pearls are free from preservatives.
Just a heads-up: If you’re using a flavored juice, check the label for added sugars to keep things balanced!
Conclusion
If you’ve been looking for a way to add a little culinary magic to your kitchen, these Apple Cider Caviar Pearls are the answer. They’re fun to make, gorgeous to look at, and absolutely delicious to eat. Whether you’re hosting a party or just want to treat yourself, these pearls will elevate any dish in the most delightful way.
Have you tried making edible caviar pearls before? Let me know in the comments how it went or if you have any creative ideas for flavors. And if you loved this recipe, feel free to share it with your friends—they’ll thank you for introducing them to such a unique treat!
Now go ahead, grab your apple cider, and start creating these irresistible little gems. You’ve got this!
FAQs
Can I use gelatin instead of agar-agar?
Agar-agar works best for this recipe because it sets faster and stays firm at room temperature, unlike gelatin, which may require refrigeration to hold its shape.
What’s the best way to chill the vegetable oil?
Place the oil in a glass jar or container and refrigerate it for an hour or freeze it for 30 minutes. Make sure it’s very cold before starting the recipe.
Can I make these pearls ahead of time?
Yes! Store them in an airtight container in the fridge for up to 3 days. Rinse them in cold water before serving to refresh their texture.
What liquids can I use besides apple cider?
You can try cranberry juice, orange juice, herbal tea, or even balsamic vinegar for savory applications. The key is choosing a liquid with a strong flavor.
Do I need special equipment for this recipe?
No fancy gadgets are needed—a dropper or syringe works best, but even a teaspoon can be used with careful pouring.
Pin This Recipe!

Apple Cider Caviar Pearls Recipe Easy Gourmet Dessert Idea
Tiny, shimmering pearls bursting with the sweet-tart flavor of apple cider, perfect for garnishing desserts, drinks, or savory dishes.
- Total Time: 45 minutes
- Yield: 4 servings 1x
Ingredients
- 1 cup high-quality, unfiltered apple cider
- 1 teaspoon agar-agar powder
- 1 cup neutral vegetable oil (e.g., canola or sunflower), chilled
- 2 tablespoons water
- 1–2 teaspoons sugar (optional)
Instructions
- Chill the vegetable oil: Pour the oil into a glass jar or container and place it in the freezer for at least 30 minutes.
- Prepare the apple cider mixture: In a small saucepan, combine the apple cider with agar-agar powder and optional sugar. Stir well to dissolve the agar-agar completely.
- Heat the mixture: Bring the apple cider mixture to a boil over medium heat, stirring continuously. Once it boils, reduce the heat and simmer for 1-2 minutes to activate the agar-agar.
- Cool slightly: Remove the saucepan from the heat and let the mixture cool for about 5 minutes. It should still be liquid but not too hot.
- Form the pearls: Using a dropper or syringe, gently drop small amounts of the cider mixture into the chilled vegetable oil. Watch as the drops turn into perfect little pearls!
- Strain and rinse: Carefully pour the oil and pearls through a fine mesh sieve. Rinse the pearls under cold water to remove any residual oil.
- Store and serve: Transfer the caviar pearls to a clean container. They’re ready to garnish your favorite dishes or desserts!
Notes
[‘Make sure the vegetable oil is ice-cold to help the pearls solidify instantly.’, ‘Work quickly when forming the pearls, as the cider mixture will start to set as it cools.’, ‘If the cider mixture thickens too much, gently reheat it to liquefy again.’, ‘Experiment with different liquids like cranberry juice, orange juice, or champagne for unique flavors.’]
- Prep Time: 40 minutes
- Cook Time: 5 minutes
- Category: Dessert
- Cuisine: American
Nutrition
- Serving Size: 1/4 cup of pearls
- Calories: 30
- Sugar: 2
- Sodium: 5
- Fat: 2
- Carbohydrates: 3
Keywords: Apple cider, caviar pearls, gourmet dessert, molecular gastronomy, easy recipe, vegan dessert, apple cider pearls


