

“Are you seriously putting cream cheese inside a cookie?” my friend texted me one evening, skeptical but intrigued. Honestly, I was half skeptical myself when I first thought about stuffing red velvet cookies with cream cheese. It wasn’t planned—it kind of happened during a frantic weeknight baking session where I just needed a quick, satisfying treat that felt special without too much fuss. I had leftover cream cheese in the fridge and a box of red velvet cake mix that was begging to be used. So, I rolled the dough around little dollops of cream cheese, not really knowing what to expect.
When they came out of the oven, glossy and cracked with that signature crinkle, my kitchen suddenly smelled like a bakery, but better—because these cookies were chewy, rich, and had this creamy surprise inside. My family, usually indifferent to anything that’s not chocolate chip, kept sneaking bites, and I found myself making these chewy red velvet crinkle cookies with cream cheese centers more times that week than I care to admit. The texture was just right—not too cakey, not too dense—and the cream cheese added a smooth tang that balanced the sweetness.
What really sold me on this recipe is how it became my go-to for everything from casual afternoons to impromptu guests. It’s the kind of cookie that looks fancy but doesn’t require a pastry degree or hours in the kitchen. I’ve made these chewy red velvet crinkle cookies with cream cheese centers for friends who swear they’re the best thing since sliced bread, and honestly, I can’t argue. There’s a quiet satisfaction in pulling these out of the oven, watching the centers stay gooey while the edges get perfectly chewy.
So, yeah, I was skeptical at first, but now I get why these cookies stick around in the rotation. They’re comforting, a little indulgent, and somehow they feel like a small celebration in every bite. If you ever find yourself with a bit of cream cheese and a craving for something sweet, give these a shot—you just might find a new favorite, like I did.
Why You’ll Love This Recipe
After making these chewy red velvet crinkle cookies with cream cheese centers multiple times, I can confidently say they hit all the right notes. Here’s why they might just become your favorite cookie, too:
- Quick & Easy: These cookies come together in about 30 minutes, perfect for those evenings when you want a treat but don’t have hours to bake.
- Simple Ingredients: You probably already have most of what you need in your pantry—red velvet cake mix, cream cheese, and a few staples.
- Perfect for Any Occasion: Whether it’s a holiday gathering, a casual coffee date, or a last-minute dessert, these cookies impress without stress.
- Crowd-Pleaser: Even folks who aren’t big on red velvet adore the chewy texture and creamy center—kids and adults alike.
- Unbelievably Delicious: The soft, crinkled exterior paired with the tangy cream cheese core makes each bite a satisfying flavor and texture combo.
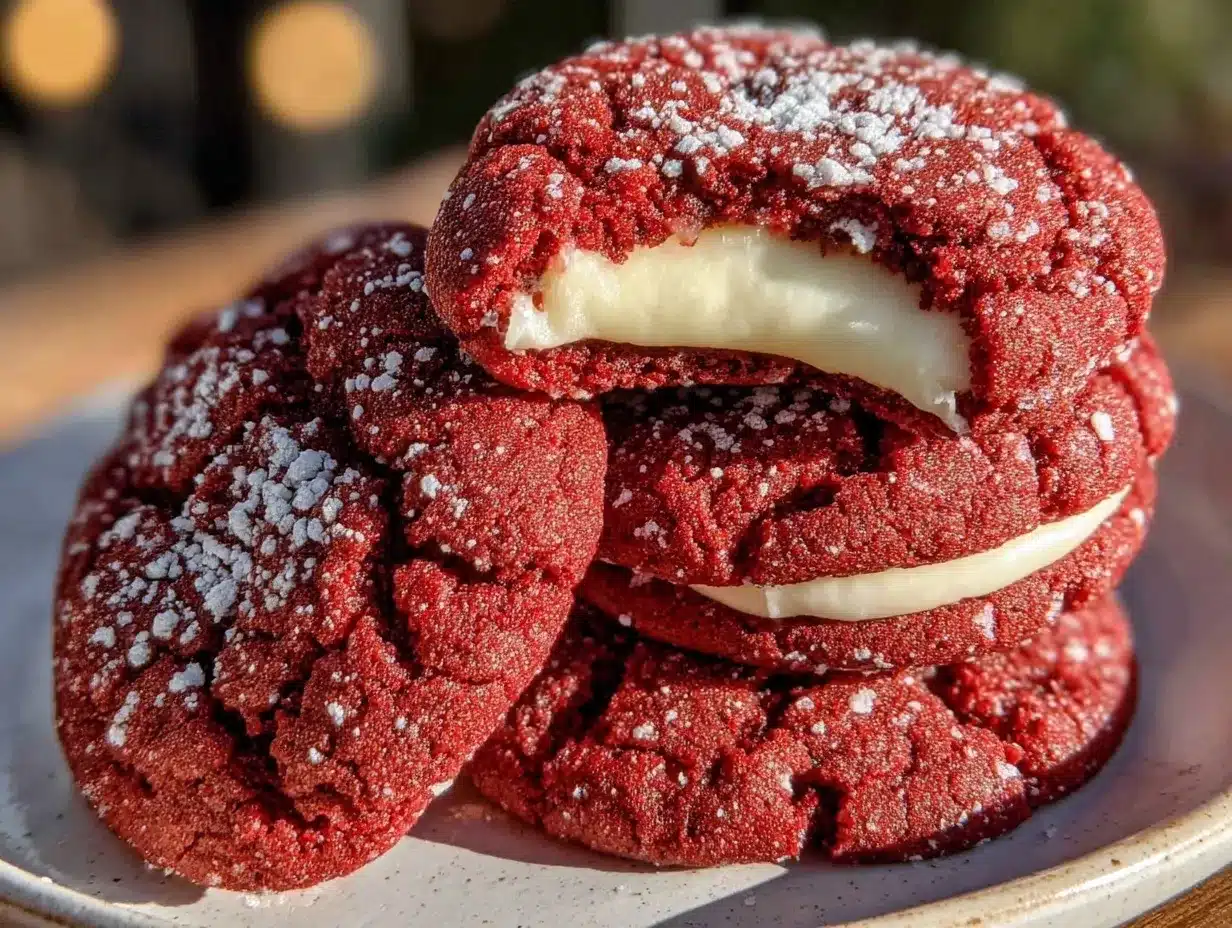
What makes these chewy red velvet crinkle cookies with cream cheese centers stand out is the way the cream cheese filling melts just enough to be creamy but still holds its shape. It’s a subtle twist that’s so rewarding. Plus, the red velvet base is perfectly balanced—not too sweet, with a hint of cocoa—and the crinkles on top add that classic homemade charm. It’s not just a cookie; it’s a little moment of joy you can make anytime.
Honestly, I’ve tried plenty of red velvet cookie recipes, but few capture that chewy softness and rich flavor like this one. It’s a recipe I trust to deliver every time, and that’s why I keep coming back to it, especially when I want something that feels both special and comforting.
What Ingredients You Will Need
This recipe uses simple, wholesome ingredients to deliver bold flavor and satisfying texture without the fuss. Most are pantry staples or easy to find, and you can swap a few to suit your needs.
- Red Velvet Cake Mix (1 box, approx. 15.25 oz / 432 g) – The base of the cookies, providing that classic flavor and vibrant color. I like Betty Crocker for consistent results.
- Cream Cheese (8 oz / 225 g, softened) – This is for the centers, adding a luscious tang and creamy texture. Use full-fat for best flavor.
- Butter (1/2 cup / 113 g, softened) – Adds richness and helps create the chewy texture.
- Egg (1 large, room temperature) – Acts as a binder for the dough.
- Powdered Sugar (1 cup / 120 g) – For rolling the cookies before baking, giving the signature crinkle look and a slight sweetness on the outside.
- Vanilla Extract (1 teaspoon) – Enhances the red velvet flavor.
- Optional: A pinch of salt if your cake mix isn’t salted, to balance the sweetness.
If you want to make these gluten-free, you can look for a gluten-free red velvet cake mix, or even try swapping in almond flour, though the texture will change slightly. For a dairy-free version, coconut cream cheese works surprisingly well in the centers, and vegan butter can replace regular butter.
When it comes to cream cheese, I always recommend a good-quality brand like Philadelphia because it melts nicely without becoming runny. The butter should be softened but not melted, which helps with the dough’s consistency. The powdered sugar coating is key—it’s what gives the cookies that dramatic, snow-dusted crinkle effect that makes them so visually irresistible.
Equipment Needed
- Mixing Bowls: One large for the cookie dough and a smaller one for the cream cheese filling if you want to soften it separately.
- Electric Mixer or Stand Mixer: Helpful for creaming butter and mixing dough evenly, but a sturdy whisk and elbow grease work too.
- Measuring Cups and Spoons: Precision helps keep these cookies consistent.
- Baking Sheets: Rimmed sheets lined with parchment paper or silicone mats to prevent sticking and promote even baking.
- Spoon or Small Ice Cream Scoop: For portioning dough and cream cheese centers uniformly.
- Cooling Rack: Essential for letting cookies cool evenly and avoid sogginess on the bottom.
If you don’t have a stand mixer, mixing by hand is totally doable—just make sure your butter is soft enough to cream easily. For budget-friendly baking, parchment paper is a must-have; it saves cleanup and helps with even baking.
Preparation Method
- Prepare the Cream Cheese Centers (10 minutes): In a small bowl, beat the softened cream cheese with half a tablespoon of powdered sugar until smooth. Using a teaspoon or small scoop, portion into 1 teaspoon-sized balls. Place them on a parchment-lined plate and freeze for at least 15 minutes. This step prevents the cream cheese from melting too much during baking.
- Make the Cookie Dough (10 minutes): In a large bowl, cream together the softened butter and remaining powdered sugar using an electric mixer on medium speed until light and fluffy, about 2 minutes. Beat in the egg and vanilla extract until combined.
- Add the Cake Mix: Gradually add the red velvet cake mix to the wet ingredients, mixing on low until just combined. The dough will be thick and slightly sticky.
- Preheat the Oven: Set your oven to 350°F (175°C) and line baking sheets with parchment paper or silicone mats.
- Assemble the Cookies (15 minutes): Scoop about 2 tablespoons (30 g) of dough and flatten slightly in your palm. Place a frozen cream cheese ball in the center and wrap the dough completely around it, sealing well. Roll the cookie ball generously in powdered sugar, ensuring a thick coating for that signature crinkle.
- Bake: Place the cookies on the prepared baking sheet about 2 inches apart to allow spreading. Bake for 12–14 minutes, or until the cookies are set around the edges but still soft in the center. They should have a cracked, crinkly surface.
- Cool: Let the cookies cool on the sheet for 5 minutes before transferring to a wire rack to cool completely. The centers will remain creamy and slightly gooey, which is the magic of this recipe.
Tips: If your dough feels too sticky to handle, chill it for 10 minutes before assembling. Watch the baking time carefully—overbaking dries out the chewy centers. When rolling in powdered sugar, don’t be shy; a thick coating enhances the contrast between the red dough and white cracks.
Cooking Tips & Techniques
One key to these chewy red velvet crinkle cookies with cream cheese centers is managing the texture. You want the cookie exterior chewy but soft, while the cream cheese center remains creamy and slightly melty. Here’s how to get it right:
- Freeze the Cream Cheese: This little trick keeps the centers from oozing out during baking. I learned this the hard way on the first batch when the cream cheese melted too much and made a mess.
- Don’t Overmix: When combining the cake mix with the wet ingredients, mix just until incorporated. Overmixing can make the cookies tough.
- Use Powdered Sugar for Rolling: Powdered sugar helps the cookies develop those beautiful crinkles. Granulated sugar won’t give the same effect.
- Monitor Oven Temperature: Oven temps can vary, so start checking at 12 minutes. The cookies are done when the edges are set but the centers still look slightly soft.
- Chill Dough if Needed: If your kitchen is warm or the dough feels too soft, a quick chill helps with handling and prevents spreading.
- Multitasking: While the cream cheese centers freeze, whip up the cookie dough to save time. This keeps your prep efficient and stress-free.
From personal experience, baking these cookies on a silicone mat rather than bare baking sheets prevents sticking without adding oil. Also, I once tried replacing butter with coconut oil, but the texture was a bit off—so stick to butter for that perfect chewiness.
Variations & Adaptations
If you want to mix things up or cater to different diets, here are some tasty options for these chewy red velvet crinkle cookies with cream cheese centers:
- Chocolate Lovers’ Twist: Add mini semi-sweet chocolate chips into the dough for bursts of melty chocolate in every bite.
- Gluten-Free Option: Use a gluten-free red velvet cake mix to keep the recipe accessible without sacrificing flavor.
- Vegan Adaptation: Substitute dairy-free cream cheese and vegan butter, and replace the egg with a flax egg (1 tbsp flaxseed meal + 3 tbsp water). Texture will be slightly different but still delicious.
- Festive Flavor: Sprinkle some finely chopped pistachios on top before baking for a colorful crunch that pairs beautifully with the red velvet.
- Seasonal Fruit Addition: If you want to bring in some fruity brightness, try serving alongside a fresh strawberry dessert like creamy no-churn strawberry ice cream for a delightful combo.
I often add a hint of espresso powder to the dough for a deeper cocoa flavor that’s subtle but adds complexity. It’s a personal favorite tweak that pairs well if you’re enjoying these cookies with a cup of coffee.
Serving & Storage Suggestions
These chewy red velvet crinkle cookies with cream cheese centers are best served at room temperature to enjoy the creamy center at its peak. Try pairing them with a cold glass of milk or a warm cup of coffee or tea for a cozy combo. For a special brunch treat, they go surprisingly well alongside a plate of creamy strawberry cheesecake stuffed French toast.
To store, keep the cookies in an airtight container at room temperature for up to 3 days. If you want to keep them longer, refrigerate for up to a week—just bring to room temperature before serving to soften the centers. For longer storage, freeze the cookies in a single layer on a baking sheet, then transfer to a freezer-safe container for up to 3 months. Reheat gently in a 300°F (150°C) oven for about 5 minutes to revive that chewy texture.
Interestingly, the flavors develop a bit after a day, with the cream cheese center melding even better with the red velvet dough. So, if you can wait, these cookies taste even more harmonious the next day.
Nutritional Information & Benefits
Each chewy red velvet crinkle cookie with cream cheese center contains approximately 180–210 calories, with moderate fat and sugar content typical of dessert treats. They provide a good source of calcium and protein thanks to the cream cheese, and the cocoa in the red velvet offers small amounts of antioxidants.
This recipe isn’t low-carb or sugar-free, but it’s made with real ingredients without artificial fillers or preservatives, which is always a win in my book. For those with dietary concerns, you can adapt it using gluten-free or vegan options as mentioned earlier.
Personally, I find these cookies are a satisfying indulgence that hits the spot without feeling overly heavy. They’re a nice way to enjoy a sweet treat with a bit of homemade touch, especially when shared with loved ones.
Conclusion
Chewy red velvet crinkle cookies with cream cheese centers have become a personal favorite because they combine simplicity with a little twist that feels special. They’re easy to make, use accessible ingredients, and deliver that comforting chewiness balanced by a creamy surprise inside. I love how this recipe invites you to customize it—whether with chocolate chips, nuts, or dietary swaps—and still come out with a winner every time.
Give these cookies a try when you want a dessert that’s both familiar and exciting. And hey, if you enjoy richer desserts, you might be curious to try the flavorful balsamic roasted strawberry shortcake—it’s a lovely companion for special occasions.
These cookies have earned a regular spot in my kitchen, and I hope they find a place in yours too. Don’t hesitate to experiment and make them your own; sometimes the best recipes are the ones we tweak to fit our own sweet tooth. If you do bake them, I’d love to hear how you customized the recipe or what moments you shared them during.
Frequently Asked Questions
Can I use regular cream cheese or does it have to be full-fat?
Full-fat cream cheese works best for a creamy, smooth center. Low-fat versions tend to be less stable and can become grainy when baked.
What if I don’t have red velvet cake mix? Can I make these from scratch?
You can use a homemade red velvet base, but cake mix simplifies the process and guarantees consistent flavor and texture.
How do I prevent the cream cheese from leaking out during baking?
Freezing the cream cheese balls before wrapping them in cookie dough helps keep them intact as the cookies bake.
Can I prepare the cookie dough ahead of time?
Yes, you can refrigerate the dough for up to 24 hours. Assemble and bake the cookies directly from the fridge, just add a couple extra minutes to baking time.
What’s the best way to reheat these cookies without drying them out?
Warm them in a 300°F (150°C) oven for 5 minutes or microwave for 10–15 seconds to soften centers without drying the cookie.
Pin This Recipe!


Chewy Red Velvet Crinkle Cookies with Cream Cheese Centers
These chewy red velvet crinkle cookies feature a creamy cream cheese center, combining a soft, crinkled exterior with a tangy, gooey surprise inside. Quick and easy to make, they are perfect for any occasion and loved by both kids and adults.
- Total Time: 37-39 minutes
- Yield: 24 cookies 1x
Ingredients
- 1 box red velvet cake mix (approx. 15.25 oz / 432 g)
- 8 oz (225 g) cream cheese, softened
- 1/2 cup (113 g) butter, softened
- 1 large egg, room temperature
- 1 cup (120 g) powdered sugar, for rolling
- 1 teaspoon vanilla extract
- Optional: pinch of salt if cake mix is not salted
Instructions
- Prepare the Cream Cheese Centers: Beat softened cream cheese with 1/2 tablespoon powdered sugar until smooth. Portion into 1 teaspoon-sized balls and freeze on a parchment-lined plate for at least 15 minutes.
- Make the Cookie Dough: Cream together softened butter and remaining powdered sugar using an electric mixer on medium speed until light and fluffy, about 2 minutes. Beat in the egg and vanilla extract until combined.
- Add the Cake Mix: Gradually add the red velvet cake mix to the wet ingredients, mixing on low until just combined. The dough will be thick and slightly sticky.
- Preheat the Oven to 350°F (175°C) and line baking sheets with parchment paper or silicone mats.
- Assemble the Cookies: Scoop about 2 tablespoons (30 g) of dough and flatten slightly in your palm. Place a frozen cream cheese ball in the center and wrap the dough completely around it, sealing well. Roll the cookie ball generously in powdered sugar for a thick coating.
- Bake: Place cookies about 2 inches apart on prepared baking sheets. Bake for 12–14 minutes, until edges are set but centers remain soft and cookies have a cracked, crinkly surface.
- Cool: Let cookies cool on the baking sheet for 5 minutes, then transfer to a wire rack to cool completely. The centers will remain creamy and slightly gooey.
Notes
Freeze cream cheese balls before wrapping to prevent leaking during baking. Use powdered sugar for rolling to achieve signature crinkle effect. Chill dough if too sticky. Avoid overmixing cake mix into wet ingredients to keep cookies tender. Watch baking time carefully to keep centers soft and chewy.
- Prep Time: 25 minutes
- Cook Time: 12-14 minutes
- Category: Dessert
- Cuisine: American
Nutrition
- Serving Size: 1 cookie
- Calories: 180210
- Sugar: 18
- Sodium: 180
- Fat: 9
- Saturated Fat: 5
- Carbohydrates: 27
- Fiber: 1
- Protein: 3
Keywords: red velvet cookies, cream cheese cookies, crinkle cookies, chewy cookies, easy dessert, holiday cookies, red velvet dessert


