

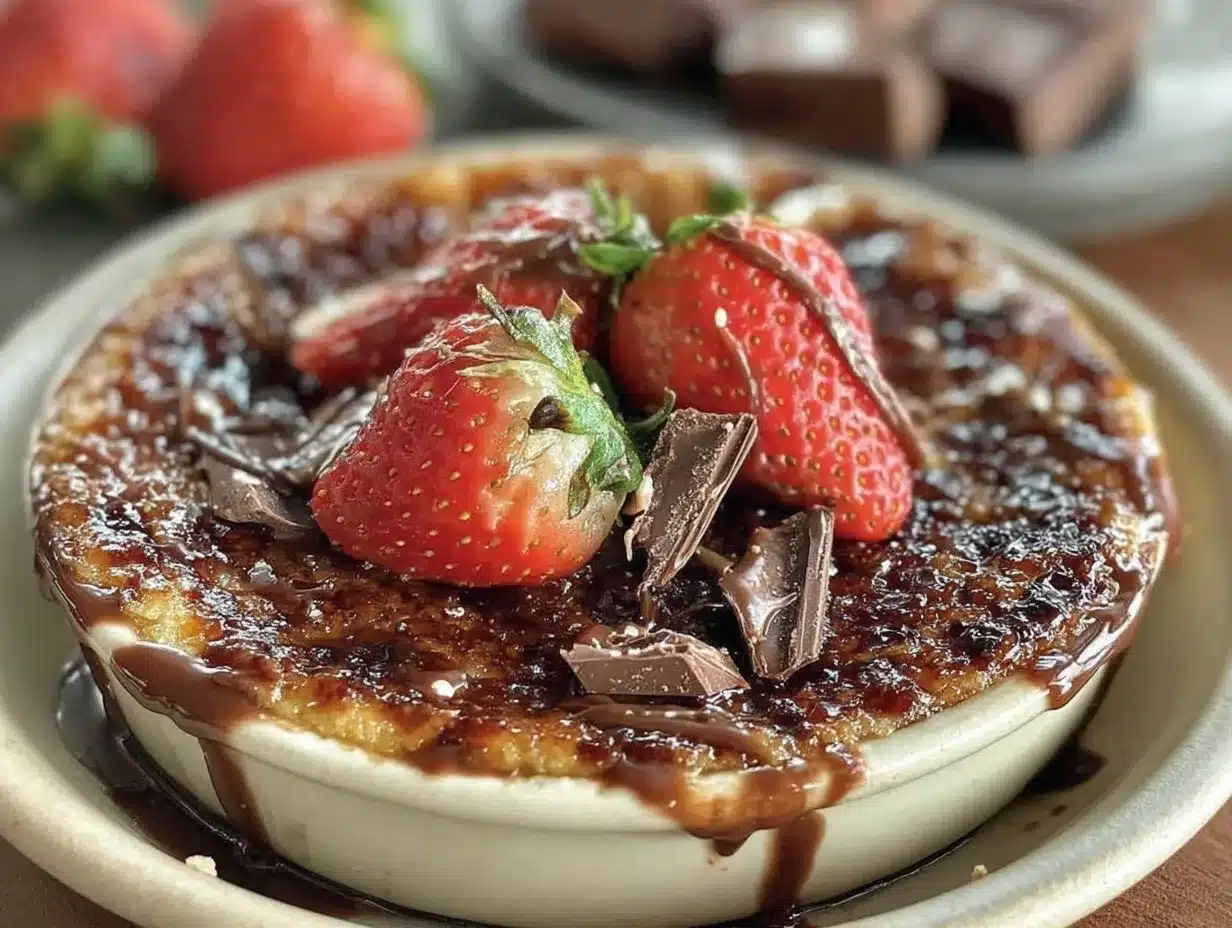
Imagine cracking through a perfectly caramelized sugar top—your spoon glides into a luxuriously creamy custard, and then, as you scoop deeper, you hit a layer of fresh, juicy strawberries. The scent of rich chocolate mingles with the roasted sugar in the air, and honestly, you can’t help but close your eyes for a second and let the moment take over. The first time I made this Chocolate-Covered Strawberry Crème Brûlée, I was standing in my tiny, sunlit kitchen, and the smell alone made my knees go weak. I remember biting into that first spoonful—my husband paused mid-conversation, looked at me, and just said, “Wow.” That’s the kind of moment where you pause, take a deep breath, and just smile because you know you’re onto something truly special.
This recipe has roots in my family’s love for both classic crème brûlée and those nostalgic chocolate-covered strawberries we used to make every Valentine’s Day when I was knee-high to a grasshopper. I’d help dip the berries in melted chocolate, licking my fingers (and, let’s face it, sneaking a few before they were set). Years later, trying to combine those two favorites was a happy accident—a rainy weekend, leftover strawberries in the fridge, and a craving for something a little fancy but not fussy. That’s how Chocolate-Covered Strawberry Crème Brûlée was born in our house, and I wish I’d thought of it years ago. It’s become a staple for family birthdays, date nights, and even gifting (because who wouldn’t love a homemade brulée in a cute little ramekin?).
Let’s just say, my family can’t keep their hands off these once they come out of the fridge (and I can’t really blame them). There’s always a little competition for who gets the most crackly sugar top, and kids and adults both swoon over that hidden strawberry layer. Honestly, this dessert is dangerously easy for something that delivers so much pure, nostalgic comfort. Whether you’re looking to impress dinner guests, treat yourself after a long week, or just brighten up your Pinterest dessert board, you’re going to want to bookmark this one. I’ve tested and tweaked the method more times than I can count (in the name of research, of course), and I can promise—every bite feels like a warm hug in dessert form.
Why You’ll Love This Chocolate-Covered Strawberry Crème Brûlée
Crème brûlée has always been a showstopper, but this Chocolate-Covered Strawberry version takes it to a whole new level without the fuss. I’ve made dozens of custards over the years—at home, for brunches, and even in culinary school—and this recipe stands out every single time. Here’s why I’m convinced you’ll fall in love with it:
- Quick & Easy: Prep is just 20 minutes, with the oven doing the heavy lifting. Perfect for busy nights or when you want a “wow” dessert with minimal effort.
- Simple Ingredients: You probably have everything on hand—cream, eggs, sugar, chocolate, and strawberries. No fancy grocery run needed!
- Perfect for Any Occasion: Dress it up for Valentine’s Day, serve at a cozy family dinner, or make ahead for a special brunch with friends. It’s always a hit.
- Crowd-Pleaser: Even my picky eaters ask for seconds. The combo of creamy custard, fresh berries, and chocolate is irresistible to kids and grown-ups alike.
- Unbelievably Delicious: The rich chocolate base pairs with tart strawberries and the shattering sugar top for a flavor and texture explosion that’s pure comfort.
What truly sets this Chocolate-Covered Strawberry Crème Brûlée apart is the balance of flavors. Some recipes just stir in chocolate or toss in berries, but I layer them so the chocolate melts and mingles with the custard, while the strawberries stay bright and juicy. I use a torch for that classic crackly finish (though the broiler works in a pinch), and honestly, it feels like you’re eating a chocolate-dipped strawberry, but in silky custard form.
This isn’t just a twist—it’s the best version I know. The texture is dreamy, the chocolate isn’t overpowering, and the strawberries add the perfect zing. It’s comfort food reimagined—faster, a little lighter, but all the soul-soothing satisfaction you want. Whether you’re impressing guests or just treating yourself, this dessert guarantees a sweet memory with every spoonful.
What Ingredients You Will Need
This recipe uses simple, wholesome ingredients to deliver bold flavor and that signature crème brûlée texture—no tricky specialty items required. Most of these are probably in your kitchen already, and a few quick swaps mean you can make this dessert work for any season or dietary need.
- For the Custard:
- 2 cups (480 ml) heavy whipping cream (for that rich, silky base—organic cream is my go-to)
- 4 large egg yolks (room temperature; separates more easily when cold, then let sit out)
- 1/2 cup (100 g) granulated sugar (plus extra for the topping)
- 1 teaspoon pure vanilla extract (I love Nielsen-Massey, but any real vanilla works)
- 1/4 teaspoon fine sea salt (brings out the chocolate and strawberry flavors)
- For the Chocolate Layer:
- 3 ounces (85 g) bittersweet or semisweet chocolate (chopped; I use Ghirardelli or Lindt bars for smooth melting)
- For the Strawberry Layer:
- 1 cup (150 g) fresh strawberries (hulled and diced; in winter, frozen berries work too, just thaw and drain well)
- For the Caramelized Sugar Topping:
- 1/4 cup (50 g) granulated sugar (for sprinkling and torching—use superfine if you want an extra-even crust)
Ingredient Tips: For best results, use high-quality chocolate (bars melt better than chips). If you need a dairy-free version, substitute full-fat coconut cream—just note the flavor will be a little tropical. Want to make it gluten-free? You’re in luck—crème brûlée is naturally gluten-free as long as you check your chocolate for cross-contamination. No strawberries? Raspberries or blackberries are delicious swaps, especially in summer. And if you want to cut the sugar, you can use a granulated sugar substitute for the topping (it won’t caramelize quite the same, but still tastes great!).
Equipment Needed
You don’t need a fancy French kitchen for this Chocolate-Covered Strawberry Crème Brûlée—just a few basic tools (and maybe a kitchen torch if you’re feeling adventurous!). Here’s what I use every time:
- 4-6 oven-safe ramekins (6-ounce/180 ml size works best; Pyrex or ceramic both work)
- 1 large baking dish or roasting pan (for the water bath, aka bain-marie)
- Medium saucepan (for heating the cream)
- Mixing bowl (heatproof, for whisking eggs and sugar)
- Whisk (a balloon whisk gives the smoothest results)
- Fine mesh sieve (to strain the custard—crucial for that silky texture!)
- Small offset spatula or spoon (for layering chocolate and strawberries)
- Kitchen torch (for caramelizing the sugar; a broiler works in a pinch, but the torch is just more fun!)
- Measuring cups and spoons
- Clean kitchen towel (to line the baking pan and keep ramekins steady)
I’ve used everything from thrifted ramekins to little Mason jars—just make sure they’re oven-safe. If you don’t have a kitchen torch, your oven broiler is a solid backup (just watch closely!). I recommend hand-washing ramekins for longevity, and if your torch is acting up, check the butane—it’s usually just low! Budget tip: Dollar store ramekins work just fine, and a basic torch from the hardware store is cheaper than the fancy kitchen models.
How to Make Chocolate-Covered Strawberry Crème Brûlée
-
Prep the Oven and Water Bath:
Preheat your oven to 325°F (160°C). Arrange your ramekins in a large baking dish or roasting pan. Lay a clean kitchen towel in the bottom—this keeps the ramekins from sliding and helps with even cooking. -
Layer the Chocolate and Strawberries:
Scatter 2-3 tablespoons (about 25 g) of diced strawberries into the bottom of each ramekin. Divide the chopped chocolate evenly among the ramekins, sprinkling it over the strawberries. (Tip: Don’t press down—just let them rest naturally.) -
Heat the Cream:
In a medium saucepan, pour in 2 cups (480 ml) heavy cream. Warm over medium heat, stirring occasionally, until it’s just steaming and small bubbles form at the edges—don’t let it boil! (About 3-4 minutes.) Remove from heat and set aside. -
Mix the Egg Yolks and Sugar:
In a heatproof mixing bowl, whisk together 4 large egg yolks and 1/2 cup (100 g) granulated sugar until the mixture is thick and pale yellow. Add 1 teaspoon vanilla extract and 1/4 teaspoon salt; whisk to combine. -
Temper the Eggs:
Slowly pour a little of the hot cream into the egg mixture, whisking constantly (this brings the eggs up to temperature without scrambling them). Gradually add the rest of the cream, whisking all the while. -
Strain the Custard:
Set a fine mesh sieve over a large measuring cup or bowl. Pour the custard mixture through to remove any cooked egg bits—this step is crucial for a silky-smooth brûlée. -
Fill the Ramekins:
Carefully ladle or pour the strained custard into each ramekin, covering the chocolate and strawberries. Fill almost to the top, leaving about 1/4 inch (6 mm) of space. -
Prepare the Water Bath:
Pour hot water into the baking dish, coming about halfway up the sides of the ramekins. (Tip: Pour the water in after the dish is in the oven to avoid spills.) -
Bake:
Bake for 35-40 minutes, or until the custards are just set around the edges but still slightly wobbly in the center. Ovens vary, so start checking at 30 minutes. (If you overbake, the texture gets grainy—pull them when they still have a little jiggle.) -
Cool:
Carefully remove the ramekins from the hot water (tongs or a towel help here). Let cool to room temperature, then refrigerate for at least 3 hours (or up to 2 days). The custard will finish setting as it chills. -
Caramelize the Sugar:
Just before serving, sprinkle about 1 teaspoon (5 g) granulated sugar evenly over each custard. Use a kitchen torch to melt and caramelize the sugar until deep golden and glassy. (If using a broiler, place ramekins under the broiler for 1-2 minutes, watching closely.) -
Serve:
Let the sugar crust cool for 2-3 minutes to harden. Grab a spoon, crack through that topping, and dig in! (Optional: Garnish with extra strawberries or a drizzle of melted chocolate for extra flair.)
Prep Notes: If the custard curdles or you see little bits of cooked egg, don’t panic—straining fixes most mistakes. For the smoothest results, use room temperature yolks and don’t skip the water bath. And if you’re nervous about torching the sugar, practice on one ramekin first. You got this!
Cooking Tips & Techniques for Perfect Crème Brûlée
Crème brûlée seems fancy, but once you know a few tricks, it’s surprisingly forgiving. Here’s everything I’ve learned after a few (delicious) trial and error sessions:
- Don’t Overheat the Cream: You want it steaming, not boiling—too hot and it can scramble the eggs, giving you sweet scrambled eggs (not ideal!).
- Temper the Eggs Slowly: Pour the hot cream into the yolks in a thin stream, whisking constantly. If you go too fast, you’ll end up with cooked egg pieces. If that happens, just strain!
- Strain for Silkiness: Always pass the custard through a fine mesh sieve. It removes any rogue egg bits and guarantees restaurant-quality texture.
- Bake Low and Slow: The water bath (bain-marie) is your best friend. It keeps the heat gentle and even. If you skip it, you risk rubbery edges.
- Don’t Overbake: The custard should still wobble in the center when you pull it from the oven. It will finish setting as it chills. Overbaking makes it grainy.
- Caramelize Sugar Evenly: Hold the torch a few inches above the sugar and move in small circles. Too close and you’ll burn the sugar; too far and it won’t melt.
- Let the Sugar Cool: Give the caramelized top 2-3 minutes to harden before cracking in—it’s worth the wait!
I’ve definitely rushed the caramelization (impatient, anyone?) and got a burnt, bitter layer—so slow and steady wins the race here. Multitasking tip: You can prep the custards a day ahead, then just torch the sugar right before serving. And if you’re making a big batch, keep a damp towel handy to wipe off the torch tip between brûlées. Consistency is all about patience and gentle heat—trust me, you’ll get that perfect crack every time.
Variations & Adaptations
This Chocolate-Covered Strawberry Crème Brûlée is a classic with a twist, but you know, it’s also endlessly customizable. Here are a few of my favorite ways to switch things up (and make everyone happy, no matter their tastes!):
- Gluten-Free and Dairy-Free: The base recipe is naturally gluten-free. For dairy-free, swap heavy cream for full-fat coconut cream and use dairy-free chocolate. The flavor is a little different—sort of tropical-chocolatey, but still delicious.
- Seasonal Fruit Swaps: Try raspberries, blackberries, or even thin-sliced peaches in place of strawberries. In fall, poached pears make a cozy twist.
- Flavor Boosts: Add a splash of orange liqueur (like Grand Marnier) to the custard for a grown-up vibe, or a pinch of espresso powder to the chocolate for a mocha hit.
- Different Cooking Methods: If you don’t have a torch, the broiler works—just watch closely so the sugar doesn’t burn. For an outdoor twist, you can even caramelize the tops with a hot spoon (heat it over your stove flame, then press onto the sugar!).
- Allergen Substitutions: For egg-free, try using a custard base made with silken tofu blended with coconut milk and chocolate, then chilled well (it won’t brûlée, but it’s creamy and luscious).
One personal favorite: I sometimes add a sliver of salted caramel under the chocolate for a triple-layered surprise. The possibilities are endless—let your imagination run wild and make this dessert your own!
Serving & Storage Suggestions
This dessert is all about drama and comfort. Here’s how to make the most of your Chocolate-Covered Strawberry Crème Brûlée:
- Serving Temperature: Serve chilled, straight from the fridge, but torch the sugar just before digging in. The contrast of cool custard and warm, crackly sugar is divine.
- Presentation: Garnish with a few extra strawberry slices or a drizzle of melted chocolate. A sprig of fresh mint always looks pretty for special occasions.
- Pairings: This crème brûlée pairs beautifully with a cup of espresso, a glass of bubbly, or a fresh berry salad for brunch.
- Storage: Store the custards (without the sugar topping) in the refrigerator, tightly covered, for up to 2 days. Don’t add the sugar until just before serving—otherwise, it’ll go soft.
- Freezing: You can freeze baked, un-torched custards for up to 1 month. Thaw overnight in the fridge, then torch the sugar before serving. The texture is slightly softer, but still tasty.
- Flavor Development: The chocolate and strawberry flavors deepen as the dessert chills, so making it a day ahead actually makes it even better!
Leftovers (if you have any!) are delicious for breakfast—no judgment here.
Nutritional Information & Benefits
Each serving of Chocolate-Covered Strawberry Crème Brûlée (about 1 ramekin) has approximately:
- Calories: 340
- Fat: 23g (mostly from cream and chocolate)
- Carbohydrates: 31g
- Protein: 5g
Health Highlights: Strawberries are packed with vitamin C and antioxidants, while dark chocolate is loaded with flavonoids (which are heart-healthy in moderation!). The recipe is naturally gluten-free and can be adapted for dairy-free needs. It does contain eggs and dairy, so those with allergies should use the adaptation tips above. In our house, this dessert is a treat—rich, satisfying, and a sweet way to celebrate life’s little moments without guilt.
Conclusion
If you’re searching for a dessert that’s easy, show-stopping, and guaranteed to spark smiles, this Chocolate-Covered Strawberry Crème Brûlée is it. With its creamy custard, hidden strawberry-chocolate surprise, and that signature crackly sugar top, it’s a sweet memory just waiting to happen. Don’t be afraid to make it your own—swap the fruit, tweak the chocolate, or play with garnishes.
I love this recipe because it’s a little nostalgic, a little fancy, but honestly, just plain fun to make and eat. I hope it brings as much joy to your table as it does to ours. If you try it, let me know how it goes—leave a comment, share your twist, or tag me in your creations. Now go grab your torch (or your broiler) and treat yourself to this unforgettable dessert—you deserve it!
Frequently Asked Questions
Can I make Chocolate-Covered Strawberry Crème Brûlée ahead of time?
Absolutely! You can prepare and bake the custard up to 2 days in advance. Just keep it refrigerated and add the sugar topping right before serving for the best crunch.
What if I don’t have a kitchen torch?
No worries! You can caramelize the sugar under your oven’s broiler. Place the ramekins on a baking sheet, sprinkle with sugar, and broil for 1-2 minutes, watching closely so it doesn’t burn.
Can I use frozen strawberries instead of fresh?
Yes—just thaw and drain them well before adding to the ramekins. This keeps the custard from getting watery.
How do I keep the custard from curdling?
Temper the eggs slowly by whisking in the hot cream a little at a time, and bake in a water bath. If you see bits of cooked egg, strain the mixture before baking for a smooth finish.
Is this dessert gluten-free?
Yes, as long as your chocolate is gluten-free. No flour needed! Always check labels if you’re cooking for someone with celiac disease or severe gluten intolerance.
Pin This Recipe!
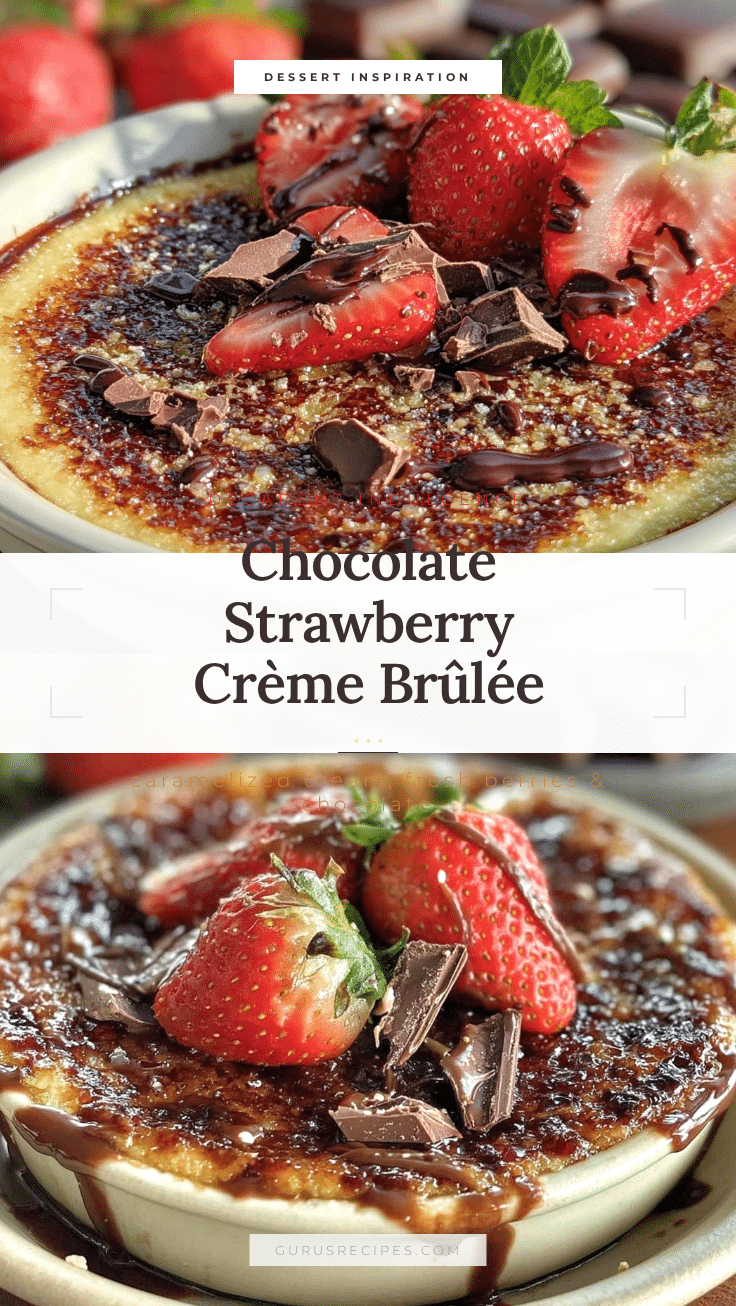

Chocolate-Covered Strawberry Crème Brûlée
This show-stopping dessert combines creamy vanilla custard, a hidden layer of juicy strawberries and rich chocolate, and a perfectly crackly caramelized sugar top. It’s an easy yet elegant treat that brings together the nostalgia of chocolate-covered strawberries with the classic comfort of crème brûlée.
- Total Time: 1 hour
- Yield: 4-6 servings 1x
Ingredients
- 2 cups heavy whipping cream
- 4 large egg yolks
- 1/2 cup granulated sugar, plus extra for topping
- 1 teaspoon pure vanilla extract
- 1/4 teaspoon fine sea salt
- 3 ounces bittersweet or semisweet chocolate, chopped
- 1 cup fresh strawberries, hulled and diced (or thawed and drained frozen strawberries)
- 1/4 cup granulated sugar (for caramelized topping)
Instructions
- Preheat oven to 325°F (160°C). Arrange 4-6 oven-safe ramekins in a large baking dish or roasting pan lined with a clean kitchen towel.
- Scatter 2-3 tablespoons of diced strawberries into the bottom of each ramekin. Divide the chopped chocolate evenly among the ramekins, sprinkling over the strawberries.
- In a medium saucepan, heat the heavy cream over medium heat until just steaming and small bubbles form at the edges (about 3-4 minutes). Do not boil. Remove from heat.
- In a heatproof mixing bowl, whisk together egg yolks and 1/2 cup granulated sugar until thick and pale yellow. Add vanilla extract and salt; whisk to combine.
- Slowly pour a little of the hot cream into the egg mixture, whisking constantly to temper. Gradually add the rest of the cream, whisking continuously.
- Strain the custard mixture through a fine mesh sieve into a large measuring cup or bowl to remove any cooked egg bits.
- Carefully ladle or pour the strained custard into each ramekin, covering the chocolate and strawberries, leaving about 1/4 inch of space at the top.
- Pour hot water into the baking dish to come halfway up the sides of the ramekins.
- Bake for 35-40 minutes, or until custards are just set around the edges but still slightly wobbly in the center. Start checking at 30 minutes.
- Remove ramekins from the water bath and let cool to room temperature. Refrigerate for at least 3 hours or up to 2 days.
- Just before serving, sprinkle about 1 teaspoon granulated sugar evenly over each custard. Use a kitchen torch to caramelize the sugar until deep golden and glassy, or broil for 1-2 minutes, watching closely.
- Let the sugar crust cool for 2-3 minutes to harden. Serve chilled, optionally garnished with extra strawberries or a drizzle of melted chocolate.
Notes
For best results, use high-quality chocolate bars and room temperature egg yolks. Always strain the custard for a silky texture. The water bath ensures gentle, even baking. If you don’t have a torch, the broiler works—just watch closely. Make ahead up to 2 days; add sugar topping just before serving. For dairy-free, use full-fat coconut cream and dairy-free chocolate. Naturally gluten-free—just check your chocolate.
- Prep Time: 20 minutes
- Cook Time: 40 minutes
- Category: Dessert
- Cuisine: French-American
Nutrition
- Serving Size: 1 ramekin (about 5-6
- Calories: 340
- Sugar: 27
- Sodium: 120
- Fat: 23
- Saturated Fat: 14
- Carbohydrates: 31
- Fiber: 2
- Protein: 5
Keywords: chocolate covered strawberry creme brulee, easy creme brulee, strawberry dessert, chocolate dessert, gluten free dessert, Valentine's Day dessert, make ahead dessert


