
Introduction
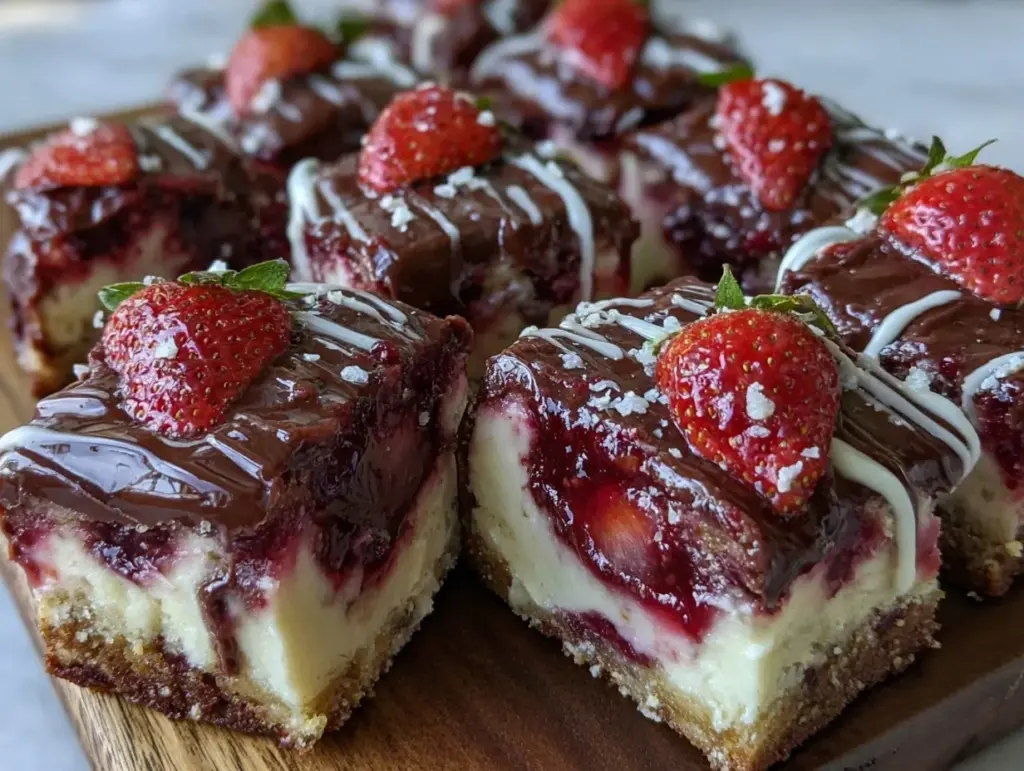
You know that unmistakable aroma when ripe strawberries meet rich, melted chocolate? That’s exactly what fills my kitchen every time I whip up these Chocolate-Covered Strawberry Pudding Bars. Picture this: velvety chocolate ganache glistening on top, a layer of creamy strawberry pudding peeking through, and a buttery, crumbly base that almost melts on your tongue. The first time I made these bars, I was instantly swept back to my grandma’s garden, plucking sun-warmed strawberries with sticky fingers, dreaming of all the sweet treats we’d make. It’s the kind of moment where you pause, take a deep breath, and just smile because you know you’re onto something truly special.
Honestly, these pudding bars are dangerously easy—so easy, in fact, my kids can’t keep their hands off them before they even hit the fridge to chill. When I brought a tray to our neighbor’s backyard BBQ, the bars vanished before the burgers were done grilling. My family couldn’t stop sneaking them off the cooling rack (and, really, I can’t blame them). There’s pure, nostalgic comfort in every bite—like a chocolate-covered strawberry, but somehow even better.
I stumbled across the idea on a rainy Sunday, trying to recreate the flavors of those fancy chocolate-dipped strawberries from the mall kiosks (you know the ones that cost a small fortune). I wish I’d thought of this years ago, because it’s become my go-to for summer parties, Valentine’s Day, and even those random Tuesday nights when you just need a pick-me-up. They’re perfect for potlucks, a sweet treat for the kids, or when you want to brighten up your Pinterest dessert board with something that looks as good as it tastes.
After countless rounds of “just one more test batch” (in the name of research, of course), these Chocolate-Covered Strawberry Pudding Bars are now a staple for family gatherings, gifting, and, let’s face it, late-night snacking. Every bite feels like a warm hug, and I’m pretty sure you’re going to want to bookmark this one.
Why You’ll Love This Recipe
Having spent years in the kitchen, I can confidently say these Chocolate-Covered Strawberry Pudding Bars bring together the best of everything: simplicity, flavor, and wow-factor. After testing with various pudding bases, chocolates, and crusts, I landed on this version because, well, it never fails.
- Quick & Easy: No oven required! These bars come together in under 30 minutes (plus a little chill time), making them perfect for busy weeknights or those last-minute dessert cravings.
- Simple Ingredients: No wild goose chase for specialty items. You probably have most of the ingredients in your pantry and fridge right now.
- Perfect for Any Occasion: Whether it’s a birthday party, a romantic dinner, or just a Netflix binge, these bars fit in everywhere. They’re a guaranteed crowd-pleaser at potlucks and family reunions.
- Crowd-Pleaser: Kids and adults both go wild for the luscious chocolate-strawberry combo. My own picky eaters request these more than classic brownies!
- Unbelievably Delicious: The contrast of creamy pudding, juicy strawberry flavor, and the snap of chocolate makes for next-level comfort food.
What sets these pudding bars apart is the technique: blending fresh strawberries into the pudding mixture gives a natural, bright flavor that tastes like summer in every bite. The no-bake crust (a mix of crushed cookies and melted butter) is buttery but not greasy, and the thick chocolate topping is as glossy as any bakery treat.
This isn’t just another pudding dessert. It’s the one that makes you close your eyes after that first forkful because it’s just that good. It’s comfort food remixed—faster and lighter, but with the same soul-soothing satisfaction. Plus, if you want to impress guests without breaking a sweat, this is your ticket. The pretty pink-and-chocolate layers look fancy but keep the stress out of the kitchen. Truly, these Chocolate-Covered Strawberry Pudding Bars are the kind of recipe you’ll make again and again.
What Ingredients You Will Need
These Chocolate-Covered Strawberry Pudding Bars rely on simple, wholesome ingredients, each pulling its weight for bold flavor and dreamy texture. Most are pantry staples, and a few fresh items make all the difference. Here’s what you’ll need:
- For the Crust:
- 2 cups (200g) chocolate graham crackers or chocolate wafer cookies, finely crushed (Oreo thins work too!)
- 5 tablespoons (70g) unsalted butter, melted (I like using European butter for a richer base)
- Pinch of salt (balances the sweetness)
- For the Strawberry Pudding Layer:
- 1 pint (300g) fresh strawberries, hulled and chopped (frozen work if you thaw and drain)
- 1/2 cup (100g) granulated sugar (adjust for sweetness of berries)
- 1/4 cup (30g) cornstarch (for a thick, sliceable pudding)
- 2 cups (480ml) whole milk (dairy-free works too—try oat or almond milk)
- 1/2 teaspoon pure vanilla extract (adds warmth)
- 1 tablespoon (14g) unsalted butter (for silkiness)
- Pinch of salt
- For the Chocolate Topping:
- 1 cup (170g) semi-sweet chocolate chips or chopped chocolate (I use Ghirardelli or Guittard for best melt)
- 1/2 cup (120ml) heavy cream (for a shiny, luscious ganache)
- 1 tablespoon (14g) unsalted butter (optional, for an extra-glossy finish)
Ingredient Tips: For a gluten-free version, try your favorite gluten-free chocolate cookies. For a vegan version, use dairy-free butter and coconut cream in the chocolate topping. If strawberries aren’t in season, swap in raspberries or a quality strawberry jam (just cut the sugar a bit).
I like to keep a stash of chocolate wafers in the pantry—just in case the urge strikes. And don’t worry if you’re short on fresh berries; I’ve made these bars with frozen strawberries and nobody complained (just let them drain well). Trust me, it’s forgiving and flexible.
Equipment Needed

- 8×8 inch (20×20 cm) square baking pan (or similar size; a glass or metal pan works)
- Food processor or zip-top bag and rolling pin (for crushing cookies; a blender works in a pinch)
- Mixing bowls (one large, one medium)
- Medium saucepan (for cooking pudding)
- Whisk (essential for smooth pudding—no lumps, please!)
- Rubber spatula (for scraping and spreading)
- Microwave-safe bowl (for melting chocolate, or use a double boiler)
- Measuring cups and spoons
- Plastic wrap or foil (for covering while chilling)
If you don’t have a food processor, a sturdy zip-top bag and a rolling pin do the trick for cookie crumbs. I’ve even used a heavy mug in a pinch—just watch your knuckles! For the chocolate, the microwave works fine, but a double boiler gives a bit more control (especially if you’ve scorched chocolate before, like I have). If budget’s a concern, any basic saucepan and bowl combo will do. Just make sure your pan has straight sides for easy slicing later.
Preparation Method
-
Prepare the Crust:
Combine 2 cups (200g) crushed chocolate graham crackers or wafers with 5 tablespoons (70g) melted butter and a pinch of salt in a bowl. Mix until all crumbs are evenly moistened.
Press the mixture firmly and evenly into the bottom of your lined or lightly greased 8×8 inch (20×20 cm) pan.
Tip: Use the bottom of a measuring cup to pack the crust tight—this prevents crumbling later.
Freeze the crust for 10 minutes while you make the pudding. -
Make the Strawberry Pudding:
Blend 1 pint (300g) hulled strawberries until smooth. If you prefer a chunkier texture, pulse a few times instead.
In a medium saucepan, combine the strawberry puree, 1/2 cup (100g) sugar, and 1/4 cup (30g) cornstarch. Whisk until smooth.
Slowly whisk in 2 cups (480ml) milk and add a pinch of salt.
Heat the mixture over medium heat, whisking constantly, until it thickens and bubbles (about 5-8 minutes). If lumps start to form, lower the heat and whisk vigorously.
Remove from heat and whisk in 1/2 teaspoon vanilla and 1 tablespoon (14g) butter until fully melted.
Let the pudding cool for 5 minutes, stirring occasionally (it will thicken further as it cools). -
Layer the Pudding:
Pour the warm strawberry pudding over the chilled crust.
Smooth the top with a spatula, tapping the pan gently to remove air bubbles.
Cover the pan with plastic wrap, pressing it directly against the pudding layer (prevents a skin from forming).
Refrigerate for at least 2 hours, or until fully set. -
Make the Chocolate Topping:
Place 1 cup (170g) chocolate chips and 1/2 cup (120ml) heavy cream in a microwave-safe bowl.
Heat in 30-second bursts, stirring well each time, until melted and glossy (about 1-2 minutes).
Stir in 1 tablespoon (14g) butter for extra shine.
Let the ganache cool for 2-3 minutes so it’s pourable but not hot. -
Assemble the Bars:
Pour the slightly cooled chocolate ganache over the chilled strawberry pudding layer.
Spread evenly with a spatula. Tap the pan to settle.
Chill the bars (uncovered) for another 1–2 hours, or until the chocolate is set but still soft enough to slice. -
Slice & Serve:
Run a knife around the edges, then lift the bars out using parchment or a thin spatula.
Cut into 16 squares using a warm, clean knife (dip in hot water and wipe off between cuts for tidy slices).
Serve cold for best texture.
Troubleshooting: If the pudding layer seems runny after chilling, let it sit an extra hour—it thickens as it cools. If the chocolate cracks when slicing, let the bars sit at room temp for 10 minutes before cutting.
Personal tip: Don’t rush the chilling time. I’ve learned (the hard way) that patience gives you those ultra-clean layers and perfect bites!
Cooking Tips & Techniques
I’ve made more than my fair share of no-bake desserts, and these Chocolate-Covered Strawberry Pudding Bars taught me a few tricks along the way.
- Perfect Crust Consistency: For a crust that holds together but isn’t rock-hard, make sure every crumb is coated in butter. If it feels dry, add another half-tablespoon of melted butter.
- Strawberry Pudding Smoothness: Blend the strawberries thoroughly if you prefer a silky texture. For a bit of fruit bite, pulse just a few times. Strain the puree for a super-refined layer (I do this when company’s coming over).
- Preventing Lumpy Pudding: Cornstarch can clump if added too quickly. Whisk it with the sugar before adding milk, and always whisk constantly over medium heat. If you see lumps, lower the heat and keep whisking—they’ll usually dissolve.
- Chocolate Ganache Gloss: Let the cream heat gently—don’t let it boil! Overheating can cause the chocolate to seize. If you’re microwaving, stir every 30 seconds. If using a double boiler, keep the bowl above—not touching—the water.
- Clean Slicing: Always use a sharp, hot knife and wipe it clean between cuts. Bars come out much prettier (learned this after many messy attempts).
Personal Lessons: I once rushed the chilling and ended up with a gooey mess. Now, I always plan ahead—making the bars the night before works best. If you’re pressed for time, pop them in the freezer for 30 minutes, but don’t forget them or the chocolate topping might crack.
Multitasking: While the pudding cools, melt your chocolate topping or clean up your prep space. It makes the whole process feel less chaotic. And don’t forget to taste along the way—quality control, right?
Variations & Adaptations
- Gluten-Free Version: Swap the chocolate graham crackers for gluten-free chocolate cookies. I’ve tried with almond flour cookies and the flavor is fantastic.
- Vegan/Dairy-Free: Use plant-based butter and coconut cream for the ganache. Almond or oat milk works well in the pudding, and vegan chocolate chips melt beautifully for the topping.
- Berry Twist: Replace strawberries with raspberries or even blueberries for a fun color and flavor change. Just adjust the sugar if your berries are extra tart.
- Nutty Crunch: Add a handful of chopped toasted almonds or hazelnuts between the pudding and chocolate layers for texture.
- Chocolate Overload: Mix mini chocolate chips into the pudding for extra bursts of chocolate in every bite.
Cooking Methods: If you don’t have a microwave, a stovetop double boiler or even a heatproof bowl over a simmering pot does the trick for ganache.
Personal Spin: My favorite twist? Swirling a spoonful of strawberry jam into the pudding before it sets—gives a pretty marbled look and a punch of flavor.
Allergy Notes: For nut allergies, check your chocolate and cookie labels. For soy allergies, use soy-free chocolate chips. This recipe is pretty forgiving, so don’t be afraid to make it your own!
Serving & Storage Suggestions
Serve these Chocolate-Covered Strawberry Pudding Bars straight from the fridge for the best texture—the chocolate is just firm enough to hold, but the pudding stays creamy and luscious. I like to slice them into neat squares and arrange them on a pretty platter with a few fresh strawberry slices for a pop of color.
Pairing Ideas: These bars go perfectly with a cold glass of milk, a hot cup of coffee, or even a bubbly rosé for a fancier touch. For a party, add a bowl of whipped cream or a scoop of vanilla ice cream on the side.
Storage: Keep the bars in an airtight container in the refrigerator for up to 4 days. Layer parchment paper between slices to prevent sticking. For longer storage, freeze the bars (before adding the chocolate topping) for up to 2 months—just thaw overnight in the fridge and add the ganache before serving.
Reheating: No need to reheat—these are best cold. If the chocolate is too firm for slicing, let them sit at room temperature for 10 minutes.
Flavor Note: The flavors deepen after a day in the fridge—the strawberry gets more intense and the chocolate settles into the pudding layer. Honestly, if you can wait, they’re even better the next day.
Nutritional Information & Benefits
Each bar (based on 16 servings) has roughly 180 calories, 9g fat, 24g carbohydrates, and 2g protein. Since you’re using real strawberries, you get a boost of vitamin C and antioxidants. The pudding layer is mostly milk, which adds calcium and a bit of protein.
For gluten-free or dairy-free diets, simple swaps make these bars accessible and just as tasty. There are nuts in some cookie brands, so always check your ingredient labels if you have allergies.
From a wellness perspective, these Chocolate-Covered Strawberry Pudding Bars are a sweet treat, but portioned perfectly for a satisfying dessert without overindulgence. I’ve found that making them at home means I can control the sugar and ingredients—always a win!
Conclusion
There’s a reason these Chocolate-Covered Strawberry Pudding Bars are on repeat in my kitchen—they’re easy, gorgeous, and deliver that irresistible combo of chocolate and fruit. Whether you’re a seasoned baker or just starting out, this no-bake dessert is approachable and endlessly customizable.
I hope you’ll make these bars your own—swap in your favorite berries, try a gluten-free crust, or double the chocolate layer for the chocoholics in your life. Personally, I love how every bite reminds me of summer and family, and how they always bring smiles to the table (and requests for seconds).
If you give these a try, let me know in the comments how you made them your own! Share with friends, pin them for later, and don’t forget to save a square or two for yourself. Happy no-bake dessert making!
Frequently Asked Questions
How long do Chocolate-Covered Strawberry Pudding Bars need to chill?
For best results, chill the assembled bars for at least 2 hours after adding the pudding layer, and another 1–2 hours after adding the chocolate topping. Overnight chilling is even better for perfect slicing.
Can I use frozen strawberries instead of fresh?
Absolutely! Just thaw and drain them well before blending. You might want to reduce the sugar a touch if your frozen berries are sweetened.
What’s the best way to cut clean slices?
Use a sharp, hot knife (dip in hot water and wipe dry between cuts) for perfect, bakery-style squares. Let the bars sit at room temp for 10 minutes if the chocolate is too firm.
How can I make these bars gluten-free?
Simply use your favorite gluten-free chocolate cookies or graham crackers for the crust. All other ingredients are naturally gluten-free—just check your labels.
Can I make these bars ahead of time?
Yes! They’re actually better after a day in the fridge, as the flavors develop and the layers set up beautifully. Store in an airtight container and slice just before serving.
Pin This Recipe!
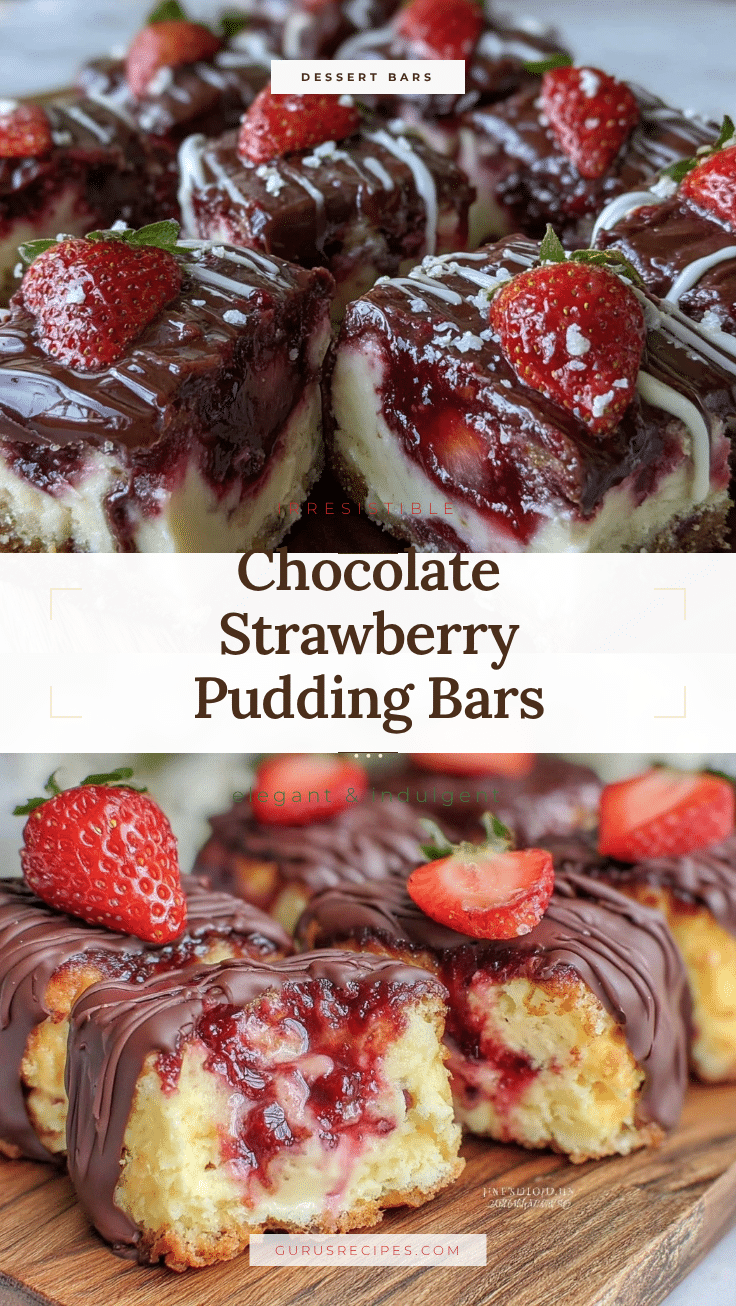

Chocolate-Covered Strawberry Pudding Bars
These easy, no-bake bars feature a buttery chocolate cookie crust, creamy strawberry pudding layer, and glossy chocolate ganache topping. Perfect for parties, potlucks, or a nostalgic treat, they deliver the classic chocolate-covered strawberry flavor in a sliceable dessert.
- Total Time: 3 hours
- Yield: 16 bars 1x
Ingredients
- 2 cups (200g) chocolate graham crackers or chocolate wafer cookies, finely crushed (Oreo thins work too!)
- 5 tablespoons (70g) unsalted butter, melted
- Pinch of salt
- 1 pint (300g) fresh strawberries, hulled and chopped (frozen work if you thaw and drain)
- 1/2 cup (100g) granulated sugar
- 1/4 cup (30g) cornstarch
- 2 cups (480ml) whole milk (or oat/almond milk for dairy-free)
- 1/2 teaspoon pure vanilla extract
- 1 tablespoon (14g) unsalted butter
- Pinch of salt
- 1 cup (170g) semi-sweet chocolate chips or chopped chocolate
- 1/2 cup (120ml) heavy cream
- 1 tablespoon (14g) unsalted butter (optional)
Instructions
- Combine crushed chocolate graham crackers or wafers with melted butter and a pinch of salt in a bowl. Mix until evenly moistened.
- Press the mixture firmly and evenly into the bottom of a lined or lightly greased 8×8 inch pan. Freeze the crust for 10 minutes.
- Blend hulled strawberries until smooth (or pulse for chunkier texture).
- In a medium saucepan, whisk together strawberry puree, sugar, and cornstarch until smooth.
- Slowly whisk in milk and add a pinch of salt. Heat over medium, whisking constantly, until thickened and bubbling (about 5-8 minutes).
- Remove from heat and whisk in vanilla and butter until melted. Let cool for 5 minutes, stirring occasionally.
- Pour warm strawberry pudding over chilled crust. Smooth top with spatula and tap pan gently to remove air bubbles.
- Cover pan with plastic wrap, pressing directly against pudding layer. Refrigerate for at least 2 hours, or until set.
- Place chocolate chips and heavy cream in a microwave-safe bowl. Heat in 30-second bursts, stirring each time, until melted and glossy (1-2 minutes). Stir in butter for extra shine.
- Let ganache cool for 2-3 minutes until pourable but not hot.
- Pour ganache over chilled pudding layer. Spread evenly and tap pan to settle. Chill bars (uncovered) for another 1–2 hours, or until chocolate is set but still soft enough to slice.
- Run a knife around edges, lift bars out using parchment or spatula. Cut into 16 squares with a warm, clean knife. Serve cold.
Notes
For gluten-free, use GF chocolate cookies. For vegan, use plant-based butter and coconut cream. Chill thoroughly for clean layers. Use a hot, clean knife for slicing. Bars are best served cold and flavors deepen after a day in the fridge. Frozen strawberries work if thawed and drained.
- Prep Time: 20 minutes
- Cook Time: 10 minutes
- Category: Dessert
- Cuisine: American
Nutrition
- Serving Size: 1 bar (1/16 of recip
- Calories: 180
- Sugar: 16
- Sodium: 80
- Fat: 9
- Saturated Fat: 5
- Carbohydrates: 24
- Fiber: 2
- Protein: 2
Keywords: chocolate, strawberry, pudding bars, no-bake, dessert, easy, summer, party, potluck, kid-friendly


