
“You can’t mess this up,” my cousin joked as I nervously eyed the mound of peanut butter and crushed cookies on my kitchen counter. Honestly, I wasn’t so sure. Graduation was just around the corner, and I wanted to whip up something special but fuss-free for the party. I needed a treat that would scream celebration without demanding hours of baking or complicated steps. That’s when the idea of Chocolate Peanut Butter Graduation Hat Truffles came to life—half inspired by last-minute jitters, half by my love for peanut butter and chocolate together.
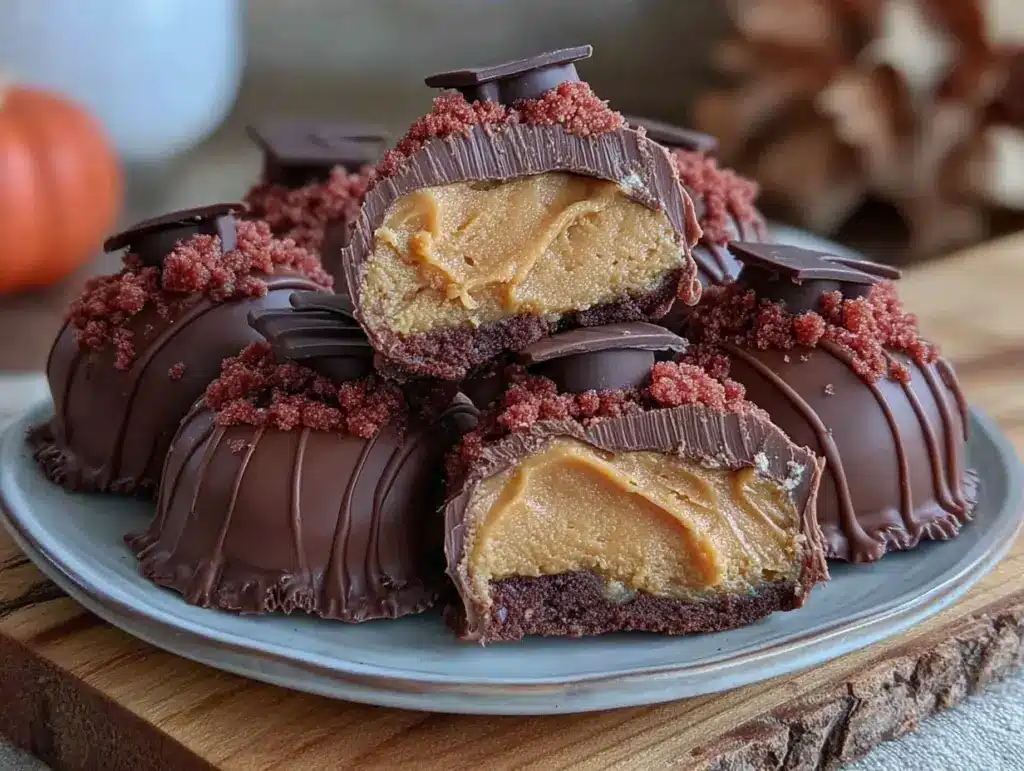
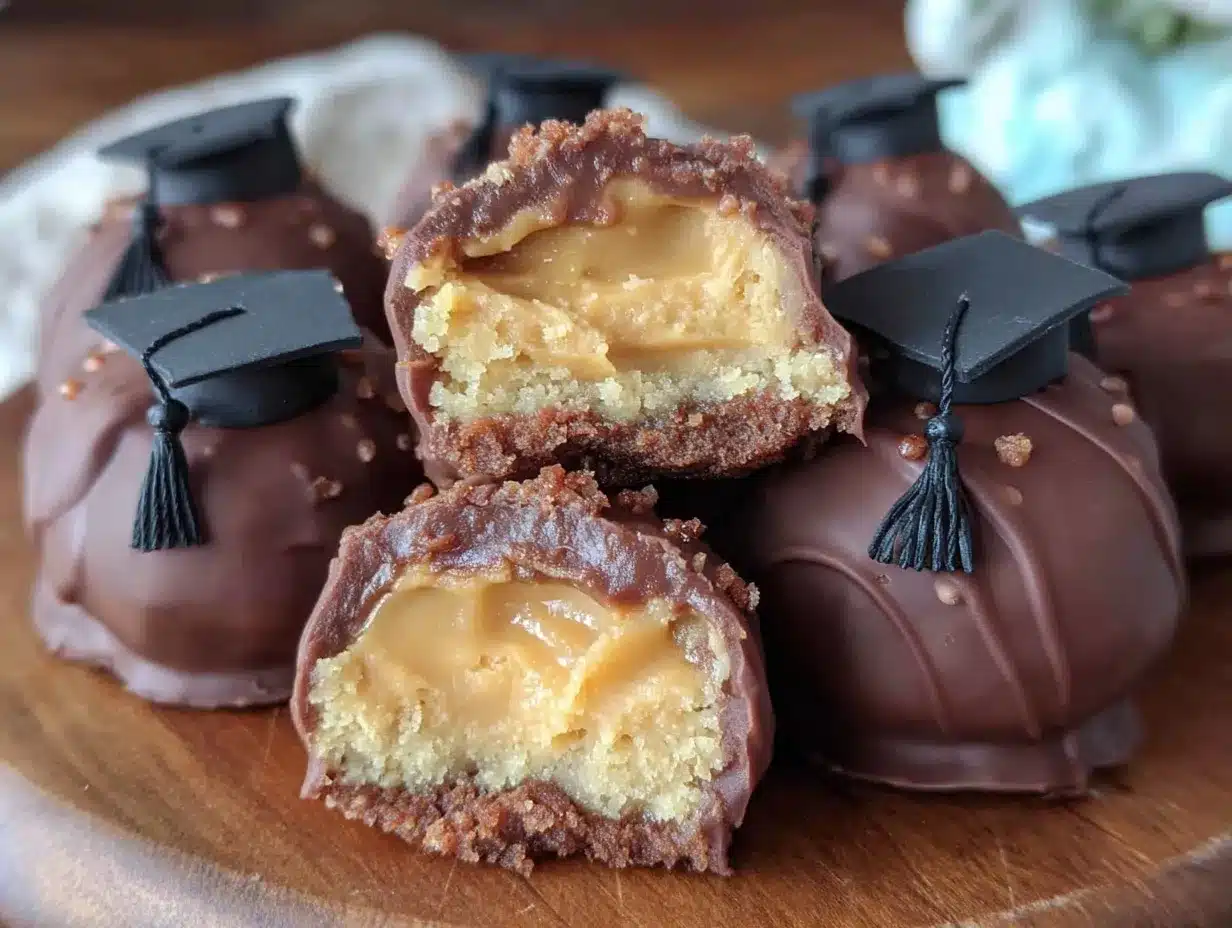
The first batch was a bit messy, my fingers covered in sticky chocolate and peanut butter, but the taste? Unexpectedly perfect. The mix of creamy peanut butter and rich chocolate hits that sweet spot, and the little graduation hats made from fondant and candy toppers brought a playful, nostalgic charm. It turned out that these truffles weren’t just easy—they quickly became the centerpiece of the entire celebration.
What stuck with me wasn’t just how delicious they were, but how making them felt like a quiet, joyful reset after weeks of chaos. Preparing these truffles gave me a moment to breathe, to smile, and to think about the graduate’s journey ahead. If you’re looking for a homemade treat that’s simple but leaves a lasting impression, these are the ones you’ll want on your table.
Why You’ll Love This Recipe
After testing this recipe multiple times (yes, more than once in a week—I admit it), I can say these Chocolate Peanut Butter Graduation Hat Truffles have a few standout perks that make them a must for any graduation party:
- Quick & Easy: You’ll have these ready in about 30 minutes, perfect for when time’s tight but taste can’t be compromised.
- Simple Ingredients: No need for fancy or hard-to-find items—just pantry staples like peanut butter, chocolate, and crushed cookies.
- Perfect for Celebrations: The graduation hat design is a playful, thoughtful touch that’s ideal for marking this milestone.
- Crowd-Pleaser: I’ve served these at family gatherings and casual get-togethers, and both kids and adults ask for seconds.
- Unbelievably Delicious: The creamy peanut butter center dipped in chocolate delivers a blissful bite every time.
What sets this recipe apart? It’s the little details, like folding in just the right amount of crushed crunchy cookies to give the truffles that perfect bite, and the easy-to-make chocolate hats that add personality without extra fuss. Honestly, it’s not just another peanut butter truffle—it’s a celebratory treat that feels both festive and homemade.
Plus, the chocolate shell hardens just right, so you get that satisfying snap when you bite in. It’s the kind of recipe that makes you close your eyes after the first bite—comfort food with a party twist. And, if you’re someone who loves making homemade goodies for special occasions but doesn’t want to spend hours in the kitchen, this recipe feels like a little gift to yourself as much as to your guests.
What Ingredients You Will Need
This recipe calls for simple, approachable ingredients that come together to create a rich, satisfying treat with minimal fuss. Most are pantry staples and should be easy to find, even if you didn’t plan ahead for the party.
- Creamy peanut butter (smooth, unsweetened or slightly salted works best for balance)
- Powdered sugar (for sweetness and structure)
- Crushed chocolate sandwich cookies (like Oreos, finely crushed for texture)
- Unsalted butter (softened, adds richness and helps bind)
- Semi-sweet or dark chocolate chips (for dipping and coating the truffles; I often use Ghirardelli for a smooth finish)
- Miniature fondant graduation hats or black candy melts (for decorating the truffle tops; you can also use black licorice strings for tassels)
- Vanilla extract (just a splash for depth)
- Optional: Sea salt flakes (a tiny pinch sprinkled on top enhances the chocolate and peanut butter flavors)
If you want to switch things up, almond butter works as a substitute for peanut butter, especially if you or your guests have allergies. For a gluten-free version, swap crushed sandwich cookies with gluten-free chocolate cookies or finely chopped nuts.
Pro tip: When selecting your chocolate, go for quality chips that melt smoothly. Cheap chocolate can seize or get grainy, and that’s no fun when you want glossy, shiny truffles. If you want to add a little touch of elegance, a sprinkle of edible gold dust over the hats looks surprisingly festive.
Equipment Needed
- Mixing bowls: One large for combining ingredients and a smaller for melting chocolate.
- Electric mixer or sturdy spoon: To blend the peanut butter, butter, and sugar smoothly.
- Food processor or plastic bag and rolling pin: For crushing the cookies finely.
- Baking sheet: To place the truffles on while chilling.
- Parchment or wax paper: Prevents sticking and makes transferring easier.
- Microwave-safe bowl or double boiler: For melting chocolate evenly without burning.
- Toothpicks or fork: Helpful for dipping the truffles in chocolate without making a mess.
For those without an electric mixer, a sturdy spoon or spatula will do—just be patient when mixing. I once whipped up a batch using just a fork, and while it took longer, the results were still great. If you don’t have a food processor, placing cookies in a sealed plastic bag and crushing them with a rolling pin works just fine—sometimes I even get a few large chunks in there for added crunch.
Preparation Method
- Crush the cookies: Place about 20 chocolate sandwich cookies in a food processor and pulse until finely ground. If you don’t have one, seal cookies in a plastic bag and crush with a rolling pin until you get fine crumbs. This step takes about 5 minutes.
- Mix the base: In a large bowl, combine 1 cup (250 g) creamy peanut butter, ½ cup (115 g) softened unsalted butter, and 2 cups (240 g) powdered sugar. Beat with an electric mixer or spoon until smooth and creamy. Add 1 tsp vanilla extract for flavor depth.
- Fold in crushed cookies: Gently fold the cookie crumbs into the peanut butter mixture. This adds texture and a little chocolate crunch. The mixture should be thick but pliable. If it feels too soft, chill for 10 minutes to firm up.
- Shape the truffles: Scoop out tablespoon-sized portions and roll them between your hands into smooth balls. Place on a parchment-lined baking sheet. You should get about 24 truffles. Chill in the fridge for 20-30 minutes to firm.
- Melt the chocolate: Using a microwave-safe bowl, melt 12 ounces (340 g) of semi-sweet chocolate chips in 30-second intervals, stirring between each until smooth. Alternatively, use a double boiler.
- Dip the truffles: Using a fork or toothpick, dip each chilled truffle into the melted chocolate, coating completely. Let excess drip off, then place back on the parchment-lined sheet.
- Add the graduation hat decoration: Before the chocolate sets, carefully place a miniature fondant graduation hat or create a small hat shape using black candy melts on top. If you want, add a tiny sea salt flake for contrast.
- Chill to set: Place the truffles back in the refrigerator for at least 30 minutes until the chocolate hardens.
- Serve and enjoy: Bring to room temperature about 10 minutes before serving for the best flavor and texture.
Quick tip: If the chocolate thickens while dipping, warm it gently again to keep it smooth. Also, don’t rush shaping the truffles—cold hands help prevent the peanut butter mixture from getting too sticky.
Cooking Tips & Techniques
Working with peanut butter and chocolate is one of those classic combos where attention to detail makes all the difference. Here are some tips I’ve learned along the way:
- Softened butter is key: If your butter is too cold, the mixture won’t come together smoothly. Let it sit out for 30 minutes before mixing.
- Chill before dipping: Firm truffles dip more cleanly in chocolate, preventing melting or loss of shape.
- Use high-quality chocolate: It melts better and gives a shinier finish. I’ve ruined batches with cheap chocolate that turned grainy or dull.
- Work quickly when decorating: Chocolate sets fast, so have your decorations ready before dipping your last truffle.
- Multitasking helps: While truffles chill, melt your chocolate or prepare decorations so you keep the momentum going.
- Common mistake: Overmixing the peanut butter and sugar can make the filling dry. Mix until just combined for a creamy texture.
When I first made these, I tried swirling the chocolate with a fork for a marbled effect, but it made the hats a bit messy. Sticking to a smooth, even coating keeps them looking sharp and professional. And trust me—once you master the dip, you’ll want to make these for every occasion.
Variations & Adaptations
Not everyone loves the same flavor combos, and I’ve played around with a few twists to suit different tastes or dietary needs:
- Nut-free version: Use sunflower seed butter instead of peanut butter and check your cookies for nut allergens.
- Dark chocolate lovers: Swap semi-sweet chips for 70% or higher dark chocolate for a richer, slightly bitter contrast.
- Extra crunch: Stir in chopped roasted peanuts or pretzel bits for texture inside the truffle.
- Seasonal flair: Add a pinch of cinnamon or pumpkin pie spice to the mix for fall celebrations.
- Vegan adaptation: Use dairy-free chocolate, vegan butter, and a suitable nut or seed butter.
One variation I adore is adding a hint of espresso powder to the peanut butter mixture—it brings out the chocolate flavor in a surprising way. If you want to try a different dessert for your party, the no-churn strawberry ice cream I tried recently is a fantastic cool complement to the richness of these truffles.
Serving & Storage Suggestions
These truffles are best served at room temperature—take them out of the fridge about 10 minutes before your guests arrive. Arrange them on a decorative platter or tiered stand to show off the graduation hats. They pair wonderfully with a cup of coffee or a sparkling celebratory drink.
For storage, keep them in an airtight container in the refrigerator for up to one week. If you want to make them ahead, they freeze well—just thaw in the fridge overnight before serving. The flavors tend to deepen after a day or two, so don’t hesitate to prepare them in advance.
If you’re planning a graduation brunch, these truffles can be a sweet finish to a spread including items like cheesecake stuffed french toast. The combination of chocolate and peanut butter alongside fruity dishes is always a winner.
Nutritional Information & Benefits
Each truffle contains approximately 120-150 calories, depending on size and specific ingredients used. They offer a good balance of protein and healthy fats from the peanut butter, with carbohydrates from the powdered sugar and cookies.
Peanut butter provides heart-healthy monounsaturated fats and some fiber, while dark chocolate contributes antioxidants. Keep in mind these are treats with sugar and fat, so moderation is key—but they’re also a comforting, energy-boosting snack during busy party days.
For those with dietary restrictions, the recipe can be adapted to be gluten-free or vegan, making it accessible without losing any of the fun or flavor.
Conclusion
There’s something about these Chocolate Peanut Butter Graduation Hat Truffles that makes celebrating feel a little sweeter and a lot more fun. They’re easy enough for a last-minute plan but special enough to make people smile and remember the occasion. Whether you’re crafting them for your own graduate or a friend’s party, the combination of chocolate and peanut butter is a timeless crowd-pleaser that you can customize to your liking.
I love how this recipe brings a sense of accomplishment—not just for the graduate but for the maker who created a delicious centerpiece with minimal stress. If you try them, I’d love to hear how you decorated your truffles or any fun twists you added. It’s the little details that make homemade treats like these truly unforgettable.
Go ahead, make these your own and savor the moment—because good food, like milestones, deserves celebration.
FAQs
Can I use crunchy peanut butter instead of creamy?
Yes, you can! Crunchy peanut butter will add extra texture inside the truffles. Just note it may change the smoothness of the filling slightly.
How long do these truffles keep fresh?
Stored in an airtight container in the fridge, they stay fresh for up to one week. They can also be frozen for up to one month.
What can I use if I don’t have fondant graduation hats?
You can create simple hats using black candy melts or shape small squares of chocolate. Even licorice strings make cute tassels!
Is there a way to make these sugar-free?
You could try using powdered erythritol or another sugar substitute, but texture and sweetness might vary. Experiment in small batches first.
Can I make these truffles ahead of time for the party?
Absolutely! They actually taste better if made a day or two ahead. Keep them refrigerated until serving.
Pin This Recipe!
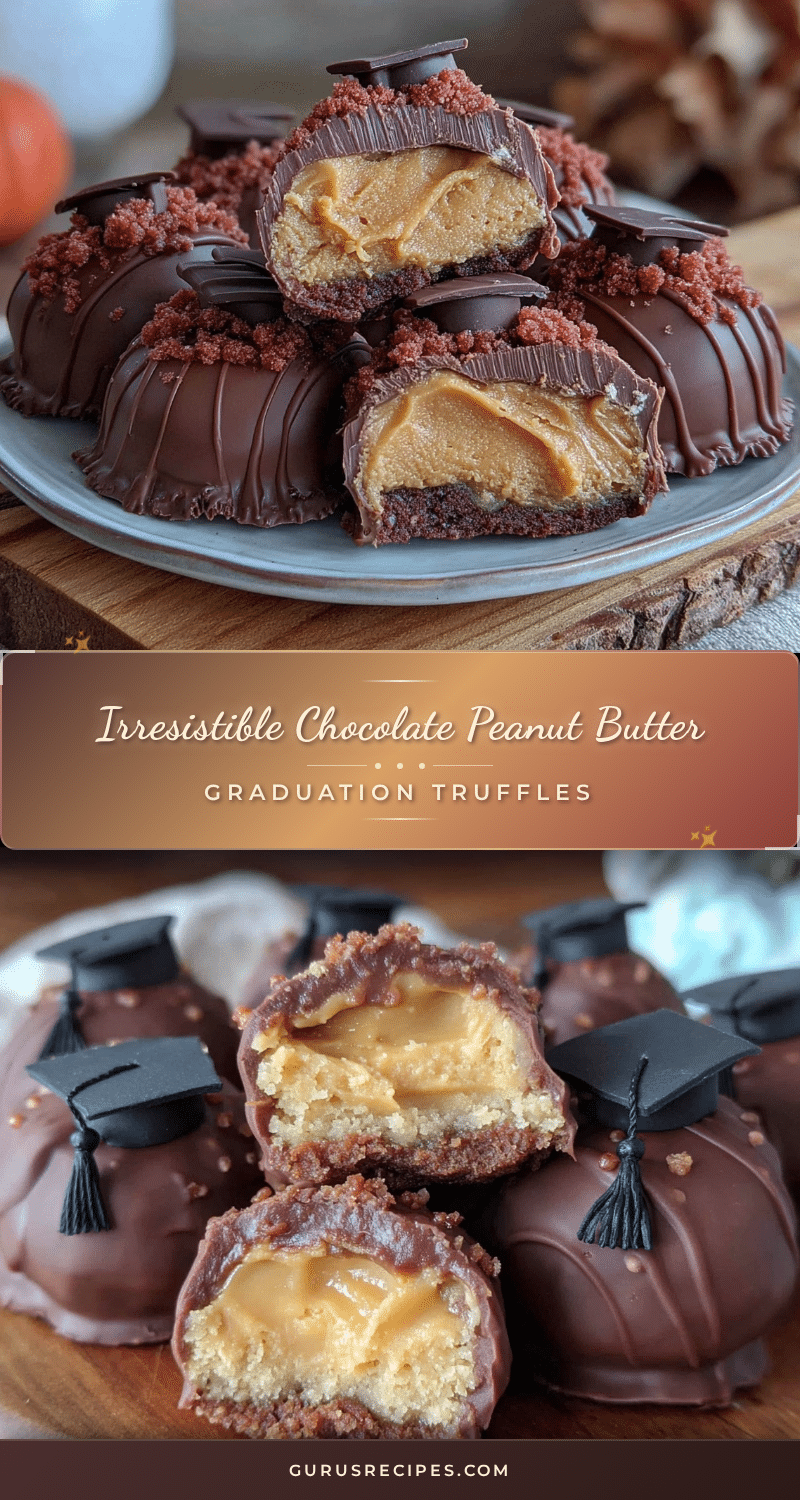

Chocolate Peanut Butter Graduation Hat Truffles
Easy homemade truffles combining creamy peanut butter and rich chocolate, decorated with playful graduation hats, perfect for graduation parties.
- Total Time: 30 minutes
- Yield: 24 truffles 1x
Ingredients
- 1 cup (250 g) creamy peanut butter (smooth, unsweetened or slightly salted)
- 2 cups (240 g) powdered sugar
- 20 chocolate sandwich cookies (like Oreos, finely crushed)
- ½ cup (115 g) unsalted butter, softened
- 12 ounces (340 g) semi-sweet or dark chocolate chips
- Miniature fondant graduation hats or black candy melts (for decorating)
- 1 teaspoon vanilla extract
- Optional: sea salt flakes (a tiny pinch)
Instructions
- Crush the cookies: Place about 20 chocolate sandwich cookies in a food processor and pulse until finely ground. If you don’t have one, seal cookies in a plastic bag and crush with a rolling pin until you get fine crumbs. This step takes about 5 minutes.
- Mix the base: In a large bowl, combine 1 cup (250 g) creamy peanut butter, ½ cup (115 g) softened unsalted butter, and 2 cups (240 g) powdered sugar. Beat with an electric mixer or spoon until smooth and creamy. Add 1 tsp vanilla extract for flavor depth.
- Fold in crushed cookies: Gently fold the cookie crumbs into the peanut butter mixture. This adds texture and a little chocolate crunch. The mixture should be thick but pliable. If it feels too soft, chill for 10 minutes to firm up.
- Shape the truffles: Scoop out tablespoon-sized portions and roll them between your hands into smooth balls. Place on a parchment-lined baking sheet. You should get about 24 truffles. Chill in the fridge for 20-30 minutes to firm.
- Melt the chocolate: Using a microwave-safe bowl, melt 12 ounces (340 g) of semi-sweet chocolate chips in 30-second intervals, stirring between each until smooth. Alternatively, use a double boiler.
- Dip the truffles: Using a fork or toothpick, dip each chilled truffle into the melted chocolate, coating completely. Let excess drip off, then place back on the parchment-lined sheet.
- Add the graduation hat decoration: Before the chocolate sets, carefully place a miniature fondant graduation hat or create a small hat shape using black candy melts on top. If you want, add a tiny sea salt flake for contrast.
- Chill to set: Place the truffles back in the refrigerator for at least 30 minutes until the chocolate hardens.
- Serve and enjoy: Bring to room temperature about 10 minutes before serving for the best flavor and texture.
Notes
Use softened butter for smooth mixing. Chill truffles before dipping for cleaner coating. Use high-quality chocolate for a shiny finish. Work quickly when decorating as chocolate sets fast. If chocolate thickens while dipping, warm gently again. Cold hands help prevent stickiness when shaping.
- Prep Time: 15 minutes
- Cook Time: 15 minutes
- Category: Dessert
- Cuisine: American
Nutrition
- Serving Size: 1 truffle
- Calories: 135
- Sugar: 10
- Sodium: 55
- Fat: 9
- Saturated Fat: 3
- Carbohydrates: 13
- Fiber: 1
- Protein: 3
Keywords: chocolate peanut butter truffles, graduation party treats, easy homemade truffles, no-bake dessert, peanut butter chocolate recipe


