

It all started on a rainy Saturday afternoon when I found myself staring at a lonely jar of sourdough starter, wondering if I had the patience for another complicated bread recipe. Honestly, the idea of kneading dough and juggling precise timings always felt like more of a weekend marathon than a cozy kitchen project. But that day, I decided to toss caution to the wind and try a crispy no knead sourdough bread recipe made easy—no fancy equipment, no hours of kneading, just a simple approach that promised a crusty loaf with minimal fuss.
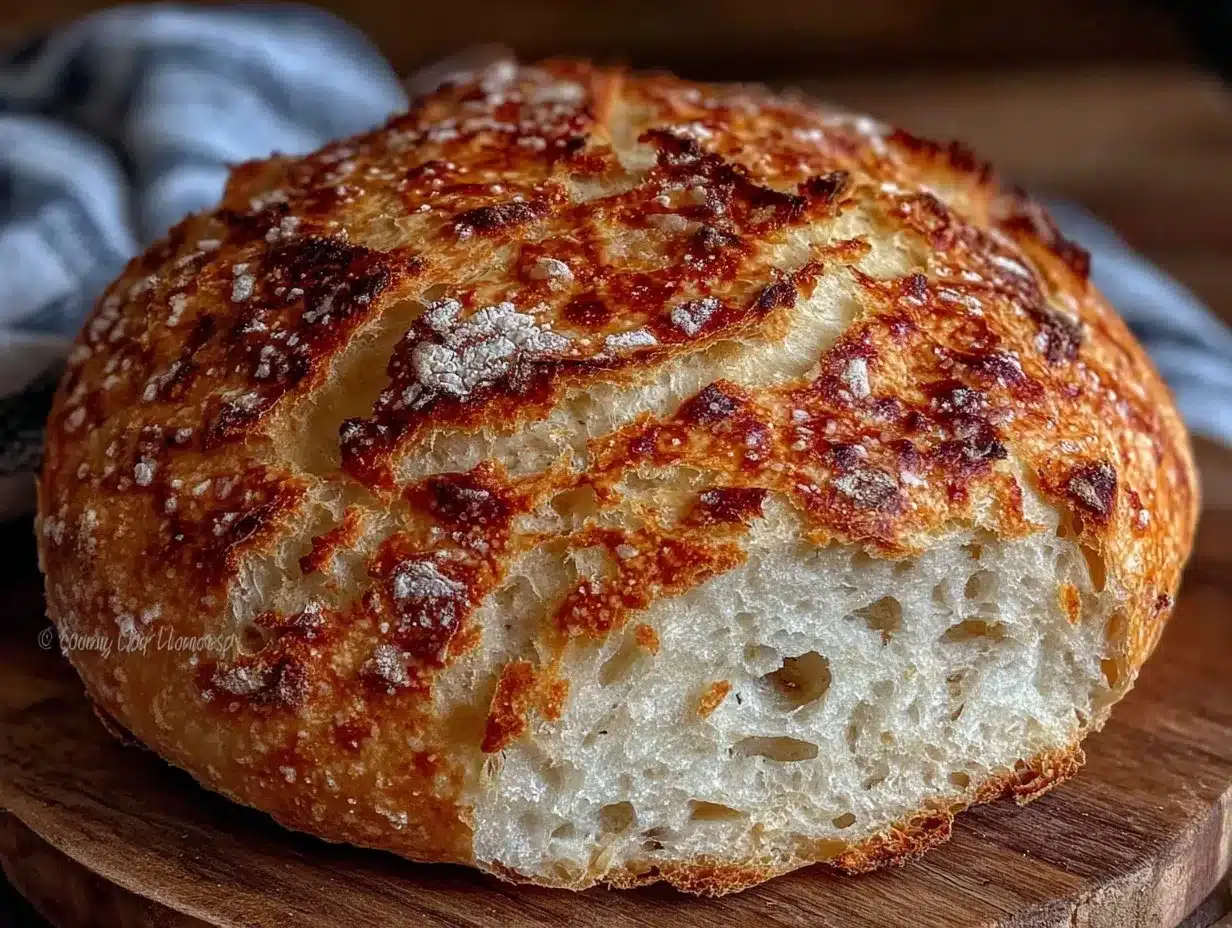
As the dough slowly bubbled and fermented on my countertop, filling the kitchen with that familiar tangy aroma, I was skeptical. Could something this hands-off really deliver the deep flavor and crispy crust I crave? When I finally slid the golden loaf out of my Dutch oven, that crackly crust and chewy crumb surprised me—it was exactly the kind of bread I’d hoped for, without the stress. Since then, this recipe has quietly become my weekend ritual, a little joy that’s both reliable and satisfying.
What sticks with me about this crispy no knead sourdough bread is how it manages to feel both effortless and rewarding. The simplicity lets me slow down without feeling overwhelmed, and the results never fail to impress friends who stop by unexpectedly. If you’ve ever thought sourdough was “too much work,” this loaf might just change your mind.
Why You’ll Love This Recipe
- Quick & Easy: Requires just a few minutes of hands-on prep and then some patient waiting—perfect for busy days when you want homemade bread without the hassle.
- Simple Ingredients: Uses basic pantry staples like flour, water, salt, and your sourdough starter—no fancy additives or mysterious flours needed.
- Perfect for Any Occasion: Whether it’s a lazy weekend breakfast or an impromptu dinner with friends, this loaf fits right in with any meal.
- Crowd-Pleaser: The crispy crust and tangy crumb get rave reviews, even from those who usually prefer store-bought bread.
- Unbelievably Delicious: The no knead method creates an open crumb and a crunchy exterior that’s pure comfort in every bite.
- What Sets It Apart: Unlike other sourdough recipes that demand constant attention, this one uses a slow fermentation and gentle folding technique, making the whole process forgiving and beginner-friendly.
- Emotional Connection: This bread isn’t just food—it’s the kind of loaf that makes you pause and savor the simple, satisfying pleasure of homemade baking.
What Ingredients You Will Need
This crispy no knead sourdough bread recipe uses straightforward, wholesome ingredients to achieve bold flavor and that signature crust without fuss. Most are pantry staples you probably already have on hand, and substitutions are simple if needed.
- Active sourdough starter (100g, bubbly and fed within the last 12 hours) – the heart of the bread’s flavor
- All-purpose flour (450g / 3 1/2 cups) – I like King Arthur for consistent results
- Water (350g / 1 1/2 cups, lukewarm) – room temperature works too; helps develop gluten gently
- Salt (10g / 2 tsp, fine sea salt preferred) – balances the sourness and strengthens the dough
Optional tweaks:
- Whole wheat flour (substitute up to half of the all-purpose for nuttier flavor)
- Rye flour (adds earthiness, replace 25% of all-purpose)
- Flaxseed or chia seeds (for crunch and nutrition, add 2 tbsp)
- Gluten-free flour blend (for gluten-free option, though texture will differ)
Pro tip: Always use a lively starter with visible bubbles for best rise. If your starter is shy, give it a feed a few hours before starting the dough.
Equipment Needed
- Mixing bowl: Large enough to hold the dough comfortably as it expands.
- Dutch oven or heavy oven-safe pot with lid: Crucial for creating a steamy environment that forms the crispy crust. If you don’t have one, a covered roasting pan or even a large oven-safe bowl inverted over the dough can work.
- Bench scraper or spatula: Handy for folding and handling sticky dough.
- Kitchen scale: For precise ingredient measurement—makes a huge difference in bread baking.
- Proofing basket or bowl lined with a clean kitchen towel: Helps shape the dough during the final rise.
From my experience, a well-seasoned Dutch oven yields the best crust, but don’t stress if you’re starting out—just make sure your pot is oven-safe up to 450°F (230°C). When not baking, keep your tools clean and dry to avoid any unwanted flavors in your next loaf.
Preparation Method
- Mix the dough: In a large bowl, combine 450g (3 1/2 cups) flour and 10g (2 tsp) salt. Stir in 100g (about 1/2 cup) active sourdough starter and 350g (1 1/2 cups) lukewarm water. Mix thoroughly until a shaggy dough forms. This should take about 2-3 minutes. The dough will be sticky and rough-looking—don’t worry, this is good.
- First rise (bulk fermentation): Cover the bowl loosely with a lid or plastic wrap. Let it rest at room temperature (about 70°F/21°C) for 12-18 hours. During this time, the dough will rise and develop flavor. You’ll notice bubbles appearing on the surface and the dough roughly doubling in size.
- Stretch and fold: After the bulk rise, gently scrape the dough onto a lightly floured surface. Using wet hands, fold the dough over itself 3-4 times to build structure without kneading. This should take 1-2 minutes. Place it back in the bowl and cover again for 30 minutes.
- Shape the dough: After the 30-minute rest, turn the dough out onto a well-floured work surface. Shape it into a tight ball by tucking edges underneath. Place it seam-side up in a floured proofing basket or bowl lined with a floured towel. Cover and let it proof for 1-2 hours until it looks puffy but not overinflated.
- Preheat the oven: Place your Dutch oven with the lid on inside the oven and preheat to 450°F (230°C) about 30 minutes before baking. The pot needs to be scorching hot to create steam and crisp crust.
- Bake the bread: Carefully transfer the dough from the basket onto parchment paper. Score the top with a sharp knife or razor blade for controlled expansion. Using oven mitts, remove the hot Dutch oven and lift the dough with parchment inside. Cover with the lid and bake for 30 minutes.
- Finish baking uncovered: After 30 minutes, take off the lid and bake for another 15-20 minutes to deepen the crust color and crispness. The bread should sound hollow when tapped on the bottom and measure an internal temperature of about 205°F (96°C).
- Cool completely: Let the loaf cool on a wire rack for at least 1 hour before slicing. This resting time finishes the crumb structure and prevents gumminess.
Note: Timing varies slightly depending on your kitchen’s temperature and starter strength, so use sensory cues—look for bubbles, dough bounce, and crust color as your guides!
Cooking Tips & Techniques
One of the trickiest parts of sourdough baking is timing the fermentation just right. Too short, and the bread won’t rise; too long, and it can become overly sour or collapse. I learned the hard way that keeping an eye on the dough’s appearance beats watching the clock.
Folding instead of kneading is a game-changer here—it helps develop gluten gently without exhausting you or the dough. Wet your hands to prevent sticking, and trust the dough to do its thing slowly.
Using a preheated Dutch oven traps steam, which is essential for that crispy crust. If you skip this step, your loaf will be tasty but lack the signature crunch.
Scoring the dough just before baking lets the bread expand beautifully. I like a single long slash down the middle for a rustic look, but feel free to get creative!
Finally, patience is key. Cooling the bread completely before slicing isn’t just a suggestion—it makes a noticeable difference in crumb texture.
Variations & Adaptations
If you want to switch things up, this crispy no knead sourdough bread recipe welcomes tweaks:
- Whole wheat or rye blend: Replace up to 50% of the all-purpose flour with whole wheat or rye for a heartier flavor and more nutrients.
- Seeded loaf: Stir in 2-3 tablespoons of sunflower, pumpkin, or flax seeds into the dough for extra texture and nutrition.
- Herb-infused bread: Add fresh or dried herbs like rosemary, thyme, or oregano to the mix for a fragrant twist.
- Gluten-free version: Use a gluten-free flour blend and add xanthan gum as per package directions; note that the texture and rise will differ.
- Different cooking vessels: If you lack a Dutch oven, try baking in a cast iron skillet with a tented foil cover or a heavy ceramic pot.
Personally, I love tossing in some cracked black pepper and parmesan cheese for a savory weekend treat—just fold it gently into the dough after the first rise.
Serving & Storage Suggestions
This sourdough bread is best enjoyed fresh, warm from the oven with butter melting into the crispy crust. It pairs beautifully with soups, stews, or simply topped with olive oil and sea salt.
To store, wrap the cooled loaf loosely in a clean kitchen towel and keep at room temperature for up to 2 days. For longer storage, slice and freeze the bread in a sealed bag—toast slices directly from frozen for a quick snack.
Reheating in a hot oven (350°F/175°C for 5-7 minutes) revives the crust crispness nicely.
Interestingly, the bread’s flavor deepens after a day or two as the sour notes mellow and the crumb firms up, so sometimes waiting a bit makes the loaf even more enjoyable.
Nutritional Information & Benefits
One slice (about 60g) of this crispy no knead sourdough bread typically contains around 150 calories, 5g protein, 1g fat, and 30g carbohydrates. It’s naturally low in sugar and made without preservatives.
Sourdough fermentation helps break down gluten and phytic acid, making the bread easier to digest for many people. Using whole grain or rye flours boosts fiber and essential minerals like magnesium and zinc.
This recipe is dairy-free and can be made gluten-free with substitutions, but it does contain wheat by default.
From a wellness perspective, homemade sourdough offers a satisfying, slow-digesting carbohydrate source that can fit into a balanced diet.
Conclusion
This crispy no knead sourdough bread recipe brings together simplicity and tradition in a way that feels approachable even if you’ve never baked bread before. It’s a comforting staple that rewards your patience with deep flavor and a crackly crust every time.
Feel free to play with the flour blends, add your favorite mix-ins, or try different baking vessels—the recipe is forgiving and flexible.
For me, this loaf has become a quiet kitchen companion, something to look forward to on slow mornings or when friends drop in unexpectedly. I hope it finds a place in your routine too.
Give it a try, share your results or adaptations, and let’s keep baking simple, satisfying bread together.
FAQs
How long does the dough need to rise for no knead sourdough bread?
Typically, the bulk fermentation takes 12-18 hours at room temperature, depending on your starter’s strength and kitchen warmth.
Can I use all whole wheat flour for this recipe?
You can, but the bread will be denser and less airy. I recommend replacing up to half of the all-purpose flour with whole wheat for balance.
What if I don’t have a Dutch oven?
Try a heavy oven-safe pot with a lid, a cast iron skillet covered with foil, or even a ceramic baking dish with a lid to trap steam.
How do I know when the bread is fully baked?
The crust should be deeply golden and crackly, and the loaf will sound hollow when tapped on the bottom. An internal temperature around 205°F (96°C) is ideal.
Can I refrigerate the dough during fermentation?
Yes, cold fermentation slows the process and can improve flavor. Just cover the dough tightly and let it rise in the fridge for up to 24 hours before shaping and baking.
Pin This Recipe!


Crispy No Knead Sourdough Bread Recipe Easy Perfect Homemade Loaf
A simple and beginner-friendly no knead sourdough bread recipe that yields a crusty loaf with a chewy crumb using minimal hands-on time and basic ingredients.
- Total Time: 13 hours
- Yield: 1 loaf (about 8-10 slices) 1x
Ingredients
- 100g active sourdough starter (about 1/2 cup), bubbly and fed within the last 12 hours
- 450g all-purpose flour (3 1/2 cups)
- 350g lukewarm water (1 1/2 cups)
- 10g fine sea salt (2 tsp)
- Optional: whole wheat flour (replace up to half of all-purpose flour)
- Optional: rye flour (replace 25% of all-purpose flour)
- Optional: flaxseed or chia seeds (2 tbsp)
- Optional: gluten-free flour blend (for gluten-free version)
Instructions
- Mix the dough: In a large bowl, combine 450g (3 1/2 cups) flour and 10g (2 tsp) salt. Stir in 100g (about 1/2 cup) active sourdough starter and 350g (1 1/2 cups) lukewarm water. Mix thoroughly until a shaggy dough forms, about 2-3 minutes.
- First rise (bulk fermentation): Cover the bowl loosely and let rest at room temperature (about 70°F/21°C) for 12-18 hours until dough doubles in size and bubbles appear.
- Stretch and fold: Gently scrape dough onto a floured surface. Using wet hands, fold dough over itself 3-4 times. Place back in bowl, cover, and rest for 30 minutes.
- Shape the dough: Turn dough onto floured surface and shape into a tight ball. Place seam-side up in a floured proofing basket or bowl lined with a floured towel. Cover and proof for 1-2 hours until puffy.
- Preheat oven: Place Dutch oven with lid inside oven and preheat to 450°F (230°C) for 30 minutes.
- Bake the bread: Transfer dough onto parchment paper, score the top, place inside hot Dutch oven, cover, and bake for 30 minutes.
- Finish baking uncovered: Remove lid and bake for an additional 15-20 minutes until crust is deeply golden and bread sounds hollow when tapped. Internal temperature should be about 205°F (96°C).
- Cool completely: Let loaf cool on wire rack for at least 1 hour before slicing.
Notes
Use a lively, bubbly starter for best rise. Wet your hands when folding to prevent sticking. Preheat the Dutch oven thoroughly to create steam for a crispy crust. Cool bread completely before slicing to avoid gumminess. Timing may vary depending on kitchen temperature and starter strength.
- Prep Time: 10 minutes
- Cook Time: 50 minutes
- Category: Bread
- Cuisine: American
Nutrition
- Serving Size: 1 slice (about 60g)
- Calories: 150
- Fat: 1
- Carbohydrates: 30
- Protein: 5
Keywords: sourdough bread, no knead bread, crispy crust, homemade bread, easy sourdough, beginner bread recipe


