
There was this one evening, late autumn, when the wind howled outside and the kitchen felt colder than usual. I was craving something warm, comforting, and simple—bread, you know, that kind you can tear apart with your hands and just feel like everything’s going to be okay. But honestly, kneading dough? Not my favorite thing after a long day. So, I decided to try a no-knead whole wheat bread recipe that promised a rustic, crispy crust without the elbow grease.
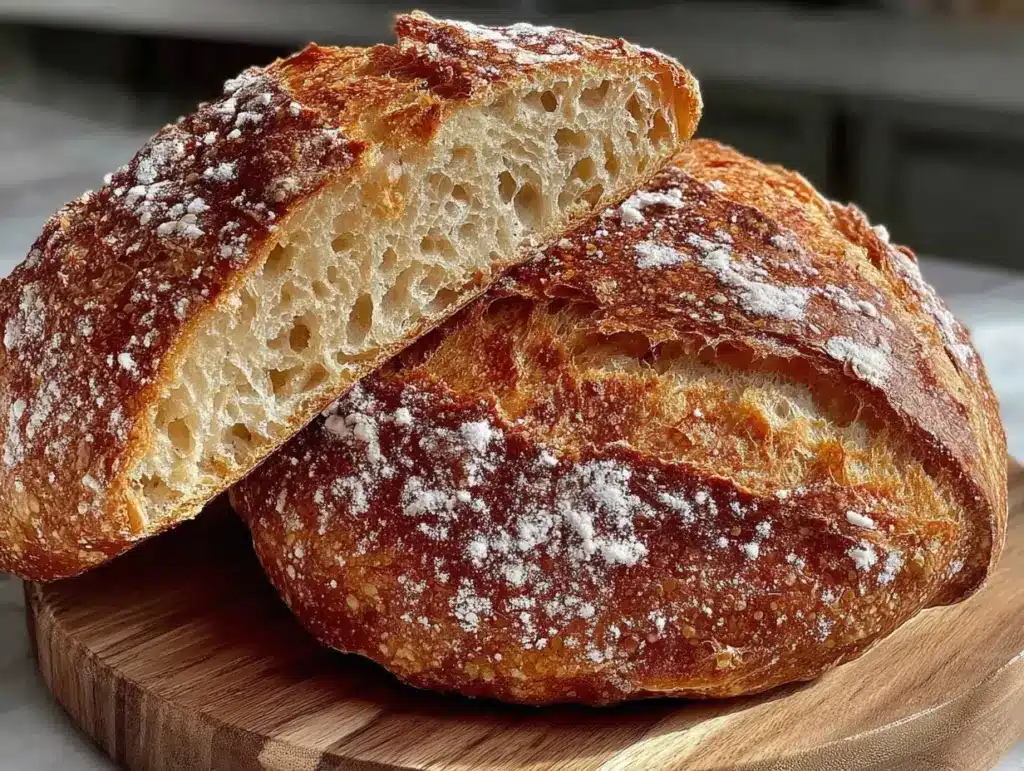
I was skeptical at first. Whole wheat bread often comes out dense or tough, and I assumed a no-knead version might just be a sad, crumbly loaf. But as the hours passed, the house filled with the smell of baked bread—nutty, earthy, with that golden crust crackling quietly as it cooled. When I finally sliced into it, there was this perfect balance of chewy crumb and crunchy crust. The kind of bread you want to eat plain, slathered with butter, or alongside a bowl of soup.
Since then, this recipe has become my go-to. It’s simple enough to make on a busy weekday but still feels like a small celebration of homemade goodness. The best part? No special equipment, no tricky techniques—just honest ingredients and a patient wait. It’s proof that sometimes the easiest recipes are the most rewarding, and this no-knead whole wheat bread with a rustic crispy crust has quietly stolen a spot in my heart (and my kitchen).
Why You’ll Love This Recipe
Honestly, this easy no-knead whole wheat bread recipe has been a game-changer in my kitchen. It’s not just about the taste—it’s about how effortlessly it comes together, even on chaotic days when I barely have time to breathe.
- Quick & Easy: Mix it up in 10 minutes and let the dough do the work overnight. Perfect for busy mornings or unplanned dinners.
- Simple Ingredients: You probably have everything in your pantry already—whole wheat flour, yeast, salt, and water. No fancy add-ins required.
- Perfect for Rustic Meals: It pairs brilliantly with soups, stews, or just good olive oil and cheese. Ideal for cozy dinners or casual weekends.
- Crowd-Pleaser: Even folks who usually shy away from whole wheat bread love this loaf. The crust’s crispiness and the soft interior win ’em over every time.
- Unbelievably Delicious: The hearty flavor of whole wheat is complemented by the crust’s crunch—honestly, it’s like artisan bread without the fuss.
What sets this recipe apart is the no-knead method combined with whole wheat flour, which often can be tricky. The long, slow rise develops flavor and texture without demanding your hands to go into dough yoga mode. Plus, baking it in a covered pot locks in moisture, giving you that bakery-quality crust at home. It’s bread that feels both rustic and refined, and honestly, it’s the kind of recipe that makes you look forward to baking again.
What Ingredients You Will Need
This recipe calls for straightforward, wholesome ingredients that come together to create bold flavor and satisfying texture without fuss. Here’s what you’ll need:
- Whole wheat flour: 3 cups (360g) – I prefer Bob’s Red Mill for its hearty texture and consistent quality.
- Instant yeast: 1 teaspoon – No need to proof it; it blends right in.
- Salt: 1 ½ teaspoons – I use fine sea salt for even distribution.
- Warm water: 1 ½ cups (360ml) – Around 100°F (38°C), just warm enough to activate the yeast without killing it.
That’s it! Just four basic ingredients. If you want to tweak it a bit:
- For gluten-free option: Swap whole wheat flour with a gluten-free blend, but note the texture will vary.
- For added sweetness: Stir in 1 tablespoon of honey or maple syrup before mixing.
- Optional seeds or nuts: Add ¼ cup sunflower seeds or chopped walnuts for crunch.
Each of these ingredients plays a key role: the whole wheat flour brings that nutty, robust flavor; the yeast works its magic slowly to develop the crumb; the salt balances and enhances; and the water hydrates and activates everything. I’ve tested this with different brands, but sticking to a quality whole wheat flour really makes a difference in the final bread’s character.
Equipment Needed
One of the best things about this no-knead whole wheat bread recipe is it doesn’t require fancy gadgets. Here’s what you’ll need:
- A large mixing bowl – for combining and letting the dough rise. Glass or stainless steel works great.
- A sturdy spoon or spatula – for mixing the sticky dough.
- A Dutch oven or heavy oven-safe pot with a lid – this creates a steamy environment for that crispy rustic crust. If you don’t have one, a cast iron pot or even a deep baking dish covered tightly with foil can work in a pinch.
- Parchment paper – to easily transfer the dough into the pot and prevent sticking.
- A kitchen towel – for covering the dough as it rises.
If you’re on a budget, you can skip the Dutch oven by using a baking sheet and placing a shallow pan of water in the oven to create steam. Just keep an eye on the crust as it may brown faster. I’ve tried both methods, and while the Dutch oven gives the best crust, the water pan method gets you close enough for casual loaves.
Preparation Method

- Mix the dry ingredients: In your large mixing bowl, combine 3 cups (360g) whole wheat flour, 1 teaspoon instant yeast, and 1 ½ teaspoons salt. Stir them together until evenly distributed. This takes about 2 minutes.
- Add water and stir: Pour in 1 ½ cups (360ml) warm water (around 100°F/38°C). Using a sturdy spoon or spatula, mix until you get a shaggy, sticky dough. It’ll look rough and a bit uneven, but that’s okay. This step should take 3-4 minutes.
- First rise: Cover the bowl with a kitchen towel or plastic wrap. Leave it on your countertop for 12 to 18 hours. The dough will bubble and double in size slowly. This slow fermentation gives it that rich flavor and airy crumb.
- Preheat the oven: About 30 minutes before baking, place your Dutch oven (or heavy pot with lid) inside the oven and preheat to 450°F (232°C). Heating the pot ensures a crisp crust.
- Shape the dough: Lightly flour a work surface and your hands. Gently turn the dough out onto it. It’ll be sticky, so use a bench scraper or spatula if needed. Fold the dough over itself once or twice to form a rough ball. Let it rest for 15 minutes.
- Prepare for baking: Place a sheet of parchment paper in a bowl or on a baking sheet. Set the dough ball on the parchment. Carefully remove the hot Dutch oven from the oven, lift the dough with the parchment, and place it inside. Cover with the lid.
- Bake covered: Bake for 30 minutes with the lid on. This traps steam and helps develop the crust.
- Bake uncovered: Remove the lid and bake for another 10-15 minutes until the crust is deep golden and crispy.
- Cool down: Transfer the bread to a wire rack and let it cool completely before slicing—about 1 to 2 hours. This step is crucial to finish the crumb setting.
Quick tips: If your dough feels too sticky to handle, dust your hands lightly with flour but avoid adding too much. The dough should be tacky to get that perfect open crumb. Also, listen for that crackling sound after baking—it’s a good sign your crust is just right.
Cooking Tips & Techniques
Working with no-knead whole wheat bread taught me some valuable lessons. First, patience is everything here. The long fermentation develops flavor and texture in a way quick-rise doughs can’t match. Don’t rush the rise; even if you peek and it looks bubbly, more time generally means better bread.
Use warm, not hot water. I once accidentally used boiling water, thinking it’d speed things up, and it killed the yeast instead—dough never rose. Keep that water around body temperature for a happy yeast party.
Handling sticky dough can be intimidating, but remember, no kneading means you don’t need to wrestle it. Use a bench scraper or wet hands to fold gently. Flour your surface lightly, but resist adding too much or your bread might turn out dry.
Preheating your Dutch oven is key. I tried baking in a cold pot once and the crust was dull and soft. Hot pot + covered baking traps steam and mimics professional ovens.
Last but not least, cooling completely before slicing helps the crumb finish setting. Cutting too soon can squash your bread’s airy texture. Trust me, it’s worth the wait!
Variations & Adaptations
This basic no-knead whole wheat bread recipe is like a blank canvas; I’ve played around with it quite a bit.
- Seeded loaf: Add 2 tablespoons of mixed seeds (pumpkin, sesame, flax) into the dough for a nutty crunch.
- Herb-infused bread: Toss in 1 tablespoon fresh chopped rosemary or thyme for an aromatic twist, perfect alongside roasted veggies.
- Part whole wheat, part white flour: Use 1 ½ cups whole wheat and 1 ½ cups bread flour to lighten the crumb if you want a less dense loaf but still with whole wheat flavor.
- Gluten-free: Substitute with a gluten-free baking mix, but expect a different texture—more crumbly and less chewy.
- Overnight cold ferment: Place the covered dough in the fridge overnight (12-18 hours) instead of room temp. It slows fermentation for deeper flavor and flexible timing.
Personally, I tried the seeded variation last winter, and it became an instant favorite. The seeds toasted right inside the crust, adding a satisfying texture that paired beautifully with melted butter and jam.
Serving & Storage Suggestions
This no-knead whole wheat bread shines best fresh out of the oven but also keeps well. Serve it at room temperature or lightly toasted to bring out its nutty flavor and crispy crust.
It pairs wonderfully with soups, stews, or a simple cheese platter. Honestly, a smear of good butter or olive oil is all you need to appreciate it.
To store, wrap the loaf in a clean tea towel or place it in a bread box to keep the crust crisp for up to 2 days. For longer storage, slice and freeze in an airtight bag. Toast slices straight from the freezer for a quick warm treat.
If the crust softens over time, pop the bread in a 350°F (175°C) oven for 5-10 minutes to refresh that crackling texture. Flavor also deepens after a day, so sometimes waiting a bit rewards you with even tastier bread.
Nutritional Information & Benefits
This whole wheat bread offers more than just good taste—it’s a nutrient-packed choice. Whole wheat flour provides fiber, B vitamins, and minerals like iron and magnesium, which help with digestion and sustained energy.
A typical slice (about 50g) contains roughly 120 calories, 4 grams of protein, and 3-4 grams of fiber. Compared to white bread, it’s a heartier option that keeps you fuller longer.
It’s naturally vegan and free from refined sugars or additives, making it a wholesome choice for most diets. Just watch out for gluten if you have sensitivities.
From a wellness perspective, making bread at home lets you control the ingredients and avoid preservatives. It’s also a satisfying ritual that connects you to your food in a way store-bought just can’t match.
Conclusion
Easy no-knead whole wheat bread with a rustic crispy crust is one of those recipes that quietly transforms everyday baking. It’s simple, forgiving, and delivers a loaf that feels special without demanding hours of work or fancy tools.
The recipe’s flexibility lets you make it your own, whether you want seeds, herbs, or a lighter crumb. It’s the kind of bread that invites you to slow down, enjoy small moments, and share around the table.
Personally, it’s become my little secret when I want homemade bread but don’t want to wrestle with dough. Give it a try, tweak it your way, and let me know how your loaf turns out. There’s something deeply satisfying about pulling a warm, crispy loaf from the oven—and I hope this recipe brings you that joy, too.
FAQs
Can I use all-purpose flour instead of whole wheat?
Yes, you can substitute all-purpose flour for a lighter texture, but you’ll lose some of the nutty flavor and fiber that whole wheat provides.
Do I really need to preheat the Dutch oven?
Preheating the Dutch oven is important to get that crispy crust. If you skip this, your bread might bake unevenly and have a softer crust.
How long can I keep this bread fresh?
Stored at room temperature wrapped in a towel or bread box, it stays fresh for about 2 days. For longer storage, slice and freeze it.
Can I add seeds or nuts to the dough?
Absolutely! Adding seeds like sunflower or flax, or nuts like walnuts, gives extra texture and flavor. Just fold them in during mixing.
What if my dough is too sticky to handle?
That’s normal for no-knead bread. Lightly flour your hands and surface, but avoid adding too much flour to keep the crumb airy. Using a bench scraper helps with handling sticky dough.
Pin This Recipe!


Easy No-Knead Whole Wheat Bread Recipe with Crispy Rustic Crust
A simple no-knead whole wheat bread recipe that yields a rustic, crispy crust and a chewy crumb, perfect for busy days and cozy meals.
- Total Time: 13 hours 55 minutes
- Yield: 1 loaf (about 8 servings) 1x
Ingredients
- 3 cups (360g) whole wheat flour
- 1 teaspoon instant yeast
- 1 ½ teaspoons salt
- 1 ½ cups (360ml) warm water (around 100°F/38°C)
Instructions
- In a large mixing bowl, combine 3 cups (360g) whole wheat flour, 1 teaspoon instant yeast, and 1 ½ teaspoons salt. Stir until evenly distributed (about 2 minutes).
- Pour in 1 ½ cups (360ml) warm water (around 100°F/38°C). Mix with a sturdy spoon or spatula until a shaggy, sticky dough forms (3-4 minutes).
- Cover the bowl with a kitchen towel or plastic wrap and leave on the countertop for 12 to 18 hours to rise until doubled and bubbly.
- About 30 minutes before baking, preheat the oven to 450°F (232°C) with a Dutch oven or heavy oven-safe pot inside.
- Lightly flour a work surface and hands. Turn the dough out onto it and fold over itself once or twice to form a rough ball. Let rest for 15 minutes.
- Place a sheet of parchment paper on a baking sheet or bowl. Set the dough ball on the parchment. Carefully remove the hot Dutch oven from the oven, lift the dough with the parchment, and place it inside. Cover with the lid.
- Bake covered for 30 minutes to trap steam and develop crust.
- Remove the lid and bake uncovered for another 10-15 minutes until the crust is deep golden and crispy.
- Transfer the bread to a wire rack and let cool completely for 1 to 2 hours before slicing.
Notes
Use warm water around 100°F (38°C) to activate yeast without killing it. Preheat the Dutch oven to ensure a crispy crust. Let bread cool completely before slicing to finish crumb setting. For gluten-free option, substitute whole wheat flour with gluten-free blend but expect different texture. Optional add-ins include seeds, nuts, honey, or herbs.
- Prep Time: 10 minutes
- Cook Time: 45 minutes
- Category: Bread
- Cuisine: American
Nutrition
- Serving Size: 1 slice (about 50g)
- Calories: 120
- Sodium: 290
- Fat: 1
- Saturated Fat: 0.2
- Carbohydrates: 24
- Fiber: 3.5
- Protein: 4
Keywords: no-knead bread, whole wheat bread, rustic bread, easy bread recipe, homemade bread, crispy crust bread


