
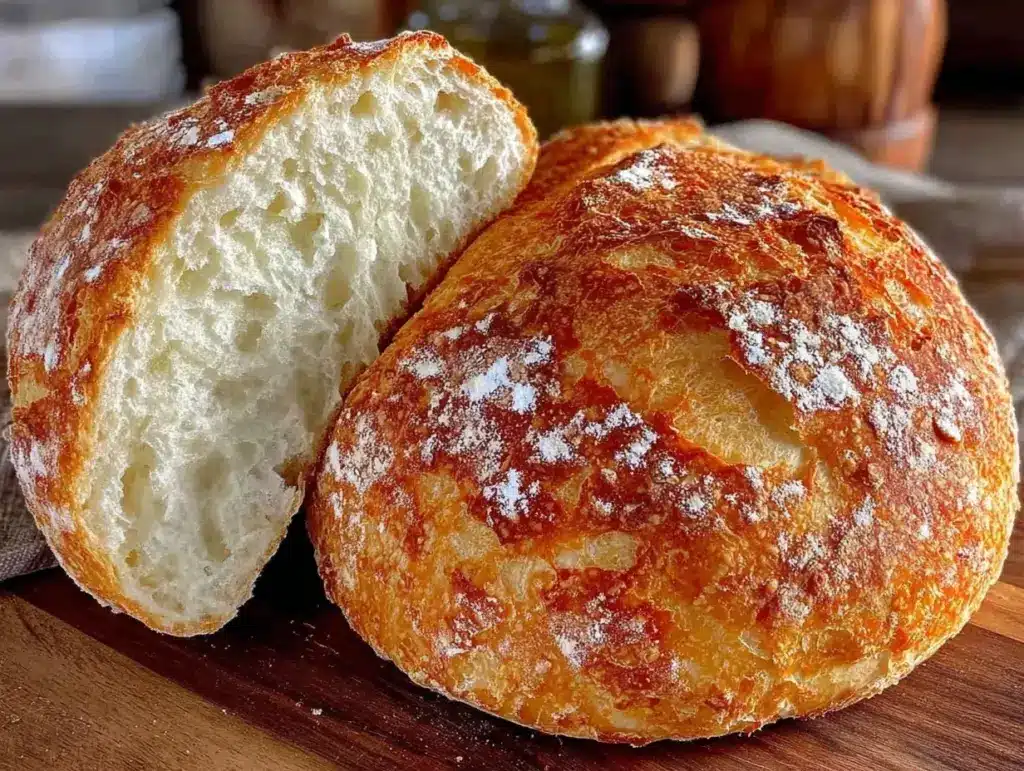
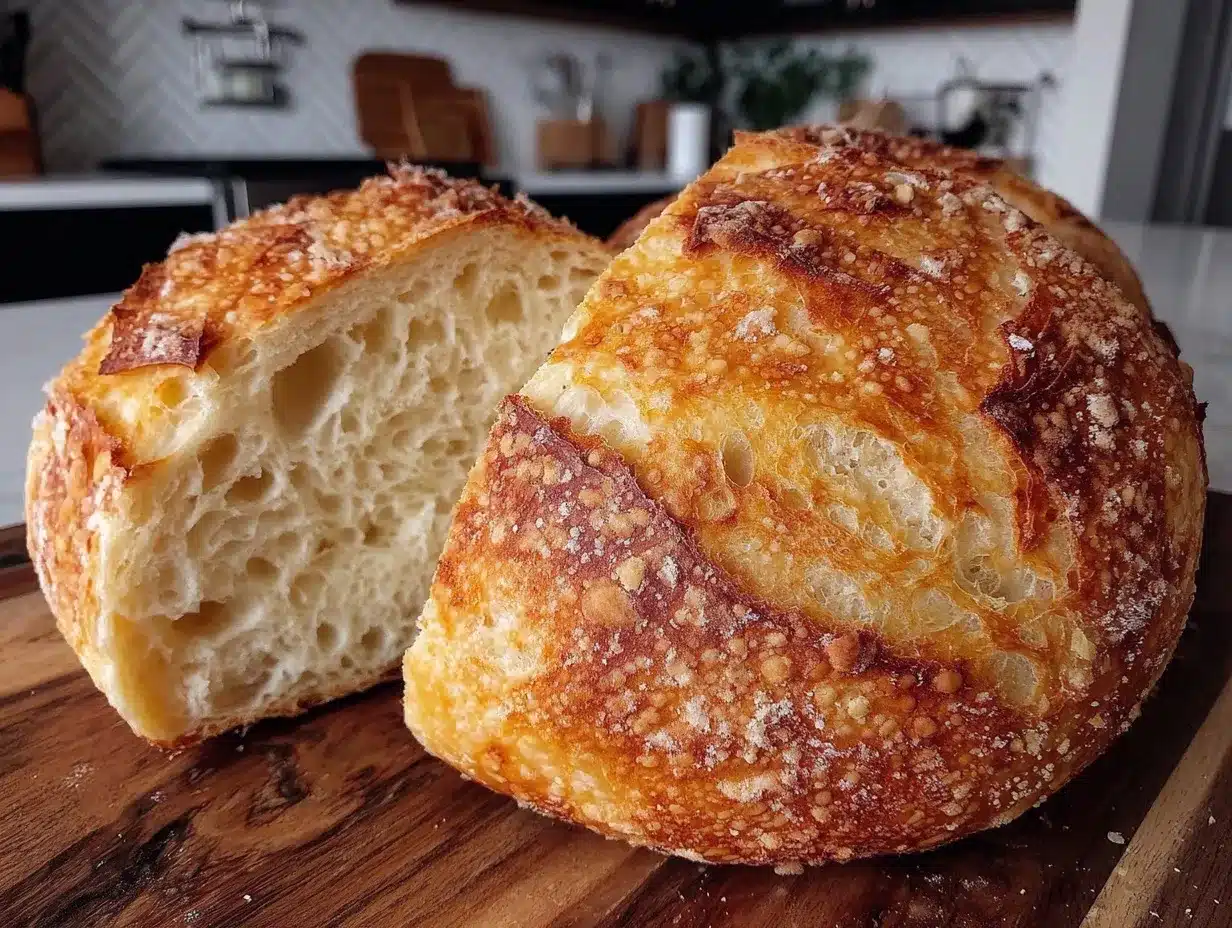
It all started on a sleepy Sunday morning when I was trying to make a loaf of bread without much fuss—or frankly, much hope. I’d tried a few yeast bread recipes before, but they always felt like a chore, with endless kneading, long rises, or tricky steps that left me doubting my baking skills. Honestly, I was just aiming for something edible, maybe a little soft and fluffy, to go with my homemade soup. What I got instead was a revelation: a fluffy, tender loaf that felt like it had risen effortlessly, like magic. This fluffy world’s easiest yeast bread recipe changed my kitchen game in a way I didn’t expect.
At first, I was skeptical about how simple the process really was. I mean, yeast bread usually means patience, right? But this recipe proved otherwise. There’s something about the soft crumb and pillowy texture that makes you want to keep slicing and toasting it, even if you’re not hungry. So many times I found myself sneaking bites before the bread even cooled down fully. It’s the kind of bread that brings a quiet sense of satisfaction—like you just made something honest and comforting with your own hands, without any stress.
What really stuck with me is how accessible it feels. No fancy tools, no mysterious ingredients, just a handful of pantry staples that come together quickly. It’s perfect for those moments when you want fresh bread but don’t want to spend hours in the kitchen or get your hands deep in dough. Somehow, this recipe makes homemade bread feel doable—even for a “not really a baker” like me. That quiet realization, that homemade bread can be fluffy and soft without complicated steps, is why this recipe has become my go-to and why I think you’ll love it too.
Why You’ll Love This Recipe
- Quick & Easy: Comes together in under 2 hours, making it perfect for busy weeknights or last-minute bread cravings.
- Simple Ingredients: Uses pantry staples like all-purpose flour, yeast, sugar, salt, and water—no specialty shopping required.
- Perfect for Any Occasion: Great for sandwiches, toast, or just slathering with butter for cozy breakfasts or casual dinners.
- Crowd-Pleaser: Always earns compliments from family and friends, even those who say they’re “not into baking.”
- Unbelievably Delicious: Soft, tender crumb with a light crust that’s just right—not too hard, not soggy—ideal for everyday eating.
This recipe isn’t like those other yeast bread recipes that call for complicated kneading or multiple rises. Instead, it uses a no-fuss mixing method that almost feels like cheating—but in the best way possible. The secret is in the gentle handling and a little patience during the rise, which creates that perfect fluffy texture. It’s a recipe I trust because I’ve tested it over and over, tweaking it just enough to be foolproof without losing any of that homemade charm.
Plus, it’s the kind of bread that makes you close your eyes after the first bite because it tastes so comforting and real. Whether you’re feeding a hungry crowd or just want a little slice of homemade goodness for yourself, this yeast bread recipe is a winner every time.
What Ingredients You Will Need
This recipe uses simple, wholesome ingredients to deliver bold flavor and satisfying texture without the fuss. Most of the items are pantry staples, and if you’re missing something, there are easy swaps to keep you going.
- All-purpose flour: 4 cups (480g) – I like King Arthur for consistent results, but any good-quality flour works.
- Instant yeast: 2 1/4 teaspoons (one packet) – Instant yeast works best here because it doesn’t require proofing.
- Sugar: 2 tablespoons – Just enough to feed the yeast and add a touch of sweetness.
- Salt: 1 1/2 teaspoons – Balances flavor; don’t skip it!
- Warm water: 1 1/2 cups (360ml), about 110°F (43°C) – Warm, not hot, to activate the yeast properly.
- Olive oil or melted butter: 2 tablespoons – Adds richness and keeps the bread soft (use dairy-free butter if needed).
Optional:
- Milk: Substitute half of the water with warm milk for a richer flavor and softer crumb.
- Honey: Swap sugar for honey if you prefer a natural sweetener (use slightly less).
- Gluten-free option: Use a gluten-free all-purpose blend, but note the texture will differ slightly.
These ingredients come together in a way that feels honest and straightforward. The warm water wakes up the instant yeast quickly, and the tiny bit of sugar helps it bloom without fuss. I’ve found that using fresh yeast packets or reliable brands really makes a difference in rise time and flavor. If you want to experiment, swapping out olive oil for melted butter gives a cozy richness that reminds me of bakery bread.
Equipment Needed
- Large mixing bowl: Big enough to hold the dough comfortably as it rises. I use a 5-quart glass bowl for easy monitoring.
- Measuring cups and spoons: For precise ingredient amounts—especially important with yeast and salt.
- Wooden spoon or spatula: To mix the dough without overworking it.
- Loaf pan (8 1/2 x 4 1/2 inches): For shaping the bread and getting that classic loaf shape.
- Kitchen towel or plastic wrap: To cover the dough during rising and keep it cozy.
- Oven thermometer (optional): Handy to check that your oven is at the right temperature, especially for beginners.
If you don’t have a loaf pan, a baking sheet lined with parchment paper works fine—just shape the dough into a round or oval loaf. I’ve tried mixing the dough in a stand mixer with a dough hook, but honestly, stirring by hand works just as well for this recipe and gives a nice tactile connection to the bread-making process.
Preparation Method
- Mix Dry Ingredients: In your large mixing bowl, combine 4 cups (480g) of all-purpose flour, 2 1/4 teaspoons of instant yeast, 2 tablespoons of sugar, and 1 1/2 teaspoons of salt. Give it a good stir to blend everything evenly. This step preps the base of your dough and ensures the yeast and salt are well distributed.
- Add Wet Ingredients: Pour in 1 1/2 cups (360ml) of warm water (about 110°F/43°C) and 2 tablespoons of olive oil or melted butter. Stir gently with a wooden spoon or spatula until a shaggy dough forms. It will be slightly sticky but cohesive. Don’t worry if it looks rough—that’s perfect.
- First Rise: Cover the bowl tightly with a kitchen towel or plastic wrap. Set it in a warm, draft-free spot to rise for about 1 hour, or until doubled in size. You’ll notice the dough puffing up and smelling pleasantly yeasty, which is your signal that it’s ready. If your kitchen is cool, placing the bowl inside a turned-off oven with the light on helps.
- Shape the Dough: Lightly flour your work surface and gently turn the dough out. Fold the edges toward the center a couple of times to form a smooth ball. Then, place it seam-side down into a greased 8 1/2 x 4 1/2-inch loaf pan. Cover again and let it rise for 30 to 45 minutes, until it’s puffed up about an inch above the pan’s rim.
- Bake the Bread: Preheat your oven to 375°F (190°C). Bake the loaf for 30 to 35 minutes, until the crust is golden brown and the bread sounds hollow when tapped on the bottom. If you have an instant-read thermometer, the internal temperature should be about 190°F (88°C). Remove from the oven and cool on a wire rack before slicing.
Pro tip: If the crust browns too fast, tent the loaf loosely with foil halfway through baking. I learned this the hard way after one batch got a crust darker than I wanted but still raw inside—lesson learned!
Cooking Tips & Techniques
Getting fluffy yeast bread right the first time feels like a small victory, but there are a few tricks I’ve picked up that make this recipe foolproof.
- Use warm—not hot—water: Yeast is living stuff, and water that’s too hot can kill it. Aim for about 110°F (43°C); it should feel warm to the touch but not scalding.
- Don’t skip the second rise: This step lets the dough relax and develop that soft, airy crumb. It might be tempting to rush, but patience pays off here.
- Gentle handling: When shaping the dough, be kind. Overworking can make the bread tough. Just fold and tuck lightly.
- Check your yeast’s freshness: Old yeast can be sluggish. I always keep a fresh packet handy and store it in the fridge to extend its life.
- Oven temperature accuracy: If your oven runs hot or cool, it affects baking times and crust color. An oven thermometer is a budget-friendly tool that saves headaches.
I once tried skipping the oil to make the bread “healthier,” but it ended up dry and crumbly. Lesson learned: a little fat keeps the crumb soft and tasty. Also, I recommend letting the bread cool fully before slicing; it’s tempting not to, but the texture is much better once it’s rested.
Variations & Adaptations
This yeast bread recipe is a blank canvas you can tweak to suit your taste or dietary needs.
- Herb-Infused: Add 1 tablespoon of dried herbs like rosemary, thyme, or oregano to the dry ingredients for a fragrant twist.
- Whole Wheat Swap: Replace half the all-purpose flour with whole wheat flour for a nuttier, heartier loaf. You might need to add a splash more water to get the right dough consistency.
- Gluten-Free Version: Use a 1:1 gluten-free flour blend designed for baking. Keep an eye on the dough as it will behave differently; you might need extra moisture or a binding agent like xanthan gum.
- Sweet Bread: Increase sugar to 1/4 cup and add a teaspoon of cinnamon or vanilla extract for a soft, sweet bread great with jam.
- Milk Bread: Substitute half of the water with warm milk and add an egg to enrich the dough, making it extra tender and rich.
Once, I tossed in some grated cheddar and chopped jalapeños for a spicy, cheesy loaf that disappeared fast at a family picnic. It’s fun to experiment, and this recipe’s forgiving nature makes it a perfect base for creativity.
Serving & Storage Suggestions
This fluffy yeast bread is best enjoyed fresh, slightly warm, and slathered with butter or your favorite spread. It pairs wonderfully with homemade soups, salads, or as a sturdy base for sandwiches.
To store, keep the bread wrapped tightly in plastic wrap or a bread bag at room temperature for up to 3 days. For longer storage, slice and freeze the loaf in an airtight bag; individual slices thaw quickly and toast up beautifully.
When reheating, toast slices lightly or warm the whole loaf in a 300°F (150°C) oven for 10 minutes wrapped in foil to revive softness. Over time, the flavors deepen slightly, making toasted leftovers even more satisfying.
Nutritional Information & Benefits
Per slice (approximate, based on 12 slices): 140 calories, 3g fat, 25g carbohydrates, 3g protein.
This bread provides a source of energy-rich carbohydrates and some protein from the flour. Using olive oil adds heart-healthy fats, and if you swap some water for milk, you get a small boost of calcium and vitamin D. It’s naturally free from preservatives, and you control the ingredients, making it a wholesome choice over store-bought options that often contain additives.
For those watching gluten intake, this recipe can be adapted with gluten-free flour blends, though texture may vary. It’s a great way to enjoy fresh bread without the extra fuss or added sugars typical in commercial loaves.
Conclusion
This fluffy world’s easiest yeast bread recipe has become my quiet kitchen hero—a reminder that homemade bread doesn’t need to be intimidating or complicated. It’s soft, light, and surprisingly simple, making fresh bread accessible for anyone willing to give it a shot. I love how it fits seamlessly into busy days, turning simple meals into moments of comfort and joy.
Feel free to customize it to your taste—whether that’s adding herbs, swapping flours, or making it sweet. Baking bread at home is about more than just the loaf; it’s a small act of care you can enjoy again and again. I’d love to hear how you make it your own, so don’t hesitate to share your tweaks or questions below.
Here’s to many cozy mornings and warm slices ahead!
FAQs
Can I use active dry yeast instead of instant yeast?
Yes, you can! If using active dry yeast, dissolve it in the warm water with sugar first and let it sit for about 5-10 minutes until foamy before mixing with the flour.
Why did my bread turn out dense instead of fluffy?
Common reasons include water that’s too hot (killing the yeast), not enough rise time, or overworking the dough. Make sure to follow the temperature guidelines and allow the dough to double in size during rising.
Can I make this bread without a loaf pan?
Absolutely! Shape the dough into a round or oval loaf and bake on a parchment-lined baking sheet. The baking time might be a bit shorter, so watch for a golden crust.
How long does homemade yeast bread stay fresh?
At room temperature, it stays fresh for about 2-3 days when wrapped well. For longer storage, slice and freeze—it will keep for up to 3 months.
Is it possible to make this bread vegan?
Yes! Just use olive oil instead of butter and ensure any optional ingredients like milk are replaced with plant-based alternatives. The recipe as written is naturally egg-free.
Pin This Recipe!

Fluffy Yeast Bread Recipe Easy Homemade Soft Bread in 5 Steps
A simple and quick yeast bread recipe that yields a soft, fluffy loaf with minimal kneading and easy steps, perfect for beginners and busy cooks.
- Total Time: 1 hour 45 minutes
- Yield: 12 slices 1x
Ingredients
- 4 cups (480g) all-purpose flour
- 2 1/4 teaspoons (one packet) instant yeast
- 2 tablespoons sugar
- 1 1/2 teaspoons salt
- 1 1/2 cups (360ml) warm water (about 110°F/43°C)
- 2 tablespoons olive oil or melted butter
Instructions
- Mix Dry Ingredients: In a large mixing bowl, combine 4 cups (480g) of all-purpose flour, 2 1/4 teaspoons of instant yeast, 2 tablespoons of sugar, and 1 1/2 teaspoons of salt. Stir to blend evenly.
- Add Wet Ingredients: Pour in 1 1/2 cups (360ml) of warm water (about 110°F/43°C) and 2 tablespoons of olive oil or melted butter. Stir gently until a shaggy dough forms.
- First Rise: Cover the bowl tightly with a kitchen towel or plastic wrap. Set in a warm, draft-free spot to rise for about 1 hour, or until doubled in size.
- Shape the Dough: Lightly flour your work surface and turn the dough out. Fold edges toward the center to form a smooth ball. Place seam-side down into a greased 8 1/2 x 4 1/2-inch loaf pan. Cover and let rise for 30 to 45 minutes until puffed about an inch above the pan’s rim.
- Bake the Bread: Preheat oven to 375°F (190°C). Bake the loaf for 30 to 35 minutes until crust is golden brown and bread sounds hollow when tapped. Internal temperature should be about 190°F (88°C). Cool on a wire rack before slicing.
Notes
Use warm water (about 110°F) to activate yeast without killing it. Do not skip the second rise for best texture. Tent with foil if crust browns too fast. Let bread cool fully before slicing. Fresh yeast packets improve rise time and flavor. Can substitute half water with warm milk for richer flavor. For gluten-free, use a gluten-free all-purpose blend but texture will differ.
- Prep Time: 15 minutes
- Cook Time: 30-35 minutes
- Category: Bread
- Cuisine: American
Nutrition
- Serving Size: 1 slice
- Calories: 140
- Sugar: 2
- Sodium: 230
- Fat: 3
- Saturated Fat: 0.5
- Carbohydrates: 25
- Fiber: 1
- Protein: 3
Keywords: yeast bread, homemade bread, soft bread, easy bread recipe, fluffy bread, no knead bread, quick bread


