
Introduction
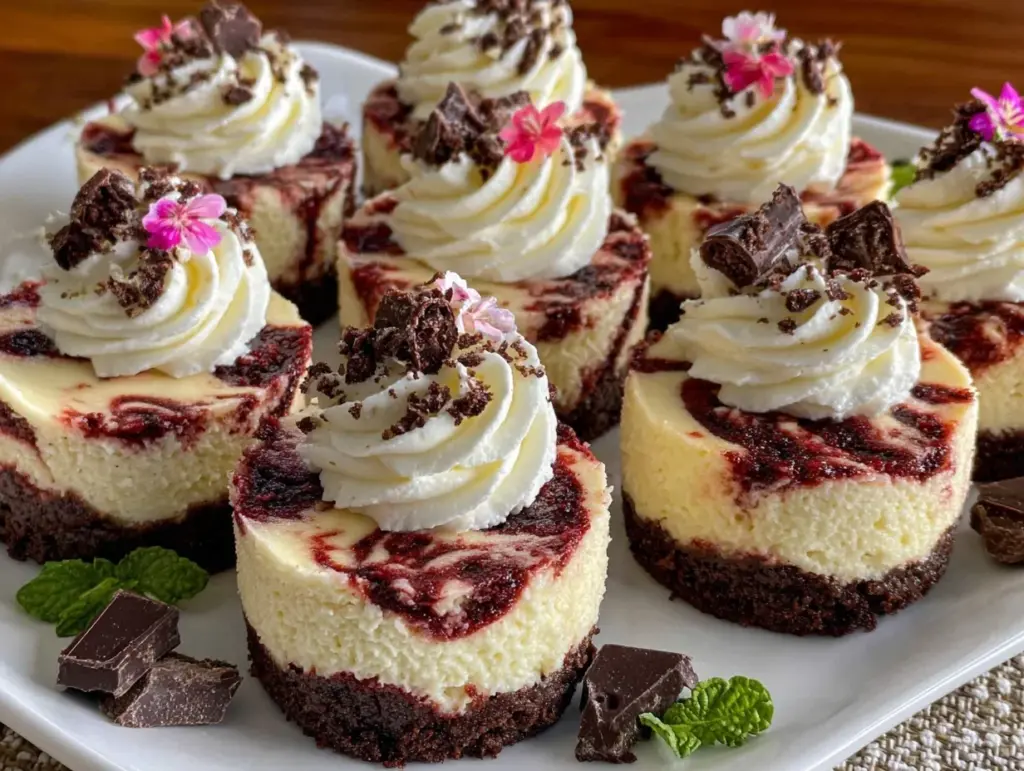
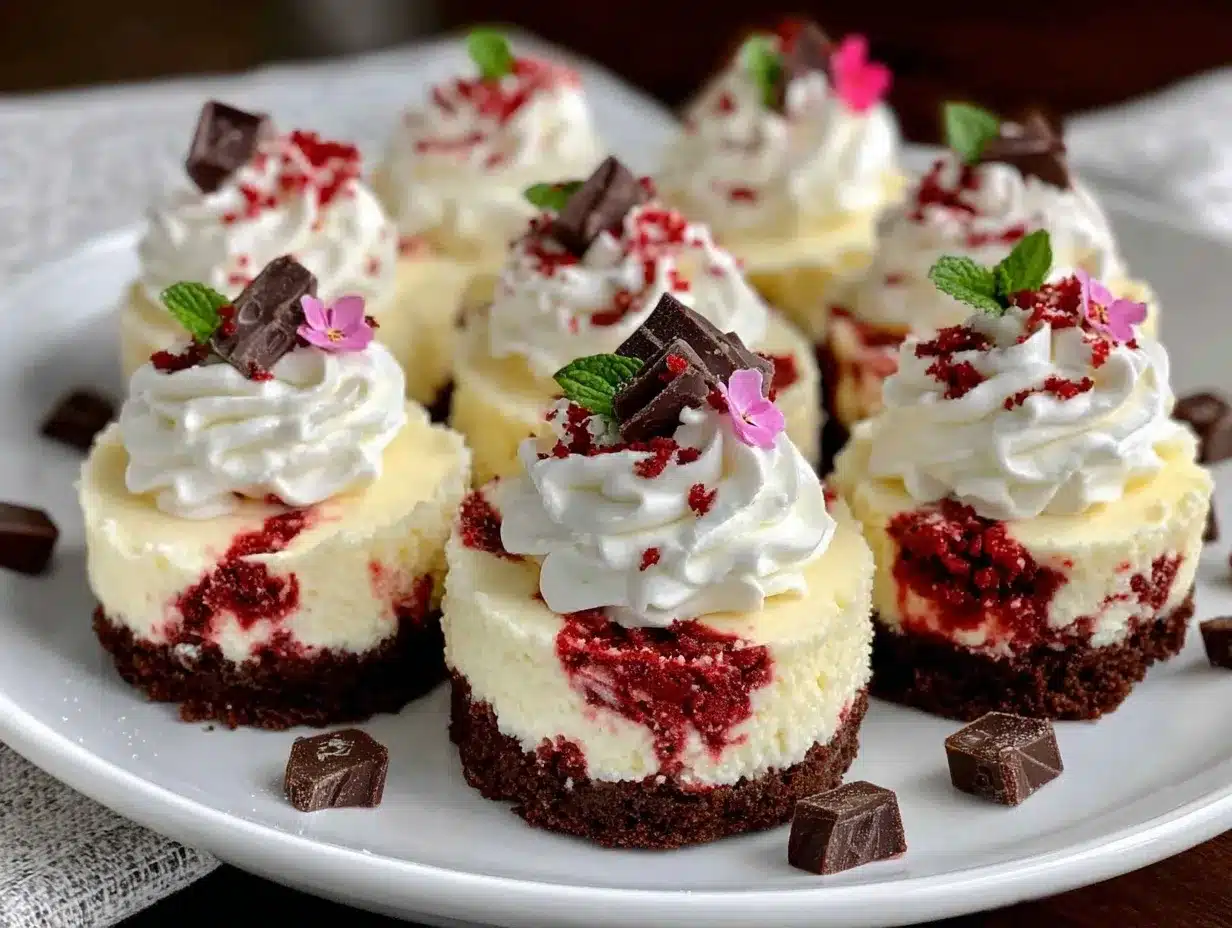
The first bite of these no-bake mini red velvet swirl cheesecakes feels like a creamy indulgence wrapped in a velvety hug. It’s the perfect dessert for parties, date nights, or just a cozy evening with family. I still remember the first time I made them—my kitchen smelled like a bakery, and my friends couldn’t stop raving about the rich, smooth texture paired with the vibrant red velvet swirls. These cheesecakes are as stunning to look at as they are to eat, making them a showstopper dessert without the need for an oven!
What I love about this recipe is how straightforward it is. No advanced baking skills are required, no complicated ingredients—just simple steps that result in a dessert that’s guaranteed to impress. Plus, they’re portioned perfectly for individual servings, so no slicing or messy plating needed. Trust me, these irresistible mini cheesecakes will be the star of your dessert table. And the best part? You get the creamy tang of cheesecake combined with the classic cocoa notes of red velvet in every bite.
Why You’ll Love This Recipe
- Effortless Elegance: These no-bake mini cheesecakes look like they came straight out of a patisserie, but they’re incredibly easy to make.
- Perfect for Parties: Individual portions mean no messy cutting or serving. They’re as visually impressive as they are delicious!
- No Oven Required: No need to preheat or stress over baking times—this recipe is entirely no-bake, ideal for hot summer months.
- Rich and Creamy: The cheesecake base is ultra-smooth, while the red velvet swirl adds just the right touch of cocoa and vibrancy.
- Customizable: You can tweak the colors, flavors, and presentation to suit the season or occasion.
- Kid and Crowd Approved: Whether it’s a birthday party or a holiday gathering, these mini cheesecakes always get rave reviews.
This isn’t just another cheesecake recipe—it’s a dessert that makes you pause and savor the moment. The balance of sweetness, creaminess, and visual appeal is truly unforgettable.
What Ingredients You Will Need
This recipe uses simple, easy-to-find ingredients that come together beautifully. Here’s what you’ll need:
- For the crust:
- 1 cup (120 g) graham cracker crumbs
- 2 tablespoons (25 g) granulated sugar
- 5 tablespoons (70 g) unsalted butter, melted
- For the cheesecake filling:
- 16 oz (450 g) cream cheese, softened
- 1 cup (240 ml) heavy cream
- 3/4 cup (150 g) granulated sugar
- 1 teaspoon vanilla extract
- 2 tablespoons unsweetened cocoa powder
- Red gel food coloring (adjust for desired intensity)
- Optional Garnish:
- Whipped cream
- Chocolate shavings
- Sprinkles or edible glitter
If you don’t have graham crackers, you can use crushed Oreos or digestive biscuits for the crust. And for dairy-free options, swap cream cheese and heavy cream with vegan alternatives like cashew cream or coconut-based products.
Equipment Needed
- Muffin tin or silicone cupcake molds
- Electric hand mixer or stand mixer
- Mixing bowls
- Rubber spatula
- Measuring cups and spoons
- Piping bag (optional, for garnishes)
If you don’t have a muffin tin, you can use small ramekins or even disposable cupcake liners. And if you’re missing a mixer, a whisk and some elbow grease will get the job done—just make sure your cream cheese is fully softened!
Detailed Preparation Method
- Prepare the crust: In a mixing bowl, combine graham cracker crumbs, sugar, and melted butter. Stir until the mixture resembles wet sand. Divide evenly into the muffin tin, pressing firmly to create a compact base for each cheesecake. Chill in the fridge for at least 15 minutes.
- Make the cheesecake filling: Beat softened cream cheese and sugar together until smooth and creamy. Add vanilla extract and continue mixing. In a separate bowl, whip heavy cream until stiff peaks form, then gently fold it into the cream cheese mixture.
- Create the red velvet swirl: Divide the cheesecake filling into two portions. In one portion, add cocoa powder and enough red food coloring to achieve your desired shade of red velvet. Stir until fully incorporated.
- Layer and swirl: Spoon a layer of plain cheesecake filling into each crust, followed by a dollop of red velvet filling. Use a toothpick or skewer to gently swirl the colors together for a marbled effect.
- Chill to set: Cover the muffin tin with plastic wrap and refrigerate for at least 4 hours or overnight for best results.
- Garnish and serve: Once set, carefully remove the mini cheesecakes from the tin. Top with whipped cream, chocolate shavings, or your favorite sprinkles before serving.
The swirling step is where you can have fun—experiment with patterns or create unique designs that wow your guests!
Cooking Tips & Techniques
- Room temperature ingredients: Make sure your cream cheese is softened and your heavy cream is chilled for the best texture.
- Chilling is key: Don’t rush the setting process. The longer these chill, the firmer and creamier they’ll be.
- Swirl technique: For cleaner, more vivid swirls, use a toothpick or chopstick instead of a spoon.
- Adjust sweetness: If you prefer a less sweet cheesecake, reduce the sugar by 1-2 tablespoons.
And here’s a tip I learned the hard way—don’t over-mix the filling. Be gentle when folding in the whipped cream to maintain the airy texture.
Variations & Adaptations
- Seasonal Twist: Swap the red velvet swirl for a green matcha swirl during spring or a pumpkin spice swirl for fall.
- Dietary Adaptations: Use gluten-free graham crackers for the crust or dairy-free alternatives for the filling.
- Flavor Preferences: Skip the cocoa powder and food coloring to make classic vanilla mini cheesecakes instead.
One variation I’ve tried that’s always a hit is adding a layer of raspberry jam under the cheesecake filling for a fruity surprise!
Serving & Storage Suggestions
Serve these mini cheesecakes chilled for best flavor—straight out of the fridge. Arrange them on a tiered dessert stand for a stunning presentation, and pair them with coffee, tea, or even a glass of champagne for a festive feel.
Leftovers can be stored in an airtight container in the fridge for up to 3 days. To freeze, wrap each cheesecake individually in plastic wrap and store in a freezer-safe bag. Thaw in the fridge overnight before enjoying.
Nutritional Information & Benefits
Each mini cheesecake contains approximately:
- Calories: 250
- Fat: 18g
- Carbohydrates: 18g
- Protein: 3g
These cheesecakes offer a delicious balance of indulgence and portion control. Cocoa powder adds a subtle antioxidant boost, while the individual servings help satisfy your sweet tooth without overindulging!
Conclusion
These irresistible no-bake mini red velvet swirl cheesecakes are the ultimate party dessert—easy, elegant, and downright delicious. Whether you’re hosting guests or just treating yourself, this recipe is sure to become a favorite. The creamy texture, bold colors, and rich flavors make every bite unforgettable.
If you give this recipe a try, I’d love to hear how it turned out! Share your adaptations, photos, or any questions in the comments below. Let’s keep spreading the cheesecake love, one swirl at a time!
FAQs
Can I make these cheesecakes ahead of time?
Absolutely! You can prepare them a day in advance and store them in the fridge until ready to serve.
Can I use a different crust instead of graham crackers?
Yes, crushed Oreos or digestive biscuits work great as alternatives!
Do I need to use food coloring?
No, you can skip the food coloring for a natural cocoa swirl or use a different color to match your theme.
How do I remove the cheesecakes from the tin without breaking them?
Use a small offset spatula or run a knife gently around the edges before lifting them out.
Can I freeze these mini cheesecakes?
Yes, they freeze beautifully! Just wrap them individually and thaw in the fridge before serving.
Pin This Recipe!


Irresistible No-Bake Mini Cheesecakes Recipe Perfect for Parties
These no-bake mini red velvet swirl cheesecakes are creamy, indulgent, and perfect for parties or cozy evenings. Stunning to look at and easy to make, they’re a showstopper dessert without the need for an oven.
- Total Time: 4 hours 20 minutes
- Yield: 12 servings 1x
Ingredients
- 1 cup graham cracker crumbs
- 2 tablespoons granulated sugar
- 5 tablespoons unsalted butter, melted
- 16 oz cream cheese, softened
- 1 cup heavy cream
- 3/4 cup granulated sugar
- 1 teaspoon vanilla extract
- 2 tablespoons unsweetened cocoa powder
- Red gel food coloring
- Optional: whipped cream
- Optional: chocolate shavings
- Optional: sprinkles or edible glitter
Instructions
- In a mixing bowl, combine graham cracker crumbs, sugar, and melted butter. Stir until the mixture resembles wet sand. Divide evenly into the muffin tin, pressing firmly to create a compact base for each cheesecake. Chill in the fridge for at least 15 minutes.
- Beat softened cream cheese and sugar together until smooth and creamy. Add vanilla extract and continue mixing. In a separate bowl, whip heavy cream until stiff peaks form, then gently fold it into the cream cheese mixture.
- Divide the cheesecake filling into two portions. In one portion, add cocoa powder and enough red food coloring to achieve your desired shade of red velvet. Stir until fully incorporated.
- Spoon a layer of plain cheesecake filling into each crust, followed by a dollop of red velvet filling. Use a toothpick or skewer to gently swirl the colors together for a marbled effect.
- Cover the muffin tin with plastic wrap and refrigerate for at least 4 hours or overnight for best results.
- Once set, carefully remove the mini cheesecakes from the tin. Top with whipped cream, chocolate shavings, or your favorite sprinkles before serving.
Notes
[‘Make sure your cream cheese is softened and your heavy cream is chilled for the best texture.’, ‘Don’t rush the setting process. The longer these chill, the firmer and creamier they’ll be.’, ‘For cleaner, more vivid swirls, use a toothpick or chopstick instead of a spoon.’, ‘If you prefer a less sweet cheesecake, reduce the sugar by 1-2 tablespoons.’, ‘Don’t over-mix the filling to maintain the airy texture.’]
- Prep Time: 20 minutes
- Cook Time: 4 hours (chilling time)
- Category: Dessert
- Cuisine: American
Nutrition
- Serving Size: 1 mini cheesecake
- Calories: 250
- Fat: 18
- Carbohydrates: 18
- Protein: 3
Keywords: no-bake, mini cheesecakes, red velvet, party dessert, easy dessert, cheesecake recipe


