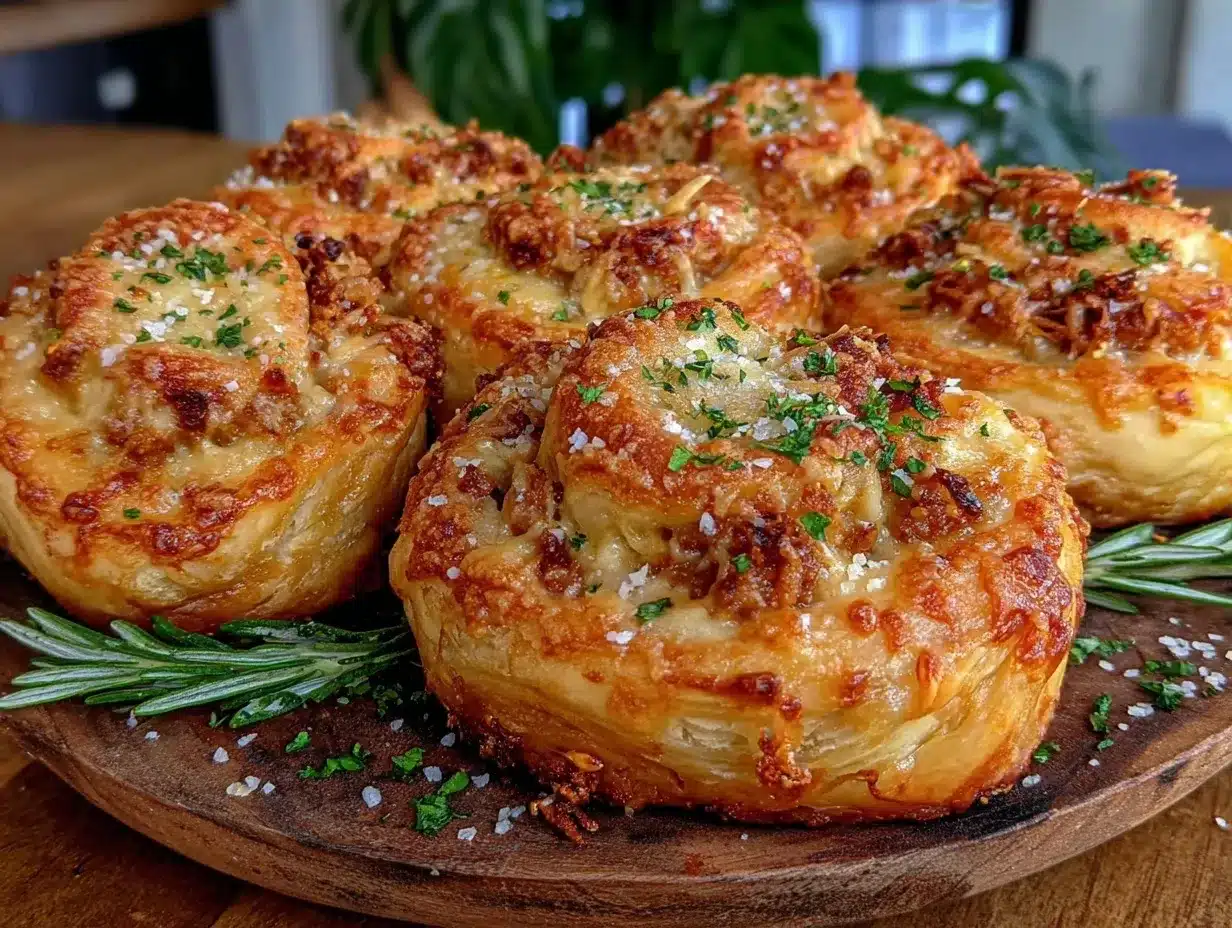
The buttery flakiness of puff pastry paired with savory turkey and creamy cheese—does it get any better? These irresistible turkey and cheese Danish pastries are the perfect combination of indulgence and practicality. Whether you’re serving them as a snack, a brunch centerpiece, or even a quick dinner, they hit the spot every single time. I first discovered this recipe during the holidays when I had leftover turkey and a craving for something new. Trust me, this one’s a keeper!
What I love most is how versatile it is. The filling can be adjusted to suit your cravings, and the end result always feels like a treat. Plus, it’s surprisingly easy to put together—no fancy techniques required. If you’re ready to impress your family, friends, or even just yourself, let’s dive into this delicious recipe for turkey and cheese Danish pastries.
Why You’ll Love This Recipe
- Perfect for any occasion: These pastries are fancy enough for a holiday brunch yet easy enough for a weeknight dinner.
- Quick and simple: Thanks to store-bought puff pastry, you can whip these up in no time.
- Great for leftovers: Got leftover turkey in the fridge? This is the ultimate way to repurpose it!
- Customizable: You can tweak the filling to fit your taste, whether you prefer a spicier kick or a sweeter twist.
- Kid-approved: The combination of flaky pastry and gooey cheese makes these a hit with kids (and adults too!).
- Absolutely delicious: The buttery pastry and savory filling come together in a way that feels indulgent yet balanced.
What sets this recipe apart? It’s the balance of flavors—savory turkey, creamy cheese, and just a hint of seasoning wrapped in golden, flaky pastry. The best part? You don’t need to be a pastry chef to make them. They’re simple, fun, and guaranteed to become a favorite in your recipe collection.
Ingredients You Will Need
This recipe uses straightforward ingredients that pack a punch of flavor. Here’s what you’ll need:
- Puff pastry: 2 sheets of store-bought puff pastry, thawed (look for all-butter varieties for the best flavor).
- Cooked turkey: 2 cups, shredded or thinly sliced—leftover turkey works perfectly!
- Cream cheese: 8 oz, softened (regular or light—your choice).
- Cheese: 1 cup shredded cheese (cheddar, mozzarella, or Gruyère works beautifully).
- Whole grain mustard: 2 tbsp (optional, for a hint of tang).
- Green onions: 2–3, chopped finely.
- Egg: 1 large, beaten (for egg wash).
- Salt and pepper: To taste.
Feel free to adjust the filling to suit your preferences! For example, swap turkey for shredded chicken or ham, or use a different type of mustard or cheese. You’ve got options!
Equipment Needed
- Rolling pin: For rolling out the puff pastry if needed.
- Sharp knife: To cut the pastry into even squares.
- Baking sheet: Lined with parchment paper for easy cleanup.
- Pastry brush: To apply the egg wash for that golden finish (a spoon works too in a pinch).
- Mixing bowls: For prepping the filling.
- Spatula: To mix the cream cheese and other ingredients smoothly.
If you don’t have a rolling pin, a clean wine bottle works as a great substitute. And for cutting the pastry, a pizza cutter can be a handy alternative!
How to Make Turkey and Cheese Danish Pastries
- Preheat your oven: Set your oven to 400°F (200°C). Line a baking sheet with parchment paper to prevent sticking.
- Prep the puff pastry: If your puff pastry is frozen, make sure it’s fully thawed. Lightly roll it out on a floured surface to smooth any creases.
- Cut the pastry: Using a sharp knife or a pizza cutter, divide each sheet into 4 equal squares (you’ll have 8 pastries total).
- Prepare the filling: In a mixing bowl, combine the softened cream cheese, shredded turkey, shredded cheese, mustard, and green onions. Add salt and pepper to taste. Mix until everything is well combined.
- Fill the pastries: Spoon about 2 tablespoons of filling onto the center of each square. Be careful not to overfill—less is more to avoid spillage.
- Fold and seal: Fold the corners of each square over the filling to meet in the center, creating a pinwheel shape. Press down lightly to seal.
- Egg wash: Brush the top of each pastry with beaten egg. This step is key to achieving that golden, glossy finish.
- Bake: Place the pastries on the prepared baking sheet and bake for 20–25 minutes, or until they’re puffed and golden brown.
- Cool and serve: Allow the pastries to cool slightly before serving. They’re best enjoyed warm!
Pro tip: If your pastries aren’t browning evenly, rotate the baking sheet halfway through. And don’t forget to keep an eye on them—puff pastry can go from golden to burnt quickly!
Cooking Tips & Techniques
- Don’t skip the egg wash: It makes the pastries beautifully golden and adds a little extra crunch.
- Thaw puff pastry properly: Let it thaw in the fridge rather than on the counter to avoid stickiness.
- Use leftovers wisely: This recipe is perfect for using up turkey from holiday meals or a rotisserie chicken.
- Don’t overfill: Keep the filling portions small to prevent it from spilling out while baking.
- Experiment with flavors: Add herbs, spices, or even a touch of hot sauce to the filling for a unique twist.
Variations & Adaptations
One of the best things about this recipe is how adaptable it is. Here are a few ideas:
- Vegetarian option: Swap the turkey for sautéed mushrooms or roasted vegetables for a hearty meat-free version.
- Seasonal twist: Add cranberry sauce to the filling during the holidays for a festive flair.
- Spicy kick: Mix in a teaspoon of chili flakes or use pepper jack cheese for a little heat.
- Gluten-free adaptation: Use gluten-free puff pastry to make this recipe accessible for those avoiding gluten.
- Cheese swap: Try feta, goat cheese, or even blue cheese for a different flavor profile.
One time, I added caramelized onions to the filling, and it was a total game-changer. Don’t hesitate to get creative with your favorite ingredients!
Serving & Storage Suggestions
These turkey and cheese Danish pastries are best served warm, straight out of the oven. Arrange them on a platter for a party, or pair them with a simple green salad for a quick, satisfying meal. If you’re serving them for brunch, they go beautifully with a cup of coffee or freshly squeezed orange juice.
To store leftovers, let the pastries cool completely and then transfer them to an airtight container. Refrigerate for up to 3 days. When you’re ready to enjoy them again, reheat in the oven at 350°F (175°C) for about 10 minutes to crisp up the pastry.
Pro tip: If you want to make them ahead, you can assemble the pastries and freeze them before baking. When ready to serve, bake them straight from frozen, adding a few extra minutes to the baking time.
Nutritional Information & Benefits
Here’s a quick breakdown of what you’re getting with these turkey and cheese Danish pastries:
- Calories: Approximately 250 per pastry.
- Protein-packed: Thanks to turkey and cheese, these pastries are a great source of protein.
- Healthy fats: Cream cheese and puff pastry provide a satisfying richness.
- Customizable for diets: Easily adapted for gluten-free or lighter options.
These pastries are a great way to sneak in protein while keeping meals comforting and fun. Plus, they’re perfectly portioned for easy serving!
Conclusion
There’s something magical about biting into a flaky, golden pastry filled with savory turkey and creamy cheese. This recipe has become a go-to in my kitchen for good reason—it’s easy, satisfying, and endlessly adaptable. Whether you’re hosting a gathering or simply treating yourself, these pastries are sure to be a hit.
So, what are you waiting for? Gather your ingredients, preheat your oven, and get ready to create something truly special. And hey, if you try this recipe, I’d love to hear how it turned out. Did you make any fun tweaks? Let me know in the comments below and don’t forget to share your creations!
Happy cooking, and remember—sometimes the simplest recipes bring the most joy.
FAQs
Can I use chicken instead of turkey?
Absolutely! Shredded chicken works just as well and gives the same savory flavor.
Can I make these pastries ahead of time?
Yes, you can prepare and freeze the unbaked pastries. Bake them straight from frozen, adding a few extra minutes to the cooking time.
What’s the best way to reheat leftovers?
Reheat them in the oven at 350°F (175°C) for about 10 minutes to restore the crispiness of the pastry.
Can I use homemade puff pastry?
Yes, homemade puff pastry will elevate the flavor and texture, but store-bought works just fine for convenience.
What other cheeses can I use?
You can try cheeses like Gouda, Swiss, or even pepper jack for a spicy twist. The options are endless!
Pin This Recipe!

Irresistible Turkey Cheese Danish Pastries
Golden, flaky puff pastry filled with savory turkey, creamy cheese, and a hint of seasoning—perfect for brunch, snacks, or dinner.
- Total Time: 40 minutes
- Yield: 8 pastries 1x
Ingredients
- 2 sheets store-bought puff pastry, thawed
- 2 cups cooked turkey, shredded or thinly sliced
- 8 oz cream cheese, softened
- 1 cup shredded cheese (cheddar, mozzarella, or Gruyère)
- 2 tbsp whole grain mustard (optional)
- 2–3 green onions, chopped finely
- 1 large egg, beaten (for egg wash)
- Salt and pepper to taste
Instructions
- Preheat your oven to 400°F (200°C). Line a baking sheet with parchment paper.
- Thaw puff pastry if frozen and lightly roll it out on a floured surface to smooth any creases.
- Cut each sheet of puff pastry into 4 equal squares, making 8 pastries total.
- In a mixing bowl, combine softened cream cheese, shredded turkey, shredded cheese, mustard, and green onions. Add salt and pepper to taste and mix well.
- Spoon about 2 tablespoons of filling onto the center of each square, being careful not to overfill.
- Fold the corners of each square over the filling to meet in the center, creating a pinwheel shape. Press lightly to seal.
- Brush the top of each pastry with beaten egg for a golden finish.
- Place the pastries on the prepared baking sheet and bake for 20–25 minutes, or until puffed and golden brown.
- Allow the pastries to cool slightly before serving. Best enjoyed warm!
Notes
[‘Thaw puff pastry in the fridge to avoid stickiness.’, ‘Don’t skip the egg wash for a golden finish.’, ‘Keep filling portions small to prevent spillage.’, ‘Experiment with flavors by adding herbs, spices, or hot sauce.’]
- Prep Time: 15 minutes
- Cook Time: 25 minutes
- Category: Snack
- Cuisine: American
Nutrition
- Serving Size: 1 pastry
- Calories: 250
- Sugar: 2
- Sodium: 300
- Fat: 15
- Saturated Fat: 8
- Carbohydrates: 20
- Fiber: 1
- Protein: 10
Keywords: turkey, cheese, Danish pastries, puff pastry, brunch, snack, easy recipe, leftover turkey


