
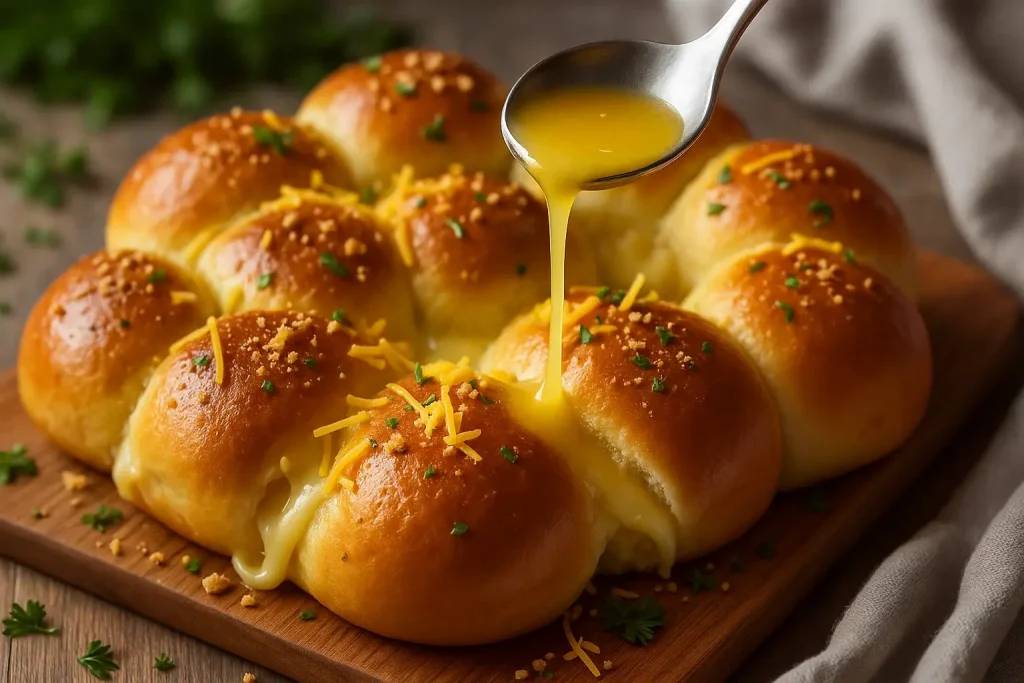
Let’s talk about one of the easiest, most crowd-pleasing side dishes you’ll ever make: Soft Hawaiian Roll Garlic Bread. Imagine buttery, golden rolls drenched in garlicky goodness, topped with gooey, melted cheese. It’s the kind of dish that makes you the hero of any party or family dinner. Whether you’re serving it alongside pasta, soup, or a hearty salad, this recipe is guaranteed to impress. Plus, it’s so simple, you’ll wonder why you didn’t make it sooner!
What makes this recipe special is its balance of flavors—sweet, soft Hawaiian rolls paired with savory garlic butter and creamy cheese. It’s a little indulgent, a little nostalgic, and completely irresistible. Trust me, once you make this, it’ll quickly become a staple at your table.
The Story Behind Soft Hawaiian Roll Garlic Bread
Garlic bread is a classic comfort food that’s been a favorite for decades, but adding Hawaiian rolls into the mix? That’s a game-changer. Hawaiian rolls originated in the 1950s in Hilo, Hawaii, where Portuguese influences brought sweet, fluffy bread to the islands. Their soft texture and slight sweetness make them perfect for soaking up buttery garlic sauce while still holding their shape.
The inspiration for this recipe came to me during a potluck. Someone brought plain Hawaiian rolls, and while they were delicious, I couldn’t help but think they’d be even better with garlic butter and cheese. So, I experimented in my kitchen, combining the rolls’ sweetness with bold garlic and creamy mozzarella. The result? A dish that disappeared faster than anything else on the table.
Soft Hawaiian Roll Garlic Bread is perfect year-round, but it’s especially fun for summer barbecues and winter holiday parties. It’s versatile, comforting, and appeals to people of all ages—kids and adults alike. Plus, it’s easy to adapt to your favorite flavors or dietary needs.
Ingredients for Soft Hawaiian Roll Garlic Bread
- Hawaiian Rolls: The sweet, soft rolls are the star of the dish. Look for brands like King’s Hawaiian for the best results. Want a homemade touch? You can bake your own rolls using recipes that incorporate pineapple juice for sweetness.
- Butter: Unsalted butter is ideal so you can control the saltiness of the dish. If you’re dairy-free, plant-based butters work beautifully.
- Garlic: Fresh garlic cloves give the best flavor. Mince them finely, or use a garlic press for convenience. In a pinch, garlic powder can work, but fresh is always better.
- Mozzarella Cheese: Opt for low-moisture mozzarella for a perfect melt. Shredded works well, but you can use slices or even fresh mozzarella for a more decadent version.
- Parsley: Fresh parsley adds a pop of color and a mild herbal flavor. If you don’t have parsley, you can substitute chives or dried Italian seasoning.
- Salt: A pinch of salt enhances the flavors, bringing everything together.
If you’re feeling adventurous, you can add parmesan cheese or sprinkle chili flakes for a spicy kick. For a healthier twist, swap out half the butter for olive oil or use whole wheat rolls.
Kitchen Equipment Needed
- Baking Dish: A 9×13-inch dish works perfectly to fit all the rolls snugly. If you don’t have one, you can use a sheet pan with raised edges.
- Small Saucepan: For melting the butter and infusing it with garlic.
- Pastry Brush: Ideal for spreading the garlic butter evenly over the rolls. If you don’t have one, a spoon will do the trick.
- Knife: For cutting the rolls and mincing the garlic.
- Foil: To cover the rolls during baking and ensure they stay moist.
If you’re working with older or less non-stick equipment, make sure to grease your baking dish lightly to prevent sticking. Trust me, nothing’s worse than losing that golden crust to the pan!
How to Make Soft Hawaiian Roll Garlic Bread
- Preheat your oven: Set it to 350°F (175°C). You’ll want the oven nice and hot when the rolls go in.
- Prepare the garlic butter: In a small saucepan, melt ½ cup (115g) of unsalted butter over medium heat. Add 4 minced garlic cloves and cook for 1-2 minutes until fragrant. Be careful not to brown the garlic—it should stay soft and aromatic.
- Slice the rolls: Without separating the rolls, carefully cut them in half horizontally to create a top and bottom layer.
- Brush the butter: Place the bottom half of the rolls in your baking dish. Generously brush half of the garlic butter over them, ensuring every roll is coated.
- Add the cheese: Sprinkle 1½ cups (340g) of shredded mozzarella evenly over the bottom layer. Place the top half of the rolls back on top.
- Brush again: Spread the remaining garlic butter over the top of the rolls. Sprinkle with chopped parsley for extra color and flavor.
- Cover and bake: Cover the dish with foil and bake for 15 minutes. Remove the foil and bake for an additional 5 minutes to let the tops turn golden brown.
- Serve: Let the rolls cool for 5 minutes before serving. Pull apart gently and enjoy the cheesy, garlicky goodness!
Cooking Tips & Techniques
Here are some tips to make sure your garlic bread comes out perfectly every time:
- Don’t rush the butter: Let the garlic infuse into the butter slowly for the best flavor. If the butter starts to brown, lower the heat.
- Use fresh ingredients: Fresh garlic and parsley make a big difference in flavor compared to powdered or dried alternatives.
- Don’t overbake: Keep an eye on the rolls during the last few minutes in the oven. They should be golden brown, not overly crisp.
- Customize the cheese: While mozzarella is a favorite, you can experiment with cheddar, provolone, or even a mix of cheeses for extra flavor.
- Keep it moist: Covering the rolls with foil during baking ensures they stay soft and don’t dry out.
Remember, the beauty of this recipe is its flexibility. Don’t be afraid to play around with flavors and ingredients!
Variations & Adaptations
Here are a few ways to make this recipe your own:
- Spicy Kick: Add a sprinkle of red chili flakes or drizzle with hot honey before serving.
- Herb Explosion: Mix Italian seasoning or rosemary into the garlic butter for an herbal twist.
- Vegan Version: Use vegan butter, dairy-free cheese, and eggless rolls for a plant-based option.
- Cheesy Overload: Add grated parmesan or a layer of cream cheese for extra richness.
- Gluten-Free: Swap Hawaiian rolls for gluten-free dinner rolls. Be sure they’re soft and sweet to maintain the flavor balance.
One of my favorite variations? Adding caramelized onions to the cheese layer for a sweet-and-savory combo. It’s absolutely divine!
Serving & Storage Suggestions
Soft Hawaiian Roll Garlic Bread is best served warm, straight from the oven. Pair it with hearty dishes like lasagna, tomato soup, or a crisp Caesar salad. For drinks, a chilled glass of rosé or sparkling water with lemon complements the flavors beautifully.
If you have leftovers (unlikely, but possible!), store them in an airtight container in the fridge for up to 3 days. To reheat, wrap the rolls in foil and bake at 300°F (150°C) for 10 minutes. You can also freeze them for up to 2 months; thaw overnight in the fridge before reheating.
Pro tip: The flavors deepen over time, so don’t be surprised if the garlic and butter taste even richer the next day!
Nutritional Information & Benefits
Here’s a quick breakdown of the nutritional values per serving (1 roll):
- Calories: 210
- Fat: 12g
- Carbohydrates: 18g
- Protein: 6g
This recipe offers a balance of carbs, fats, and protein, making it a satisfying treat. Garlic is known for its immune-boosting properties, and parsley adds a dose of vitamins A and C. If you opt for whole wheat rolls or reduce the butter, you can make it a bit healthier without sacrificing flavor.
Conclusion
Soft Hawaiian Roll Garlic Bread is the ultimate party side dish—easy to make, universally loved, and endlessly adaptable. I love how it brings people together, whether it’s at a casual dinner or a festive celebration. There’s something magical about pulling apart those cheesy, garlicky rolls and sharing them with loved ones.
Give this recipe a try, and let me know how it turned out for you. Did you add your own twist? Share your pictures and thoughts in the comments below—I’d love to hear from you! Happy cooking, and don’t forget to enjoy every buttery, cheesy bite.
FAQs
Can I make this ahead of time?
Yes! Assemble the rolls and refrigerate them covered with foil. Bake them fresh when you’re ready to serve.
What cheese works best for this recipe?
Mozzarella is the go-to, but feel free to use cheddar, provolone, or a mix for different flavors.
Can I use regular dinner rolls instead of Hawaiian rolls?
Absolutely! Just keep in mind that the sweetness of Hawaiian rolls adds a unique flavor to the dish.
How do I store leftovers?
Store in an airtight container in the fridge for up to 3 days. Reheat in foil at 300°F for 10 minutes.
What can I pair this bread with?
It’s perfect with pasta dishes, soups, or salads. You can also serve it as a standalone snack!

Soft Hawaiian Roll Garlic Bread
Soft Hawaiian Roll Garlic Bread combines sweet, fluffy rolls with savory garlic butter and melted mozzarella cheese, making it a crowd-pleasing side dish perfect for any occasion.
- Total Time: 30 minutes
- Yield: 12 rolls 1x
Ingredients
- 12 Hawaiian rolls (e.g., King’s Hawaiian)
- 1/2 cup (115g) unsalted butter
- 4 garlic cloves, minced
- 1 1/2 cups (340g) shredded mozzarella cheese
- 2 tablespoons fresh parsley, chopped
- Pinch of salt
Instructions
- Preheat your oven to 350°F (175°C).
- In a small saucepan, melt 1/2 cup (115g) of unsalted butter over medium heat. Add 4 minced garlic cloves and cook for 1-2 minutes until fragrant, being careful not to brown the garlic.
- Without separating the rolls, carefully cut them in half horizontally to create a top and bottom layer.
- Place the bottom half of the rolls in a 9×13-inch baking dish. Generously brush half of the garlic butter over them, ensuring every roll is coated.
- Sprinkle 1 1/2 cups (340g) of shredded mozzarella evenly over the bottom layer. Place the top half of the rolls back on top.
- Spread the remaining garlic butter over the top of the rolls. Sprinkle with chopped parsley for extra color and flavor.
- Cover the dish with foil and bake for 15 minutes. Remove the foil and bake for an additional 5 minutes to let the tops turn golden brown.
- Let the rolls cool for 5 minutes before serving. Pull apart gently and enjoy!
Notes
For extra flavor, consider adding parmesan cheese or chili flakes. Covering the rolls with foil during baking ensures they stay soft and moist.
- Prep Time: 10 minutes
- Cook Time: 20 minutes
- Category: Side Dish
- Cuisine: American
Nutrition
- Serving Size: 1 roll
- Calories: 210
- Sugar: 5
- Sodium: 210
- Fat: 12
- Saturated Fat: 7
- Carbohydrates: 18
- Fiber: 1
- Protein: 6
Keywords: Hawaiian rolls, garlic bread, cheesy bread, party side dish, easy recipe


