

Let me set the scene: it’s a chilly December afternoon, and the house is buzzing with that unmistakable blend of cinnamon candles, distant laughter, and the sound of holiday tunes. There’s something magical about the way the fragrance of toasted almonds and fresh herbs fills the air when I’m shaping the pine cone cheese ball. You know, the kind of moment where you pause, take a deep breath, and just smile because you know you’re onto something truly special.
The first time I put together this pine cone cheese ball, I was knee-high to a grasshopper, helping my grandma prepare for her legendary Christmas Eve party. She’d hand me the almonds (one by one!) and let me decorate the cheese ball with all the patience in the world. I was instantly hooked. Honestly, I wish I’d remembered this recipe years ago for other holiday gatherings. It’s dangerously easy, totally festive, and has pure, nostalgic comfort baked right in.
Fast forward to my own kitchen—now, whenever I make this centerpiece, my family can’t help sneaking bites off the serving platter (I’m looking at you, Uncle Joe). There’s always a chorus of “Wait, is that really cheese?” and “Wow, it looks just like a pine cone!” It’s perfect for potlucks, a sweet treat for your kids’ holiday parties, or just to brighten up your Pinterest board. The perfect pine cone cheese ball recipe has quickly become a staple for family gatherings, gifting, and those cozy evenings when you want something a little extra special. In the name of research, of course, I’ve tested it at least a dozen times—each time, it feels like a warm hug in appetizer form. Trust me, you’re going to want to bookmark this one.
Why You’ll Love This Perfect Pine Cone Cheese Ball
After years spent in both busy home kitchens and bustling catering setups, I can honestly say this perfect pine cone cheese ball is a holiday MVP. There’s something about the way it brings people together—everyone wants a slice, and no one can stop talking about how pretty it looks. Here’s why you’ll want this recipe in your holiday arsenal:
- Quick & Easy: Comes together in less than 30 minutes (plus chilling time), which means you can whip it up even when you’re short on time.
- Simple Ingredients: No fancy grocery trips needed; most ingredients are probably already chilling in your fridge or pantry.
- Perfect for Any Occasion: Great for potlucks, brunch spreads, cozy dinners, or as a show-stopping centerpiece at holiday parties.
- Crowd-Pleaser: Kids and adults alike rave about the creamy, savory flavor—and the fun pine cone shape is always a conversation starter.
- Unbelievably Delicious: The blend of cheeses, herbs, and crunchy almonds is next-level comfort food. It’s got that perfect balance of richness and freshness.
What sets this pine cone cheese ball apart? I blend in a dash of smoked paprika and fresh dill for a subtle kick, and use whole toasted almonds for the “scales,” which not only add crunch but also create that unmistakable pine cone look. Unlike some cheese balls that taste flat or overly salty, this one hits all the right notes—creamy but not too heavy, tangy but not sharp.
Honestly, it’s the kind of appetizer that makes you close your eyes after the first bite. There’s soul-soothing satisfaction in every mouthful. Whether you’re looking to impress guests without the stress, or just want to turn a simple meal into something memorable, this recipe has you covered. It’s comfort food—holiday style!
What Ingredients You Will Need
This recipe uses simple, wholesome ingredients to deliver bold flavor and that wow-factor texture—without any fuss. You’ll find most of these are pantry and fridge staples, and there’s plenty of room for swaps if you need.
- For the Cheese Ball:
- 8 oz (225 g) cream cheese, softened (full-fat gives the best texture, but you can use light)
- 1 ½ cups (170 g) shredded sharp cheddar cheese
- ½ cup (120 g) goat cheese or feta, crumbled (adds tanginess)
- 2 tbsp fresh parsley, finely chopped
- 1 tbsp fresh dill, chopped (or 1 tsp dried dill)
- 1 tsp smoked paprika
- ½ tsp garlic powder
- ¼ tsp black pepper
- 1 tsp Worcestershire sauce (optional, but adds depth)
- ¼ cup (30 g) finely minced green onions
- Salt, to taste (usually about ⅛ tsp—taste and adjust)
- For Decorating:
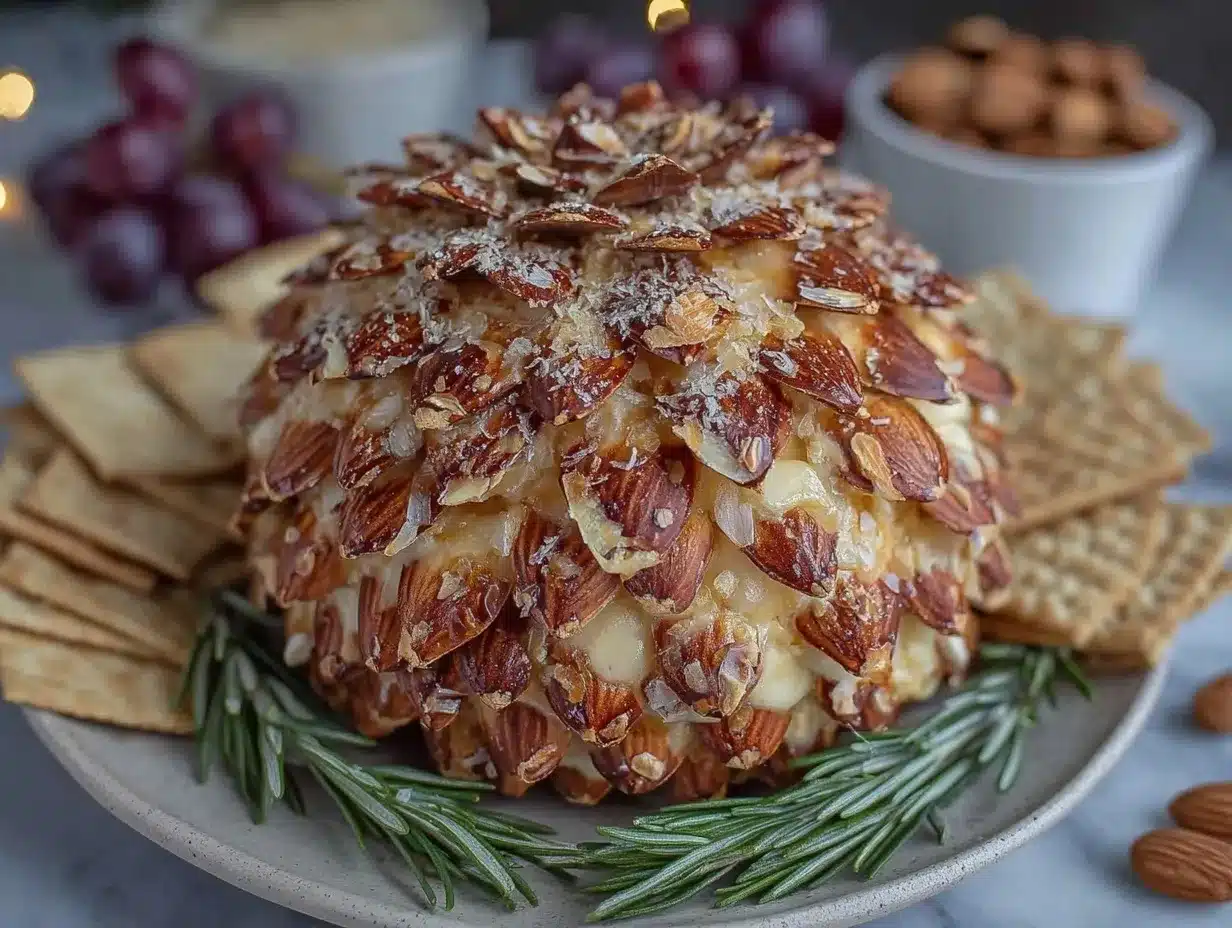
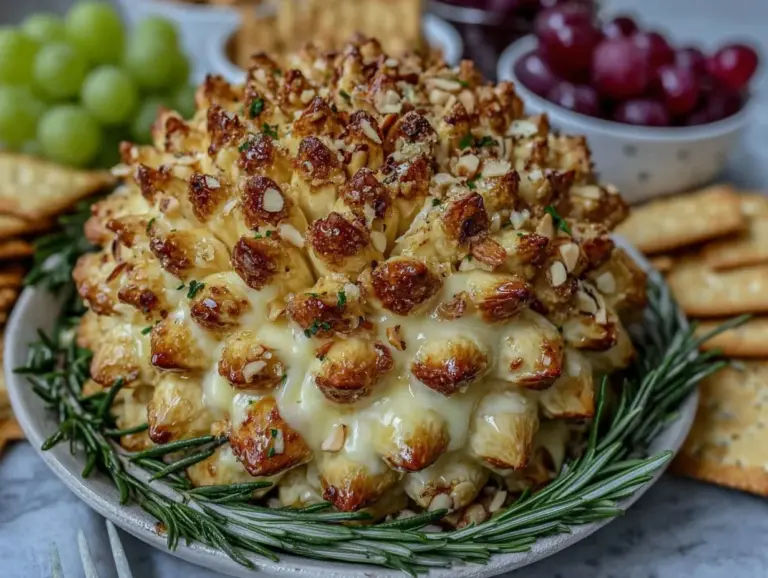
- 1 cup (110 g) whole toasted almonds (unsalted works best for flavor and appearance)
- Parsley sprigs or rosemary branches (for garnish—these create the “pine needles” look!)
- Optional Substitutions:
- Use dairy-free cream cheese and cheddar for a vegan version (I’ve had good luck with Violife brand)
- Swap goat cheese for blue cheese for a stronger flavor
- Instead of almonds, try pecans or roasted pumpkin seeds for a different crunch
- Use low-fat cheeses if you want a lighter option, though the texture will be a tad softer
- Fresh herbs are best, but dried can work in a pinch—just halve the amounts
Pro tip: If you’re making this for a big crowd, you can easily double the ingredients and make two pine cone cheese balls—one with nuts, one nut-free for allergy concerns. In summer, I swap the herbs for fresh basil and a sprinkle of lemon zest for a lighter, brighter flavor.
Equipment Needed
You don’t need a ton of fancy equipment for the perfect pine cone cheese ball—just a few basics, and you’re good to go.
- Mixing Bowl: Large enough to hold all the ingredients, preferably glass or stainless steel (easy to clean).
- Hand Mixer or Sturdy Wooden Spoon: For blending the cheeses smoothly. I usually use a hand mixer for speed, but a spoon works just fine if you don’t mind a little elbow grease.
- Plastic Wrap: Essential for shaping the cheese ball and chilling it in the fridge.
- Serving Platter: A shallow, wide dish is best—makes decorating with almonds and herbs much easier. If you don’t have one, a baking sheet lined with parchment paper works in a pinch.
- Small Knife or Offset Spatula: For smoothing and shaping the cheese ball into that signature pine cone shape.
- Measuring Cups and Spoons: For accuracy (no guessing when it comes to flavor balance!).
I’ve tried making this with just a fork and my hands before—messy, but doable! If you’re on a budget, the only must-have is a good mixing bowl and something to spread the cheese. A cheap hand mixer from the big-box store has lasted me several years (just clean the beaters well after mixing sticky cheese blends).
Preparation Method
Ready to make your perfect pine cone cheese ball? Here’s my tried-and-true, step-by-step guide. Don’t worry—this is way more fun than fussy.
-
Combine the Cheeses (5 min):
In a large mixing bowl, blend 8 oz (225 g) cream cheese, 1 ½ cups (170 g) shredded cheddar, and ½ cup (120 g) goat cheese until smooth. Use a hand mixer for best results. The mixture should be creamy and thick—if it’s too stiff, let it sit for a few minutes to soften. -
Add the Flavorings (3 min):
To the cheese blend, add 2 tbsp parsley, 1 tbsp dill, 1 tsp smoked paprika, ½ tsp garlic powder, ¼ tsp black pepper, 1 tsp Worcestershire sauce, and ¼ cup (30 g) green onions. Sprinkle in salt to taste. Mix well using a spoon or mixer. You’ll notice the color take on a beautiful herby speckle. -
Shape the Cheese Ball (5 min):
Scrape the mixture onto a sheet of plastic wrap. Gather the sides and mold the cheese into an oval, about 7 inches (18 cm) long and 3 inches (8 cm) wide—think pine cone shape, slightly tapered at one end. Wrap tightly and refrigerate for at least 1 hour (or up to 24 hours for stronger flavor). -
Prepare the Almonds (2 min):
If your almonds aren’t already toasted, spread them on a baking sheet and toast at 350°F (175°C) for 7-8 minutes. Let cool before using. -
Decorate the Cheese Ball (10 min):
Unwrap the chilled cheese ball and place it on your serving platter. Starting at the tapered end, press whole almonds into the surface, overlapping slightly to mimic pine cone scales. Work your way up in neat rows. If almonds keep sliding off, gently press the cheese with your fingers to firm it up. -
Add Garnish (2 min):
Arrange fresh rosemary or parsley sprigs around the “base” of the pine cone to create a forest floor effect. You can tuck a few sprigs in at the top for extra pine cone realism. -
Chill or Serve:
Serve immediately, or cover loosely with plastic wrap and refrigerate until ready. The cheese ball holds its shape well for up to 2 days. If it softens too much, pop it in the freezer for 15 minutes before serving.
Prep notes: If the mixture is too soft, chill longer before shaping. If the cheese ball cracks while decorating, smooth with a spatula or wet fingers. The pine cone cheese ball should smell fresh and herby, and feel firm but spreadable. I always keep extra almonds on hand just in case—I tend to snack as I decorate (guilty!).
Cooking Tips & Techniques
Here’s where experience really counts—making the perfect pine cone cheese ball isn’t hard, but these tips will save you from the usual hiccups.
- Chill Time Matters: Don’t rush chilling. The cheese ball needs at least an hour in the fridge to firm up, or else your almonds will slide right off. I learned this the hard way—my first attempt was more pine blob than pine cone.
- Use Softened Cream Cheese: If your cream cheese is too cold, it won’t blend properly, and you’ll end up with lumpy bits. Let it come to room temp for that silky texture.
- Almond Placement: Start at the pointed end and work in rows, overlapping each almond slightly. Don’t press too hard—gentle pressure is key. Sometimes I get impatient and just stick them on, but taking your time really pays off.
- Flavor Balance: Taste the mixture before chilling. If it seems bland, add a pinch more salt or herbs. The flavors intensify overnight, so err on the side of subtlety.
- Easy Cleanup: Line your workspace with parchment paper for less mess. Cheese can be sticky, and I’ve ruined more than one holiday tablecloth (lesson learned!).
- Shape Adjustments: If your cheese ball looks more like a football than a pine cone, use your knife or spatula to gently mold the sides. Imperfect is charming, anyway!
Most common mistake? Not chilling long enough (seriously—patience pays off). If you’re prepping for a party, make the cheese ball the night before, then decorate the day of. Multitasking trick: toast the almonds while you mix the cheese. Consistency is all about prepping ahead and not skimping on chilling time. Every time I get ahead of myself, I end up re-shaping right before the guests arrive. Trust me, slow and steady wins this race!
Variations & Adaptations
One of the best parts about the perfect pine cone cheese ball is how easy it is to customize. Here are some of my favorite twists:
- Dietary Variation: Make it vegan by using dairy-free cream cheese and cheddar, plus roasted pumpkin seeds instead of almonds. This version is surprisingly rich and gets rave reviews from my plant-based friends.
- Seasonal Twist: In spring or summer, swap the dill and parsley for fresh basil and mint, and add a sprinkle of lemon zest. It gives the cheese ball a lighter, garden-fresh vibe.
- Flavor Adventure: Add 2 tbsp finely chopped sun-dried tomatoes and 1 tsp dried Italian herbs for a Mediterranean pine cone cheese ball. I tried this at a summer picnic last year, and it was gone in minutes.
- Cooking Methods: If you don’t want to use nuts, you can press in thin slices of black olives or even roasted red pepper strips for a nut-free option. The look is different, but just as fun!
- Allergen Substitutions: Use sunflower seeds instead of almonds for those with tree nut allergies. They’re smaller, but the effect is still visually stunning.
- Personal Favorite: Once, I added a little chipotle powder and swapped almonds for smoked pecans—major hit with the spice lovers in my family!
Don’t be afraid to experiment with flavors and toppings. The pine cone cheese ball can be as classic or as wild as you want. I always encourage people to make it their own—after all, that’s half the fun.
Serving & Storage Suggestions
Your perfect pine cone cheese ball deserves a little fanfare when it hits the table. Here’s how I like to serve and store it:
- Serving Temperature: Best served chilled or at cool room temperature. If it’s been in the fridge overnight, let it sit out for 10-15 minutes before serving so it’s perfectly spreadable.
- Presentation Tips: Place on a wide platter, surround with fresh rosemary and parsley sprigs for that “forest floor” look. I like to scatter crackers, sliced baguette, or veggie sticks around the pine cone for easy dipping.
- Perfect Pairings: Serve with sparkling cider, mulled wine, or a crisp white wine. It’s also great alongside fruit jams or spicy pepper jelly.
- Storage: Wrap leftovers tightly in plastic wrap and refrigerate. The cheese ball keeps for up to 3 days. For longer storage, freeze (before decorating) for up to 2 weeks—thaw overnight in the fridge before adding almonds.
- Reheating: Honestly, you don’t need to reheat, but if the cheese ball gets too firm, let it warm up at room temperature. Flavors meld and deepen as it sits, so sometimes it’s even better the second day.
One last tip: If you’re serving outdoors or at a buffet, keep the cheese ball on a cold pack or chilled tray to prevent softening. I’ve learned the hard way that a warm room equals a droopy pine cone!
Nutritional Information & Benefits
Here’s the scoop on what you’re actually eating with this pine cone cheese ball centerpiece:
- Estimated Per Serving (1/12 of recipe):
- Calories: 160
- Fat: 13g
- Protein: 7g
- Carbs: 3g
- Fiber: 1g
- Key Health Benefits:
- Almonds add heart-healthy fats and a satisfying crunch.
- Cheese provides calcium and protein—great for energy during holiday hustle.
- Fresh herbs boost antioxidants and flavor without extra calories.
- Dietary Notes:
- Gluten-free (if served with gluten-free crackers)
- Low-carb, high-protein
- Contains dairy and nuts (watch for allergies—see adaptation notes above)
From a wellness perspective: I love that this festive treat lets you control the ingredients, skip processed additives, and sneak in some extra herbs. I always feel good about serving it—especially when I’ve loaded up on fresh greens.
Conclusion
If you’re looking for a holiday centerpiece that’s as tasty as it is gorgeous, the perfect pine cone cheese ball is a must-try. It’s easy to make, endlessly customizable, and always gets rave reviews from family and friends. Plus, it’s the kind of recipe that invites creativity—try different herbs, nuts, or cheeses, and make it your own.
Personally, I love how this cheese ball brings people together. There’s something about that pine cone shape that just says “holiday magic.” Every time I serve it, I get to watch everyone’s eyes light up—and honestly, that’s the best part.
So grab your mixing bowl, put on your favorite playlist, and let’s get festive! I’d love to hear how you adapt this recipe—drop your twists in the comments below, or share your centerpiece photos on social media. Happy holidays, and may your pine cone cheese ball be the star of your celebration!
Frequently Asked Questions
Can I make the pine cone cheese ball ahead of time?
Absolutely! You can prep the cheese ball up to 2 days ahead. Just shape and chill, then decorate with almonds right before serving for best texture.
What can I use instead of almonds for decoration?
Try pecans, sunflower seeds, thinly sliced olives, or roasted pumpkin seeds. They all create a fun, textured look and work for allergy concerns.
Is this recipe suitable for vegetarians?
Yes, just be sure to check that your Worcestershire sauce is vegetarian (some contain anchovies). All other ingredients are vegetarian-friendly.
How do I keep the cheese ball from getting too soft at room temperature?
Chill it thoroughly before serving, and keep it on a cold tray or pack if it’s sitting out for a while. If it does soften, pop it back in the fridge for 15 minutes.
Can I freeze the cheese ball?
You can freeze the cheese ball before decorating with almonds. Wrap tightly and freeze for up to 2 weeks. Thaw overnight in the fridge, then decorate and serve.
Pin This Recipe!
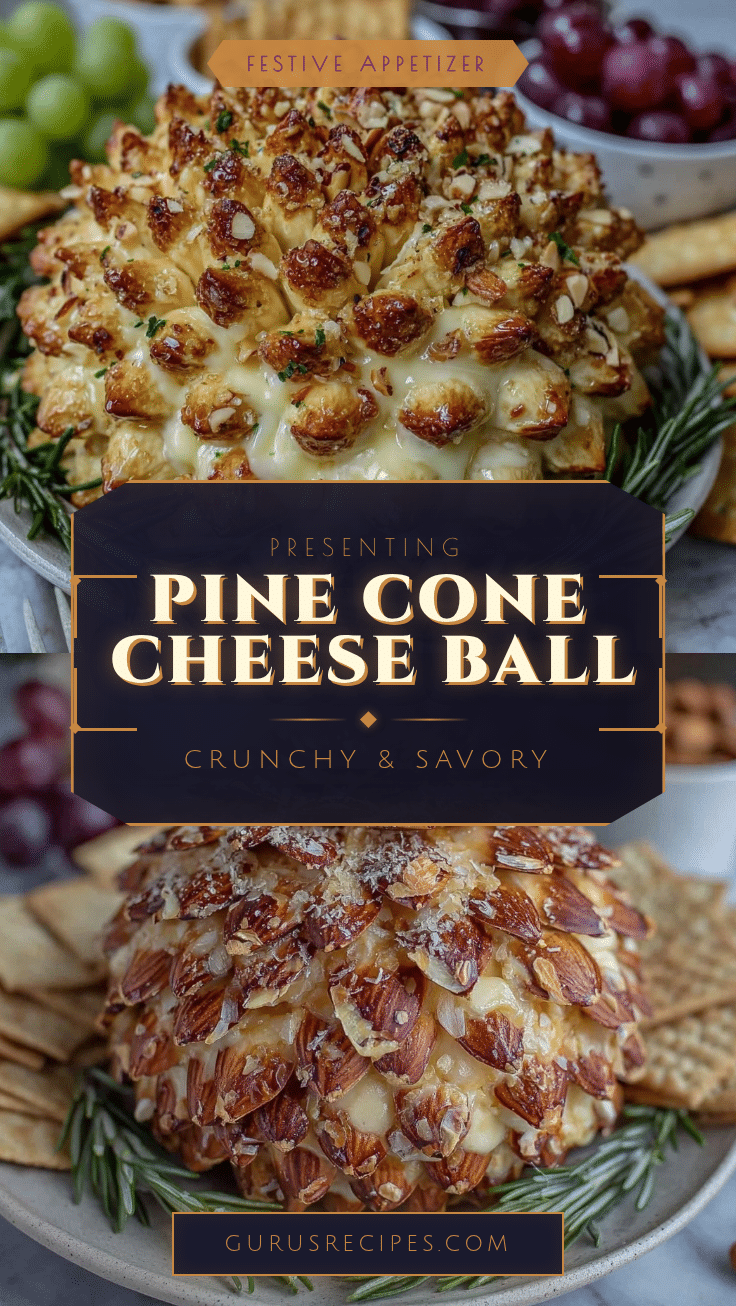
Perfect Pine Cone Cheese Ball
This festive pine cone cheese ball is a creamy, savory holiday centerpiece, decorated with toasted almonds and fresh herbs for a show-stopping appetizer. Quick to prepare and endlessly customizable, it’s a crowd-pleaser for any gathering.
- Total Time: 1 hour 30 minutes
- Yield: 12 servings 1x
Ingredients
- 8 oz cream cheese, softened
- 1 1/2 cups shredded sharp cheddar cheese
- 1/2 cup goat cheese or feta, crumbled
- 2 tbsp fresh parsley, finely chopped
- 1 tbsp fresh dill, chopped (or 1 tsp dried dill)
- 1 tsp smoked paprika
- 1/2 tsp garlic powder
- 1/4 tsp black pepper
- 1 tsp Worcestershire sauce (optional)
- 1/4 cup finely minced green onions
- Salt, to taste (about 1/8 tsp)
- 1 cup whole toasted almonds (unsalted)
- Parsley sprigs or rosemary branches (for garnish)
Instructions
- In a large mixing bowl, blend cream cheese, shredded cheddar, and goat cheese until smooth using a hand mixer or sturdy spoon.
- Add parsley, dill, smoked paprika, garlic powder, black pepper, Worcestershire sauce, green onions, and salt to the cheese mixture. Mix well.
- Scrape the mixture onto a sheet of plastic wrap. Shape into an oval, about 7 inches long and 3 inches wide, resembling a pine cone. Wrap tightly and refrigerate for at least 1 hour (up to 24 hours for stronger flavor).
- If almonds are not toasted, spread them on a baking sheet and toast at 350°F for 7-8 minutes. Let cool.
- Unwrap the chilled cheese ball and place on a serving platter. Starting at the tapered end, press whole almonds into the surface in overlapping rows to mimic pine cone scales.
- Arrange fresh rosemary or parsley sprigs around the base for garnish.
- Serve immediately, or cover loosely and refrigerate until ready. For firmer texture, chill in the freezer for 15 minutes before serving.
Notes
Chill the cheese ball thoroughly before decorating to prevent almonds from sliding off. Use softened cream cheese for best texture. Taste and adjust seasoning before chilling. For nut-free options, use sunflower seeds or sliced olives. Can be made ahead and decorated just before serving.
- Prep Time: 20 minutes
- Cook Time: 8 minutes
- Category: Appetizer
- Cuisine: American
Nutrition
- Serving Size: 1/12 of cheese ball
- Calories: 160
- Sugar: 1
- Sodium: 220
- Fat: 13
- Saturated Fat: 6
- Carbohydrates: 3
- Fiber: 1
- Protein: 7
Keywords: cheese ball, holiday appetizer, pine cone cheese ball, party centerpiece, festive recipe, almonds, vegetarian, gluten-free, easy appetizer


