

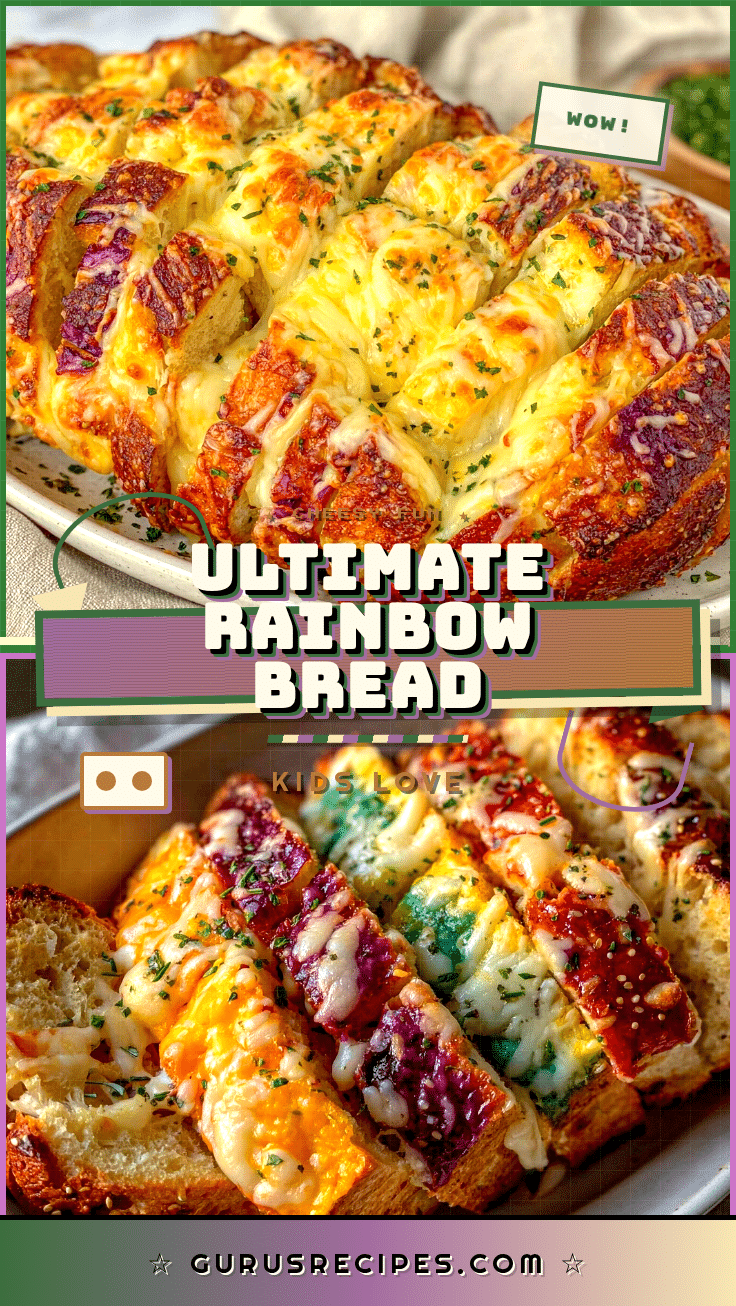
Picture this: the oven is humming, and the smell of garlic, butter, and bubbling cheese fills the air. The colors—oh, the colors!—are popping from every slice like a whimsical storybook page. That’s the magic of my Dr. Seuss Rainbow Cheesy Bread. The first time I pulled this bread from the oven, I just stood there, grinning like a kid who found a golden ticket. The gooey cheese was stretching in every direction, and those bold, bright veggie colors turned the kitchen into a party. I was instantly hooked. This was the kind of moment where you pause, take a deep breath, and just smile because you know you’re onto something truly special.
This recipe has a little nostalgia baked right in. When I was knee-high to a grasshopper, my grandma used to make cheesy bread for every get-together. But, honestly, it was always beige. Years later, after one too many rainy afternoons with restless kids, I decided to jazz it up, Seuss-style. Out came the peppers, purple cabbage, and a rainbow of veggies. Suddenly, snack time became an adventure. Now, my kids practically hover by the oven, waiting for the “cheese pull test” (it’s a thing in our house), and my friends text me for the recipe before the party’s even over.
Let’s face it, there’s something about food that’s both playful and delicious—it brings out the kid in all of us. This Dr. Seuss Rainbow Cheesy Bread is perfect for potlucks, birthday parties, or just brightening up your Pinterest board. It’s the kind of dangerously easy recipe that disappears before you can snap a photo. (I’ve tested it more times than I’d care to admit, all in the name of research, of course.) If you want a party snack that feels like a warm hug and looks like edible art, you’re going to want to bookmark this one. Trust me—your crew will be sneaking slices before you even call them to the table!
Why You’ll Love This Dr. Seuss Rainbow Cheesy Bread
When it comes to crowd-pleasing snacks, this cheesy bread has earned its stripes, both at my own family parties and through countless recipe tests. I’ve baked, broiled, and taste-tested enough to know: this is the one that gets devoured first (and leaves everyone asking for seconds). Here’s why you’re about to fall in love with this playful, colorful treat:
- Quick & Easy: Ready in under 30 minutes, it’s the perfect answer for last-minute party requests or spontaneous playdates.
- Simple Ingredients: You probably have everything you need in your pantry and fridge—no scavenger hunt through specialty stores required.
- Perfect for Parties & Playdates: The bright colors and gooey cheese make this a hit with kids, but the flavor wins over grown-ups, too.
- Crowd-Pleaser: Every time I set this on the table, adults and kids both circle back for “just one more piece.”
- Unbelievably Delicious: The combo of crisp bread, melty cheese, and fresh veggies is pure comfort food—nostalgic but with a modern twist.
What makes this Dr. Seuss Rainbow Cheesy Bread stand out? It’s not just the colors (though, you can’t help but smile at those). The secret is layering the cheese under and over the veggies, so every bite is gooey, stretchy, and packed with flavor. I’ve tested different cheeses, played with veggie combos, and experimented with broiling for that perfect golden finish. The result? Bread that’s crisp on the edges, soft in the middle, and loaded with color and taste.
This isn’t your average cheesy bread. It’s a memory in the making—one that encourages kids to eat their veggies and gets adults reminiscing about their favorite childhood stories. It’s comfort food, but brighter and more joyful. Whether you’re trying to impress at a birthday bash, make snack time fun, or just sneak some veggies onto your kid’s plate, this recipe is your new secret weapon. Honestly, if you’re looking for a snack that sparks conversation and brings smiles (without any fuss), you’ve found it!
What Ingredients You Will Need
This Dr. Seuss Rainbow Cheesy Bread keeps things simple while packing a punch of flavor and color. Most ingredients are pantry staples or easy-to-find veggies, making this an accessible recipe for any home cook. Here’s what you’ll need to create that magical rainbow effect:
- For the Bread Base:
- 1 large Italian or French bread loaf (about 16 oz / 450 g), sliced in half lengthwise
- 2 tablespoons (28 g) unsalted butter, softened (for spreading; adds richness)
- 1 clove garlic, minced (optional, for flavor)
- For the Cheese Layer:
- 2 cups (200 g) shredded mozzarella cheese (for maximum meltiness—I like using Galbani or Sargento brands)
- 1 cup (100 g) shredded cheddar cheese (for color and flavor; sharp works best)
- 1/2 cup (50 g) grated Parmesan cheese (adds a salty kick)
- For the Rainbow Veggies:
- 1/3 cup (40 g) finely diced red bell pepper
- 1/3 cup (40 g) finely diced orange bell pepper
- 1/3 cup (40 g) finely diced yellow bell pepper
- 1/3 cup (40 g) finely diced green bell pepper
- 1/3 cup (40 g) finely diced purple cabbage (for the perfect pop of purple)
- 1/3 cup (40 g) finely diced cherry tomatoes or halved grape tomatoes (for red)
- 2 tablespoons (10 g) finely chopped fresh parsley or basil (for green flecks and freshness)
- Optional Extras:
- Pinch of red pepper flakes (if you like a little heat)
- Olive oil spray (for a golden finish)
- Flaked sea salt (for sprinkling just before serving)
Ingredient Tips: For the best cheesy stretch, go for whole milk mozzarella. If you’re dairy-free, vegan mozzarella shreds work surprisingly well (I’ve tried Daiya and Violife). For gluten-free, use a gluten-free baguette or bread loaf. In the summer, I swap in fresh corn kernels or diced zucchini. You can also use whatever colorful veggies your little ones will eat—shredded carrots, broccoli florets, or even sliced black olives for a bit of whimsy.
Don’t sweat it if you only have a couple of pepper colors—just aim for a cheerful variety! This recipe is forgiving and fun, so let your fridge inspire you.
Equipment Needed
- Baking Sheet or Sheet Pan: For supporting the bread and catching any melty cheese overflow.
- Sharp Chef’s Knife: Essential for dicing veggies into perfect little cubes (makes the colors pop and cook evenly).
- Cutting Board: Preferably non-slip for safety—kids can help if you use a kid-safe knife.
- Mixing Bowls: For tossing and organizing the veggie “rainbow” by color.
- Pastry Brush or Butter Knife: To slather on the garlic butter. A spoon works in a pinch.
- Measuring Cups and Spoons: For accuracy, especially with cheese (you can eyeball, but it’s easy to over-cheese—yes, that’s a thing!).
- Aluminum Foil or Parchment Paper: Optional, but makes clean-up a breeze—especially if the cheese tries to escape.
- Oven or Toaster Oven: Standard is fine; a toaster oven works for half-batches.
If you don’t have a proper sheet pan, I’ve used a large cast iron skillet with great results. For budget-friendly tools, the knives and pans from IKEA or Target do the trick. I once used a bread knife instead of a chef’s knife—just go slow and steady. And if you’re using a fancy baking stone, let it preheat so the bread gets extra crisp on the bottom. A quick tip: wipe knives dry between veggie colors to keep those rainbow stripes clean!
How to Make Dr. Seuss Rainbow Cheesy Bread

- Preheat and Prep: Preheat your oven to 400°F (200°C). Line a baking sheet with parchment paper or foil for easy clean-up. Set the bread, cut side up, on the tray.
- Make Garlic Butter: In a small bowl, mix 2 tablespoons (28 g) softened butter with 1 minced garlic clove. If your butter’s too firm, microwave it for 10 seconds to soften (don’t melt). Spread the garlic butter evenly over the cut sides of the bread. The bread should look a little glossy and smell amazing.
- Prep the Veggies: Dice all your bell peppers, cabbage, and tomatoes into small, even pieces—aim for 1/4 inch (0.5 cm) cubes. This way, they cook evenly and give the bread that neat, rainbow look. If your tomatoes are super juicy, blot them with a paper towel so they don’t make the bread soggy.
- Layer the Cheese: Sprinkle 1 cup (100 g) mozzarella evenly over each bread half, then 1/2 cup (50 g) cheddar, and finally 1/4 cup (25 g) Parmesan. Reserve the rest of the cheese for the top.
- Create the Rainbow: Arrange the veggies in colorful stripes across the bread. I start with red (tomatoes), then orange, yellow, green (bell peppers), and finish with purple cabbage. Press them lightly into the cheese so they stick. It doesn’t have to be perfect—just cheerful!
- Top It Off: Sprinkle the remaining mozzarella and cheddar over the veggies. Add a pinch of red pepper flakes if you like spice, and a drizzle of olive oil spray for a golden sheen.
- Bake: Bake in the preheated oven for 12–15 minutes, or until the cheese is melted and bubbling and the bread edges are golden brown. If you like an extra-crisp top, broil for 1–2 minutes at the end—watch closely so it doesn’t burn.
- Finishing Touches: Remove from the oven and let cool for 2–3 minutes. Sprinkle with fresh parsley or basil. For extra crunch, add a light sprinkle of flaked sea salt.
- Slice and Serve: Cut the bread into 2-inch (5-cm) strips or squares. The cheese should stretch and the colors should be vibrant. Serve warm for the best cheese pull!
Troubleshooting: If the cheese isn’t browning, broil for a minute or two. If veggies look too wet, pat them dry before adding. Bread too crisp? Bake on a lower rack next time. I’ve learned (the hard way) to always check at the 10-minute mark—every oven’s a little different. And don’t stress if the stripes aren’t perfect; it’s all part of the fun!
Cooking Tips & Techniques
Over the years, I’ve picked up a few tricks to make this Dr. Seuss Rainbow Cheesy Bread a guaranteed hit—every single time.
- Keep Veggies Dry: Wet veggies equal soggy bread. After dicing, lay them out on a paper towel for a few minutes. This little step saves your bread from getting mushy.
- Cheese Under AND Over: A layer of cheese under the veggies helps them stick, while the top layer gives you that golden, gooey finish. I learned this after my first batch had “runaway peppers.”
- Even Slicing: Use a serrated bread knife for cutting—less squish, more defined stripes.
- Timing Is Everything: If you’re multitasking (like I usually am), set two timers: one for 12 minutes (check for melty cheese), and another as a backup for broiling. A minute too long under the broiler can mean burnt cheese—ask me how I know!
- Mixing Up the Cheese: Try a blend of mozzarella and fontina for extra stretch. If you love super-sharp flavor, a little aged provolone or asiago works wonders.
- Batch Cooking: For big parties, prep the bread and veggies ahead of time. Assemble just before baking for the freshest result.
- Personal Flops: One time, I tried adding all the veggies before the cheese—looked messy and half of them fell off. Lesson learned: cheese is your glue!
- Consistency Tips: Use the same size dice for all veggies. Not only does it look better, but everything cooks at the same rate—no crunchy surprises.
Don’t be afraid to play around! Cooking is part science, part art, and sometimes the best discoveries happen by accident (like the time I swapped basil for parsley and everyone loved it). If you’re cooking with kids, let them “paint” their own stripes—they’ll be proud, and more likely to eat their veggies, too.
Dr. Seuss Rainbow Cheesy Bread Variations & Adaptations
One of the best parts about this rainbow cheesy bread is how customizable it is. Over the years, I’ve tinkered with a bunch of variations—here are a few of my favorites:
- Gluten-Free: Swap the Italian loaf for your favorite gluten-free baguette or flatbread. I’ve tried Schär and Canyon Bakehouse with great results. You may need to adjust the baking time—gluten-free breads tend to crisp faster.
- Vegan: Use dairy-free butter and plant-based mozzarella (like Daiya or Follow Your Heart). Go for a mix of vegan cheddar and mozzarella for that classic stretch and flavor. If you want to get wild, add a sprinkle of nutritional yeast for a cheesy kick.
- Spicy Version: Add thin slices of jalapeño or sprinkle pepper jack cheese for a grown-up twist. I love this at adult gatherings—keeps things interesting.
- Seasonal Veggies: In spring, swap some bell peppers for thin asparagus tips. In summer, add sweet corn or diced zucchini. In fall, try roasted butternut squash cubes for orange, and in winter, use sun-dried tomatoes for deep red.
- Different Cooking Methods: For a crispier crust, bake directly on a preheated pizza stone. If you have an air fryer, small pieces of bread can be crisped up quickly—just check at the 5-minute mark for doneness.
- Cheese Swap: Try Monterey Jack, fontina, or even a smoky gouda. Each cheese brings a new personality to the bread.
- Personal Favorite: Sometimes, I add a thin layer of pesto under the cheese—gives a herby, fragrant layer that’s out of this world.
Don’t hesitate to get creative. Let the kids pick their own veggie colors or use what you have in the fridge. The fun is in making it your own—and you might just discover your new favorite combo along the way!
Serving & Storage Suggestions
Serving: This cheesy bread is at its best served warm, right out of the oven. Slice into strips or squares and arrange on a platter—the rainbow stripes really pop against a white plate. For parties, I like to serve with a side of marinara or ranch for dipping (kids go wild for this). Pair with fresh fruit or a crisp salad for a balanced meal. For grown-ups, this bread goes perfectly with a cold glass of lemonade or even a light Pinot Grigio.
Storage: Leftovers (if you have any!) can be wrapped tightly in foil and stored in the refrigerator for up to 3 days. To reheat, pop slices in a 350°F (175°C) oven for 5–7 minutes until the cheese is bubbly again. You can also use a toaster oven for smaller batches. I don’t recommend microwaving—it softens the bread too much and you lose that lovely crisp. If you want to freeze, assemble the bread without baking, wrap well, and freeze for up to a month. Bake straight from frozen, adding 5 extra minutes to the bake time. Honestly, the flavors get even better on day two as the garlic and cheese meld—so don’t be shy about making extra!
Nutritional Information & Benefits
One generous slice (about 1/10 of a loaf) of Dr. Seuss Rainbow Cheesy Bread delivers approximately:
- Calories: 180
- Protein: 7g
- Carbohydrates: 16g
- Total Fat: 9g
- Fiber: 2g
- Sugar: 2g
The rainbow veggies bring a boost of vitamins A and C, antioxidants, and fiber—so you’re sneaking in real nutrition with every slice. The cheese provides calcium and protein, making it a more balanced snack. For gluten-free or dairy-free eaters, the substitutions listed above help everyone enjoy this fun food. Just a heads-up: it contains gluten, dairy, and could have traces of soy depending on your bread and cheese brands. From a wellness perspective, I love that this recipe gets kids excited about eating colorful veggies—making healthy choices feel like a treat instead of a chore.
Conclusion
If you’re searching for a party snack that’s as much fun to make as it is to eat, Dr. Seuss Rainbow Cheesy Bread is your new go-to. It’s easy, colorful, and loaded with flavor—plus, it puts smiles on faces every single time. Don’t be afraid to swap in your favorite cheeses or veggies; this recipe is all about making it your own. Personally, I love how it brings everyone together in the kitchen—from little hands arranging stripes to grown-ups sneaking extra pieces.
Ready to try it? Bookmark this page, whip up a loaf, and share how you made it yours. Leave a comment below with your favorite veggie combos or party memories—I love hearing how these recipes fit into your lives. Whether it’s for a birthday bash, rainy day snack, or just a burst of color on your dinner table, this bread is sure to become a family favorite. Happy baking, and may your days be as bright and cheesy as your bread!
Frequently Asked Questions
Can I make this Dr. Seuss Rainbow Cheesy Bread ahead of time?
Yes! You can prep the bread with butter, cheese, and veggies, then wrap it well and refrigerate for up to 12 hours. Bake just before serving for the freshest taste.
What’s the best way to cut the bread for perfect rainbow slices?
Use a serrated bread knife and let the bread cool for a couple of minutes after baking. This keeps the cheese and veggies from sliding off. Cut straight down for neat stripes.
How can I get my kids to help with this recipe?
Let them arrange the veggie stripes! It’s a fun, hands-on way to get kids excited about their food. They can also sprinkle the cheese or brush the butter on the bread.
What other breads can I use if I can’t find Italian or French bread?
Baguette, ciabatta, or even naan work great. Just adjust the baking time if your bread is thinner or thicker than a standard loaf.
Can I freeze leftover cheesy bread?
Absolutely. Wrap slices tightly in foil and freeze for up to a month. Reheat in a hot oven for 7–10 minutes until the cheese is bubbly and the bread is crisp again.
Pin This Recipe!

Dr. Seuss Rainbow Cheesy Bread: Easy Party Snack Kids Love
This playful, colorful cheesy bread is loaded with gooey cheese and a rainbow of fresh veggies, making it a crowd-pleasing snack for kids and adults alike. Ready in under 30 minutes, it’s perfect for parties, playdates, or brightening up any meal.
- Total Time: 25 minutes
- Yield: 10 slices 1x
Ingredients
- 1 large Italian or French bread loaf (about 16 oz), sliced in half lengthwise
- 2 tablespoons unsalted butter, softened
- 1 clove garlic, minced (optional)
- 2 cups shredded mozzarella cheese
- 1 cup shredded cheddar cheese
- 1/2 cup grated Parmesan cheese
- 1/3 cup finely diced red bell pepper
- 1/3 cup finely diced orange bell pepper
- 1/3 cup finely diced yellow bell pepper
- 1/3 cup finely diced green bell pepper
- 1/3 cup finely diced purple cabbage
- 1/3 cup finely diced cherry tomatoes or halved grape tomatoes
- 2 tablespoons finely chopped fresh parsley or basil
- Pinch of red pepper flakes (optional)
- Olive oil spray (optional)
- Flaked sea salt (optional, for sprinkling before serving)
Instructions
- Preheat your oven to 400°F (200°C). Line a baking sheet with parchment paper or foil. Place the bread, cut side up, on the tray.
- In a small bowl, mix softened butter with minced garlic. Spread evenly over the cut sides of the bread.
- Dice all bell peppers, cabbage, and tomatoes into small, even pieces (about 1/4 inch cubes). Blot tomatoes with a paper towel if juicy.
- Sprinkle 1 cup mozzarella, 1/2 cup cheddar, and 1/4 cup Parmesan evenly over each bread half. Reserve the rest of the cheese for topping.
- Arrange the veggies in colorful stripes across the bread: red (tomatoes), orange, yellow, green (bell peppers), and purple (cabbage). Press lightly into the cheese.
- Sprinkle the remaining mozzarella and cheddar over the veggies. Add red pepper flakes if desired and a light spray of olive oil.
- Bake for 12–15 minutes, or until cheese is melted and bubbling and bread edges are golden brown. For extra crispness, broil for 1–2 minutes at the end, watching closely.
- Remove from oven and let cool for 2–3 minutes. Sprinkle with fresh parsley or basil and flaked sea salt if desired.
- Slice into 2-inch strips or squares and serve warm.
Notes
For best results, keep veggies dry to prevent soggy bread. Cheese under and over the veggies helps everything stick and gives a gooey finish. Use a serrated bread knife for clean slices. Feel free to swap in your favorite cheeses or veggies. For gluten-free or vegan versions, use appropriate bread and cheese substitutes.
- Prep Time: 10 minutes
- Cook Time: 15 minutes
- Category: Appetizer
- Cuisine: American
Nutrition
- Serving Size: 1 slice (about 1/10
- Calories: 180
- Sugar: 2
- Sodium: 350
- Fat: 9
- Saturated Fat: 5
- Carbohydrates: 16
- Fiber: 2
- Protein: 7
Keywords: cheesy bread, rainbow bread, party snack, kids snack, vegetable bread, Dr. Seuss, colorful appetizer, easy party food


