

Let me tell you, the aroma that floats through my kitchen when these Cheddar-Stuffed Soda Bread Minis hit the oven is pure magic—like a cozy bakery tucked away on an Irish hillside. The rustic crackle of a golden crust, the buttery scent of cheddar melting into the nooks, and the faint tang of buttermilk all swirl together, making it nearly impossible to wait for them to cool. I still remember the first time I baked a batch on a chilly March afternoon—my hands dusted with flour, the air humming with anticipation, and my youngest sneaking pieces of cheese off the counter (caught red-handed, of course!). It was the kind of moment where you pause, take a deep breath, and just smile because you know you’re onto something truly special.
Honestly, soda bread always had a spot at our St. Patrick’s Day table, but these minis—with their gooey cheddar centers—were a game-changer. When I was knee-high to a grasshopper, my grandma would bake big, hearty loaves, but I wanted something a little more snackable, a little more party-ready. That’s how I stumbled onto the idea of stuffing sharp cheddar into mini soda breads: bite-sized, packable, and perfect for sharing at potlucks or sneaking into lunchboxes. I wish I’d thought of this years ago—my family can’t stop sneaking them off the cooling rack (and, honestly, who could blame them?).
Every batch gets rave reviews, whether I’m pulling them out for a festive St. Paddy’s brunch or gifting a little bag to a neighbor. There’s just something about tearing open a warm mini and watching cheesy steam billow out that brings out the kid in everyone. I’ve tested these dozens of times in the name of “research” (wink), and they’ve become a staple for family gatherings and comfort food cravings. If you’re craving a recipe that feels like a warm hug and looks adorable on your Pinterest board, you’re going to want to bookmark these Cheddar-Stuffed Soda Bread Minis—especially for St. Patrick’s Day!
Why You’ll Love This Cheddar-Stuffed Soda Bread Minis Recipe
As someone who’s spent years tinkering with Irish soda bread recipes (and, let’s face it, eating more than my fair share), I can say with all honesty: these Cheddar-Stuffed Soda Bread Minis are the real deal. Let’s break down why you’ll be hooked after just one batch:
- Quick & Easy: From mixing to baking, you’ll have a fresh batch ready in under 40 minutes. No yeast, no proofing—just mix, stuff, and bake. Perfect for last-minute St. Patrick’s Day gatherings or unexpected company.
- Simple Ingredients: Nothing fancy here! You probably have everything in your pantry: flour, baking soda, buttermilk, and your favorite cheddar. No need for a special grocery trip.
- Perfect for Entertaining: These minis are tailor-made for St. Patrick’s Day parties, brunch spreads, or cozy family dinners. They look darling in a bread basket and disappear fast!
- Crowd-Pleaser: Kids love the cheesy surprise inside, and adults appreciate the nostalgic, homey flavor. They’re the first thing to go at every potluck I’ve brought them to.
- Unbelievably Delicious: That combo of tangy buttermilk dough and melty sharp cheddar? Next-level comfort food. The exterior is golden and crisp, while the inside is soft and pillowy—honestly, you’ll want to eat them straight from the oven.
What truly sets this recipe apart? It’s not just another soda bread with cheese tossed in. By tucking a cube of cheddar in the center, each mini becomes a self-contained cheesy delight. The dough is gently mixed—never overworked—so you get that signature tender crumb, not a tough roll. I use a touch of brown sugar for depth, and I always pick a good, aged cheddar for maximum flavor. It’s a little twist on tradition that just works.
These Cheddar-Stuffed Soda Bread Minis are more than just a snack—they’re a little celebration in every bite. You can serve them warm for ultimate gooeyness or let them cool for easy packing. They’re comfort food, party food, and kid-friendly all in one. Whether you’re Irish or just Irish at heart, you’ll find yourself reaching for this recipe whenever you need a little homemade joy. Trust me, once you try them, you’ll be making excuses to bake another batch!
What Ingredients You Will Need
This Cheddar-Stuffed Soda Bread Minis recipe keeps things simple—no hard-to-find ingredients or complicated steps. Here’s what you’ll need to whip up a batch of these cheesy, tender bites:
- For the Dough:
- All-purpose flour (2 1/2 cups / 315g) – The backbone of the bread. I usually stick with King Arthur or Bob’s Red Mill for reliable results.
- Whole wheat flour (1/2 cup / 60g) – Adds a touch of nuttiness and color. You can use all white flour if you prefer a lighter crumb.
- Granulated sugar (2 tablespoons / 25g) – Just enough to balance the tang. Brown sugar works too for a deeper flavor.
- Baking soda (1 teaspoon / 6g) – The leavening power! Make sure it’s fresh; old soda won’t give you that lift.
- Kosher salt (3/4 teaspoon / 4g) – For flavor. Table salt works, but I’d use a bit less since it’s finer.
- Unsalted butter (3 tablespoons / 42g, cold, cut in cubes) – Adds tenderness. If using salted, just reduce the added salt a smidge.
- Wet Ingredients:
- Buttermilk (1 cup / 240ml, cold) – The secret to that signature tang and tenderness. If you don’t have buttermilk, mix 1 cup milk with 1 tablespoon lemon juice or vinegar and let it sit for 5 minutes.
- Large egg (1, room temperature) – Helps bind and tenderize.
- Honey (1 tablespoon / 20g, optional) – For a hint of sweetness. Skip it if you like a more savory bread.
- For the Cheddar Filling:
- Sharp cheddar cheese (about 6–8 oz / 170–225g, cut into 18 small cubes) – Go for a good aged cheddar (like Cabot or Kerrygold). Mild works too, but sharp brings the flavor. You can even try white cheddar for a fun twist!
- For Topping (Optional):
- Flaky sea salt – Sprinkled on top for crunch and flavor (I love Maldon here).
- Fresh herbs (chives or parsley, finely chopped) – For a pop of green and freshness, especially festive for St. Patrick’s Day.
Ingredient Tips & Swaps:
- No buttermilk? Use plain kefir or make a quick version with milk and lemon juice.
- To make it gluten-free, swap the flours for a 1:1 gluten-free blend like Cup4Cup (texture may be a bit different, but still tasty!).
- For dairy-free, use a plant-based butter, a dairy-free cheddar, and a buttermilk alternative (almond milk + vinegar works in a pinch).
- Want to add more zing? Toss in a pinch of black pepper or a little dry mustard powder to the dough.
I always say—use what you have and don’t sweat the small stuff. The magic is in the cheese surprise and that classic soda bread flavor!
Equipment Needed
- Large mixing bowl – For combining your dry and wet ingredients. If you don’t have a big enough bowl, use a clean stock pot (I’ve done it in a pinch!).
- Pastry cutter or two butter knives – To cut in the butter. You can use your fingertips too—just work quickly to keep the butter cold.
- Measuring cups and spoons – Accuracy is key, especially for baking soda and buttermilk.
- Kitchen scale (optional but recommended) – For weighing flour and cheese, especially if you want consistent minis.
- Baking sheet – Lined with parchment or a silicone mat for easy cleanup.
- Small cookie scoop or tablespoon – For portioning the dough evenly. If you don’t have one, a regular spoon works fine.
- Cooling rack – For letting the minis cool so the bottoms don’t get soggy.
- Sharp knife – To cube your cheddar and make little crosses atop each mini for that classic soda bread look.
If you don’t have a pastry cutter, two butter knives do a great job for cutting in butter—just crisscross them through the flour. Silicone mats are easier to clean than parchment if you bake a lot (mine’s been with me for years!). And if you’re on a budget, thrift stores often have mixing bowls and baking sheets for next to nothing. Just give everything a good wash before you start. Honestly, the simpler the tools, the more fun the process!
Preparation Method

- Preheat and Prep: Heat your oven to 400°F (200°C). Line a large baking sheet with parchment paper or a silicone baking mat. This keeps the bottoms golden and clean-up a breeze.
- Mix Dry Ingredients: In a large mixing bowl, whisk together 2 1/2 cups (315g) all-purpose flour, 1/2 cup (60g) whole wheat flour, 2 tablespoons (25g) sugar, 1 teaspoon (6g) baking soda, and 3/4 teaspoon (4g) kosher salt. Make sure there are no lumps—soda clumps can taste weird!
- Cut in Butter: Add 3 tablespoons (42g) cold unsalted butter, cut into cubes. Use a pastry cutter, two knives, or your fingertips to work the butter into the flour until it looks like coarse crumbs with some pea-sized pieces. Don’t overwork! Butter lumps = tender minis.
- Whisk Wet Ingredients: In a separate bowl or measuring jug, whisk together 1 cup (240ml) cold buttermilk, 1 large egg, and 1 tablespoon (20g) honey (if using). The mixture should be smooth and creamy.
- Combine and Mix: Pour the wet ingredients over the dry mixture. Stir gently with a wooden spoon or spatula until a shaggy dough forms. The dough will be sticky—don’t worry, that’s perfect.
- Portion the Dough: Dust your hands with flour and scoop tablespoon-sized portions (about 2 tablespoons or 35g each) of dough. You should get about 18 minis. If the dough sticks, flour your hands again.
- Stuff with Cheddar: Flatten each portion in your palm, place a cube of cheddar (about 1/2 inch / 1.2cm wide, 10–12g each) in the center, then fold the dough around the cheese, pinching to seal. Roll gently into a ball and set seam-side down on your baking sheet.
- Optional Toppings: Brush the tops lightly with buttermilk or melted butter. Sprinkle with flaky sea salt and a little chopped parsley or chives if you like a pop of color.
- Score Minis: Use a sharp knife to cut a shallow X on top of each mini. This isn’t just for looks—it helps them bake evenly and gives them that classic soda bread charm.
- Bake: Bake for 15–18 minutes, or until the minis are golden brown, puffed, and you see a little cheese bubbling out. The bottoms should sound hollow when tapped.
- Cool & Serve: Transfer minis to a cooling rack. Let them rest for at least 10 minutes—this lets the cheese set a bit (otherwise, molten lava!). Warm is best, but room temperature is still delicious.
Notes & Troubleshooting: If your dough seems dry, add another tablespoon of buttermilk. If it’s too wet, dust with a little more flour. Don’t overmix—gentle hands make the most tender minis. If the cheese leaks out a bit, that’s normal—just means more crispy bits! For extra flavor, toss a pinch of black pepper in the dough or try a mix of cheeses. And if you’re short on time, you can make bigger minis and bake a couple minutes longer.
Cooking Tips & Techniques
You know, after many batches (and a few oops moments), I’ve picked up some tricks for making perfect Cheddar-Stuffed Soda Bread Minis every time:
- Cold Ingredients Are Key: Keep your butter and buttermilk cold. This makes the dough puff up in the oven, giving you that tender, almost biscuit-like bite. If your kitchen is warm, pop your cheese cubes and butter in the freezer for a couple minutes before using.
- Don’t Overmix: Soda bread dough likes to be left alone. Mix just until combined, or you’ll end up with tough minis. Lumps and a little stickiness are totally fine.
- Seal the Cheese Well: Pinch the dough closed around the cheddar or it’ll ooze out during baking. If some leaks out, don’t worry—those crispy cheese bits are a treat!
- Size Matters: Try to make the minis the same size so they bake evenly. Using a cookie scoop helps, but if you’re eyeballing it, no stress—just check for doneness and pull the smaller ones early if needed.
- Score for Success: The little X on top isn’t just cute; it helps the minis rise properly. Don’t skip this step!
- Use a Sturdy Baking Sheet: Thin pans can burn the bottoms. A heavy baking sheet or double-stacking pans works wonders if you’ve had burnt bottoms before.
- Test for Doneness: Tap the bottom of a mini—if it sounds hollow, you’re good. The tops should be golden, and you might see a little cheese peeking out.
- Let Rest Before Eating: Hot cheese burns! Let the minis cool for 10 minutes so the cheese sets and you avoid accidental mouth blisters (ask me how I know!).
My biggest rookie mistake was overworking the dough and ending up with hockey pucks instead of pillowy minis. Less is more—gentle mixing and keeping things cold really are the secrets. And honestly, if you’re making these for a crowd, double the recipe—because they vanish fast!
Variations & Adaptations
One of the things I love most about these Cheddar-Stuffed Soda Bread Minis is how easy they are to tweak for different tastes and diets. Here are some ideas to make them your own:
- Herb & Cheese Twist: Add 1 tablespoon of chopped fresh chives, dill, or parsley to the dough for a fresh, savory note. Swap the cheddar for Gruyère or pepper jack for a different flavor spin (I tried Gruyère once—so good with a hint of rosemary!).
- Gluten-Free Minis: Use a gluten-free 1:1 flour blend in place of the all-purpose and whole wheat flours. The texture will be a bit different—slightly more crumbly—but still delicious and cheesy.
- Dairy-Free Version: Use a plant-based butter, dairy-free cheddar (like Violife), and make your own “buttermilk” with almond or soy milk plus a splash of lemon juice. The flavor is a bit milder but still satisfying and great for sharing with friends who can’t do dairy.
- Spicy Cheddar Minis: Stir 1/2 teaspoon cayenne or smoked paprika into the dough. Use spicy cheddar or add a sliver of pickled jalapeño with the cheese for a little kick.
- Seasonal Swap: In summer, fold in 1/4 cup finely chopped sun-dried tomatoes and use white cheddar for a Mediterranean vibe. In fall, try adding a pinch of caraway or swap in Irish Dubliner cheese.
- Mini Loaf Version: Instead of minis, shape into 6–8 larger rolls or make one big round loaf (adjust baking time to 25–30 minutes for a loaf).
Allergies? For egg-free, you can skip the egg and add an extra tablespoon of buttermilk. For nut allergies, stick with regular dairy. I’ve played around with all kinds of cheese—smoked cheddar is a hit for grown-ups! My family’s favorite twist is adding chives and a sprinkle of Everything Bagel seasoning on top—seriously addictive.
Serving & Storage Suggestions
I always serve these Cheddar-Stuffed Soda Bread Minis warm, right from the oven, when the cheese is just the right amount of gooey and the crust is crisp. Arrange them in a rustic basket lined with a tea towel for that cozy, homemade look—perfect for St. Patrick’s Day brunch or as an appetizer at your next party. They pair beautifully with a hearty Irish stew, a fresh green salad, or even a bowl of tomato soup. For drinks, an Irish ale or a cup of strong black tea makes a lovely match.
If you have leftovers (which is rare at my house!), let the minis cool completely, then store them in an airtight container at room temperature for up to 2 days. For longer storage, wrap them tightly and freeze for up to 2 months. To reheat, pop them in a 350°F (175°C) oven for 8–10 minutes, or until warmed through and the cheese is melty again. You can microwave them in 10-second bursts, but the crust will soften a bit.
Honestly, the flavor deepens after a day—they get even more tender as they sit, though they’re never quite as magical as fresh from the oven. If you want to prep ahead, shape the minis, stuff them with cheese, and refrigerate on a parchment-lined tray for up to 8 hours before baking. Just add a couple minutes to the baking time if starting from cold. Handy for busy holiday mornings!
Nutritional Information & Benefits
Per mini (based on a batch of 18): approximately 130 calories, 5g protein, 16g carbohydrates, 5g fat, and 1g fiber. These Cheddar-Stuffed Soda Bread Minis offer a good balance of protein and carbs, thanks to the flour and cheese combo. The whole wheat flour adds a touch of fiber, and using sharp cheddar means you get big flavor with less cheese overall.
Key health perks? No added preservatives, no trans fats, and you control the sodium. If you use a reduced-fat cheese or plant-based options, you can easily adjust the nutrition for your needs. The recipe is nut-free and can be adapted for gluten-free or dairy-free diets, making it a great choice for sharing at gatherings with various dietary needs.
I love that these minis are satisfying without being heavy—perfect for a snack that keeps you going. Just remember, if anyone in your group has a dairy or gluten allergy, use the swaps mentioned above. Homemade always wins for wholesome comfort!
Conclusion
There’s a reason these Cheddar-Stuffed Soda Bread Minis have become a go-to in my kitchen—they’re easy, endlessly adaptable, and deliver that perfect punch of cheesy, nostalgic comfort in every bite. Whether you’re celebrating St. Patrick’s Day or just want a snack that makes you smile, this recipe is worth trying and tweaking to make your own. The combination of tender crumb and melty cheddar is pure joy, and I love how they bring people together around the table—no fancy ingredients required.
Don’t be afraid to play with herbs, cheeses, or shapes—make this recipe fit your family’s tastes and traditions. If you give these minis a try (or put your own spin on them!), I’d love to hear how they turn out—drop a comment, share a photo, or tag me on Pinterest. There’s nothing better than seeing how a simple recipe brings a little more happiness (and cheese!) into your day. Happy baking, and may your St. Patrick’s Day be extra delicious!
FAQs About Cheddar-Stuffed Soda Bread Minis
Can I make these Cheddar-Stuffed Soda Bread Minis ahead of time?
Yes! You can shape and stuff the minis, then refrigerate them (covered) for up to 8 hours before baking. Just bake a couple minutes longer if starting cold. They also freeze well after baking—simply reheat in the oven for best results.
What kind of cheddar works best?
Sharp cheddar is my favorite for a bold, cheesy flavor, but mild or white cheddar works too. For a fun twist, try smoked cheddar or even pepper jack for a little heat!
How can I make these gluten-free?
Just substitute the all-purpose and whole wheat flours with a 1:1 gluten-free flour blend. The minis will be a bit more crumbly but still tasty and cheesy.
What should I do if the cheese leaks out?
If some cheese escapes during baking, don’t stress—those crispy bits are delicious! Be sure to pinch the dough tightly around the cheese, but a little leakage is totally normal.
Can I use other fillings besides cheddar?
Absolutely! Try Gruyère, mozzarella, chopped cooked bacon, or even caramelized onions for different flavors. Just keep the filling to about 1/2 inch cubes to ensure the minis bake evenly.
Pin This Recipe!
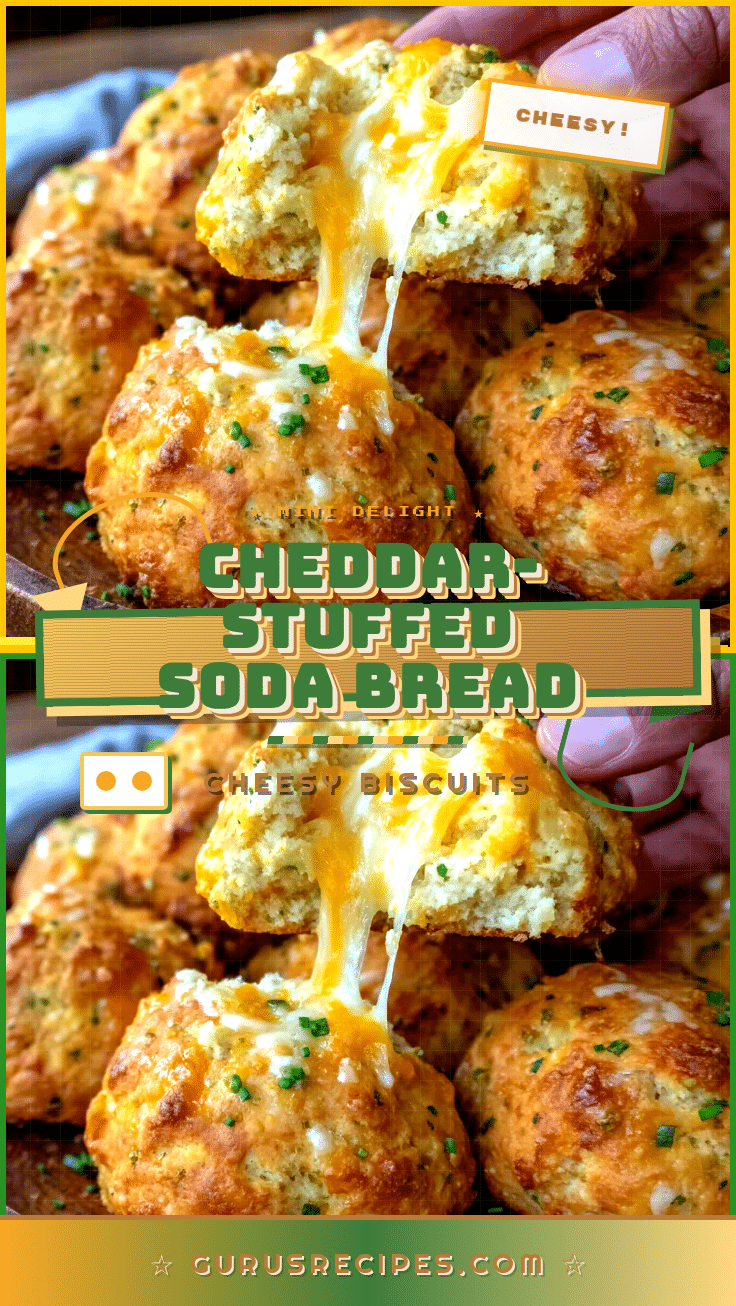

Cheddar-Stuffed Soda Bread Minis
These Cheddar-Stuffed Soda Bread Minis are a quick, easy, and crowd-pleasing appetizer featuring a tender, tangy soda bread dough wrapped around gooey cheddar cheese. Perfect for St. Patrick’s Day, potlucks, or anytime you want a cheesy, comforting snack.
- Total Time: 38 minutes
- Yield: 18 minis 1x
Ingredients
- 2 1/2 cups all-purpose flour
- 1/2 cup whole wheat flour (or use all-purpose for lighter minis)
- 2 tablespoons granulated sugar (or brown sugar for deeper flavor)
- 1 teaspoon baking soda
- 3/4 teaspoon kosher salt
- 3 tablespoons unsalted butter, cold and cut into cubes
- 1 cup buttermilk, cold (or 1 cup milk + 1 tablespoon lemon juice or vinegar, rested 5 minutes)
- 1 large egg, room temperature
- 1 tablespoon honey (optional, for sweetness)
- 6–8 oz sharp cheddar cheese, cut into 18 small cubes (about 1/2 inch each)
- Flaky sea salt, for topping (optional)
- Fresh herbs (chives or parsley), finely chopped, for topping (optional)
Instructions
- Preheat oven to 400°F (200°C). Line a large baking sheet with parchment paper or a silicone baking mat.
- In a large mixing bowl, whisk together all-purpose flour, whole wheat flour, sugar, baking soda, and kosher salt until well combined.
- Add cold, cubed butter and cut it into the flour mixture using a pastry cutter, two knives, or your fingertips until the mixture resembles coarse crumbs with some pea-sized pieces.
- In a separate bowl or measuring jug, whisk together buttermilk, egg, and honey (if using) until smooth.
- Pour wet ingredients over dry ingredients and stir gently with a wooden spoon or spatula until a shaggy, sticky dough forms. Do not overmix.
- Dust hands with flour and scoop out tablespoon-sized portions (about 2 tablespoons or 35g each) of dough. You should get about 18 minis.
- Flatten each dough portion in your palm, place a cube of cheddar in the center, and fold the dough around the cheese, pinching to seal. Roll gently into a ball and place seam-side down on the baking sheet.
- Brush tops lightly with buttermilk or melted butter. Sprinkle with flaky sea salt and chopped herbs if desired.
- Use a sharp knife to cut a shallow X on top of each mini.
- Bake for 15–18 minutes, until golden brown, puffed, and cheese is bubbling out. The bottoms should sound hollow when tapped.
- Transfer minis to a cooling rack and let rest for at least 10 minutes before serving.
Notes
Keep butter and buttermilk cold for best texture. Don’t overmix the dough—gentle handling makes tender minis. Pinch dough tightly around cheese to minimize leaks; a little cheese escaping is normal and delicious. For gluten-free, use a 1:1 gluten-free flour blend. For dairy-free, use plant-based butter, cheese, and buttermilk alternative. Minis can be made ahead and refrigerated before baking, or frozen after baking and reheated.
- Prep Time: 20 minutes
- Cook Time: 18 minutes
- Category: Appetizer
- Cuisine: Irish
Nutrition
- Serving Size: 1 mini
- Calories: 130
- Sugar: 2
- Sodium: 180
- Fat: 5
- Saturated Fat: 3
- Carbohydrates: 16
- Fiber: 1
- Protein: 5
Keywords: soda bread, cheddar, appetizer, St. Patrick's Day, Irish, cheese, snack, party food, easy, quick, bread, mini


