
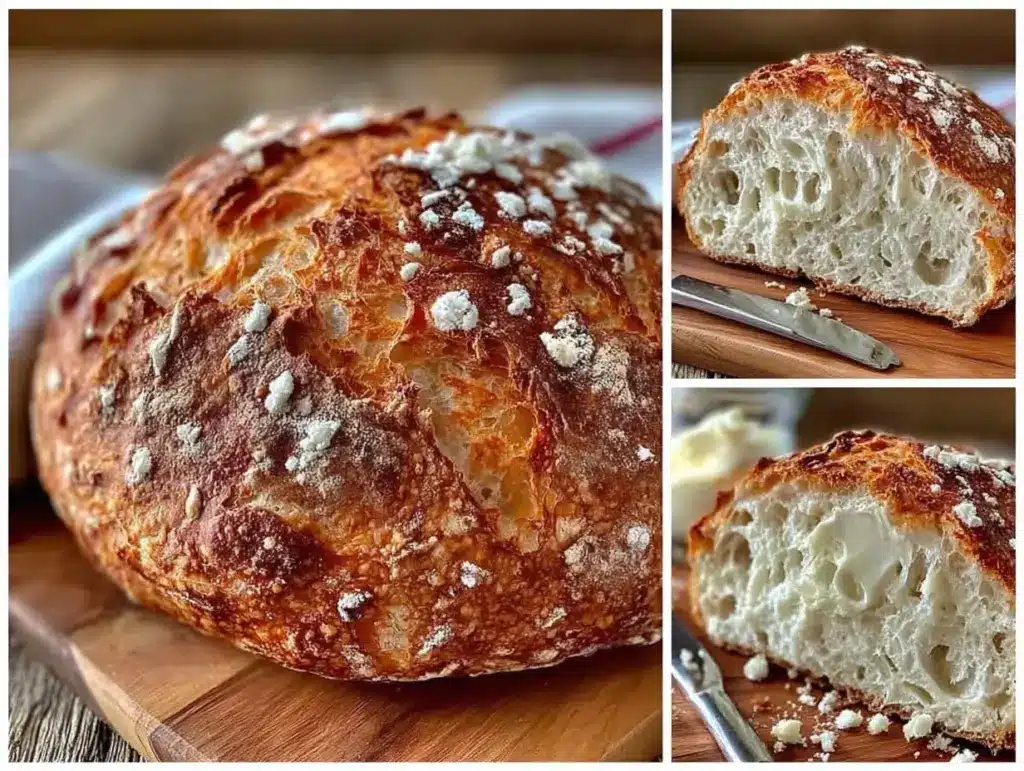
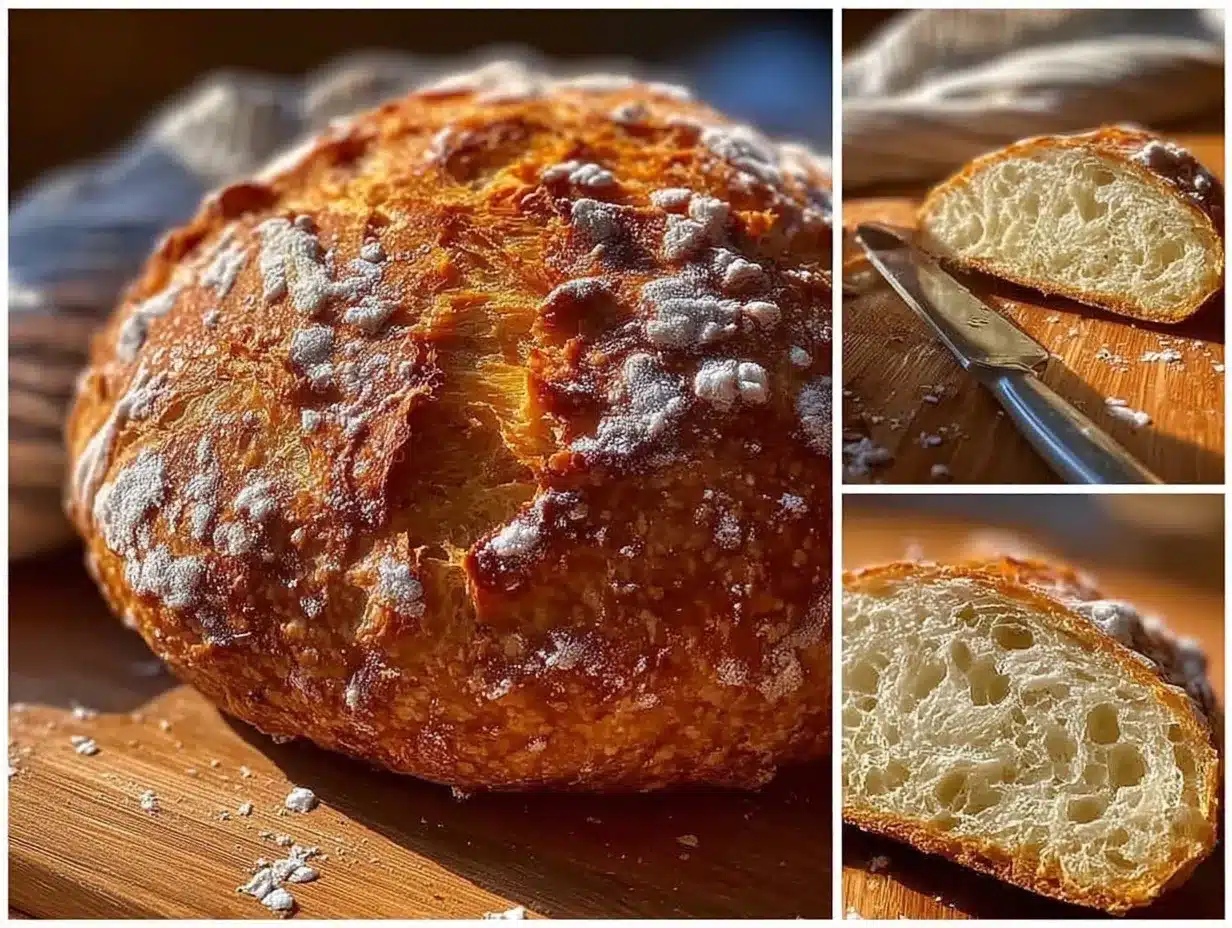
It was one of those rare quiet Sunday mornings when the kitchen felt like a cozy little sanctuary. The house was still, the sun was just starting to peek through the curtains, and I found myself craving the smell of freshly baked bread without the hassle of hours of kneading or complicated gluten-free baking gymnastics. Honestly, gluten-free bread has always been a bit of a challenge for me—either too dense, crumbly, or just plain boring. But this easy no knead gluten-free bread with a soft, fluffy crust changed everything.
I stumbled on the recipe almost by accident, really. I was trying to simplify my weekend baking routine, and after a few frustrating attempts with traditional methods, I just threw the ingredients together, skipped the kneading, and let time do its thing. What came out of the oven was a warm, airy loaf with a crust so soft it practically melted in my mouth. It was so unexpectedly good that I found myself making it multiple times that week—no joke.
What stuck with me was the bread’s gentle crumb and the way it paired perfectly with everything from jam at breakfast to a quick sandwich at lunch. It’s the kind of recipe that feels like it’s been in your family forever, even if it just landed in your kitchen today. And that’s why I keep coming back to it—because it’s just simple, honest, and reliably delicious. If you’ve ever thought gluten-free bread couldn’t be soft and fluffy, this recipe might just change your mind.
Why You’ll Love This Recipe
After testing countless gluten-free bread recipes, this one stands out for a bunch of solid reasons. It’s not just another loaf—it’s an easy, no-nonsense approach that really works.
- Quick & Easy: You toss everything in a bowl and forget about kneading—less than 10 minutes prep time, and the yeast and baking magic take care of the rest.
- Simple Ingredients: No weird flours or additives needed. Just a few pantry staples like gluten-free flour blend, yeast, and some moisture to keep things soft.
- Perfect for Busy Days: Whether you’re juggling work or just want a fuss-free bake, this recipe fits perfectly into your routine.
- Crowd-Pleaser: Friends and family don’t even realize it’s gluten-free until you tell them. The soft crust and fluffy crumb win them over every time.
- Unbelievably Delicious: The crust is tender, not tough or chewy, and the crumb has that lightness that gluten-free breads usually miss.
What sets this bread apart is the no-knead technique combined with a smart blend of flours that keeps it moist and soft. Plus, the slow rise gives it a subtle depth of flavor that feels homemade and comforting. You know that cozy feeling when you bite into something warm and fluffy? This recipe nails it. It’s the kind of bread that makes you pause for a second and just savor the moment.
What Ingredients You Will Need
This recipe uses simple, wholesome ingredients to deliver bold flavor and satisfying texture without the fuss. Most are pantry staples, and substitutions are easy if you need them.
- Gluten-Free All-Purpose Flour Blend (2 ½ cups / 310 g) – I recommend brands like Bob’s Red Mill or King Arthur for consistent results.
- Xanthan Gum (1 teaspoon) – Helps with texture and elasticity. Skip if your flour blend already includes it.
- Instant Yeast (2 teaspoons) – The driving force behind the rise; make sure it’s fresh for best results.
- Sugar (1 tablespoon) – Feeds the yeast and adds a touch of sweetness.
- Salt (1 teaspoon) – Balances flavor and enhances the crust.
- Warm Water (1 ⅔ cups / 400 ml) – Not hot, just warm to the touch to activate yeast properly.
- Olive Oil (2 tablespoons) – Adds moisture and gives the crust a delicate softness.
- Apple Cider Vinegar (1 teaspoon) – A secret weapon for tenderness and crumb structure.
For a richer loaf, some folks add a tablespoon of honey or swap olive oil for melted butter, which works beautifully too. If you’re dairy-free, olive oil keeps it light and vegan-friendly. The beauty is in the simplicity: few ingredients, but each plays a key role in making that soft, fluffy crust happen.
Equipment Needed
- Large Mixing Bowl: To combine ingredients easily without mess.
- Wooden Spoon or Silicone Spatula: For mixing—no electric mixer required (yay for easy cleanup!).
- Loaf Pan: A standard 9×5 inch (23×13 cm) pan works best for shaping and baking.
- Kitchen Scale: Optional but helpful for accurate measurements, especially with gluten-free flour.
- Measuring Cups and Spoons: For precise ingredient amounts.
- Clean Kitchen Towel or Plastic Wrap: To cover dough during rising.
If you don’t have a loaf pan, a small baking dish or oven-safe bowl can substitute; just adjust baking time slightly. I personally prefer silicone loaf pans because the bread releases easily and cleanup is a breeze. One tip is to lightly oil your pan even if it’s non-stick—the bread loves a little extra lubrication for that tender crust.
Preparation Method
- Combine Dry Ingredients: In your large mixing bowl, whisk together 2 ½ cups (310 g) gluten-free flour blend, 1 teaspoon xanthan gum (if needed), 2 teaspoons instant yeast, 1 tablespoon sugar, and 1 teaspoon salt. This step ensures the yeast and seasonings are evenly distributed. (Time: 2 minutes)
- Add Wet Ingredients: Pour in 1 ⅔ cups (400 ml) warm water, 2 tablespoons olive oil, and 1 teaspoon apple cider vinegar. Stir gently with a wooden spoon until the mixture is smooth and sticky—no dry flour patches should remain. The batter will be wetter than traditional bread dough, which is normal. (Time: 3 minutes)
- First Rise: Cover the bowl with a clean kitchen towel or plastic wrap and leave it in a warm spot to rise for 1 ½ to 2 hours. You’ll notice the dough will puff up and develop air bubbles—that’s the yeast working its magic. Resist the urge to stir it down! (Tip: If your kitchen is chilly, placing the bowl near a warm stove or inside an oven with just the light on helps.)
- Prepare the Loaf Pan: Lightly oil a 9×5 inch (23×13 cm) loaf pan to prevent sticking. (Time: 1 minute)
- Transfer Dough: Using a spatula, scrape the dough into the prepared pan. Smooth the top gently with a wet spatula or damp fingers to shape evenly. Cover loosely with the towel again for the second rise. (Time: 2 minutes)
- Second Rise: Let the dough rise in the pan for about 45 minutes until it looks puffed and slightly domed over the edges.
- Bake: Preheat your oven to 375°F (190°C). Place the loaf in the center rack and bake for 40–45 minutes. The crust should turn a light golden color, and the bread will sound hollow when tapped on the bottom. (Tip: If the crust browns too quickly, tent with foil halfway through baking.)
- Cool: Remove from oven and let the bread cool in the pan for 10 minutes before transferring to a wire rack to cool completely. This step lets the crumb set nicely and avoids sogginess.
Pro tip: Don’t skip the cooling—it’s tempting to slice right away, but the bread finishes cooking as it cools. Also, the dough’s stickiness can be a bit intimidating, but that’s exactly how you know it’ll come out soft and fluffy.
Cooking Tips & Techniques
Gluten-free bread can be tricky, but here are some things I’ve learned from trial and error that save headaches:
- Don’t Over-Knead: This no knead recipe is all about letting the yeast and time do the work. Over-handling the dough can make it dense.
- Watch Your Water Temperature: Too hot and you kill the yeast; too cold and it won’t activate. Warm, just above body temperature is perfect.
- Use Fresh Yeast: Old yeast means less rise. I always keep a fresh jar in the fridge.
- Patience Matters: Gluten-free doughs often need longer rising times. Don’t rush the process or you’ll lose that fluffy texture.
- Keep Ingredients Consistent: Switching flour blends can change results. Stick to your favorite brand for best outcomes.
- Multitask During Rise: Use rising time to prep toppings, clean up, or make a cup of coffee—makes the wait feel productive.
I once tried to speed things up by cranking the heat—it ended with a burnt crust and gummy crumb. Lesson learned: slow and steady wins the fluffiness race every time.
Variations & Adaptations
This bread is a great base to customize depending on your needs or cravings. Here are some ideas:
- Herb & Garlic: Add 1 teaspoon dried Italian herbs and 1 clove garlic powder to the dry mix for a savory twist.
- Seeded Loaf: Mix in 2 tablespoons of chia seeds, flaxseeds, or sunflower seeds for crunch and nutrition.
- Dairy-Free & Vegan: Stick with olive oil and swap sugar for maple syrup or agave for a vegan-friendly version.
- Gluten-Free & Nut-Free: Use a certified nut-free gluten-free flour blend if allergies are a concern.
- Different Flours: Try swapping half the flour blend for sorghum or brown rice flour for a nuttier flavor.
I tried adding rosemary and sea salt flakes as a topping once—it was a game-changer for sandwich bread. Feel free to experiment, as this recipe is forgiving and adaptable.
Serving & Storage Suggestions
This bread is best served fresh and slightly warm to enjoy that soft crust and fluffy crumb at their peak. Toasting slices brings back that fresh-baked feel even a day later.
- Pair with your favorite jam or honey for breakfast.
- Use it for sandwiches—turkey, avocado, or grilled cheese all shine on this bread.
- Serve alongside soups or salads for a comforting meal.
To store, wrap the cooled bread tightly in plastic wrap or place in an airtight container. It keeps well at room temperature for 2 days. For longer storage, slice and freeze in zip-top bags—toast slices directly from frozen. Reheating in the oven (around 300°F / 150°C for 10 minutes) restores softness nicely.
Over time, the bread’s flavors deepen, making it great for next-day sandwiches or croutons. Just don’t expect it to stay as fluffy indefinitely—fresh is best!
Nutritional Information & Benefits
This loaf offers a gluten-free alternative that’s light yet satisfying. Here’s an estimate per slice (assuming 12 slices):
| Calories | 120 kcal |
|---|---|
| Carbohydrates | 24 g |
| Protein | 2 g |
| Fat | 3 g |
| Fiber | 1 g |
The use of olive oil and apple cider vinegar supports heart health and digestion. Plus, gluten-free flour blends reduce exposure to gluten, which benefits those with sensitivities or celiac disease.
Keep in mind, gluten-free does not always mean low-carb, so portion control is key if managing blood sugar. This bread is free from common allergens like dairy (if using olive oil) and nuts, making it accessible for many diets.
Conclusion
This easy no knead gluten-free bread with a soft, fluffy crust quickly became a staple in my kitchen because it’s just so effortless and rewarding. The simplicity of the method means you don’t have to be a bread expert to get great results, and the loaf itself is versatile enough for any meal.
Feel free to tweak the ingredients or add your favorite flavors to make it your own. I love this bread because it turns gluten-free baking from a chore into a cozy, comforting ritual. If you try it, I’d love to hear how it goes for you—what variations you come up with or how you serve it.
Keep baking, keep experimenting, and most importantly—enjoy every soft, fluffy bite.
FAQs About Easy No Knead Gluten-Free Bread
Can I use regular all-purpose flour instead of gluten-free flour?
This recipe is specifically designed for gluten-free flour blends. Using regular flour will change the texture and rise, so it’s best to stick with gluten-free if needed.
Why is my gluten-free bread dense instead of fluffy?
Common reasons include using old yeast, not allowing enough rising time, or skipping xanthan gum (if your flour blend doesn’t include it). Make sure water is warm (not hot) and be patient with the rise times.
Can I make this bread without xanthan gum?
If your gluten-free flour blend already contains xanthan gum or another binder, you can omit it. Otherwise, it helps improve texture and elasticity.
How should I store leftover bread?
Wrap cooled bread tightly in plastic wrap or airtight containers. It keeps at room temperature for 2 days, or you can freeze slices for longer storage.
Can I add seeds or herbs to this bread?
Absolutely! Mix in seeds, herbs, or spices during the dry ingredient stage for extra flavor and texture. Just keep the total flour amount the same.
Pin This Recipe!


Easy No Knead Gluten-Free Bread Recipe Perfect for Soft Fluffy Crust
An easy no-knead gluten-free bread recipe that yields a soft, fluffy crust and tender crumb, perfect for busy days and gluten-free diets.
- Total Time: 2 hours 55 minutes
- Yield: 12 slices 1x
Ingredients
- 2 ½ cups (310 g) gluten-free all-purpose flour blend
- 1 teaspoon xanthan gum (optional, if not included in flour blend)
- 2 teaspoons instant yeast
- 1 tablespoon sugar
- 1 teaspoon salt
- 1 ⅔ cups (400 ml) warm water
- 2 tablespoons olive oil
- 1 teaspoon apple cider vinegar
Instructions
- Combine dry ingredients: In a large mixing bowl, whisk together gluten-free flour blend, xanthan gum (if needed), instant yeast, sugar, and salt.
- Add wet ingredients: Pour in warm water, olive oil, and apple cider vinegar. Stir gently until the mixture is smooth and sticky with no dry flour patches.
- First rise: Cover the bowl with a clean kitchen towel or plastic wrap and let rise in a warm spot for 1 ½ to 2 hours until dough puffs up and develops air bubbles.
- Prepare the loaf pan: Lightly oil a 9×5 inch (23×13 cm) loaf pan to prevent sticking.
- Transfer dough: Scrape the dough into the prepared pan and smooth the top gently with a wet spatula or damp fingers. Cover loosely with a towel for the second rise.
- Second rise: Let the dough rise in the pan for about 45 minutes until puffed and slightly domed.
- Bake: Preheat oven to 375°F (190°C). Bake the loaf for 40–45 minutes until the crust is light golden and the bread sounds hollow when tapped. Tent with foil if crust browns too quickly.
- Cool: Remove from oven and cool in the pan for 10 minutes, then transfer to a wire rack to cool completely before slicing.
Notes
Do not over-knead the dough; the batter will be wetter than traditional bread dough. Use warm water (not hot) to activate yeast properly. Let the bread cool completely before slicing to avoid sogginess. Tent with foil if crust browns too quickly during baking. Fresh yeast yields best rise. Variations include adding herbs, seeds, or swapping olive oil for melted butter.
- Prep Time: 10 minutes
- Cook Time: 45 minutes
- Category: Bread
- Cuisine: Gluten-Free
Nutrition
- Serving Size: 1 slice
- Calories: 120
- Fat: 3
- Carbohydrates: 24
- Fiber: 1
- Protein: 2
Keywords: gluten-free bread, no knead bread, soft crust bread, easy gluten-free baking, fluffy gluten-free bread


