
“You seriously made those desserts in jars? And they match our school colors perfectly?” my friend asked, raising an eyebrow as she eyed the colorful layers shimmering through the glass. Honestly, I didn’t expect this little idea to catch on so fast.
It all started the day before a big game when I realized I’d forgotten to bring a snack for the team’s parents and boosters. Rummaging through my pantry, I spotted some leftover cake crumbs, a tub of whipped cream, and a few jars I’d been hoarding (because, you know, jars are just too handy). I threw together layers in those jars, adding dollops of pudding and sprinkles in the school colors we all love. The result? Not only did the desserts look festive, but they tasted like little bites of fun and nostalgia.
I wasn’t sure how this “perfect mason jar layered desserts in school colors” idea would fly, but by halftime, folks were asking for seconds and the recipe. Since then, I’ve made these for birthday parties, potlucks, and even casual family dinners. The charm of these desserts is in their playful layers and the way they turn simple ingredients into something memorable (plus, they’re super easy to transport). It’s a recipe that sticks with you — not just because of the colors, but because it’s a little celebration in every jar.
And honestly, the best part is how adaptable the recipe is — you can twist it to fit your favorite team, occasion, or even your mood. It’s become my go-to quick dessert that feels special without the fuss. So, here’s the story behind these perfect mason jar layered desserts in school colors, and why they might just become your next favorite treat.
Why You’ll Love This Recipe
Having made these mason jar layered desserts more times than I can count, I can say they’re a real crowd-pleaser—whether you’re cheering courtside or just craving a sweet bite. Here’s why this recipe deserves a spot in your dessert rotation:
- Quick & Easy: You can whip these up in about 20 minutes, which is ideal when you’re balancing life’s chaos or prepping for last-minute gatherings.
- Simple Ingredients: No exotic or hard-to-find items here. Most of what you need is probably right in your pantry or fridge already.
- Perfect for Celebrations: From school spirit events to birthday parties, these desserts bring a festive touch that’s both visual and delicious.
- Crowd-Pleaser: Kids and adults alike love the colorful layers and creamy textures—plus, they’re portion-controlled, which is a bonus.
- Unbelievably Delicious: The balance of moist cake, smooth pudding, and light whipped cream hits just the right spot every time.
This isn’t just about mixing ingredients in a jar. There’s a little technique involved—like layering the cake crumbs just right to keep them moist without getting soggy, or choosing the right pudding flavor that compliments your school colors. I’ve tweaked and tested this recipe to make sure the texture and flavors shine, even after sitting for a while.
And if you want a dessert that feels both nostalgic and fresh, this recipe fits the bill. It’s more than just sweet layers; it’s about creating moments—whether you’re enjoying the game, hosting friends, or just treating yourself to something fun. Plus, if you’re in the mood for other berry-inspired treats, my creamy no-churn strawberry ice cream is a delightful companion dessert that’s just as simple and satisfying.
What Ingredients You Will Need
This recipe uses simple, wholesome ingredients to deliver bold flavor and satisfying texture without the fuss. Most are pantry staples or easy to find at any grocery store. The key is choosing components that layer well and complement your school colors perfectly.
- For the Cake Layer:
- Yellow or white cake mix or homemade cake, crumbled (moist but not crumbly-dry)
- Optional: Food coloring gel in school colors to tint cake crumbs if needed
- For the Pudding Layer:
- Instant vanilla or chocolate pudding mix (I prefer Jell-O brand for its smooth texture)
- Milk (whole or 2% for creaminess, about 2 cups / 480 ml)
- Optional: Food coloring to tint pudding layers matching your school colors
- For the Whipped Cream Layer:
- Heavy whipping cream, chilled (1 cup / 240 ml)
- Powdered sugar (2 tablespoons for a touch of sweetness)
- Vanilla extract (1 teaspoon for flavor depth)
- For Garnish and Decoration:
- Colored sprinkles or edible glitter in school colors
- Fresh berries (optional, for fresh flavor and texture contrast)
- Mini chocolate chips or crushed cookies for texture (optional)
If you want a dairy-free version, swap the milk and cream for coconut milk and coconut cream, which works surprisingly well. For gluten-free, use gluten-free cake crumbs or crushed gluten-free cookies. In the warmer months, fresh berries like strawberries or blueberries add a seasonal pop of flavor and color, similar to the fresh fruit in my homemade fresh strawberry galette.
Equipment Needed
- Standard mason jars or similar clear glass jars (8 oz / 240 ml size works perfectly for individual servings)
- Mixing bowls (one large for whipping cream, one medium for pudding)
- Electric hand mixer or stand mixer for whipping cream (a whisk works, but takes longer!)
- Measuring cups and spoons for precise ingredient amounts
- Spatula or spoon for layering ingredients smoothly
- Optional: Piping bag or plastic sandwich bag with a corner cut off for neater cream layers
I usually use regular mason jars because they’re sturdy, reusable, and create that classic layered look everyone loves. If you don’t have mason jars, small clear dessert cups or even sturdy plastic cups work fine. For the whipped cream, an electric mixer speeds things up, but I’ve had success with a manual whisk when I’m feeling patient.
Pro tip: Wash and dry the jars thoroughly to avoid any moisture that could make cake crumbs soggy. Also, if you want to reuse your jars, soak them in warm soapy water after use and avoid the dishwasher for longer life.
Preparation Method
- Prepare the cake crumbs: Crumble your baked cake into small, even pieces. If you want to boost the school colors, gently mix in a tiny bit of food coloring gel until you reach the desired shade. Avoid overmixing to keep crumbs fluffy. (About 10 minutes)
- Make the pudding: In a medium bowl, whisk the instant pudding mix with 2 cups (480 ml) of cold milk until thickened, about 2 minutes. If coloring is desired, divide pudding into separate bowls and add a few drops of food coloring to each. Stir gently until uniform. (5 minutes)
- Whip the cream: Chill your mixing bowl and beaters for 10 minutes if possible. Pour 1 cup (240 ml) of heavy cream into the bowl, add powdered sugar and vanilla extract, and whip on medium-high speed until soft peaks form. Be careful not to overwhip or it will turn grainy. (5-7 minutes)
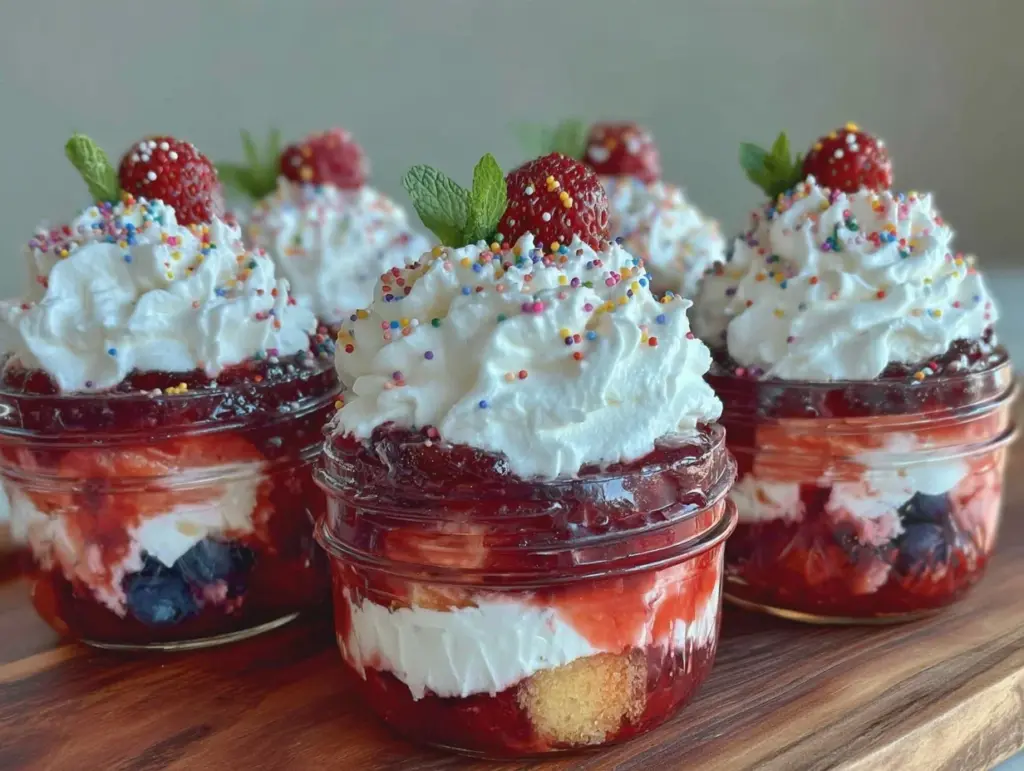
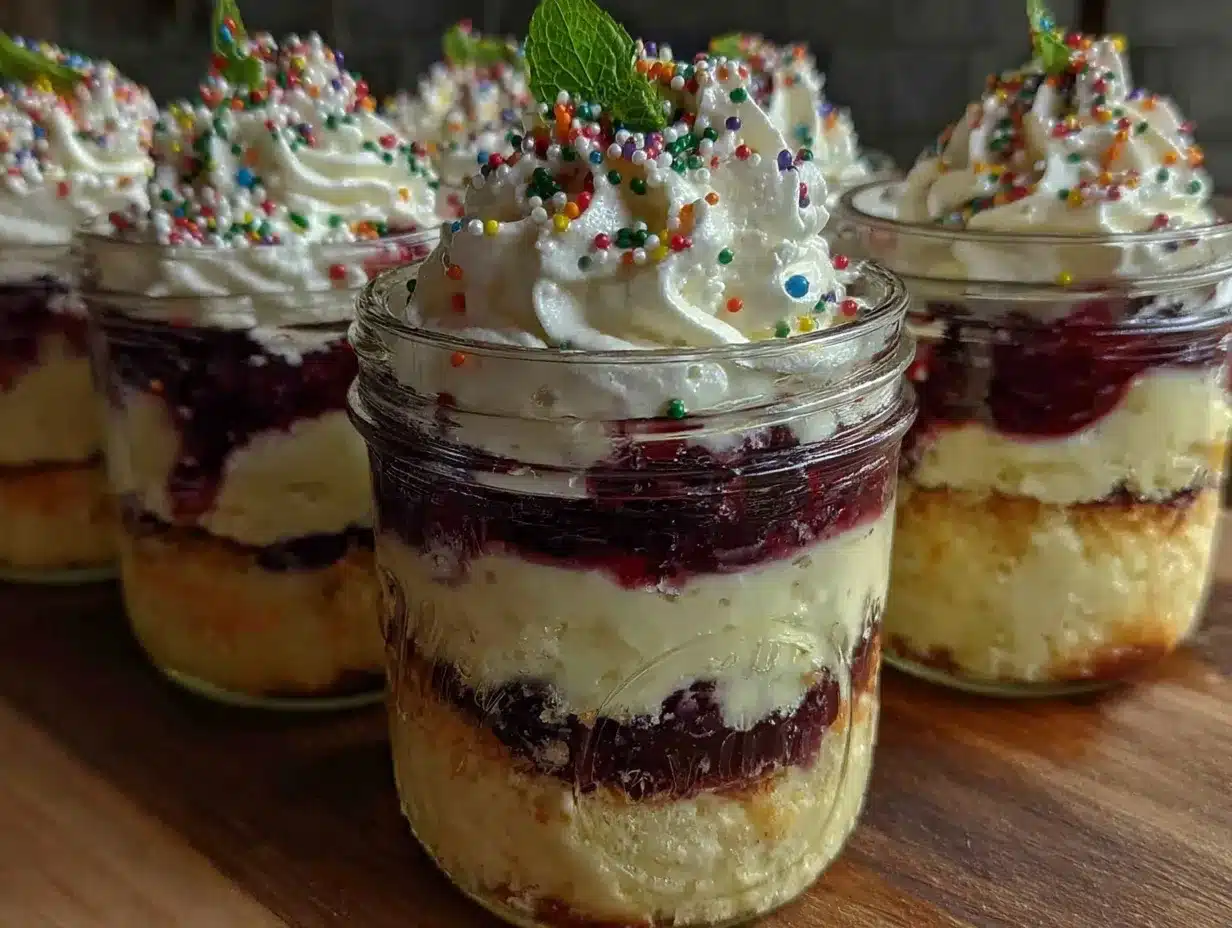
- Layer the jars: Start with a bottom layer of cake crumbs (about 2 tablespoons). Then spoon or pipe a layer of pudding (about 3 tablespoons), followed by a layer of whipped cream (2 tablespoons). Repeat layers until the jar is nearly full, ending with whipped cream on top. Use a spatula to smooth each layer gently. (10-15 minutes)
- Add garnishes: Top each jar with sprinkles, berries, or crushed cookies to match your school colors and add texture. This step brings the whole dessert to life visually and flavor-wise.
- Chill before serving: Refrigerate the jars for at least 1 hour to let flavors meld and layers set. They’re best served chilled but not frozen.
Watch the layers through the glass as you build—it’s like edible art! If you’re prepping for a crowd, these can be assembled a day ahead and kept covered in the fridge. Just add the fresh toppings right before serving to keep the colors vibrant and textures crisp.
Cooking Tips & Techniques
Getting the perfect mason jar layered desserts in school colors just right takes a bit of practice, but these tips will have you looking like a pro in no time.
- Keep cake crumbs moist but not soggy. If your cake is a day old, it’s perfect crumb texture. If it’s too fresh, you can gently toast crumbs for a minute or two to dry them slightly.
- Whip the cream to soft peaks. Overwhipping leads to butter-like clumps, while underwhipping makes the layers runny. Soft peaks hold shape but still feel light.
- Use gel food coloring. It’s more concentrated than liquid and won’t thin out your pudding or cake crumbs.
- Layer with care. Use a small spoon or piping bag to keep edges clean and layers even. Uneven layers can look messy and mix flavors too soon.
- Plan your timing. If you’re making several jars, prepare the pudding and cream first, then assemble quickly to keep pudding from thickening too much before layering.
- Chill jars before filling. This helps the layers stay distinct and makes handling easier.
One time, I forgot to chill the jars and the pudding warmed up, which made the layers blend together too much—lesson learned! Also, I’ve found that adding a thin layer of whipped cream between pudding and cake crumbs keeps the cake from soaking up too much moisture and turning mushy.
Variations & Adaptations
This recipe is like a blank canvas for creativity. Here are some ways I’ve mixed things up to suit different tastes and occasions:
- Dietary twists: Swap regular pudding for dairy-free or vegan pudding mixes, and use coconut whipped cream for a plant-based dessert.
- Flavor swaps: Instead of vanilla pudding, try chocolate or butterscotch for a richer twist. Adding a layer of fresh fruit preserves or jam can add sweetness and tartness.
- Seasonal colors: For fall games, use orange and brown layers with pumpkin spice cake crumbs. Spring might call for pastel layers with lemon or berry flavors.
- Textural boosts: Add a crunchy layer of toasted nuts or granola for contrast. I once added crushed pretzels for a salty-sweet vibe that really surprised everyone.
- Cooking methods: If you want to prepare cake crumbs from scratch quickly, try baking a sheet cake the night before or use leftover birthday cake from celebrations.
My personal favorite is layering in a bit of balsamic roasted strawberry shortcake flavor by adding roasted berry compote between layers. It adds a subtle tang and complexity that balances the sweetness.
Serving & Storage Suggestions
These mason jar desserts are best served chilled, directly from the fridge. The cool temperature keeps the whipped cream fresh and the pudding firm yet creamy. For presentation, tie a small ribbon around the jar lid or add a colorful spoon matching your school colors for extra flair.
They pair beautifully with a light sparkling beverage or even a hot cup of coffee if you want contrast. For an event, line them up on a decorated table to double the visual impact of those colorful layers.
Store leftovers tightly covered in the refrigerator for up to 2 days. The flavors meld nicely over time, but the cake crumbs may soften slightly. Avoid freezing, as the texture of the whipped cream and pudding will change.
When reheating (if you must), let the dessert sit at room temperature for 15 minutes and stir gently to loosen layers—though honestly, these taste best cold and fresh. If you want a quick freshening-up tip, add a dollop of fresh whipped cream or a sprinkle of fresh berries before serving again.
Nutritional Information & Benefits
While these desserts are a treat, they’re portion-controlled, which helps with mindful indulgence. Each 8 oz (240 ml) jar contains roughly 250-300 calories, with moderate amounts of fat and sugar depending on the pudding and cake used.
Key ingredients like milk and cream provide calcium and protein, and you can add fresh fruit for vitamins and fiber. Using homemade or low-sugar pudding mixes can reduce added sugars.
For those with gluten sensitivities, substitute with gluten-free cake or cookie crumbs. Dairy-free versions using coconut milk and cream cater to lactose intolerance.
Personally, I appreciate that these desserts balance indulgence and portion size—they’re perfect for sharing school spirit without going overboard.
Conclusion
This recipe for perfect mason jar layered desserts in school colors has become a favorite not just because it looks fantastic, but because it’s an easy way to bring people together through food and fun. Whether you’re hosting a game day party or just want a cheerful dessert that feels personalized, these jars deliver without hassle.
Feel free to experiment with your favorite flavors and color combos to make it truly your own. I’ve loved how this simple idea has sparked joy and creativity in my kitchen—turning basic ingredients into little celebrations.
If you try this recipe, I’d love to hear how you customized it or what school colors you rocked! Sharing food stories makes the experience richer, don’t you think? Here’s to many colorful, tasty moments ahead.
Frequently Asked Questions
Can I prepare these mason jar desserts ahead of time?
Yes! They can be assembled up to a day in advance and stored covered in the fridge. Add fresh toppings right before serving for best presentation.
What if I don’t have mason jars?
Small clear cups or dessert dishes work just as well. The key is transparent containers that show off the layers.
Can I use homemade pudding instead of instant?
Absolutely. Just ensure your pudding is thick enough to hold layers without running. Homemade pudding may require extra chilling.
How do I keep the cake crumbs from getting soggy?
Use cake that’s a day old or gently toast crumbs to dry slightly. Adding a thin whipped cream layer between crumbs and pudding helps too.
Are there vegan options for this recipe?
Yes! Use dairy-free milk and cream alternatives like coconut milk and coconut whipped cream. Choose vegan cake or cookie crumbs for the base.
Pin This Recipe!

Perfect Mason Jar Layered Desserts for School Colors Easy Recipe
A quick and easy layered dessert in mason jars that matches school colors perfectly, combining moist cake crumbs, smooth pudding, and light whipped cream for a festive and crowd-pleasing treat.
- Total Time: 1 hour 20 minutes
- Yield: 6 servings
Ingredients
- Yellow or white cake mix or homemade cake, crumbled (moist but not crumbly-dry)
- Optional: Food coloring gel in school colors to tint cake crumbs if needed
- Instant vanilla or chocolate pudding mix (preferably Jell-O brand)
- Milk (whole or 2%, about 2 cups / 480 ml)
- Optional: Food coloring to tint pudding layers matching your school colors
- Heavy whipping cream, chilled (1 cup / 240 ml)
- Powdered sugar (2 tablespoons)
- Vanilla extract (1 teaspoon)
- Colored sprinkles or edible glitter in school colors
- Fresh berries (optional)
- Mini chocolate chips or crushed cookies for texture (optional)
Instructions
- Prepare the cake crumbs: Crumble baked cake into small, even pieces. Mix in a tiny bit of food coloring gel if desired to boost school colors. Avoid overmixing to keep crumbs fluffy. (About 10 minutes)
- Make the pudding: Whisk instant pudding mix with 2 cups (480 ml) cold milk until thickened, about 2 minutes. Divide pudding into bowls and add food coloring if desired. Stir gently until uniform. (5 minutes)
- Whip the cream: Chill mixing bowl and beaters for 10 minutes if possible. Pour 1 cup (240 ml) heavy cream into bowl, add powdered sugar and vanilla extract, whip on medium-high speed until soft peaks form. Avoid overwhipping. (5-7 minutes)
- Layer the jars: Start with about 2 tablespoons of cake crumbs at the bottom. Spoon or pipe about 3 tablespoons of pudding, then 2 tablespoons of whipped cream. Repeat layers until jar is nearly full, ending with whipped cream on top. Smooth each layer gently. (10-15 minutes)
- Add garnishes: Top each jar with sprinkles, berries, or crushed cookies to match school colors.
- Chill before serving: Refrigerate jars for at least 1 hour to let flavors meld and layers set. Serve chilled but not frozen.
Notes
[‘Keep cake crumbs moist but not soggy; use day-old cake or gently toast crumbs if too fresh.’, ‘Whip cream to soft peaks to avoid grainy texture or runny layers.’, ‘Use gel food coloring for vibrant colors without thinning layers.’, ‘Layer carefully with a spoon or piping bag for clean edges.’, ‘Chill jars before filling to keep layers distinct.’, ‘Add a thin whipped cream layer between pudding and cake crumbs to prevent sogginess.’, ‘Assemble up to a day ahead and add fresh toppings before serving.’, ‘For dairy-free, substitute milk and cream with coconut milk and coconut cream.’, ‘For gluten-free, use gluten-free cake crumbs or crushed cookies.’]
- Prep Time: 20 minutes
- Cook Time: 0 minutes
- Category: Dessert
- Cuisine: American
Nutrition
- Serving Size: 1 jar (8 oz / 240 ml
- Calories: 275
- Sugar: 22
- Sodium: 150
- Fat: 15
- Saturated Fat: 9
- Carbohydrates: 30
- Fiber: 1
- Protein: 4
Keywords: mason jar desserts, layered desserts, school colors dessert, easy dessert, pudding dessert, whipped cream dessert, party dessert, portable dessert


