
This was supposed to be a batch of Oreo truffles shaped like little ghosts. I had the white chocolate melting, the candy eyes ready to go, and a playlist of spooky sound effects queued up for my Halloween party prep session last October. But then my neighbor, Carol, knocked on the door asking if I had an extra bag of black gel food coloring because her son’s classroom cupcakes were looking tragically pale. I handed it over without thinking. It wasn’t until I was already mixing the crushed Oreos with cream cheese that I realized my fatal mistake—I had no black coloring left, and the white chocolate was already shimmering in the microwave.
I stood there, honestly, feeling that familiar pinch of panic. You know that feeling when a plan unravels in slow motion? I considered a frantic run to the store, but the clock was ticking, and my kitchen looked like a flour bomb had gone off. So I did what any reasonable person would do when faced with a decorating disaster—I grabbed a bag of dark chocolate melting wafers I had stashed for a rainy day. I figured, at the very worst, I would have dark, lumpy balls that tasted like cookies and cream. Not a total loss, right?
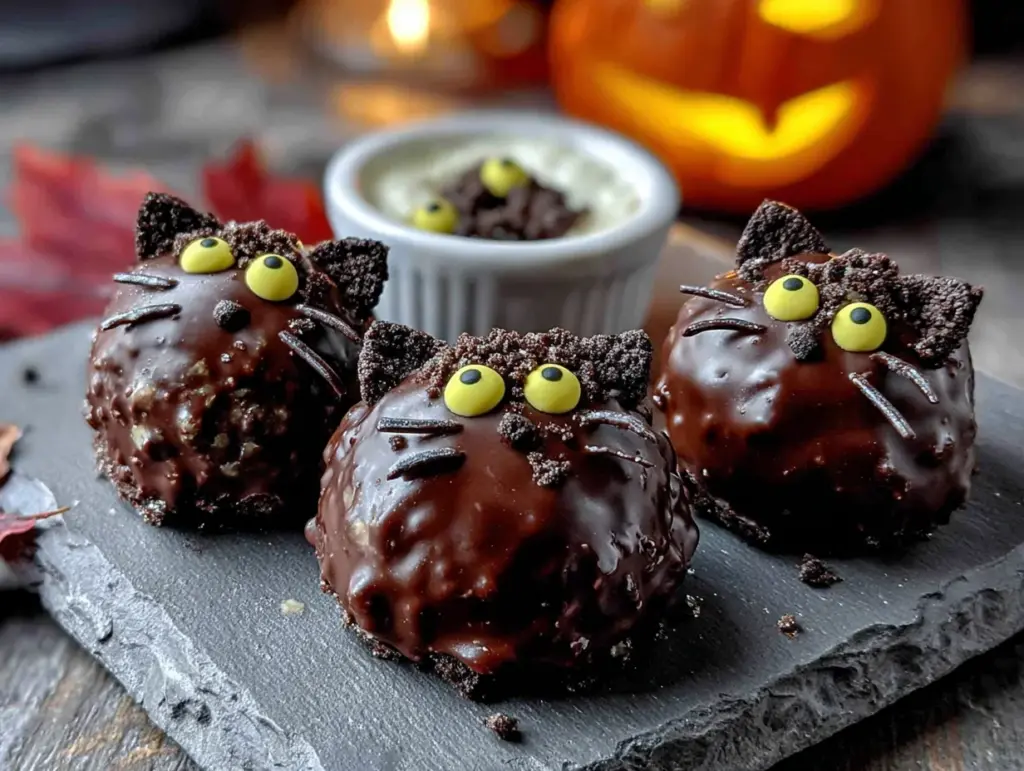
What came out of that frantic pivot was nothing like the plan—and so much better. The dark chocolate gave these truffles a rich, almost decadent depth that white chocolate just can’t touch. And then, in a moment of pure, unfocused inspiration, I used a toothpick to drag little white chocolate whiskers and ears onto the dark surface. They looked like tiny, mischievous black cats staring up at me from the baking sheet. I let out a laugh right there in my messy kitchen. These Crowd-Pleasing Black Cat Oreo Truffles for Halloween were born from a shortage and a moment of stubborn creativity, and honestly, they have stolen the show at every gathering since. They are the reason I keep making this recipe—because sometimes the best things come from a happy little kitchen crisis.
Why You’ll Love This Recipe
I have tested this recipe in four different kitchens, for parties ranging from a casual potluck to a full-blown costume bash, and it never fails. It has become my secret weapon for hosting, and here is why it will become yours too.
- Quick & Easy: These truffles come together in under 30 minutes of active time. The hardest part is waiting for them to chill. Perfect for when you realize the party is tomorrow and you have zero treats prepared.
- Simple Ingredients: No fancy grocery trips needed. Oreos, cream cheese, and chocolate wafers are probably already in your pantry or can be grabbed in one quick aisle at the store.
- Perfect for Halloween Gatherings: These little black cats are the ultimate conversation starter at any Halloween party, potluck, or festive get-together. They look like you spent hours, but we know the truth.
- Crowd-Pleaser: I have watched kids and adults alike do a double-take at these truffles before snatching them up. They disappear faster than almost any other treat on the table.
- Unbelievably Delicious: The combination of the creamy, cookies-and-cream filling with the rich dark chocolate shell is next-level comfort food. It is a texture and flavor combo that just works.
What makes this recipe different from the rest is the technique. By using dark chocolate instead of white, you get a shell that is not overly sweet and perfectly balances the sugary Oreo center. Plus, the simple toothpick method for the cat faces is foolproof—no piping bags or steady hands required. This isn’t just another version of a truffle; it is my best version, developed through trial and error (and one very memorable shortage).
This recipe is the kind that makes you close your eyes after the first bite. It is comfort food reimagined for a spooky season—faster to make than a batch of cookies, but with the same soul-soothing satisfaction. Perfect for impressing your guests without stress, or turning a simple Halloween gathering into something truly memorable.
What Ingredients You Will Need
This recipe uses simple, pantry-friendly ingredients to deliver bold flavor and an adorable presentation without the fuss. Each component has a specific job to play in creating the perfect truffle.
- For the Truffle Filling:
- 1 (14.3 oz) package of Oreo cookies (regular, not Double Stuf) — You will use the whole cookie, cream filling and all. I prefer the classic flavor, but feel free to experiment.
- 8 oz (226g) full-fat cream cheese, softened to room temperature. This is crucial for a smooth, scoopable mixture. Low-fat cream cheese can make the filling too soft.
- 1/4 teaspoon vanilla extract (optional, but I find it rounds out the flavor nicely).
- For the Coating & Decoration:
- 12 oz (340g) dark chocolate melting wafers or dark chocolate chips. I recommend Ghirardelli or CandiQuik for the smoothest melt and best snap when set.
- 1/2 cup (about 90g) white chocolate melting wafers or white chocolate chips — for the adorable cat faces.
- 1 teaspoon coconut oil or vegetable shortening (divided use) — This helps thin the chocolate for a smoother dip and a glossier finish.
- For the Cat Details (Optional but Highly Recommended):
- A small handful of black candy melts for the eyes and nose, OR you can use a tiny dab of black frosting. I often just use a food-safe marker on the white chocolate dots.
Ingredient Selection Tips: For the best texture, make sure your cream cheese is truly at room temperature. If you are in a hurry, cut it into small cubes and let it sit on the counter for 15 minutes. For the Oreos, avoid the “thins” or “Double Stuf” varieties—the ratio of cookie to cream is important for the right consistency. If you are gluten-free, look for certified gluten-free Oreos, which work perfectly in this recipe. I have tried this with dairy-free cream cheese (like Kite Hill) and dark chocolate, and it works well for a dairy-free version, though the texture is slightly less firm.
Equipment Needed
You do not need a fancy kitchen to pull off these Crowd-Pleasing Black Cat Oreo Truffles for Halloween. Here is what you will need:
- Food Processor: This is the star of the show for crushing the Oreos into a fine crumb. A high-speed blender can work in a pinch, but a food processor is faster and gives a more even texture.
- Large Mixing Bowl: For combining the Oreo crumbs and cream cheese.
- Baking Sheet: Lined with parchment paper or a silicone baking mat. This is where your truffles will chill.
- Small Cookie Scoop or Melon Baller: For portioning out uniform truffle balls. This makes the process much faster and gives you a professional look.
- Microwave-Safe Bowls: For melting the chocolate. Glass or ceramic works best.
- Toothpicks or a Small Skewer: For dipping the truffles and for painting on the cat details. This is your secret weapon.
- Piping Bag or Small Ziploc Bag: For drizzling the white chocolate cat faces. A tiny corner snip is all you need.
Budget-Friendly Tip: If you don’t have a food processor, place the Oreos in a large Ziploc bag and crush them with a rolling pin. It takes a bit of elbow grease, but it gets the job done. Also, a regular teaspoon works fine for portioning if you don’t have a cookie scoop.
Preparation Method
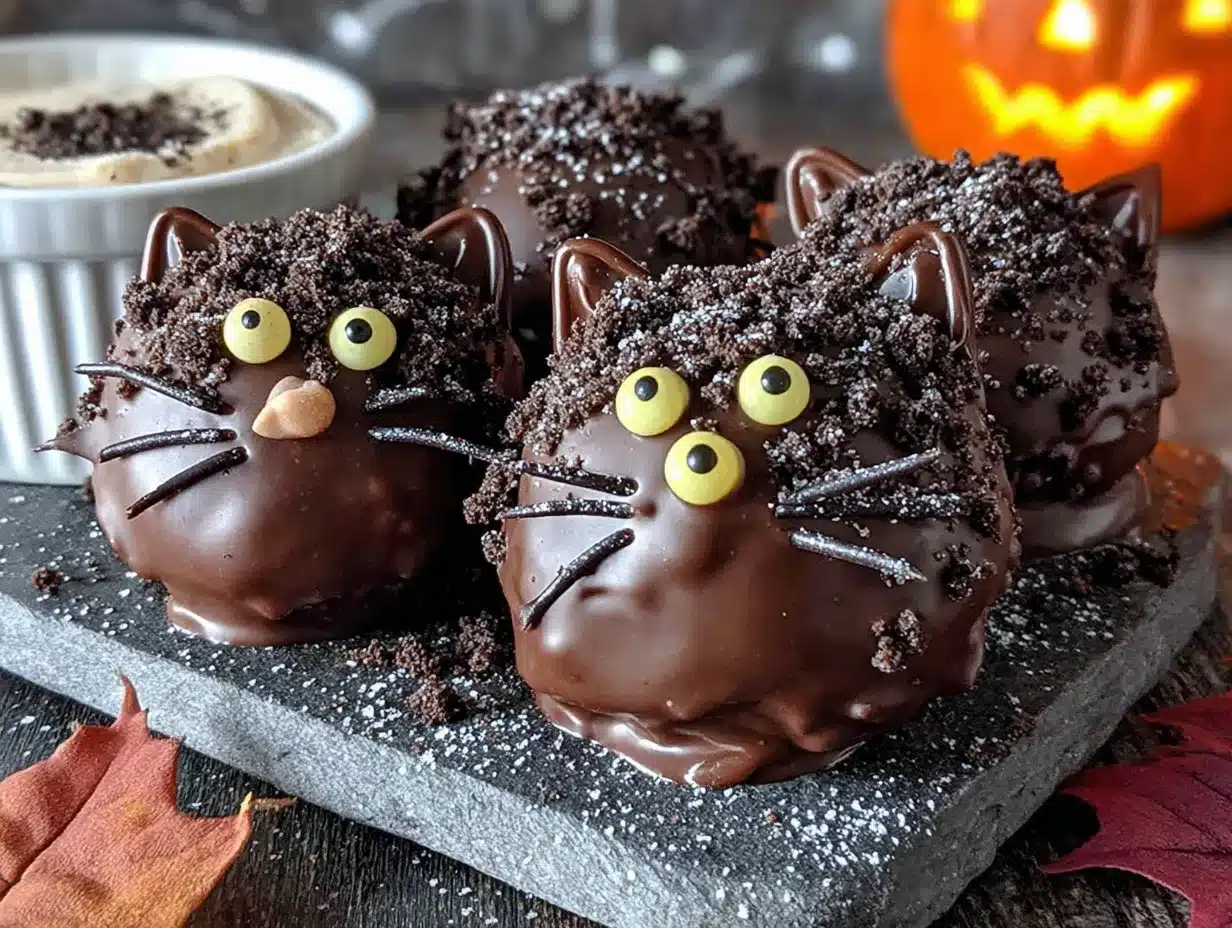
Follow these steps, and you will have a tray of adorable black cat truffles ready to wow your guests. Take your time with the chilling steps—they are the secret to success.
- Crush the Oreos: Place the entire package of Oreos (cream and all) into your food processor. Pulse until you have a fine, sand-like crumb. There should be no large chunks of cookie left. This takes about 15-20 seconds of pulsing. (Sensory cue: It should smell intensely of chocolate and vanilla cream.)
- Mix the Filling: In a large mixing bowl, combine the Oreo crumbs with the softened cream cheese and vanilla extract. Use a spatula or your hands (gloved are fine!) to mix until everything is fully incorporated. The mixture should be a dark, uniform paste that holds together when pressed. (Sensory cue: It will feel slightly sticky but should not be greasy.)
- Portion and Chill: Using your small cookie scoop or a spoon, portion the mixture into 1-inch balls (about 20-24 total). Roll them between your palms to make them smooth and round. Place them on the parchment-lined baking sheet. Pop the sheet into the refrigerator for at least 30 minutes, or up to 1 hour. This step is non-negotiable—the balls need to be firm so they don’t fall apart when you dip them in chocolate. (Personal tip: I once skipped this step because I was in a rush, and my truffles turned into a chocolate soup. Learn from my mistake!)
- Melt the Dark Chocolate: About 10 minutes before the truffles are done chilling, place the dark chocolate melting wafers in a microwave-safe bowl. Add 1/2 teaspoon of coconut oil. Microwave in 30-second intervals, stirring well after each, until completely smooth and glossy. Do not overheat, or the chocolate will seize. (Sensory cue: It should look like a thick, dark river.)
- Dip the Truffles: Remove the chilled truffle balls from the fridge. Using a fork or a toothpick, carefully dip each ball into the melted dark chocolate, coating it completely. Let any excess chocolate drip back into the bowl. Place the dipped truffle back onto the parchment paper. Repeat with all the truffles.
- First Set: Place the baking sheet with the dipped truffles back into the refrigerator for 10-15 minutes, or until the dark chocolate is completely set and firm to the touch.
- Make the Cat Faces: While the truffles are setting, melt the white chocolate wafers with the remaining 1/2 teaspoon of coconut oil in a separate microwave-safe bowl, using the same 30-second interval method. Transfer the melted white chocolate to a small piping bag or a Ziploc bag with a tiny corner snipped off.
- Decorate the Cats: Remove the truffles from the fridge. Working one at a time, pipe two small white triangles on the top of each truffle for the ears. Then, pipe two small white dots for the eyes and a tiny upside-down triangle for the nose. Using a toothpick, gently drag a tiny line down from the nose to create a mouth, and then two or three small dots on each side of the nose for whiskers. Let the white chocolate set at room temperature for about 10 minutes. (Personal tip: Don’t stress about perfection! Each cat will have its own little personality, which is part of the charm.)
- Final Chill: Return the decorated truffles to the refrigerator for another 15 minutes to fully set the white chocolate before serving or storing.
Cooking Tips & Techniques
Over the years, I have made these truffles more times than I can count, and I have collected a few hard-won lessons along the way. Here is what I wish I had known from the start.
The Temperature Trap: The biggest mistake people make is not chilling the truffle balls long enough. If they are even slightly warm, they will start to disintegrate in the warm chocolate, leaving you with a muddy mess. I once had a batch turn into a blob because I was impatient. Trust me, the 30-minute chill is sacred.
The Chocolate Seize: Water is the enemy of melted chocolate. Even a tiny drop of water from a wet spoon can cause your chocolate to seize up into a grainy, clumpy mess. Make sure all your bowls and utensils are completely dry. If your chocolate does seize, you can sometimes save it by whisking in a teaspoon of warm coconut oil, but it is best to avoid the situation entirely.
Multitasking Strategy: While the truffle balls are chilling for their first 30 minutes, I use that time to clean up my food processor and set up my dipping station. I line up my bowls, parchment, and toothpicks so that when the timer goes off, I can move quickly. This makes the whole process feel much less chaotic.
The Perfect Dip: For a smooth, professional-looking shell, use a fork to dip the truffle, then tap the fork gently on the edge of the bowl to encourage the excess chocolate to drip off. You can also use a toothpick to pop any air bubbles that form on the surface of the chocolate.
Consistency is Key: If your truffle mixture feels too soft to roll, add a few more crushed Oreos. If it feels too dry and crumbly, add a tiny splash of milk or an extra ounce of cream cheese. The mixture should feel like a firm, slightly sticky playdough.
Variations & Adaptations
One of the best things about this recipe is how easy it is to tweak. Here are a few of my favorite variations.
- Spooky Spider Truffles: Instead of cat faces, dip the truffles in dark chocolate and then, while the chocolate is still wet, press in eight pretzel stick legs (broken in half) on each side. Add a tiny white chocolate dot for an eye.
- Pumpkin Spice Truffles: Add 1/2 teaspoon of pumpkin pie spice and 1/4 cup of canned pumpkin puree (drained of excess water) to the Oreo and cream cheese mixture. The pumpkin adds a lovely fall flavor and a slightly softer texture.
- Mint Chocolate Chip Cats: Swap the vanilla extract for 1/4 teaspoon of peppermint extract. Fold in 1/4 cup of mini chocolate chips into the filling before rolling. The mint and chocolate are a classic combination.
- Gluten-Free & Vegan Adaptations: Use certified gluten-free Oreos and a dairy-free cream cheese alternative. For the chocolate, ensure your dark chocolate is dairy-free. This version is just as delicious and perfect for guests with dietary restrictions.
- White Cat Truffles: For a different look, dip the truffles in white chocolate instead of dark. Use dark chocolate to pipe the ears, eyes, and nose. This gives a “ghost cat” vibe that is equally adorable.
I once made a batch of these with my niece, and we accidentally used mint Oreos. They were surprisingly good, and we called them “Zombie Cat” truffles. Don’t be afraid to experiment—the worst that can happen is you end up with a delicious mistake!
Serving & Storage Suggestions
These truffles are best served cold, straight from the refrigerator. The firm chocolate shell gives way to a creamy, cool center—it is a textural experience that is incredibly satisfying. For a Halloween party, I like to arrange them on a black platter or a cake stand lined with orange and purple sprinkles. They make a fantastic centerpiece that doubles as a dessert.
What to Serve Alongside: These truffles are rich, so they pair beautifully with something light and tart. A glass of cold milk is the classic choice, but they also go wonderfully with a cup of hot apple cider or a pumpkin spice latte. For a dessert table, serve them alongside crispy caramel popcorn balls for a sweet and salty contrast.
Storage Instructions: Store the truffles in an airtight container in the refrigerator for up to one week. Layer them between sheets of parchment paper so they don’t stick together. I find that the flavors actually meld and deepen after a day in the fridge, so these are a fantastic make-ahead treat for your party.
Freezing Instructions: These truffles freeze beautifully. Place them in a single layer on a baking sheet and freeze until solid (about 1 hour). Then, transfer them to a freezer-safe bag or container. They will keep for up to 3 months. To thaw, simply move them to the refrigerator overnight. Do not thaw them at room temperature, as condensation can make the chocolate bloom.
Reheating Note: You really don’t want to reheat these. They are meant to be eaten cold. If you have leftovers (unlikely!), just keep them chilled.
Nutritional Information & Benefits
Let’s be real—these are a treat, not a health food. But knowing what is in them helps you enjoy them mindfully. The following is an estimate per truffle (based on 24 truffles).
- Estimated Calories: 180-200
- Fat: 11g
- Carbohydrates: 22g
- Sugar: 16g
- Protein: 2g
Health Highlights: The dark chocolate in this recipe is a source of antioxidants (flavonoids), which are known to support heart health. The cream cheese provides a small amount of calcium and protein. Of course, the Oreos are the main event here, and they are all about the joy factor.
Dietary Considerations: This recipe can easily be made gluten-free and dairy-free with the right substitutions. It is naturally vegetarian. Please note that it contains dairy, gluten (unless substituted), and soy (from the chocolate).
My personal perspective? I believe in balance. These truffles are a special-occasion treat that brings a huge amount of joy to a gathering. Knowing exactly what goes into them—real ingredients, no weird preservatives—makes me feel good about serving them to the people I care about.
Conclusion
These Crowd-Pleasing Black Cat Oreo Truffles for Halloween are more than just a cute dessert. They are a testament to the fact that sometimes the best recipes come from the most unexpected places—like a missing bottle of food coloring and a neighbor in need. They are simple enough for a beginner baker to master, yet impressive enough to steal the spotlight at any Halloween party.
I encourage you to make these your own. Play with the decorations, try a different chocolate, or add a splash of your favorite extract. The recipe is a starting point, not a rulebook. The real magic happens when you put your own spin on it.
I love this recipe because it reminds me to stay calm when things go wrong in the kitchen. It is a delicious little victory every single time. Now, I want to hear from you! Have you made these? Did you add a fun twist? Drop a comment below and tell me all about it. And if you loved them, please share this post with a friend who loves Halloween as much as we do. Happy haunting, and happy baking!
Frequently Asked Questions
Can I use Double Stuf Oreos for this recipe?
I do not recommend it. The higher cream-to-cookie ratio in Double Stuf Oreos can make the truffle mixture too soft and greasy, which makes it harder to roll into balls. Stick with the classic Oreos for the best texture.
My chocolate seized up and became grainy. What happened?
This usually happens when a tiny bit of water gets into the chocolate. Make sure all your bowls and utensils are completely dry. You can try to salvage it by whisking in a teaspoon of warm coconut oil, but it is best to start fresh if it is too far gone.
How far in advance can I make these truffles?
You can make them up to 3 days in advance and store them in an airtight container in the refrigerator. They actually taste better after a day because the flavors have time to meld. You can also freeze them for up to 3 months.
Can I use almond bark or candy melts instead of chocolate chips?
Absolutely! Almond bark and candy melts are designed for dipping and will give you a very smooth, shiny finish. They are a great alternative if you have them on hand. Just follow the melting instructions on the package.
My truffle mixture is too sticky to roll. What should I do?
If the mixture is too sticky, pop it in the refrigerator for 15-20 minutes to firm up. The cold will make it much easier to handle. If it is still too sticky, you can add a few more crushed Oreos to absorb the excess moisture.
Pin This Recipe!


Best Black Cat Oreo Truffles: Easy Halloween Treat
These adorable black cat Oreo truffles are a quick and easy Halloween treat made with crushed Oreos, cream cheese, and a dark chocolate coating. Perfect for parties, they come together in under 30 minutes of active time and are sure to be a crowd-pleaser.
- Total Time: 1 hour 20 minutes (includes chilling time)
- Yield: 20-24 truffles 1x
Ingredients
- 1 (14.3 oz) package Oreo cookies (regular, not Double Stuf)
- 8 oz (226g) full-fat cream cheese, softened to room temperature
- 1/4 teaspoon vanilla extract (optional)
- 12 oz (340g) dark chocolate melting wafers or dark chocolate chips
- 1/2 cup (about 90g) white chocolate melting wafers or white chocolate chips
- 1 teaspoon coconut oil or vegetable shortening (divided use)
- A small handful of black candy melts for eyes and nose (optional, or use black frosting or food-safe marker)
Instructions
- Crush the Oreos: Place the entire package of Oreos (cream and all) into a food processor. Pulse until you have a fine, sand-like crumb, about 15-20 seconds.
- Mix the Filling: In a large mixing bowl, combine the Oreo crumbs with the softened cream cheese and vanilla extract. Mix until fully incorporated into a dark, uniform paste that holds together when pressed.
- Portion and Chill: Using a small cookie scoop or spoon, portion the mixture into 1-inch balls (about 20-24 total). Roll them smooth and place on a parchment-lined baking sheet. Refrigerate for at least 30 minutes, or up to 1 hour.
- Melt the Dark Chocolate: About 10 minutes before the truffles are done chilling, place the dark chocolate melting wafers in a microwave-safe bowl. Add 1/2 teaspoon of coconut oil. Microwave in 30-second intervals, stirring well after each, until completely smooth and glossy.
- Dip the Truffles: Remove the chilled truffle balls from the fridge. Using a fork or toothpick, dip each ball into the melted dark chocolate, coating completely. Let excess drip off, then place back on the parchment paper. Repeat with all truffles.
- First Set: Place the baking sheet with the dipped truffles back into the refrigerator for 10-15 minutes, or until the dark chocolate is completely set and firm.
- Make the Cat Faces: While the truffles are setting, melt the white chocolate wafers with the remaining 1/2 teaspoon of coconut oil in a separate microwave-safe bowl using the same 30-second interval method. Transfer to a small piping bag or Ziploc bag with a tiny corner snipped off.
- Decorate the Cats: Remove the truffles from the fridge. Pipe two small white triangles on the top for ears, two small white dots for eyes, and a tiny upside-down triangle for the nose. Using a toothpick, gently drag a tiny line down from the nose to create a mouth, and then two or three small dots on each side for whiskers. Let the white chocolate set at room temperature for about 10 minutes.
- Final Chill: Return the decorated truffles to the refrigerator for another 15 minutes to fully set the white chocolate before serving or storing.
Notes
Chilling the truffle balls for at least 30 minutes is crucial to prevent them from falling apart when dipped. Make sure all bowls and utensils are completely dry to avoid chocolate seizing. For a smoother dip, use a fork and tap gently on the bowl to remove excess chocolate. The truffles can be stored in an airtight container in the refrigerator for up to one week, or frozen for up to 3 months.
- Prep Time: 20 minutes
- Cook Time: 0 minutes
- Category: Dessert
- Cuisine: American
Nutrition
- Serving Size: 1 truffle
- Calories: 190
- Sugar: 16
- Sodium: 120
- Fat: 11
- Saturated Fat: 6
- Carbohydrates: 22
- Fiber: 1
- Protein: 2
Keywords: Oreo truffles, black cat truffles, Halloween treats, easy Halloween dessert, no-bake dessert, Oreo balls, dark chocolate truffles


