
I never thought chicken breast could be anything more than a bland, dry piece of meat until one late evening when I found myself staring into the fridge, half-exhausted and craving something comforting yet quick. Honestly, I was skeptical about using my Dutch oven for chicken breasts. I’d always reserved it for stews or braises, you know, those long, slow-cooked meals. But that night, desperation led to experimentation — I tossed some chicken breasts in with a few simple seasonings, closed the lid, and hoped for the best.
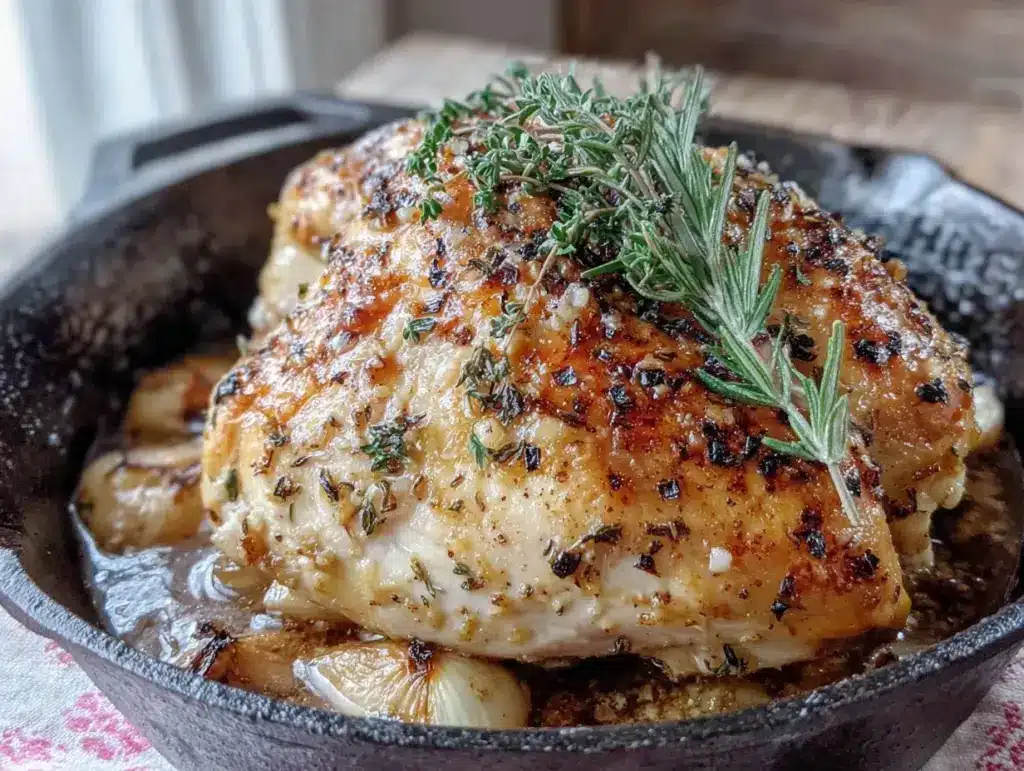
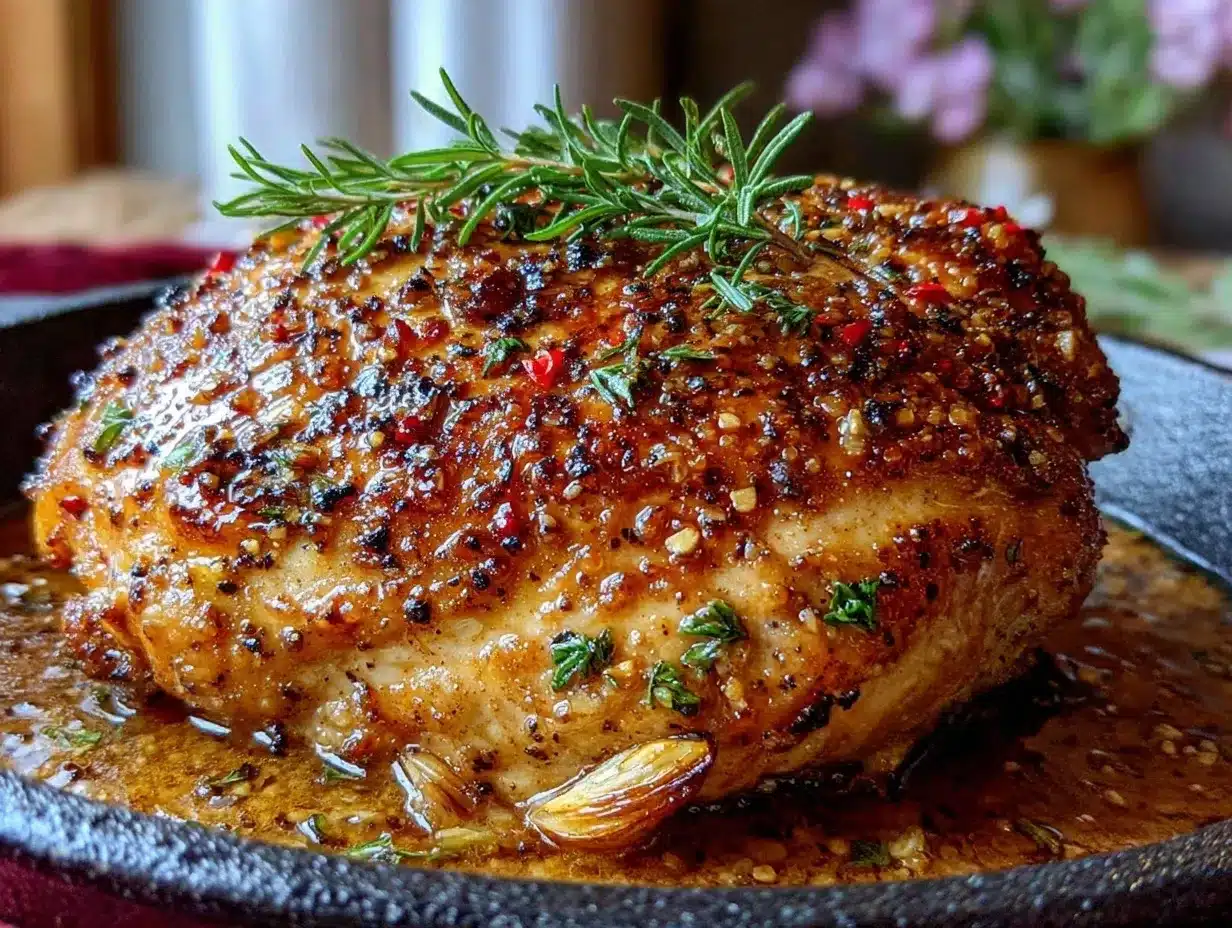
The moment I sliced through that perfectly cooked chicken, the crispy golden skin crackled under my knife, and the inside was juicy beyond belief. I swear, it was like finding a secret hack I’d never known before. Since then, I’ve made this Best Dutch Oven Chicken Breast with Crispy, Juicy Perfection recipe so many times it’s become a go-to. The kitchen smells like a cozy restaurant, and I barely have to fuss to get it right. It’s just one of those meals that feels like a little win, especially on hectic nights.
What’s funny is how something so simple can feel so satisfying. It’s not flashy, but it’s reliable — and that makes all the difference. I think that’s why this recipe sticks with me; it’s honest food done well, with a touch of magic from the Dutch oven. If you’re ready to stop dreading dry chicken and start loving your weeknight dinners, this might just be your new favorite trick.
Why You’ll Love This Recipe
- Quick & Easy: Comes together in under 35 minutes, perfect for busy weeknights or last-minute dinners.
- Simple Ingredients: No fancy or hard-to-find items—just pantry staples and fresh chicken breasts.
- Perfect for Any Occasion: Works great for family dinners, meal prep, or even a casual date night.
- Crowd-Pleaser: Kids, adults, picky eaters—everyone asks for seconds because of that crispy skin and juicy inside.
- Unbelievably Delicious: The combination of pan-searing and oven roasting in a Dutch oven seals in juices and delivers unmatched texture.
This recipe isn’t just a twist on typical chicken breast cooking—it’s about mastering a method that balances crispiness and moisture perfectly. The key? Starting with a hot Dutch oven to sear the skin, then finishing covered to gently cook through without drying out. I’ve tested this method countless times, adjusting sear times and oven temps, and it’s the result of those little tweaks that make it stand out from the rest.
Honestly, it’s the kind of chicken that makes you close your eyes after the first bite and say, “Yep, that’s exactly what I wanted.” Whether you’re a kitchen novice or someone who likes to cook regularly, this recipe delivers consistency and flavor with minimal stress.
What Ingredients You Will Need
This recipe uses simple, wholesome ingredients to deliver bold flavor and satisfying texture without the fuss. Most of these are pantry staples, and you probably have them on hand already.
- Chicken breasts: Skin-on, boneless (about 6-8 ounces / 170-225 grams each) for the best texture and moisture retention.
- Olive oil: A good quality extra virgin olive oil for searing (I prefer California Olive Ranch for its mild flavor).
- Salt: Kosher salt is best for seasoning evenly and drawing out moisture from the skin, helping it crisp.
- Black pepper: Freshly ground for a punch of flavor.
- Garlic: 2-3 cloves, smashed (adds aromatic depth).
- Fresh herbs: A few sprigs of thyme or rosemary (optional but recommended for that subtle earthy note).
- Butter: Unsalted, about 1 tablespoon (helps brown the chicken and adds richness).
- Chicken broth or water: 1/4 cup (60 ml) to keep the chicken moist during oven roasting.
Ingredient notes: For a dairy-free version, swap butter with extra olive oil or vegan margarine. If you want to add a smoky twist, sprinkle a little smoked paprika with the salt and pepper. In the summer, fresh herbs from your garden really make a difference here.
Equipment Needed
- Dutch oven: A 5-6 quart (4.7-5.7 liters) enameled cast iron Dutch oven is ideal. It holds heat evenly and can go from stovetop to oven seamlessly.
- Tongs: For flipping the chicken breasts without tearing the skin.
- Instant-read thermometer: Optional but handy for checking the internal temperature reaches 165°F (74°C).
- Wooden spoon or spatula: To help move garlic and herbs around without scratching the enamel.
- Oven mitts: Because Dutch ovens get hot — safety first!
If you don’t have a Dutch oven, a heavy oven-safe skillet with a lid can work, but you might miss out on some heat retention benefits. I’ve tried this recipe with a cast iron skillet covered tightly with foil, and it’s decent, but the Dutch oven’s even heat makes a noticeable difference.
Preparation Method
- Preheat your oven to 375°F (190°C). This moderate temperature ensures the chicken finishes cooking gently without burning the skin.
- Pat chicken breasts dry with paper towels. This step is crucial — moisture on the skin prevents crispness, so get them as dry as you can.
- Season generously both sides with kosher salt and freshly ground black pepper. If you want, add a pinch of smoked paprika or garlic powder here for extra flavor.
- Heat the Dutch oven over medium-high heat and add olive oil (about 2 tablespoons). You want it shimmering but not smoking.
- Place chicken breasts skin-side down carefully into the hot oil. Press down gently with tongs to ensure even contact. Sear for 5-7 minutes without moving them — patience here builds that coveted crispy skin.
- Flip the chicken and add butter, smashed garlic cloves, and fresh herbs around the chicken. Spoon some of the melted butter over the breasts to boost flavor.
- Add chicken broth or water to the bottom of the Dutch oven (not over the chicken) to create a little steam for gentle cooking.
- Cover the Dutch oven with its lid and transfer to the preheated oven. Roast for 15-20 minutes or until the internal temperature reaches 165°F (74°C) when checked with a thermometer.
- Remove from oven and let rest covered for 5 minutes. Resting allows juices to redistribute, making the chicken super juicy.
- Serve immediately with your favorite sides and enjoy the crispy, juicy magic.
Tips: If the skin isn’t crispy enough after roasting, you can place the Dutch oven back on the stovetop uncovered for a minute or two, skin side down, over medium heat. Just watch carefully to avoid burning.
Cooking Tips & Techniques
One of the trickiest parts about chicken breast is avoiding dryness, but the Dutch oven method here nails it by combining searing and covered roasting. Here’s what I learned after a few too many dry batches:
- Don’t skip drying the chicken. I once rushed this step and ended up with soggy skin. Patting dry is a game-changer.
- Use room temperature chicken. Taking the breasts out of the fridge 20 minutes before cooking helps them cook evenly.
- Resist the urge to fiddle with the chicken during searing. Let it sit skin-side down until it naturally releases from the pan.
- Keep the oil hot but not smoking. Too cool, and you won’t get that crisp; too hot, and you risk burning.
- Use an instant-read thermometer. It saves guesswork and prevents overcooking.
- Multitask by prepping sides while the chicken roasts. It’s a great way to keep dinner flowing without stress.
Variations & Adaptations
- Herb and Lemon Twist: Add lemon zest and juice with the herbs before roasting for a bright, fresh flavor.
- Spicy Kick: Rub the chicken with smoked paprika, cayenne, and garlic powder for a smoky heat.
- Gluten-Free Option: This recipe is naturally gluten-free—just double-check your broth ingredients to avoid hidden gluten.
- Low-Carb Friendly: Serve with roasted veggies or a leafy salad for a balanced, carb-conscious meal.
- Dairy-Free Version: Swap butter for extra olive oil or a dairy-free spread without losing richness.
Once, I swapped thyme for fresh oregano and added a splash of white wine to the broth, which gave the chicken a slightly different but lovely Mediterranean vibe. Experimenting with herbs and liquids can totally change the mood of this recipe!
Serving & Storage Suggestions
This chicken is best served hot right out of the Dutch oven to enjoy that perfect crispy skin. Pair it with creamy mashed potatoes, steamed green beans, or a crisp mixed salad—simple sides that let the chicken shine.
Leftovers? They keep well in an airtight container in the fridge for up to 3 days. To reheat, gently warm in a 300°F (150°C) oven for about 10-15 minutes, skin side up to maintain crispiness. Avoid microwaving if you want to keep that texture intact.
Flavors actually deepen a bit after a day, so it’s a great make-ahead option for lunches or quick dinners. Just remember to re-crisp the skin during reheating if you can—it makes all the difference.
Nutritional Information & Benefits
This recipe is a lean protein powerhouse, with each 6-ounce (170 grams) chicken breast providing about 165 calories, 31 grams of protein, and minimal fat (mostly healthy fats from olive oil and butter). It’s naturally gluten-free and low in carbs, fitting nicely into many diets.
Chicken breast offers essential nutrients like niacin, selenium, and vitamin B6, supporting metabolism and immune function. Using olive oil adds heart-healthy monounsaturated fats, and fresh herbs contribute antioxidants without adding calories.
If you’re mindful of sodium, adjust the salt to taste or use a lower-sodium broth. This recipe balances flavor and nutrition without feeling heavy or overly rich.
Conclusion
The Best Dutch Oven Chicken Breast with Crispy, Juicy Perfection is a recipe I keep coming back to because it delivers reliable results with minimal fuss. It’s the kind of meal that feels both comforting and a little special, exactly what you want on any night of the week. The crispy skin and juicy interior combo make every bite satisfying, and the simple ingredients mean you won’t stress about complicated prep.
Feel free to tweak the herbs or spices to match your mood or pantry. This recipe is forgiving and flexible, which is why I love it so much. Next time you want an easy but impressive chicken dinner, remember this method—you won’t regret it.
And hey, if you try it, I’d love to hear how it turns out or what twists you add. Sharing those little kitchen wins is part of the fun, right?
FAQs
Can I use frozen chicken breasts for this recipe?
It’s best to use fully thawed chicken breasts for even cooking and crispy skin. Cooking from frozen will result in uneven texture and may increase cooking time.
What if my chicken breasts are very thick?
For thick breasts, consider butterflying or pounding them to an even thickness to help them cook through without drying out.
Can I make this recipe without a Dutch oven?
A heavy, oven-safe skillet with a tight-fitting lid can work, but the even heat retention of a Dutch oven really helps with consistent results.
How do I know when the chicken is done?
Use an instant-read thermometer to check for an internal temperature of 165°F (74°C). The juices should run clear when pierced.
Can I prepare this recipe ahead of time?
You can season the chicken breasts a few hours ahead and keep them covered in the fridge. Cook just before serving for the best texture and flavor.
Pin This Recipe!


Best Dutch Oven Chicken Breast Recipe 5 Easy Steps for Crispy Juicy Perfection
A quick and easy Dutch oven method for perfectly crispy skin and juicy chicken breasts, ideal for busy weeknights or any occasion.
- Total Time: 35 minutes
- Yield: 2 servings 1x
Ingredients
- 2 skin-on, boneless chicken breasts (6–8 ounces each)
- 2 tablespoons extra virgin olive oil
- Kosher salt, to taste
- Freshly ground black pepper, to taste
- 2–3 cloves garlic, smashed
- A few sprigs fresh thyme or rosemary (optional)
- 1 tablespoon unsalted butter
- 1/4 cup chicken broth or water
Instructions
- Preheat your oven to 375°F (190°C).
- Pat chicken breasts dry with paper towels.
- Season both sides generously with kosher salt and freshly ground black pepper. Optionally add smoked paprika or garlic powder.
- Heat the Dutch oven over medium-high heat and add olive oil until shimmering but not smoking.
- Place chicken breasts skin-side down into the hot oil and press gently with tongs. Sear for 5-7 minutes without moving.
- Flip the chicken and add butter, smashed garlic cloves, and fresh herbs around the chicken. Spoon melted butter over the breasts.
- Add chicken broth or water to the bottom of the Dutch oven, avoiding pouring over the chicken.
- Cover the Dutch oven with its lid and transfer to the oven. Roast for 15-20 minutes or until internal temperature reaches 165°F (74°C).
- Remove from oven and let rest covered for 5 minutes.
- Serve immediately with your favorite sides.
Notes
Patting the chicken dry is crucial for crispy skin. Use room temperature chicken for even cooking. If skin isn’t crispy enough after roasting, re-sear skin side down on stovetop for 1-2 minutes. Use an instant-read thermometer to ensure chicken reaches 165°F. For dairy-free, substitute butter with extra olive oil or vegan margarine. Leftovers keep well refrigerated for up to 3 days; reheat in oven to maintain crispiness.
- Prep Time: 10 minutes
- Cook Time: 25 minutes
- Category: Main Course
- Cuisine: American
Nutrition
- Serving Size: 1 chicken breast (6-
- Calories: 165
- Sodium: 300
- Fat: 7
- Saturated Fat: 2
- Protein: 31
Keywords: Dutch oven chicken breast, crispy chicken skin, juicy chicken breast, easy chicken recipe, weeknight dinner, healthy chicken


