

“Hey, you’ve got to try this trifle!” my neighbor called out one sunny afternoon while we were both wrestling with our overflowing grocery bags. I was skeptical at first—no-bake cheesecakes always seemed a bit too fussy or gimmicky to me. But, honestly, that first bite of this Easy No-Bake Red White and Blue Cheesecake Trifle changed my mind. It was like the 4th of July had been packed into a glass bowl, all vibrant and festive with those bright berry layers and creamy cheesecake goodness.
What really caught me off guard was how simple it was. No oven, no complicated steps—just layering fresh flavors and colors that somehow felt both indulgent and effortlessly light. Over the next week, I found myself making it again and again, bringing it to barbecues and casual get-togethers, and watching it disappear before I could blink. It’s funny how a humble trifle, which I once thought of as just a dessert for fancy dinners, became my go-to when I wanted to impress without the stress.
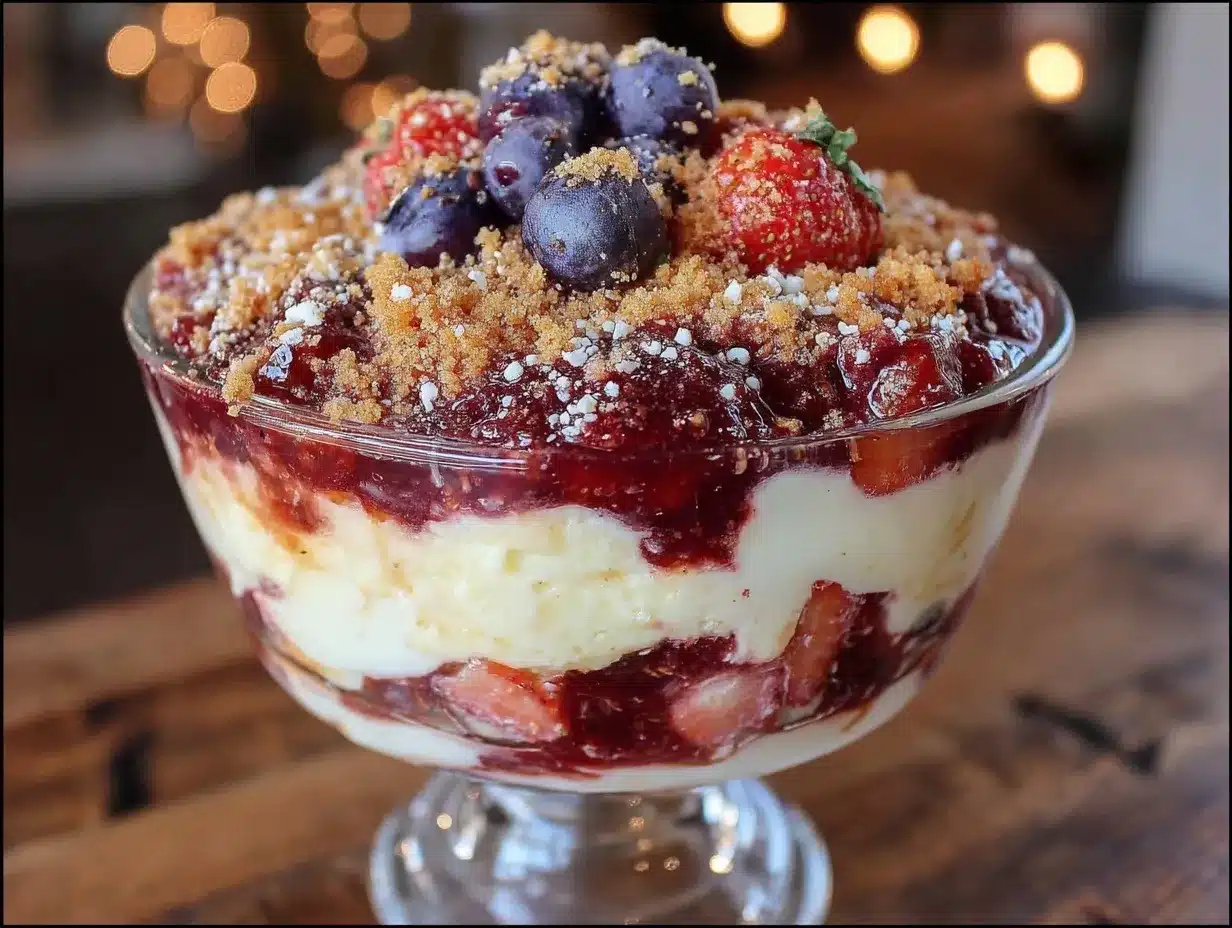
There’s something calming about spooning through those layers—the soft vanilla cheesecake, the bursts of juicy strawberries and blueberries, all resting on a crunchy graham cracker base. It’s the kind of dessert that makes you pause, smile, and feel a little patriotic without even trying. That’s why this recipe stuck with me: it’s friendly, festive, and forgiving, perfect for those moments when you want something sweet but stress-free.
So, if you’re looking for a dessert that’s both eye-catching and downright delicious, this no-bake red white and blue cheesecake trifle might just become your new favorite. It’s the kind of recipe that invites you to linger at the table a little longer, savoring summer’s best flavors—one spoonful at a time.
Why You’ll Love This Easy No-Bake Red White and Blue Cheesecake Trifle Recipe
After testing this recipe multiple times (and sharing it with more than a few friends), I can confidently say this trifle hits all the right notes for a summer dessert:
- Quick & Easy: This dessert comes together in under 20 minutes, making it perfect for busy weeknights, last-minute parties, or casual 4th of July celebrations.
- Simple Ingredients: No need for specialty stores—most ingredients are pantry or fridge staples like cream cheese, whipped topping, and fresh berries.
- Perfect for Summer Gatherings: Its fresh, fruity layers and cool creamy texture make it ideal for potlucks, backyard barbecues, or even a picnic dessert.
- Crowd-Pleaser: Kids love the colorful layers, and adults appreciate the balance of sweet, tart, and creamy flavors.
- Unbelievably Delicious: The graham cracker crumb base adds a delightful crunch, while the cheesecake layer is silky smooth—so comforting and satisfying.
What sets this cheesecake trifle apart? It’s the layering technique that keeps each bite exciting, and the no-bake method means you avoid the fuss of baking and cooling. Plus, blending softened cream cheese with whipped topping creates a fluffy, airy cheesecake layer that feels indulgent but isn’t heavy. I’ve tried other no-bake cheescake recipes, but this one’s texture and balance are just right.
Honestly, this recipe isn’t just a dessert—it’s a little celebration in a bowl. Each spoonful reminds me why I keep coming back to it, whether it’s for a casual family dinner or impressing guests without the stress.
What Ingredients You Will Need for the Easy No-Bake Red White and Blue Cheesecake Trifle
This recipe uses simple, wholesome ingredients to deliver bold flavor and satisfying texture without the fuss. Most of these are likely already in your kitchen, and the fresh berries add that vibrant red and blue perfect for summer.
- For the Cheesecake Layer:
- Cream cheese, softened (8 oz / 225 g) – I prefer Philadelphia for smoothness
- Powdered sugar (1 cup / 120 g) – sifted for no lumps
- Vanilla extract (1 tsp)
- Heavy whipping cream (1 cup / 240 ml) – chilled, for whipping
- For the Berry Layers:
- Fresh strawberries (1 ½ cups / 225 g), hulled and sliced (or frozen, thawed)
- Fresh blueberries (1 cup / 150 g)
- Granulated sugar (2 tbsp) – to macerate the berries (optional, adjust to taste)
- For the Base:
- Graham cracker crumbs (1 ½ cups / 150 g) – for a crunchy, buttery foundation
- Unsalted butter (5 tbsp / 70 g), melted – binds the crumbs together
- Optional Garnish:
- Fresh mint leaves – for a pop of color
- Extra whole berries – for topping
Seasonal tip: If fresh berries aren’t in season, frozen works just fine—just thaw and drain excess liquid. For a gluten-free twist, swap graham cracker crumbs with gluten-free cookie crumbs. You can also use coconut whipped cream if you prefer a dairy-free option, though the texture will be slightly different.
Equipment Needed
- Medium mixing bowls – for whipping cream and mixing cheesecake layer
- Electric mixer or stand mixer – helps whip the cream to stiff peaks and beat cream cheese smooth
- Spatula – for folding ingredients gently
- Measuring cups and spoons – for accurate ingredient amounts
- Trifle bowl or clear glass bowl (about 2-quart / 2-liter capacity) – to show off the beautiful layers
- Food processor or plastic bag and rolling pin – to crush graham crackers (if not pre-crumbled)
If you don’t have a trifle bowl, a large glass bowl or even individual clear dessert glasses work well. I’ve found that a hand mixer is totally fine here—no need for fancy stand mixers. Just make sure your mixing bowl is chilled when whipping the cream for best results.
Preparation Method for Easy No-Bake Red White and Blue Cheesecake Trifle
- Prepare the graham cracker crust: Place graham crackers in a food processor and pulse until fine crumbs form (or crush in a sealed plastic bag with a rolling pin). Transfer crumbs to a bowl and add melted butter. Stir until all crumbs are coated. Press mixture evenly into the bottom of your trifle bowl to create a firm base. Set aside (about 10 minutes).
- Make the cheesecake layer: In a mixing bowl, beat softened cream cheese with powdered sugar and vanilla extract until smooth and creamy (about 2-3 minutes). In a separate chilled bowl, whip the heavy cream to stiff peaks. Gently fold the whipped cream into the cream cheese mixture, preserving the airy texture. This creates a fluffy, light cheesecake layer (about 5 minutes).
- Macerate the strawberries: Combine sliced strawberries with granulated sugar in a small bowl. Let them sit for 10-15 minutes until they release their juices and become juicy and sweet.
- Start layering: Spoon about one-third of the cheesecake mixture evenly over the graham cracker crust. Next, add a layer of macerated strawberries, including their juices. Then add a layer of fresh blueberries.
- Repeat layers: Add another one-third of the cheesecake mixture, followed by more strawberries and blueberries. Finish with a final cheesecake layer on top.
- Chill the trifle: Cover the bowl with plastic wrap and refrigerate for at least 2 hours (or overnight). This allows the layers to meld and flavors to develop.
- Garnish and serve: Just before serving, top with extra fresh berries and mint leaves for a festive finish.
Pro tip: When folding the whipped cream into the cream cheese, be gentle to keep the mixture light and fluffy. If the cheesecake layer feels too soft, chill it for 15 minutes before assembling to firm up a bit. Don’t skip the maceration step for strawberries—it adds a lovely natural sweetness and juice that makes the layers extra luscious.
Cooking Tips & Techniques for the Perfect Trifle
Making this no-bake cheesecake trifle has taught me a few tricks worth sharing:
- Softened cream cheese is a must: If your cream cheese is cold, it won’t blend smoothly and you’ll get lumps. Leave it out for 30 minutes or microwave for 10 seconds (careful not to melt).
- Chill your mixing bowl: This helps whip the cream faster and yields better volume.
- Don’t overmix: When folding whipped cream into the cream cheese, use a spatula and fold carefully. Overmixing can deflate the fluffy texture.
- Layer evenly: Try to spread each layer gently but evenly—this helps the trifle hold its shape and looks beautiful in a clear bowl.
- Use fresh, ripe berries: They make all the difference in taste and appearance. If berries are tart, add a little sugar to balance.
- Make it ahead: This trifle actually tastes better after a few hours or overnight in the fridge when flavors marry nicely.
One time, I forgot to chill the whipped cream bowl, and the cream took forever to whip—lesson learned! Also, I once skipped the graham cracker crust and layered the cheesecake directly on the bowl bottom; while tasty, it lacked that satisfying crunch. So, I never skip the crust now—it adds that perfect texture contrast.
Variations & Adaptations for Your Cheesecake Trifle
This recipe is versatile and easy to tweak to fit your tastes or dietary needs:
- Berry swaps: Use raspberries or blackberries for a different twist. In summer, try swapping strawberries for fresh peaches or mango for a tropical flair.
- Gluten-free option: Replace graham cracker crumbs with gluten-free cookie crumbs or crushed nuts like almonds or pecans.
- Dairy-free adaptation: Use dairy-free cream cheese and coconut whipped cream. The texture will be a bit different but still delicious.
- Chocolate layer: Add a thin layer of chocolate ganache or chocolate cookie crumbs for a richer taste profile.
- Mini trifles: Serve in individual glasses or mason jars for easy portion control and charming presentation.
I once tried a version with a swirl of homemade strawberry sauce between layers, inspired by the balsamic roasted strawberry shortcake recipe I love. The tangy sweetness paired beautifully with the creamy cheesecake, making it a real crowd-pleaser.
Serving & Storage Suggestions
This cheesecake trifle is best served chilled, straight from the fridge. The cool, creamy layers are refreshing on a warm day, and the berries burst with flavor.
For a festive touch, garnish the top with whole strawberries, blueberries, and a few mint leaves right before serving. It pairs wonderfully with light beverages like iced tea or sparkling water with lemon.
Store leftovers covered tightly in the refrigerator for up to 3 days. The graham cracker crust will soften over time, but the flavors actually deepen. If you want to keep the crust crunchier longer, add the crust layer just before serving instead of assembling the entire trifle ahead.
Reheating is not recommended since this is a no-bake chilled dessert, but letting it sit at room temperature for 10 minutes before serving softens the cheesecake layer just right.
Nutritional Information & Benefits
Each serving of this Easy No-Bake Red White and Blue Cheesecake Trifle packs a balance of indulgence and fresh nutrition:
- Approximate calories per serving: 320 kcal (based on 8 servings)
- Protein from cream cheese and whipping cream helps satisfy hunger
- Fresh berries offer antioxidants, vitamin C, and fiber
- Contains dairy and gluten (from graham crackers), with easy substitutions for both
- Lower in added sugar than many traditional cheesecakes thanks to natural berry sweetness
From a wellness perspective, this dessert strikes a nice balance between treating yourself and keeping things light. Using fresh fruit and skipping heavy sauces keeps it from feeling overly rich, making it a guilt-free pleasure on a summer day.
Conclusion
This Easy No-Bake Red White and Blue Cheesecake Trifle is one of those recipes that feels like it was made for summer celebrations—fresh, colorful, and simple enough to whip up without breaking a sweat. Whether you’re feeding a crowd or just craving a sweet treat yourself, it’s flexible enough to match your style and schedule.
I keep coming back to it because it’s forgiving, beautiful, and genuinely delicious—a rare combo in the dessert world. Plus, it’s a perfect way to showcase seasonal berries without the fuss of baking.
Try making this trifle your own with different fruit combinations or add-ins, and don’t hesitate to share how you customize it. I’d love to hear about your twists and how this dessert fits into your summer traditions. There’s something special about a recipe that brings people together, spoon by spoon.
Frequently Asked Questions about the Easy No-Bake Red White and Blue Cheesecake Trifle
Can I make the trifle ahead of time?
Yes! It actually tastes better after sitting in the fridge for a few hours or overnight, allowing flavors to meld. Just keep it covered to prevent drying out.
What can I use instead of graham cracker crumbs?
You can use crushed digestive biscuits, gluten-free cookie crumbs, or even crushed pretzels for a salty-sweet twist.
How do I keep the berries from making the crust soggy?
Macerate the strawberries separately and drain excess juice before layering. You can also assemble the crust just before serving if you want extra crunch.
Is there a way to make this recipe vegan?
Yes! Use vegan cream cheese alternatives and coconut whipped cream. Swap graham crackers for vegan-friendly cookie crumbs.
Can I use frozen berries?
Absolutely. Just thaw and drain them well to avoid excess moisture that could make the dessert watery.
For those who love berry-forward desserts, this trifle complements other favorites like the creamy no-churn strawberry ice cream or the strawberry cheesecake stuffed french toast, making your summer menu truly shine.
Pin This Recipe!
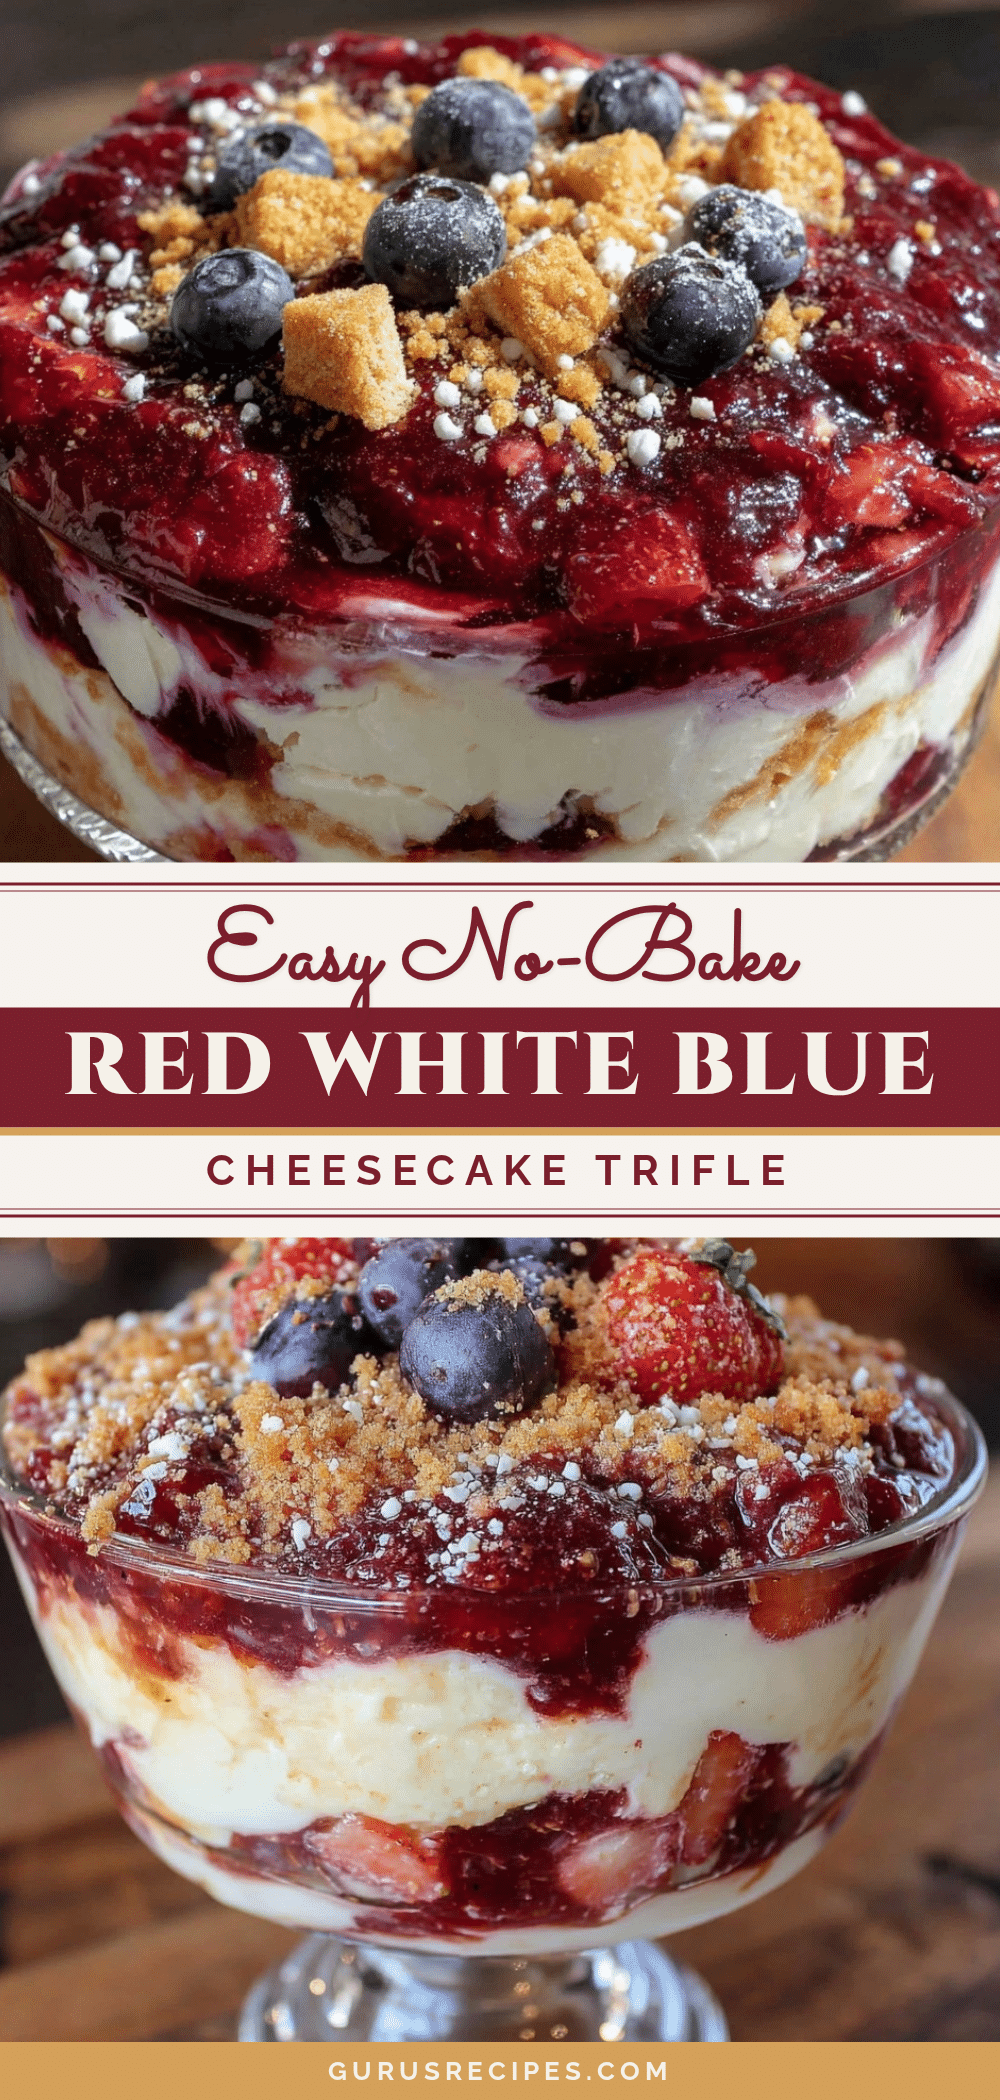

Easy No-Bake Red White and Blue Cheesecake Trifle
A festive and simple no-bake cheesecake trifle layered with fresh strawberries, blueberries, and a crunchy graham cracker crust, perfect for summer celebrations like the 4th of July.
- Total Time: 2 hours 15 minutes
- Yield: 8 servings 1x
Ingredients
- 8 oz cream cheese, softened
- 1 cup powdered sugar, sifted
- 1 tsp vanilla extract
- 1 cup heavy whipping cream, chilled
- 1 ½ cups fresh strawberries, hulled and sliced (or frozen, thawed)
- 1 cup fresh blueberries
- 2 tbsp granulated sugar (optional, to macerate berries)
- 1 ½ cups graham cracker crumbs
- 5 tbsp unsalted butter, melted
- Fresh mint leaves (optional, for garnish)
- Extra whole berries (optional, for topping)
Instructions
- Prepare the graham cracker crust: Place graham crackers in a food processor and pulse until fine crumbs form (or crush in a sealed plastic bag with a rolling pin). Transfer crumbs to a bowl and add melted butter. Stir until all crumbs are coated. Press mixture evenly into the bottom of your trifle bowl to create a firm base. Set aside for about 10 minutes.
- Make the cheesecake layer: In a mixing bowl, beat softened cream cheese with powdered sugar and vanilla extract until smooth and creamy (about 2-3 minutes). In a separate chilled bowl, whip the heavy cream to stiff peaks. Gently fold the whipped cream into the cream cheese mixture, preserving the airy texture. This creates a fluffy, light cheesecake layer (about 5 minutes).
- Macerate the strawberries: Combine sliced strawberries with granulated sugar in a small bowl. Let them sit for 10-15 minutes until they release their juices and become juicy and sweet.
- Start layering: Spoon about one-third of the cheesecake mixture evenly over the graham cracker crust. Next, add a layer of macerated strawberries, including their juices. Then add a layer of fresh blueberries.
- Repeat layers: Add another one-third of the cheesecake mixture, followed by more strawberries and blueberries. Finish with a final cheesecake layer on top.
- Chill the trifle: Cover the bowl with plastic wrap and refrigerate for at least 2 hours or overnight to allow the layers to meld and flavors to develop.
- Garnish and serve: Just before serving, top with extra fresh berries and mint leaves for a festive finish.
Notes
Use softened cream cheese for smooth blending. Chill mixing bowl before whipping cream for better volume. Fold whipped cream gently to keep cheesecake layer light and fluffy. Macerate strawberries to add natural sweetness and juice. For gluten-free, substitute graham cracker crumbs with gluten-free cookie crumbs. For dairy-free, use dairy-free cream cheese and coconut whipped cream. Assemble crust just before serving to keep it crunchy longer.
- Prep Time: 15 minutes
- Cook Time: 0 minutes
- Category: Dessert
- Cuisine: American
Nutrition
- Serving Size: 1/8 of the trifle bo
- Calories: 320
- Sugar: 18
- Sodium: 210
- Fat: 22
- Saturated Fat: 13
- Carbohydrates: 25
- Fiber: 2
- Protein: 5
Keywords: no-bake cheesecake, trifle, 4th of July dessert, red white and blue dessert, summer dessert, easy cheesecake, berry dessert


