
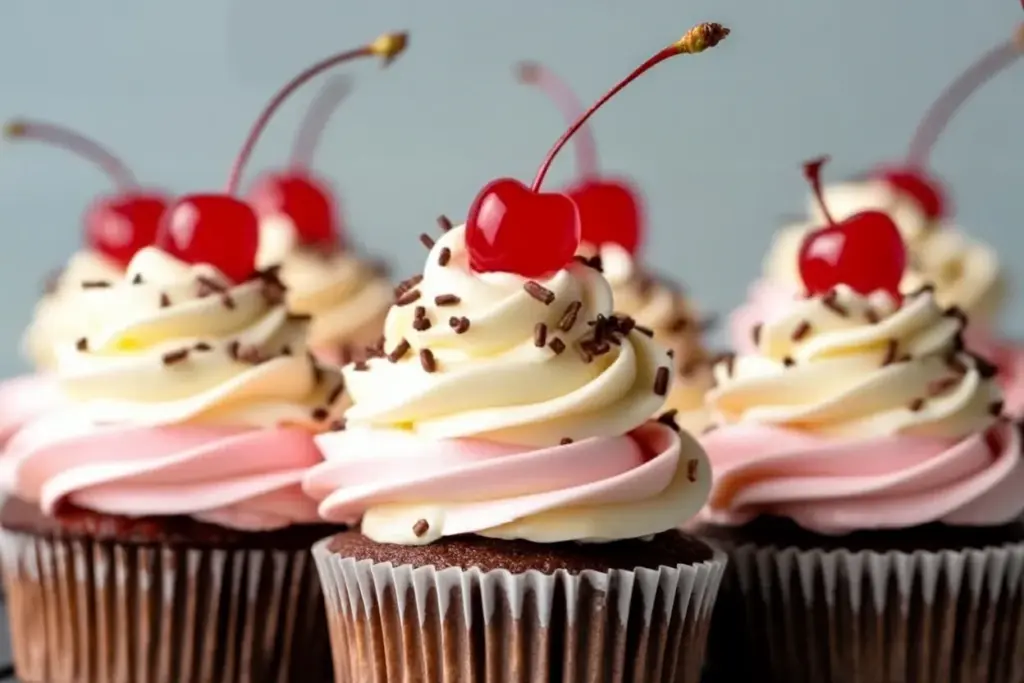
The first bite of Neapolitan ice cream cupcakes always takes me back to my childhood birthday parties—sticky fingers, big grins, and an impossible choice between chocolate, vanilla, and strawberry. With this recipe, you don’t have to pick just one flavor. Imagine layers of soft cake, creamy ice cream, and a swirl of whipped frosting, all nestled in a cupcake liner. It’s a party in every bite! Neapolitan ice cream cupcakes are my go-to treat for celebrations because, let’s be honest, they look adorable, taste incredible, and always disappear fast.
I still remember the first time I made these for my niece’s birthday. The kitchen was a mess, sprinkles everywhere, but those giggles and “mmm” sounds made it totally worth it. Over the years, I’ve tweaked and tested this Neapolitan ice cream cupcakes recipe, making sure every layer stands out. Whether you’re planning a summer birthday bash or just want to surprise your family with something special, these cupcakes are a guaranteed hit. They’re perfect for busy hosts, picky eaters, and anyone who loves a classic ice cream combo with a playful twist.
I’ve lost count of how many times I’ve baked these—sometimes for parties, sometimes just because. Trust me, once you try these Neapolitan ice cream cupcakes, you’ll see why they’re a staple in my dessert lineup. If you’re looking for a show-stopping treat that’s as fun to assemble as it is to eat, you’re in the right place.
Why You’ll Love This Recipe
Let’s face it: some desserts are just crowd-pleasers, and these Neapolitan ice cream cupcakes never disappoint. Here’s why I keep coming back to this recipe—and why you will too:
- Quick & Easy: No need for fancy equipment or complicated steps. You get bakery-worthy cupcakes without spending hours in the kitchen.
- Simple Ingredients: Everything you need is probably already in your pantry or freezer. No stress shopping here!
- Perfect for Parties: These cupcakes are always the first to vanish at birthday gatherings, potlucks, or summer BBQs. Kid-approved and adult-adored.
- All-in-One Treat: Why choose between cake and ice cream when you can have both? Each bite gives you chocolate, vanilla, and strawberry—pure nostalgia.
- Instagram & Pinterest Worthy: They look as good as they taste. The pastel layers and whipped topping are total show-stoppers on any dessert table.
What really sets my Neapolitan ice cream cupcakes recipe apart is the way each layer is crafted for maximum flavor. I use a chocolate cake base (moist but sturdy), then add a creamy vanilla ice cream middle, and finish with a swirl of strawberry ice cream. I’ve learned through trial and error that freezing between layers gives you those picture-perfect stripes—and prevents soggy cupcakes. This technique isn’t in most recipes, but it makes a world of difference!
Honestly, these are the cupcakes people remember long after the party’s over. They have that “wow” factor without the stress, and you can prep most of it ahead of time. For anyone who loves classic desserts with a twist, these cupcakes are a must-try. Whether you’re baking with kids, for a crowd, or just want a treat that feels a little extra special, you’ll fall in love with this recipe.
What Ingredients You Will Need
This Neapolitan ice cream cupcakes recipe comes together with a blend of simple cake ingredients and a trio of classic ice cream flavors. I love that you can use store-bought or homemade ice cream, and the cake base is totally adaptable for dietary needs.
- For the Chocolate Cupcake Base:
- 1 cup (125g) all-purpose flour
- 1/3 cup (35g) unsweetened cocoa powder (I like Ghirardelli for extra richness)
- 1 tsp baking powder
- 1/2 tsp baking soda
- 1/4 tsp salt
- 1/2 cup (100g) granulated sugar
- 1/2 cup (100g) brown sugar, packed
- 1/3 cup (80ml) vegetable oil or melted butter (butter gives a richer flavor)
- 2 large eggs, room temperature
- 1/2 cup (120ml) buttermilk (or milk + 1 tsp lemon juice as a quick substitute)
- 1 tsp pure vanilla extract
- For the Ice Cream Layers:
- 1 pint (about 2 cups/475ml) vanilla ice cream, slightly softened
- 1 pint (about 2 cups/475ml) strawberry ice cream, slightly softened
- Optional: 1 pint chocolate ice cream for extra indulgence or swapping out a layer
- I usually go with classic Breyers or Häagen-Dazs, but any good-quality ice cream works
- For the Topping:
- 1 cup (240ml) heavy whipping cream, cold
- 2 tbsp powdered sugar
- 1/2 tsp vanilla extract
- Rainbow sprinkles, chocolate shavings, or fresh strawberries for garnish (optional but highly recommended!)
If you’re gluten-free, swap the flour for a 1:1 gluten-free blend. Dairy-free? Use coconut or oat-based ice cream and plant-based cream for topping. I’ve even made mini versions for little hands, and trust me, they’re just as cute. If you’re in a hurry, you can use store-bought chocolate cupcakes and focus on the assembly. These cupcakes are flexible, so don’t stress if you have to make a last-minute swap!
Equipment Needed
- 12-cup muffin tin: A standard muffin pan works perfectly. If you have a silicone one, it makes removing the frozen cupcakes even easier.
- Paper or silicone cupcake liners: I recommend using sturdy liners—trust me, it makes life so much easier when unmolding the frozen cupcakes.
- Ice cream scoop: For even layers. You can also use a large spoon, but the scoop makes it neater.
- Electric mixer or stand mixer: For the whipped cream topping. If you don’t have one, a good old-fashioned whisk and some elbow grease work too.
- Mixing bowls (medium and large): For the cake batter and whipped cream.
- Rubber spatula and spoon: For mixing and spreading the ice cream layers.
- Measuring cups and spoons: Accuracy helps with cakes, especially.
- Cooling rack: For cooling the cupcakes before layering on the ice cream.
- Freezer-safe tray or flat plate: To freeze the cupcakes without them sticking together.
If you don’t have a muffin tin, you can use ramekins or even sturdy silicone baking cups. I’ve used both when baking with my niece, and the results are just as fun. For the mixer, hand mixers are totally fine—just watch the cream so it doesn’t over-whip. If you’re on a budget, most dollar stores carry tins and measuring sets that work great for this recipe. Just make sure everything is clean and dry, especially when whipping cream or handling ice cream.
How to Make Neapolitan Ice Cream Cupcakes
-
Prep Your Tools and Ingredients
Preheat your oven to 350°F (175°C). Line a 12-cup muffin pan with sturdy cupcake liners. Set your ice cream out to soften (about 10-15 minutes at room temp). The ice cream should be spreadable but not melted. Don’t forget to chill your mixing bowl and beaters for the whipped cream—they whip up faster this way! -
Mix the Chocolate Cupcake Batter
In a medium bowl, whisk together 1 cup (125g) flour, 1/3 cup (35g) cocoa powder, 1 tsp baking powder, 1/2 tsp baking soda, and 1/4 tsp salt. In a large bowl, beat 1/2 cup (100g) granulated sugar, 1/2 cup (100g) brown sugar, and 1/3 cup (80ml) oil or melted butter until smooth. Beat in 2 large eggs, then add 1/2 cup (120ml) buttermilk and 1 tsp vanilla extract. Gradually add the dry ingredients, mixing just until combined. Batter should be thick and glossy. -
Bake the Cupcakes
Spoon the batter evenly into the lined muffin cups (about 2/3 full). Bake for 15-18 minutes, or until a toothpick comes out clean. Let cupcakes cool in the pan for 5 minutes, then transfer to a rack to cool completely. Warm cupcakes will melt the ice cream, so patience is key here. -
Assemble the Ice Cream Layers
Once cupcakes are completely cool, use an ice cream scoop to place a layer of vanilla ice cream (about 2 tbsp per cupcake) on each cupcake. Smooth it with a spoon. Freeze for 20-30 minutes, or until firm. Repeat with a layer of strawberry ice cream. If you’re feeling extra, add a thin chocolate ice cream layer in between, freezing between each addition. -
Whip Up the Creamy Topping
In a chilled bowl, whip 1 cup (240ml) heavy cream with 2 tbsp powdered sugar and 1/2 tsp vanilla until stiff peaks form. Don’t walk away—over-whipped cream turns grainy fast. Pipe or dollop the whipped cream onto each cupcake. Add sprinkles, chocolate shavings, or a fresh strawberry if you like. -
Freeze and Serve
Place finished Neapolitan ice cream cupcakes on a tray and freeze for at least 1 hour before serving. For the best texture, let them sit at room temperature for 5-10 minutes before eating. The cake will soften, and the ice cream layers will be perfectly creamy. -
Troubleshooting:
If your ice cream is too hard to spread, give it a few more minutes at room temp. If layers are slipping, freeze each layer longer. If the whipped topping starts to melt, chill the cupcakes again before serving. Don’t stress if the layers aren’t perfect—honestly, the homemade look is half the charm!
Pro tip: If you’re making these with kids, let them pick the sprinkle toppings. It’s messy, but so much fun.
Cooking Tips & Techniques
After making Neapolitan ice cream cupcakes dozens of times, I’ve picked up a few tricks that make a big difference. Want your cupcakes to turn out bakery-perfect? Try these tips:
- Freeze Between Layers: It’s tempting to rush, but freezing each ice cream layer separately ensures neat stripes and prevents a mushy mess. Patience pays off!
- Don’t Overfill: Leave a little space at the top of each cupcake liner for the ice cream and whipped topping. If you go too high, things get melty and hard to handle.
- Use Sturdy Liners: Thin paper liners can get soggy. Silicone or double-lined paper cups hold up better when frozen and make for easier peeling.
- Scoop Consistently: For that picture-perfect look, use the same size scoop for each layer. If you’re eyeballing it, aim for about 2 tablespoons per ice cream layer.
- Whip Cream Just Right: Stop whipping as soon as stiff peaks form. Over-mixing can make it grainy. If in doubt, err on the side of soft peaks—you can always whip a little more.
- Work in Batches: If your kitchen is warm, assemble a few cupcakes at a time and keep the rest in the freezer. Melting ice cream is a real struggle on hot days!
- Customize Flavors: Don’t be afraid to swap in different ice creams. I’ve tried mint chocolate chip and even peanut butter—so good!
I’ve definitely made the mistake of stacking ice cream before the cupcakes cooled—huge mess. Now, I always double-check the cake is room temp. Also, if cupcakes get stuck in the pan, a quick dip of the bottom in warm water helps them pop right out. Little things like that keep the process fun instead of frustrating.
Variations & Adaptations
The beauty of Neapolitan ice cream cupcakes is how easily you can make them your own. Here are some of my favorite twists:
- Gluten-Free: Swap the all-purpose flour with a trusted 1:1 gluten-free blend. I’ve used King Arthur and Bob’s Red Mill with great results.
- Dairy-Free: Use plant-based ice creams (like oat or coconut milk varieties) and coconut cream for the topping. It’s just as creamy and delicious!
- Flavor Swaps: Try swapping strawberry ice cream for raspberry or cherry, or go wild with a cookies-and-cream layer. Chocolate-mint is a hit for winter parties.
- Different Cakes: If you’re not a chocolate fan (hard to believe, but it happens), use vanilla or even strawberry cupcakes as the base.
- Mini Cupcakes: Make bite-sized versions using a mini muffin tin—adorable and perfect for little hands or dessert buffets.
- Top with Ganache: For extra decadence, drizzle a little chocolate ganache before adding whipped cream. I’ve tried this for adult parties, and it always wows guests.
Once, I even made a “birthday cake” version with confetti cake base and rainbow sherbet. It was a total hit! Don’t be afraid to experiment based on what you have on hand or what your party theme is. The options are endless.
Serving & Storage Suggestions
Neapolitan ice cream cupcakes shine brightest when served slightly softened—let them sit out for 5-10 minutes so the cake and ice cream are just right. I love serving them on a pretty platter with extra sprinkles and fresh strawberries for a festive touch. They look especially cute with colorful cupcake liners or little birthday flags stuck on top.
These cupcakes pair perfectly with lemonade, iced coffee, or a glass of cold milk. If you’re planning a bigger dessert table, they look great next to fruit skewers or a bowl of fresh berries. For a grown-up spin, serve with espresso or even a splash of Bailey’s in the whipped cream.
Store any leftovers (if you’re lucky to have them!) in an airtight container in the freezer for up to 1 week. Place parchment between layers to prevent sticking. To re-serve, let cupcakes thaw at room temp for a few minutes. The flavors actually get better after a day or two—the cake absorbs a bit of ice cream and gets extra fudgy. Just don’t refreeze melted cupcakes; they lose their texture.
Nutritional Information & Benefits
Each Neapolitan ice cream cupcake clocks in at roughly 250-300 calories, depending on the ice cream and toppings you choose. You’ll get a balance of carbs, a little protein, and some healthy fats from the cream and eggs. Using high-quality cocoa powder brings antioxidants, and you can sneak in fiber with whole wheat flour if you like.
For those watching allergens, remember there’s dairy, gluten, and eggs in the classic version, but you can easily adapt with safe swaps. The recipe can be made gluten-free and dairy-free without losing any of the celebration vibes. I love that a small treat like this can fit into most balanced eating plans—because everyone deserves a birthday cupcake now and then!
Conclusion
Neapolitan ice cream cupcakes are more than just a dessert—they’re a memory in the making. Each colorful layer brings a little joy, whether you’re celebrating a birthday, a graduation, or simply the end of a busy week. I love this recipe because it’s forgiving, fun, and guaranteed to make people smile. Don’t be afraid to put your own spin on the flavors or toppings—half the fun is making them your own.
So go ahead, whip up a batch, and let me know how yours turn out! Leave a comment or share your cupcake creations on social media. I’d love to see what you come up with, especially if you try a new flavor combo. Here’s to sweet moments, happy parties, and a freezer full of irresistible Neapolitan ice cream cupcakes!
FAQs About Neapolitan Ice Cream Cupcakes
How far in advance can I make Neapolitan ice cream cupcakes?
You can assemble them up to 1 week ahead! Keep them sealed in a freezer-safe container and add the whipped cream topping the day you serve for best texture.
Can I use store-bought cupcakes instead of baking from scratch?
Absolutely! Store-bought chocolate cupcakes work well if you’re in a hurry—just focus on layering the ice cream and topping for that homemade magic.
What’s the best way to soften ice cream for layering?
Let ice cream sit at room temperature for 10-15 minutes until it’s just spreadable. If it gets too soft, pop it back in the freezer for a bit before assembling the next layer.
How do I unmold the frozen cupcakes without breaking them?
Use sturdy liners and let the cupcakes thaw for a couple of minutes before peeling off the wrapper. Silicone liners peel off the easiest, especially for little hands.
Can I use other ice cream flavors?
Of course! Mix and match your favorites—try cookies and cream, mint chip, or even mango sorbet for a sunny twist. The recipe is super flexible, so have fun with it!
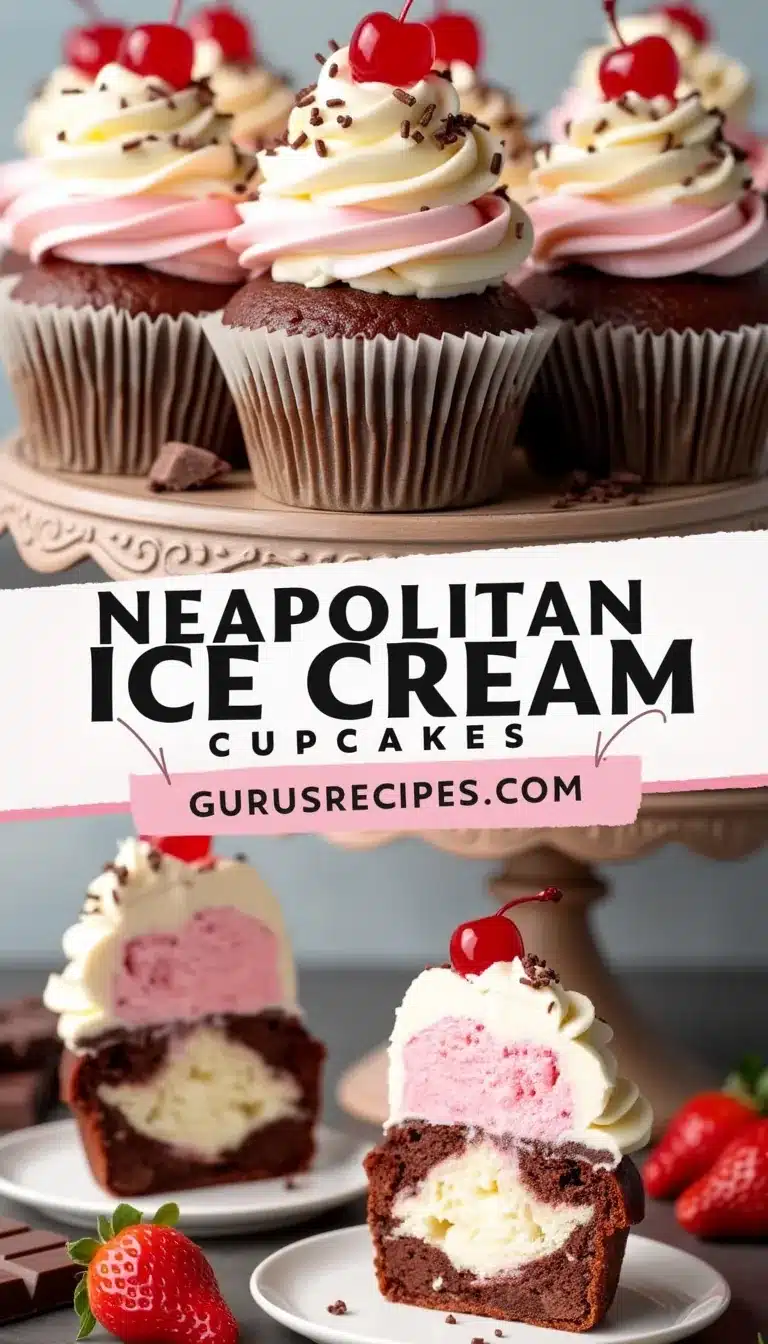

Neapolitan Ice Cream Cupcakes
These Neapolitan ice cream cupcakes combine layers of moist chocolate cake, creamy vanilla and strawberry ice cream, and a swirl of whipped cream for a fun, nostalgic treat. Perfect for birthdays, parties, or any celebration, they’re easy to make and always a crowd-pleaser.
- Total Time: 2 hours
- Yield: 12 cupcakes 1x
Ingredients
- 1 cup (125g) all-purpose flour
- 1/3 cup (35g) unsweetened cocoa powder
- 1 tsp baking powder
- 1/2 tsp baking soda
- 1/4 tsp salt
- 1/2 cup (100g) granulated sugar
- 1/2 cup (100g) brown sugar, packed
- 1/3 cup (80ml) vegetable oil or melted butter
- 2 large eggs, room temperature
- 1/2 cup (120ml) buttermilk (or milk + 1 tsp lemon juice)
- 1 tsp pure vanilla extract
- 1 pint (about 2 cups/475ml) vanilla ice cream, slightly softened
- 1 pint (about 2 cups/475ml) strawberry ice cream, slightly softened
- Optional: 1 pint chocolate ice cream for extra indulgence or swapping out a layer
- 1 cup (240ml) heavy whipping cream, cold
- 2 tbsp powdered sugar
- 1/2 tsp vanilla extract
- Rainbow sprinkles, chocolate shavings, or fresh strawberries for garnish (optional)
Instructions
- Preheat your oven to 350°F (175°C). Line a 12-cup muffin pan with sturdy cupcake liners. Set ice cream out to soften for 10-15 minutes. Chill mixing bowl and beaters for whipped cream.
- In a medium bowl, whisk together flour, cocoa powder, baking powder, baking soda, and salt. In a large bowl, beat granulated sugar, brown sugar, and oil or melted butter until smooth. Beat in eggs, then add buttermilk and vanilla extract. Gradually add dry ingredients, mixing just until combined.
- Spoon batter evenly into lined muffin cups (about 2/3 full). Bake for 15-18 minutes, or until a toothpick comes out clean. Let cupcakes cool in the pan for 5 minutes, then transfer to a rack to cool completely.
- Once cupcakes are completely cool, use an ice cream scoop to place a layer of vanilla ice cream (about 2 tbsp per cupcake) on each cupcake. Smooth with a spoon. Freeze for 20-30 minutes, or until firm. Repeat with a layer of strawberry ice cream. Optionally, add a thin chocolate ice cream layer in between, freezing between each addition.
- In a chilled bowl, whip heavy cream with powdered sugar and vanilla until stiff peaks form. Pipe or dollop whipped cream onto each cupcake. Add sprinkles, chocolate shavings, or a fresh strawberry if desired.
- Place finished cupcakes on a tray and freeze for at least 1 hour before serving. For best texture, let them sit at room temperature for 5-10 minutes before eating.
- If ice cream is too hard to spread, let it sit at room temp a few more minutes. If layers slip, freeze each layer longer. If whipped topping melts, chill cupcakes again before serving.
Notes
Freeze each ice cream layer separately for neat stripes. Use sturdy liners to prevent sogginess. Customize with different ice cream flavors or cake bases. For gluten-free, use a 1:1 GF flour blend; for dairy-free, use plant-based ice cream and coconut cream. Let cupcakes sit at room temp for 5-10 minutes before serving for best texture.
- Prep Time: 30 minutes
- Cook Time: 18 minutes
- Category: Dessert
- Cuisine: American
Nutrition
- Serving Size: 1 cupcake
- Calories: 275
- Sugar: 22
- Sodium: 180
- Fat: 14
- Saturated Fat: 7
- Carbohydrates: 34
- Fiber: 2
- Protein: 4
Keywords: neapolitan, ice cream cupcakes, birthday, party, chocolate, vanilla, strawberry, easy dessert, summer treat, kid-friendly, frozen cupcakes


