
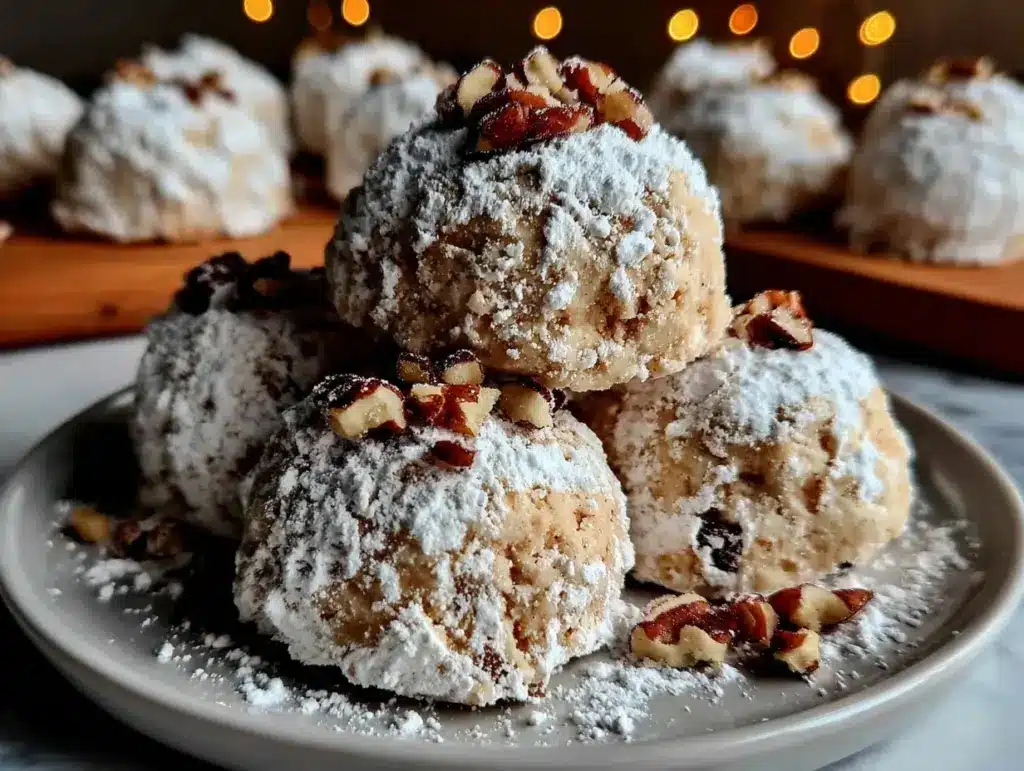
Let me set the scene: the aroma of toasted walnuts mingling with sweet, buttery dough floats through the kitchen, making everyone stop in their tracks. You know that feeling—when the scent alone tells you something wonderful is about to happen. That’s exactly what you get when you bake a batch of Russian Tea Cakes with a rich walnut filling. The first time I made these cookies, I was just a kid, knee-high to a grasshopper, helping my grandmother dust powdered sugar over warm, crumbly rounds. There was this moment—standing by her side, powdered sugar drifting in the air like winter snow—where I paused and realized these cookies were more than just treats. They were tradition, comfort, and pure happiness rolled into perfect bites.
Russian Tea Cakes have this timeless appeal. Honestly, I stumbled upon the original recipe years ago at a holiday cookie exchange (after sneaking one too many off the platter—no shame). I was instantly hooked by their melt-in-your-mouth texture and the surprise of buttery walnuts tucked inside. Let’s face it, these cookies are dangerously easy to make, and the nostalgia they bring is almost as good as their flavor. Whether you’re baking for a festive gathering, trying to impress at a potluck, or just need a sweet treat for your family, these Russian Tea Cakes fit right in. My kids can’t stop grabbing them off the cooling rack, and even my toughest critics (the in-laws) have asked for the recipe. If you love old-fashioned cookies that deliver pure, nostalgic comfort, you’re going to want to bookmark this one.
I’ve tested this Russian Tea Cakes recipe countless times—in the name of research, of course—and every batch has become a staple for family gatherings, gifting, and those cozy, rainy afternoons. There’s something about the crumbly texture, the buttery walnut filling, and the snowy powdered sugar that just feels like a warm hug. Trust me, if you haven’t tried these yet, you’re in for a treat that will brighten up your Pinterest cookie board and your kitchen table.
Why You’ll Love This Russian Tea Cakes Recipe
If you’re searching for the ultimate Russian Tea Cakes recipe, look no further. I’ve baked hundreds of batches over the years, and this version stands out for its unbeatable texture, flavor, and simplicity. Here’s why these cookies have become a must-bake in my home—and why I think you’ll fall for them too:
- Quick & Easy: These Russian Tea Cakes come together in under 45 minutes, so you can whip up a batch even on busy weeknights or when you get a last-minute craving.
- Simple Ingredients: No fancy grocery trips required. You probably have everything you need—just pantry staples and a handful of walnuts.
- Perfect for Any Occasion: From holiday cookie trays to afternoon tea, these cookies shine at festive gatherings, brunch, or even as a sweet lunchbox surprise.
- Crowd-Pleaser: Kids love them, adults love them, and they’ve never failed to get rave reviews (even from picky eaters!).
- Unbelievably Delicious: The tender, crumbly texture paired with the rich, buttery walnut filling is comfort food at its finest. Every bite is pure bliss.
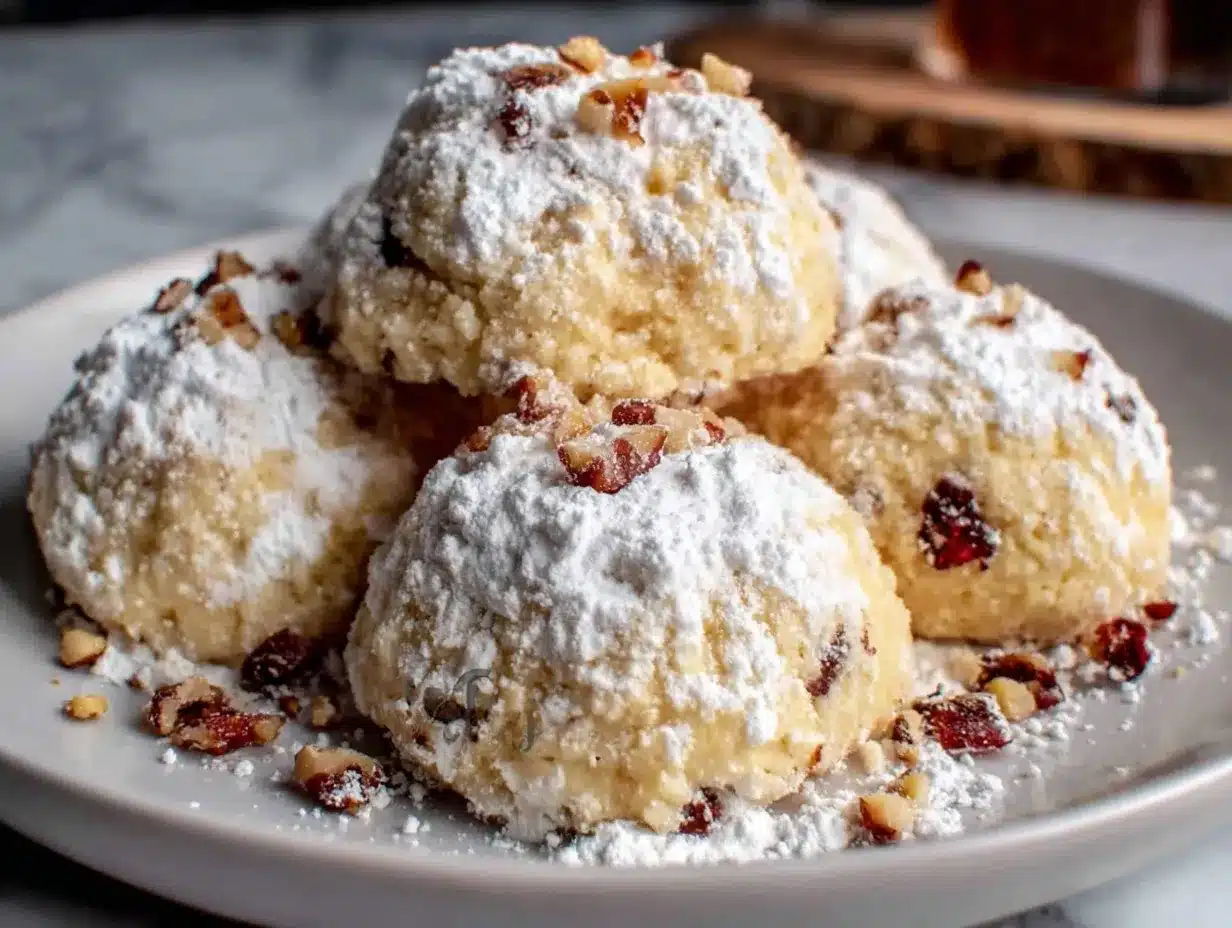
What sets this Russian Tea Cakes recipe apart? For starters, I use finely chopped walnuts and just enough butter to make every bite melt on your tongue. While some recipes skip the filling or use almonds, I stick with walnuts—they add a subtle earthiness and just the right chew. I’ve also found that rolling the cookies twice in powdered sugar gives them a beautiful, snowy finish and keeps them sweet without being cloying. It’s a small detail, but it makes a big difference.
Honestly, these cookies aren’t just good—they’re the kind that make you close your eyes after the first bite and smile. They’re old-school comfort, but with a modern twist that makes them easier and more reliable than ever. Whether you’re baking to impress guests, spoil your family, or just treat yourself after a long day, this Russian Tea Cakes recipe will turn any ordinary moment into something special.
What Ingredients You Will Need
This Russian Tea Cakes recipe uses simple, wholesome ingredients to deliver bold flavor and the perfect, melt-in-your-mouth texture. Most of them are pantry staples, and a few easy swaps make it adaptable for different dietary needs or flavors. Here’s what you’ll need:
- For the Dough:
- 1 cup (226g) unsalted butter, softened (for that rich, creamy base)
- 1/2 cup (60g) powdered sugar (adds sweetness and that delicate crumb)
- 2 tsp vanilla extract (I love Nielsen-Massey for pure, aromatic flavor)
- 2 1/4 cups (280g) all-purpose flour (King Arthur is my go-to for best texture)
- 1/4 tsp fine sea salt (balances the sweetness)
- For the Walnut Filling:
- 1 cup (120g) walnuts, finely chopped (toasted for extra flavor—just toss in a dry skillet for a few minutes)
- 2 tbsp (16g) granulated sugar (helps bind the nuts and adds a subtle crunch)
- 1 tsp ground cinnamon (optional, but adds a lovely warmth)
- For Rolling:
- 1 cup (120g) powdered sugar (for that snowy, sweet finish)
Ingredient Tips and Substitutions:
- Use pecans or almonds in place of walnuts if you prefer—just make sure they’re finely chopped.
- For gluten-free Russian Tea Cakes, swap all-purpose flour for a 1:1 gluten-free flour blend (Bob’s Red Mill works well).
- Dairy-free? Use a plant-based butter substitute. I’ve had good luck with Earth Balance.
- If you’re short on powdered sugar, you can pulse granulated sugar in a blender until fine. It won’t be quite as soft, but it’ll do in a pinch.
- Seasonal twist: in summer, try adding a dash of lemon zest to the dough for a bright pop of flavor.
I love how flexible this Russian Tea Cakes recipe is. If you need to adjust for allergies or dietary needs, there’s almost always a simple swap. And honestly, the walnuts are the real star here—make sure to toast them for the best flavor!
Equipment Needed
You don’t need much to make these Russian Tea Cakes—just a few reliable kitchen tools and some optional gadgets if you want to make life easier. Here’s what I use every time:
- Baking Sheet: A sturdy, rimmed sheet pan (line with parchment for easy cleanup)
- Mixing Bowls: At least two—one for the dough and one for the walnut filling
- Electric Mixer: Stand mixer or hand mixer (either works, but the stand mixer makes creaming butter a breeze)
- Measuring Cups & Spoons: For accuracy—especially with flour and butter
- Cookie Scoop: Optional, but great for uniform size (I use a 1-tbsp scoop)
- Spatula & Wooden Spoon: For mixing and scraping down the sides
- Wire Cooling Rack: Essential for letting the cookies cool before rolling in sugar
If you don’t have a mixer, you can make this dough by hand—just be patient when creaming the butter and sugar. I’ve used everything from vintage Pyrex bowls to budget-friendly sheet pans from Target, and they all work. To keep your tools in top shape, wash mixing attachments right after use (butter can be tricky if it dries!). And if you want to splurge, a good cookie scoop is worth every penny for those perfectly round Russian Tea Cakes.
Preparation Method
- Preheat your oven to 350°F (175°C).
Line a baking sheet with parchment paper or a silicone mat. This helps prevent sticking and ensures even baking. - Prepare the walnut filling:
In a small bowl, combine 1 cup (120g) finely chopped walnuts, 2 tbsp (16g) granulated sugar, and 1 tsp ground cinnamon (if using). Toast the walnuts in a dry skillet over medium heat for 3–4 minutes, stirring often, until fragrant. Let cool completely. - Cream the butter and sugar:
In a large mixing bowl, beat 1 cup (226g) unsalted butter and 1/2 cup (60g) powdered sugar together until light and fluffy—about 2–3 minutes with an electric mixer. You’re looking for a pale, creamy mixture. - Add vanilla and dry ingredients:
Mix in 2 tsp vanilla extract. Sift together 2 1/4 cups (280g) all-purpose flour and 1/4 tsp fine sea salt, then gradually add to the butter mixture. Beat on low speed until just combined. The dough will look crumbly but should hold together when pressed. - Shape the cookies:
Take a tablespoon of dough and flatten slightly in your palm. Spoon about 1/2 tsp of walnut filling into the center, then gently fold the dough around the filling and roll into a ball (about 1 inch / 2.5 cm diameter). Place on the prepared baking sheet, spacing about 2 inches (5 cm) apart. - Bake:
Bake in the preheated oven for 12–15 minutes, or until the bottoms are lightly golden and the tops look set. The cookies won’t brown much on top—don’t overbake or they’ll lose their tender texture. - Cool and roll in powdered sugar:
Let the cookies cool on the pan for 5 minutes (they’re fragile when hot!). Transfer to a wire rack. While still warm, roll each cookie in powdered sugar. Let cool completely, then roll again for a snowy finish. - Final tips:
If the dough cracks when shaping, just press it gently back together—Russian Tea Cakes are forgiving! If the filling leaks out, pinch the seams closed. For best results, use room temperature butter and measure flour by spooning into the cup and leveling off.
These cookies are best enjoyed fresh, but honestly, they stay tender for days. I always make a double batch because they disappear fast!
Cooking Tips & Techniques
Baking Russian Tea Cakes is pretty straightforward, but a few tricks will guarantee you get perfect results every time. Over the years, I’ve had my fair share of mishaps (think flat, greasy cookies and burnt bottoms), so here’s what I’ve learned the hard way:
- Don’t skip toasting the walnuts: Just a few minutes in a skillet brings out their rich, nutty flavor and keeps the filling from tasting flat.
- Use room temperature butter: Cold butter won’t cream properly, and melted butter will make the dough greasy. Trust me, I’ve tried both—stick with softened!
- Measure flour carefully: Too much flour = dry cookies. Use the spoon-and-level method for accuracy.
- Double roll in powdered sugar: The first roll while warm lets the sugar melt in, the second after cooling gives that classic snowy look.
- Space cookies out: These cookies don’t spread much, but give them room so they bake evenly.
If you ever find your Russian Tea Cakes crumbling too much, it’s usually because the dough is too dry. You can add a teaspoon of milk to bring it together. On the flip side, if the cookies flatten, the butter was probably too soft or the oven too hot. Keep an eye on them after the 10-minute mark—the bottoms should be just golden.
Multitasking tip: While the cookies bake, prep your powdered sugar for rolling and clean up your workspace. That way, you’re ready to finish and enjoy them right out of the oven. Consistency comes from practice, but with these tips, you’ll be baking perfect Russian Tea Cakes in no time!
Variations & Adaptations
One of the best things about Russian Tea Cakes is how easy they are to adapt to different tastes, seasons, and dietary needs. Here are a few favorite twists I’ve tried (with great results!):
- Gluten-Free Version: Swap the all-purpose flour for a 1:1 gluten-free blend (like Bob’s Red Mill). The texture stays tender, and nobody can tell the difference.
- Nut-Free Adaptation: Use sunflower seeds or toasted pumpkin seeds in place of walnuts for a nut-free option. You’ll get a similar crunch and flavor without the allergens.
- Seasonal Flavors: In the winter, add 1/2 tsp ground cardamom to the dough for a cozy, spiced twist. In spring or summer, a little lemon or orange zest brightens up the flavor.
- Chocolate Lovers: Fold mini chocolate chips or drizzle melted chocolate over cooled cookies for a decadent upgrade.
- Vegan Russian Tea Cakes: Use plant-based butter and swap out the egg (if your variation includes it) for a flax egg. I’ve made this version for vegan friends, and it’s always a hit.
If you want to switch up the cooking method, you can bake these in a toaster oven—just watch the temperature and reduce baking time by a couple of minutes. I’ve also tried making mini Russian Tea Cakes (half the size) for party platters. They’re adorable and perfect for snacking. Customizing this recipe is half the fun, so don’t be afraid to get creative!
Serving & Storage Suggestions
Russian Tea Cakes are best served at room temperature, dusted generously with powdered sugar. I love piling them high on a vintage cake stand or in a pretty tin for gifting. They look gorgeous on a holiday table, and their snowy finish makes them a showstopper for any cookie platter.
- Serving Ideas: Pair with hot tea, coffee, or even a glass of cold milk for classic comfort. They also go well with fresh berries or a scoop of vanilla ice cream for dessert.
- Storage: Store in an airtight container at room temperature for up to 1 week. For longer storage, freeze in a zip-top bag for up to 2 months (just thaw and re-roll in sugar).
- Reheating: If the cookies get a little stale, pop them in a low oven (300°F/150°C) for 3–5 minutes to refresh. Let cool slightly, then roll in powdered sugar again.
- Flavor Development: Russian Tea Cakes actually taste even better after a day or two as the flavors meld and the texture softens. If you can resist eating them all at once, you’ll be rewarded with even more buttery goodness!
Whether you’re serving these cookies fresh or saving them for later, they’re guaranteed to bring smiles and requests for the recipe.
Nutritional Information & Benefits
Here’s a rough breakdown for these Russian Tea Cakes (per cookie):
- Calories: 110
- Fat: 7g (mostly from butter and walnuts)
- Carbohydrates: 10g
- Protein: 1g
- Sugar: 4g
Walnuts are packed with omega-3 fatty acids and antioxidants, which help support brain and heart health. Using real butter and moderate sugar keeps this recipe simple, with no artificial additives. This Russian Tea Cakes recipe can be adapted for gluten-free or dairy-free diets with easy swaps. The only potential allergens are tree nuts and dairy, so check your substitutions if needed. From a wellness perspective, I see these cookies as a small, joyful treat—perfect for mindful snacking and sharing with loved ones.
Conclusion: Why You Need These Russian Tea Cakes in Your Life
If you’re looking for a cookie recipe that’s easy to make, packed with buttery flavor, and sure to impress, these Russian Tea Cakes with walnut filling are the one to try. They’re more than just cookies—they’re a connection to tradition, comfort, and the joy of homemade treats. I love how customizable they are, so don’t hesitate to put your own spin on the recipe.
Honestly, these Russian Tea Cakes never last long in my house. They’re perfect for gifting, gatherings, or sneaking with your morning coffee. I hope you enjoy baking (and eating!) them as much as I do. If you try this recipe, let me know in the comments—share your favorite variations or tag your pictures on Pinterest so we can all see your creations. Happy baking, and may your kitchen always smell like buttery goodness!
FAQs: Russian Tea Cakes Recipe
Can I use pecans instead of walnuts in Russian Tea Cakes?
Absolutely! Pecans work just as well and bring a slightly sweeter, buttery flavor. Just chop them finely and toast for best results.
How do I prevent Russian Tea Cakes from crumbling?
If your cookies are too crumbly, the dough might be dry. Add a teaspoon of milk or gently knead until it holds together. Also, make sure you’re not over-measuring the flour.
Can I freeze Russian Tea Cakes after baking?
Yes! Place cooled cookies in a zip-top freezer bag and freeze for up to 2 months. Thaw at room temperature and re-roll in powdered sugar to refresh their snowy look.
Are Russian Tea Cakes gluten-free?
This recipe uses regular flour, but you can easily replace it with a gluten-free 1:1 baking blend. The texture stays surprisingly tender.
How long do Russian Tea Cakes stay fresh?
Stored in an airtight container at room temperature, they’ll stay fresh for up to a week. They also freeze well if you want to keep some for later.
Pin This Recipe!


Russian Tea Cakes Recipe: Easy Buttery Walnut Cookies Everyone Loves
These classic Russian Tea Cakes are tender, buttery cookies filled with toasted walnuts and finished with a snowy coating of powdered sugar. Perfect for holidays, gatherings, or a cozy afternoon treat, they deliver nostalgic comfort in every bite.
- Total Time: 35 minutes
- Yield: 24 cookies 1x
Ingredients
- 1 cup (226g) unsalted butter, softened
- 1/2 cup (60g) powdered sugar
- 2 tsp vanilla extract
- 2 1/4 cups (280g) all-purpose flour
- 1/4 tsp fine sea salt
- 1 cup (120g) walnuts, finely chopped, toasted
- 2 tbsp (16g) granulated sugar
- 1 tsp ground cinnamon (optional)
- 1 cup (120g) powdered sugar, for rolling
Instructions
- Preheat your oven to 350°F (175°C). Line a baking sheet with parchment paper or a silicone mat.
- Prepare the walnut filling: In a small bowl, combine walnuts, granulated sugar, and cinnamon (if using). Toast the walnuts in a dry skillet over medium heat for 3–4 minutes, stirring often, until fragrant. Let cool completely.
- Cream the butter and powdered sugar together in a large mixing bowl until light and fluffy, about 2–3 minutes with an electric mixer.
- Mix in vanilla extract. Sift together flour and salt, then gradually add to the butter mixture. Beat on low speed until just combined. The dough will look crumbly but should hold together when pressed.
- Take a tablespoon of dough and flatten slightly in your palm. Spoon about 1/2 tsp of walnut filling into the center, then gently fold the dough around the filling and roll into a ball (about 1 inch diameter). Place on the prepared baking sheet, spacing about 2 inches apart.
- Bake in the preheated oven for 12–15 minutes, or until the bottoms are lightly golden and the tops look set. Do not overbake.
- Let the cookies cool on the pan for 5 minutes. Transfer to a wire rack. While still warm, roll each cookie in powdered sugar. Let cool completely, then roll again for a snowy finish.
- If the dough cracks when shaping, press it gently back together. If the filling leaks out, pinch the seams closed. For best results, use room temperature butter and measure flour by spooning into the cup and leveling off.
Notes
Toast walnuts for best flavor. Double roll cookies in powdered sugar for a classic snowy look. For gluten-free, use a 1:1 gluten-free flour blend. If dough is too dry, add a teaspoon of milk. Cookies can be made with pecans or almonds instead of walnuts. Store in an airtight container for up to 1 week or freeze for up to 2 months.
- Prep Time: 20 minutes
- Cook Time: 15 minutes
- Category: Dessert
- Cuisine: Russian
Nutrition
- Serving Size: 1 cookie
- Calories: 110
- Sugar: 4
- Sodium: 30
- Fat: 7
- Saturated Fat: 4
- Carbohydrates: 10
- Fiber: 0.5
- Protein: 1
Keywords: Russian Tea Cakes, walnut cookies, holiday cookies, powdered sugar, butter cookies, traditional cookies, easy dessert, nut cookies


