
“Are you seriously making a cheese ball shaped like a chick?” my sister asked over the phone last Easter morning. Honestly, I wasn’t sure if my little Easter brunch surprise would fly, but there I was in my kitchen, nursing a lukewarm cup of coffee and sculpting a cheesy little chick that looked more goofy than gourmet. I had been fiddling with the idea for days—partly because I wanted something festive but low-fuss, and partly because my usual crowd loves a good quirky appetizer. This cheese ball chick shaped recipe was born from that quiet moment of last-minute inspiration and a dash of kitchen whimsy.
It wasn’t about impressing anyone with fancy techniques or rare ingredients—just a simple, crowd-pleasing bite that feels like a celebration in itself. The texture, the familiar tang of cream cheese blended with sharp cheddar, and the playful shape made it an instant hit. And honestly, it’s stuck with me since, popping up on my Easter table every year without fail. I’m pretty sure this little chick has a quiet way of bringing smiles—and a bit of fun—to the table, no matter how wild the morning’s been.
So if you’re looking for an easy Easter brunch treat that’s as charming as it is tasty, and you want a recipe that’s as approachable as it is delightful, this perfect cheese ball chick shaped recipe might just become your new holiday tradition too.
Why You’ll Love This Recipe
There’s something about this perfect cheese ball chick shaped recipe that makes Easter brunch feel both festive and effortless. From my many kitchen trials (and a few laughs over misshapen chicks), here’s why I keep coming back to this one:
- Quick & Easy: You can have this cheese ball ready in about 30 minutes—ideal for those last-minute brunch plans or when you realize you forgot to pick up a snack.
- Simple Ingredients: No hunting for obscure items here—cream cheese, cheddar, and a handful of common extras you probably already have.
- Perfect for Easter Brunch: It’s the kind of centerpiece appetizer that sparks conversation and gets everyone in the holiday spirit.
- Crowd-Pleaser: Kids love the shape and adults appreciate the savory flavor combo—trust me, this chick disappears fast.
- Unbelievably Delicious: The creamy yet tangy cheese blend with crunchy coatings is the kind of comfort food that feels fancy without the fuss.
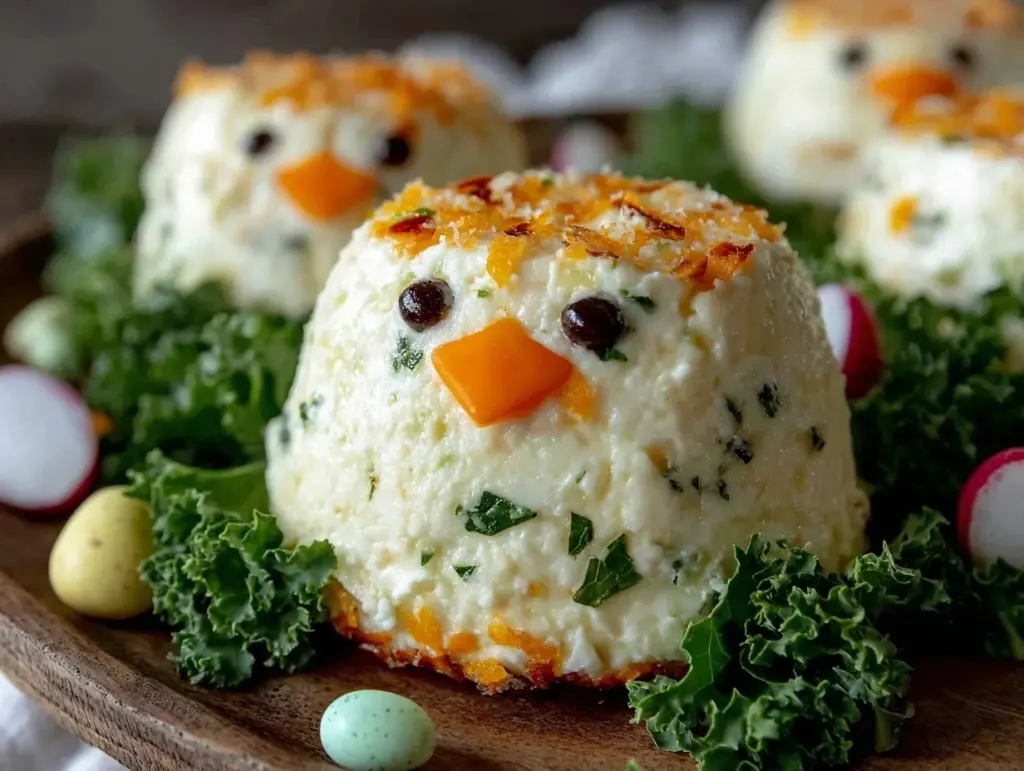
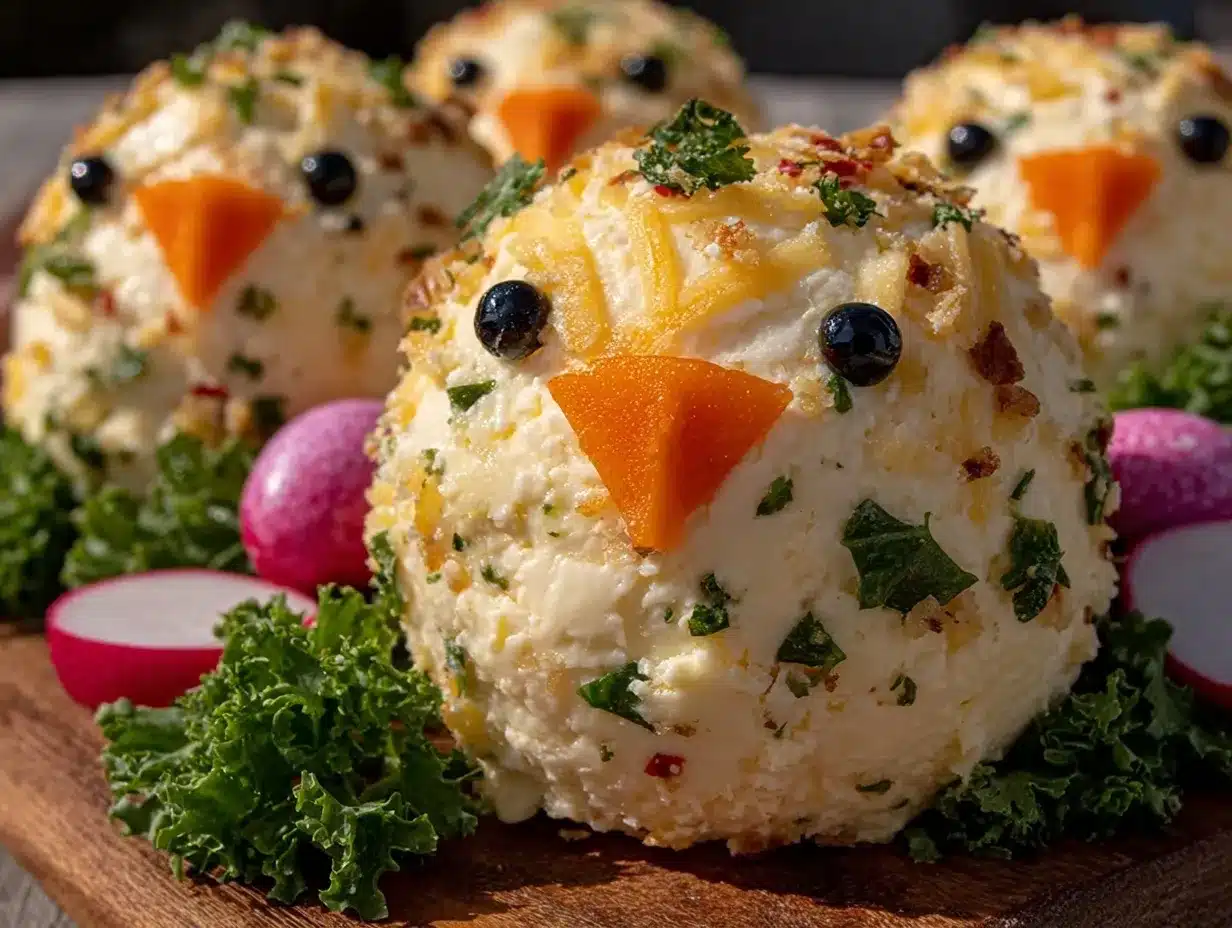
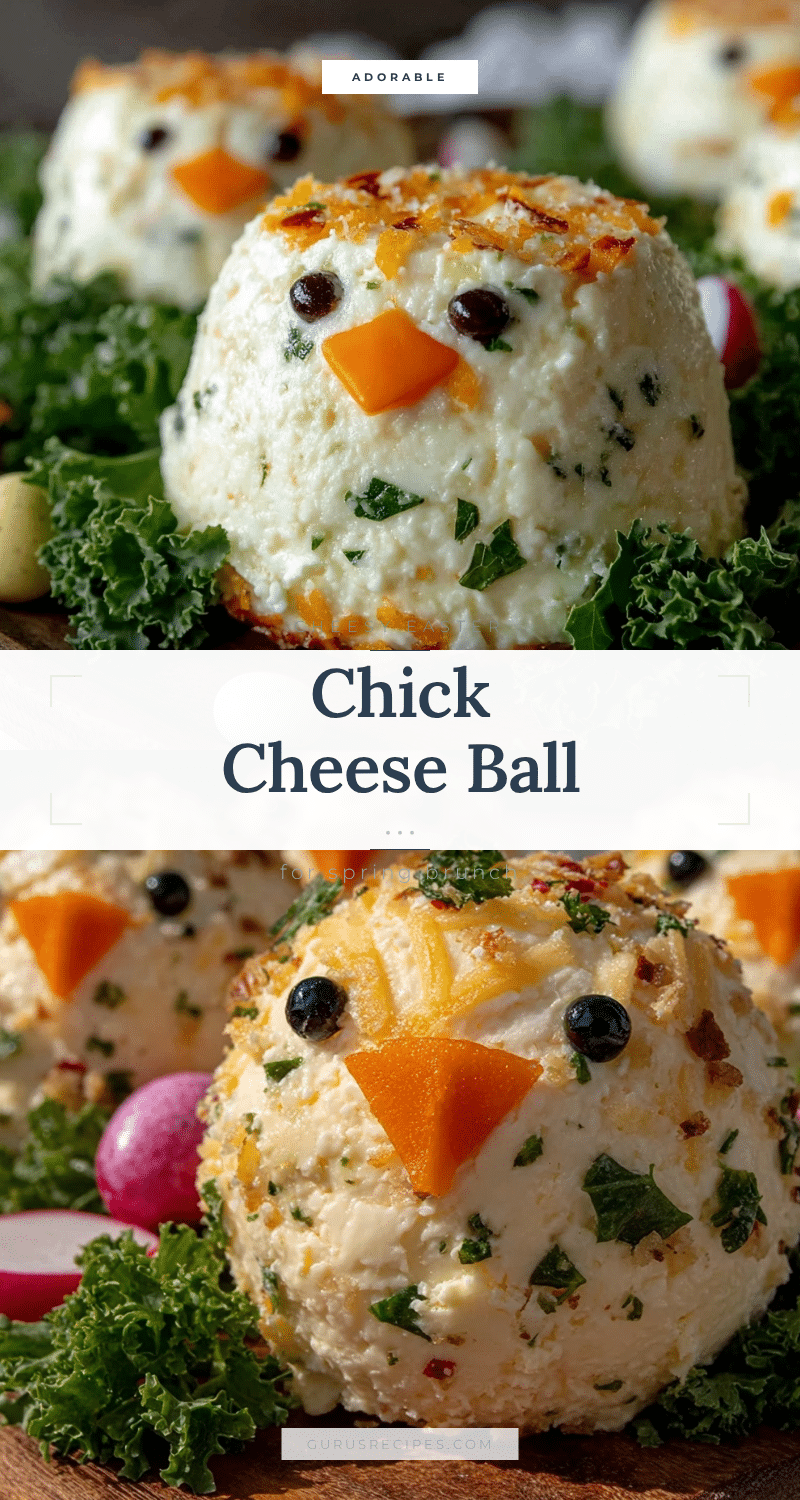
This cheese ball chick shaped recipe isn’t just a run-of-the-mill cheese ball. The secret? I blend in a bit of sharp cheddar to give it that tangy kick and use finely chopped nuts and herbs on the outside for texture and a pop of fresh flavor. It’s like the classic cheese ball had a cute little makeover. Plus, shaping it into a chick makes it festive and fun, which turns even skeptical guests into believers.
It’s a recipe that makes you pause for a second after the first bite, maybe even close your eyes because, honestly, it’s that satisfying. Whether you’re hosting a big brunch or just want a playful appetizer that doesn’t feel like work, this recipe fits the bill perfectly.
What Ingredients You Will Need
This recipe uses simple, wholesome ingredients to deliver bold flavor and a satisfying texture without the fuss. Most are pantry staples, and substitutions are easy if you need to accommodate dietary preferences.
- Cream Cheese, softened (8 oz / 225 g) – The base for smooth, creamy texture.
- Sharp Cheddar Cheese, shredded (1 cup / 100 g) – Adds tang and depth.
- Grated Parmesan Cheese (1/4 cup / 25 g) – For an umami boost.
- Minced Green Onions (2 tablespoons) – Adds fresh, mild onion flavor.
- Garlic Powder (1/2 teaspoon) – Gives subtle savory notes.
- Worcestershire Sauce (1 teaspoon) – A tiny punch of savory complexity.
- Chopped Pecans or Walnuts (1/2 cup / 50 g) – Toasted for crunch on the outside (I use Diamond of California pecans for the best texture).
- Chopped Fresh Parsley (2 tablespoons) – For a pop of color and freshness.
- Baby Carrots (2 pieces) – Cut for the chick’s beak.
- Black Peppercorns or Black Peppercorn Substitute (2 pieces) – For the eyes (you can also use whole cloves or small olives).
- Optional: Paprika or turmeric powder for a gentle yellow tint on the outside.
If you want to give this a gluten-free twist, just double-check that your Worcestershire sauce is gluten-free. For a dairy-free version, swap cream cheese with a dairy-free spreadable cheese and cheddar with a vegan shredded cheese alternative. The texture changes slightly, but the festive vibe remains intact.
Equipment Needed
For this perfect cheese ball chick shaped recipe, you don’t need fancy kitchen gadgets, which is part of the charm:
- Mixing Bowl: Medium size, for combining ingredients comfortably.
- Hand Mixer or Wooden Spoon: I personally prefer a hand mixer for quicker, smoother blending, but a sturdy spoon works if you don’t mind a bit of arm work.
- Plastic Wrap: Essential for shaping and chilling the cheese ball without mess.
- Small Knife: For carving the baby carrot beak and shaping the chick.
- Serving Platter: A flat surface to display your creation.
If you don’t have a hand mixer, no worries! When I first made this, I mixed everything by hand—it just took a few more minutes and a bit of elbow grease. Also, keep a small bowl of warm water handy for shaping the cheese ball more easily; dipping your hands in it helps prevent sticking.
Preparation Method
- Soften the cream cheese: Leave the 8 oz (225 g) cream cheese out at room temperature for about 30 minutes before starting. This makes mixing easier and ensures a smooth texture.
- Mix the cheese base: In a medium bowl, combine softened cream cheese, 1 cup (100 g) shredded sharp cheddar, and 1/4 cup (25 g) grated Parmesan. Use a hand mixer on medium speed or a wooden spoon to blend until creamy and well combined—about 2-3 minutes.
- Add flavorings: Stir in 2 tablespoons minced green onions, 1/2 teaspoon garlic powder, and 1 teaspoon Worcestershire sauce. Mix thoroughly to distribute the flavors evenly. The mixture should smell inviting and savory.
- Chill the mixture: Cover the bowl with plastic wrap and refrigerate for at least 30 minutes to firm up. This step makes shaping easier and helps the flavors meld.
- Prepare the coating: While chilling, toast 1/2 cup (50 g) chopped pecans or walnuts in a dry skillet over medium heat for 3-4 minutes, stirring frequently until fragrant and lightly browned. Remove from heat and mix with 2 tablespoons chopped fresh parsley. Let cool.
- Shape the chick: Once chilled, scoop the cheese mixture onto a clean surface or large piece of plastic wrap. Using your hands, form an oval shape for the body—about 6 inches (15 cm) long and 4 inches (10 cm) wide. Pinch one end slightly to create a small head shape.
- Coat the chick: Spread the nut and parsley mixture on a flat plate. Roll the cheese ball gently in the coating until evenly covered. Press lightly to help the coating stick.
- Add facial features: Cut two small baby carrot pieces for the beak and press them gently into the head. Use two peppercorns or small olives for the eyes. If you want a yellow tint, dust lightly with a pinch of paprika or turmeric powder.
- Final chill: Place the shaped cheese ball chick on a serving platter, cover loosely with plastic wrap, and refrigerate for at least 1 hour before serving. This helps it firm up and lets the flavors settle.
Tip: If your cheese ball feels too soft to shape, pop it back in the fridge for 10-15 minutes and try again. The warmth of your hands can soften it quickly, so working efficiently helps.
Cooking Tips & Techniques
Making this cheese ball chick shaped recipe is as much about fun as it is about flavor. Here are some tips I’ve picked up after a few rounds of trial and error:
- Softening the cream cheese properly: Don’t rush this step. If the cream cheese is too cold, you’ll end up with lumps or uneven texture, which makes shaping tricky.
- Balancing the seasoning: I’ve learned that the Worcestershire sauce adds subtle depth without overpowering. Don’t skip it! Also, fresh green onions bring a brightness that cuts through the richness.
- Toasting nuts: Toasting brings out the oils and adds that lovely crunch. Be careful not to burn them—stir often and remove from heat as soon as you smell that nutty aroma.
- Shaping technique: Using plastic wrap to help mold the cheese ball can save some mess. I sometimes gently shape the basic form with my hands, then use plastic wrap to tighten and smooth it out.
- Handling the coating: If your nut mixture doesn’t stick well, try pressing it gently into the cheese ball with your fingers instead of rolling.
- Eyes and beak placement: Adding these last ensures they don’t shift or fall off during chilling. If you’re nervous about the peppercorns falling off, a tiny dab of cream cheese as “glue” works wonders.
One time, I accidentally left the cheese ball out too long, and it got a bit too soft to hold its shape. Lesson learned: chill it properly before handling, and if you need to, pop it back in the fridge between steps. This will save you from a gooey mess and keep that chick looking charming.
Variations & Adaptations
This recipe is a great canvas for creativity. Here are some ways I’ve tweaked or adapted it, depending on mood and occasion:
- Herb and Garlic Twist: Add finely chopped fresh dill and chives to the cheese mixture for a brighter, garden-fresh flavor.
- Spicy Kick: Mix in a pinch of cayenne pepper or a few diced jalapeños for those who like a little heat. Swap the nuts for crushed spicy roasted pumpkin seeds to match.
- Vegan Version: Use vegan cream cheese and shredded vegan cheddar, and replace nuts with toasted sunflower seeds for crunch. The flavor shifts but stays delicious.
- Seasonal Coating: For a spring twist, coat the cheese ball in finely chopped edible flowers or fresh herbs like basil and mint.
- Mini Chick Bites: Shape the mixture into smaller, individual chick-shaped bites—perfect for a party platter or finger food.
Personally, I like to switch up the nuts depending on what’s fresh or on hand. Pecans give a buttery crunch, but walnuts or even chopped almonds work beautifully. Once I tried rolling the cheese ball in crushed pretzels for a salty, crunchy coating—unexpected but surprisingly good!
Serving & Storage Suggestions
Serve this perfect cheese ball chick shaped recipe slightly chilled but not ice-cold—about 10 minutes out of the fridge is perfect. This lets the flavors soften and the cheese spread nicely.
Arrange it on a colorful platter surrounded by crackers, sliced baguette, or fresh veggie sticks like cucumber and bell peppers. It pairs wonderfully with a light white wine or a refreshing sparkling water with lemon.
For storage, wrap the cheese ball tightly in plastic wrap and keep refrigerated for up to 3 days. The flavors actually mellow overnight, making it even tastier the next day. Just bring it out 15-20 minutes before serving to take the chill off.
If you want to prep in advance, you can assemble and chill it the day before Easter brunch—freeing up your morning for other dishes like a creamy no-churn strawberry ice cream or a fresh strawberry galette for dessert.
Nutritional Information & Benefits
This cheese ball chick shaped appetizer offers a tasty dose of protein and calcium from the cheeses, plus healthy fats from the nuts. One serving (about 1/12th of the cheese ball) roughly contains:
| Calories | 150-180 kcal |
|---|---|
| Protein | 6-8 g |
| Fat | 13-15 g (mostly from nuts and cheese) |
| Carbohydrates | 2-4 g |
Key benefits include calcium for bone health and protein for sustained energy—perfect for a brunch that keeps you going through the day. The nuts also add fiber and healthy unsaturated fats.
Note: This recipe contains dairy and nuts, so it’s not suitable for those with allergies to those ingredients. However, substitutions are possible for those with dietary restrictions.
Conclusion
This perfect cheese ball chick shaped recipe brings a little joy and whimsy to any Easter brunch table. It’s approachable, tasty, and festive without demanding hours in the kitchen. I love how it makes a simple cheese ball feel like a centerpiece—and seeing the smiles when guests notice the chick’s bright carrot beak is a small joy worth the effort.
Feel free to customize it with your favorite cheeses or coatings, and don’t be afraid to get creative with the shape. Whether you’re hosting or bringing a dish to share, this cheese ball has a way of fitting right in.
If you try it out, I’d love to hear how your chick turns out or what variations you come up with. Sharing those little kitchen moments is what makes recipes like this so special. Here’s to many more fun and flavorful Easter brunches ahead!
FAQs About the Perfect Cheese Ball Chick Shaped Recipe
How long can I store the cheese ball before serving?
Store it wrapped tightly in the fridge for up to 3 days. Bring it out 15-20 minutes before serving for the best texture and flavor.
Can I make this cheese ball ahead of time?
Absolutely! It actually tastes better if it sits overnight, allowing the flavors to meld.
What can I use if I don’t have nuts for the coating?
Try crushed pretzels, finely chopped seeds, or even breadcrumbs mixed with herbs for a different texture.
How do I shape the cheese ball if it’s too soft?
Chill the cheese mixture longer until firm, or use plastic wrap to help mold and shape without sticking.
Can I use other cheeses in this recipe?
Yes! Mix in your favorites like mozzarella for mildness or pepper jack for a spicy twist, adjusting seasoning accordingly.
Pin This Recipe!

Perfect Cheese Ball Chick Shaped Recipe for Easy Easter Brunch Fun
A festive and easy cheese ball shaped like a chick, perfect for Easter brunch. This recipe combines cream cheese, sharp cheddar, and a crunchy nut coating for a crowd-pleasing appetizer.
- Total Time: 1 hour 40 minutes
- Yield: 12 servings 1x
Ingredients
- 8 oz (225 g) cream cheese, softened
- 1 cup (100 g) sharp cheddar cheese, shredded
- 1/4 cup (25 g) grated Parmesan cheese
- 2 tablespoons minced green onions
- 1/2 teaspoon garlic powder
- 1 teaspoon Worcestershire sauce
- 1/2 cup (50 g) chopped pecans or walnuts, toasted
- 2 tablespoons chopped fresh parsley
- 2 baby carrots, cut for the chick’s beak
- 2 black peppercorns or black peppercorn substitutes for the eyes
- Optional: paprika or turmeric powder for a gentle yellow tint
Instructions
- Soften the cream cheese by leaving it out at room temperature for about 30 minutes.
- In a medium bowl, combine softened cream cheese, shredded sharp cheddar, and grated Parmesan. Blend with a hand mixer or wooden spoon until creamy and well combined, about 2-3 minutes.
- Stir in minced green onions, garlic powder, and Worcestershire sauce until evenly mixed.
- Cover the bowl with plastic wrap and refrigerate for at least 30 minutes to firm up.
- Toast chopped pecans or walnuts in a dry skillet over medium heat for 3-4 minutes until fragrant and lightly browned. Remove from heat and mix with chopped fresh parsley. Let cool.
- Scoop the chilled cheese mixture onto a clean surface or plastic wrap. Shape into an oval about 6 inches long and 4 inches wide, pinching one end to form a small head shape.
- Spread the nut and parsley mixture on a flat plate. Roll the cheese ball gently in the coating until evenly covered, pressing lightly to help it stick.
- Cut two small baby carrot pieces for the beak and press them into the head. Use two peppercorns or small olives for the eyes. Dust lightly with paprika or turmeric powder if desired.
- Place the shaped cheese ball chick on a serving platter, cover loosely with plastic wrap, and refrigerate for at least 1 hour before serving.
Notes
If the cheese ball is too soft to shape, chill it longer or use plastic wrap to help mold it. Use a small dab of cream cheese as glue for eyes if needed. Toast nuts carefully to avoid burning. For gluten-free, ensure Worcestershire sauce is gluten-free. For dairy-free, substitute cream cheese and cheddar with vegan alternatives.
- Prep Time: 35 minutes
- Cook Time: 5 minutes
- Category: Appetizer
- Cuisine: American
Nutrition
- Serving Size: About 1/12th of the
- Calories: 165
- Sugar: 1
- Sodium: 180
- Fat: 14
- Saturated Fat: 6
- Carbohydrates: 3
- Fiber: 1
- Protein: 7
Keywords: cheese ball, Easter appetizer, brunch recipe, cheese appetizer, festive appetizer, easy cheese ball, holiday appetizer


