

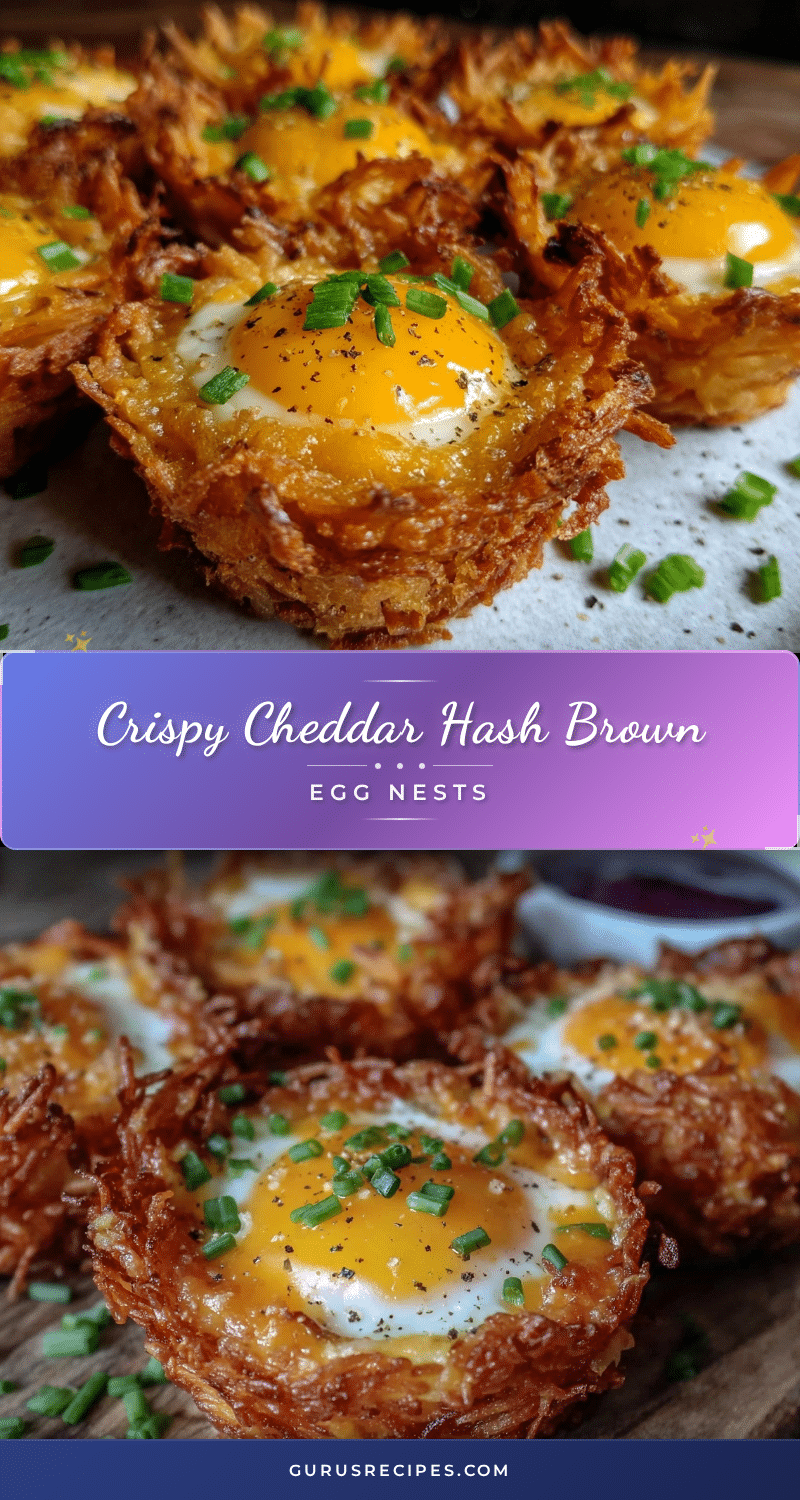
“Careful with those nests,” my friend warned over the phone, “they’re dangerously addictive.” I laughed it off thinking, how crispy can hash browns really get paired with eggs? But, honestly, the first time I made these Crispy Cheddar Hash Brown Egg Nests with Runny Yolks, I was hooked before I even plated the last one. There was this satisfying crunch when I bit in, the kind that makes you pause and savor, followed by the creamy burst of a perfectly runny yolk that oozed onto the cheddar-speckled potatoes.
It all started on a busy Saturday morning when I only had 20 minutes and some leftover shredded potatoes in the fridge. I was skeptical about nesting the eggs inside crispy hash browns, but the idea stuck. Turns out, the secret was mixing sharp cheddar into the hash browns before baking them in muffin tins, creating little crispy bowls perfectly shaped to cradle the eggs. The contrast between the golden, crunchy edges and the soft, molten center? Honestly, it felt like a tiny breakfast miracle.
Since then, these nests have become my go-to when I want something that feels special but is really simple to pull together. The smell alone—melty cheddar mingled with sizzling potatoes—can turn any dull morning into something cozy and bright. I’ve even brought these along to brunches, and friends keep asking for the recipe, especially after that first gooey yolk break. It’s funny how a few humble ingredients can create such a memorable dish.
What’s stuck with me is how this recipe manages to feel comforting without being fussy. It’s a quiet reminder that sometimes, the best meals are born from a little improvisation and a craving for something warm, crispy, and satisfying. And, well, if you like eggs with your hash browns, this recipe might just become your favorite too.
Why You’ll Love This Recipe
After testing and tweaking this Crispy Cheddar Hash Brown Egg Nests recipe multiple times, I can confidently say it hits all the right notes for a cozy breakfast or brunch. Here’s why it’s worth keeping in your recipe rotation:
- Quick & Easy: Ready in under 30 minutes, perfect for busy mornings or unexpected guests.
- Simple Ingredients: Uses pantry staples like shredded potatoes, cheddar cheese, and eggs—no fancy trips needed.
- Great for Brunch or Weekend Treats: These nests impress without stress, ideal for casual gatherings or a lazy weekend start.
- Crowd-Pleaser: Kids and adults both love the crispy texture paired with runny yolks—it’s comfort food in bite-sized form.
- Unbelievably Delicious: The combination of sharp cheddar baked right into the hash brown base gives these nests a flavor depth that’s anything but ordinary.
What sets this recipe apart is the technique of mixing cheddar cheese into the hash browns before shaping them into nests. This not only adds richness but helps the nests hold together with a perfect crispy edge. Plus, baking the eggs inside the nests ensures the yolks stay runny while the whites set firm, which—let’s be honest—is the best part.
It’s not just a recipe; it’s a little breakfast ritual that feels like a treat but really doesn’t take much effort. Whether you’re feeding a crowd or just making breakfast for one, these nests bring a comforting, satisfying start to the day.
What Ingredients You Will Need
This recipe relies on straightforward, wholesome ingredients that come together for bold flavor and a delightful texture balance. Most are pantry staples, and substitutions are easy if you need them.
- Shredded Potatoes: About 4 cups (600 g), thawed if frozen. You can shred fresh potatoes yourself or buy frozen hash browns. I usually prefer frozen for ease and consistent texture.
- Sharp Cheddar Cheese: 1 cup (100 g), shredded. I recommend using a good-quality sharp cheddar like Cabot for that perfect tang and melt.
- Eggs: 6 large, room temperature. Fresh eggs make a huge difference in texture and flavor.
- Green Onions: 2, finely chopped (optional, adds freshness and a mild bite).
- Salt: 1 teaspoon, or to taste.
- Black Pepper: ½ teaspoon freshly ground.
- Garlic Powder: ¼ teaspoon, for a subtle savory note.
- Butter or Oil: 2 tablespoons, for greasing the muffin tin and adding crispiness. I like using unsalted butter for flavor but vegetable oil works fine too.
Substitution tips: Use dairy-free cheese and plant-based butter if you want a vegan twist (though eggs will need a replacement like tofu scramble). For a gluten-free option, this recipe naturally fits since there’s no flour involved.
If you’re feeling adventurous, swapping cheddar for gouda or pepper jack can add a different flavor profile. Fresh herbs like thyme or parsley also work well mixed into the nests for a seasonal touch.
Equipment Needed
- Muffin Tin: Essential for shaping the hash brown nests. Standard 12-cup pans work perfectly.
- Mixing Bowl: Medium to large, for combining potatoes, cheese, and seasonings.
- Non-stick Cooking Spray or Pastry Brush: For greasing the muffin tin to ensure easy release.
- Oven: Preheated to 400°F (205°C) for baking.
- Spatula or Spoon: Useful for pressing the potato mixture into the muffin cups.
For those without a muffin tin, small oven-safe ramekins or a mini bundt pan can work—but be mindful of baking time and nest size. I’ve tried silicone muffin cups too, and while they’re flexible, they can sometimes cause the nests to lose shape a bit.
Pro tip: If you want crispier nests, after baking, place them under the broiler for a minute or two—just watch closely to avoid burning.
Preparation Method

- Preheat your oven to 400°F (205°C). Lightly grease a 12-cup muffin tin with butter or non-stick spray to prevent sticking.
- Combine the shredded potatoes, cheddar cheese, green onions, salt, pepper, and garlic powder in a large mixing bowl. Stir gently to mix everything evenly.
- Divide the potato mixture evenly among the muffin cups. Using the back of a spoon or your fingers, press the mixture firmly against the bottom and sides of each cup, creating a small “nest” with a hollow center for the egg. This step is crucial for shaping the nests and ensuring they hold together while baking.
- Bake the nests in the preheated oven for 15 minutes. You should see the edges start to turn golden and crispy—this is the magic moment when the texture begins to set.
- Carefully crack one egg into the center of each nest. Try to keep the yolk intact for that signature runny finish.
- Return the muffin tin to the oven and bake for another 10-12 minutes until the whites are set but yolks remain soft. Keep an eye on them after 10 minutes to avoid overcooking.
- Remove from the oven and let the nests cool for a minute or two before gently running a knife around the edges to loosen them. Use a small spatula to transfer each nest to a plate.
- Serve immediately with a sprinkle of extra chopped green onions or fresh herbs if desired.
Pro tip: If your eggs cook faster than the nests crisp up, you can briefly broil the nests at the end for 1-2 minutes for extra crunch—but watch closely.
Also, if your shredded potatoes are quite wet, pat them dry with paper towels before mixing. Excess moisture can make the nests soggy, and nobody wants that.
Cooking Tips & Techniques
Getting perfectly crispy hash brown nests with runny yolks is all about timing and texture balance. Here are some tips I’ve picked up along the way:
- Use thawed or freshly shredded potatoes: Frozen hash browns work great, but if you shred fresh potatoes, squeeze out as much moisture as possible to avoid sogginess.
- Don’t skip the cheese: Cheddar not only adds flavor but acts like glue to hold the nests together.
- Press firmly: When shaping the nests, compact the potato mixture well to form sturdy walls that won’t collapse when you add the egg.
- Watch the eggs closely: Oven temperatures vary, so start checking at 10 minutes after adding eggs. The yolks should jiggle slightly but whites must be set.
- Grease thoroughly: Butter or oil the muffin tins well to get those nests out without breaking.
- Cool briefly before unmolding: Letting the nests rest a couple of minutes helps them firm up and release easily.
One rookie mistake I made was adding the eggs too early, resulting in runny whites and undercooked nests. Patience pays off here! Also, I sometimes sprinkle a pinch of smoked paprika before baking for a subtle smoky kick.
Variations & Adaptations
This recipe is surprisingly flexible and easy to adapt to your preferences or dietary needs:
- Vegetable Boost: Add finely diced bell peppers, mushrooms, or spinach into the potato-cheese mix for more color and nutrients.
- Spicy Kick: Mix in a bit of diced jalapeño or cayenne pepper for those who like heat.
- Different Cheeses: Swap cheddar for mozzarella, pepper jack, or feta to change the flavor profile. Feta adds a salty tang that pairs beautifully with potatoes.
- Gluten-Free & Vegan: Naturally gluten-free if you use plain shredded potatoes. For vegan, replace eggs with a tofu scramble or chickpea flour “egg” batter, and use dairy-free cheese.
- Oven vs. Air Fryer: Tried air frying these at 375°F (190°C) for 12-15 minutes with eggs added halfway through. Results were crisp but baking gives a more even cook on eggs.
Personally, I once added caramelized onions to the mix for a sweeter twist that balanced out the sharp cheddar beautifully. It was a hit at a brunch potluck alongside some loaded baked potato soup.
Serving & Storage Suggestions
These nests are best enjoyed fresh and warm, straight from the oven when the edges are crispy and yolks are gloriously runny. Serve them with a sprinkle of freshly chopped herbs like chives or parsley for a pop of color and brightness.
They pair wonderfully with light sides such as mixed greens or fresh fruit salad. For a heartier brunch, consider serving alongside crispy bacon or a fresh tomato salsa.
If you have leftovers (they don’t usually last long!), store nests in an airtight container in the refrigerator for up to 2 days. Reheat gently in a 350°F (175°C) oven for about 10 minutes to regain some crispness. Avoid microwaving if you want to keep that crunch intact.
Flavors actually deepen a bit after resting, so if you like, prep the nests a day ahead and just bake with eggs on the day of serving. For a weekend brunch, I sometimes serve these nests with a refreshing side like the creamy strawberry cheesecake stuffed French toast for a sweet-savory combo that impresses every time.
Nutritional Information & Benefits
Each Crispy Cheddar Hash Brown Egg Nest provides a satisfying balance of protein, fat, and carbohydrates, making it a filling breakfast choice.
| Nutrient | Approximate Amount per Serving (1 Nest) |
|---|---|
| Calories | 220 |
| Protein | 12g |
| Fat | 14g |
| Carbohydrates | 12g |
| Fiber | 1.5g |
Key ingredients like eggs and cheddar provide high-quality protein and essential nutrients such as vitamin D and calcium. Potatoes offer potassium and vitamin C, especially if you use fresh ones.
This recipe fits well into a gluten-free diet and can be adapted for low-carb by substituting potatoes with cauliflower rice. Just remember that swapping ingredients will affect texture and flavor.
From a wellness perspective, this dish balances comfort and nutrition in a way that doesn’t feel restrictive—perfect for starting your day with a smile and enough energy to get going.
Conclusion
The Crispy Cheddar Hash Brown Egg Nests with Runny Yolks recipe is one of those rare breakfasts that feels indulgent yet is surprisingly simple to make. The crispy edges and gooey yolks create a textural harmony that’s hard to beat. It’s a recipe that encourages a little patience and care but rewards you with a delightful meal every time.
Whether you like to keep it classic or play with flavors and add-ins, these nests are a great base for customization. I love how they bring a touch of fun and elegance to the breakfast table without any fuss.
If you try this recipe, I’d love to hear how you make it your own—drop a comment or share your favorite variations. Cooking should be joyful, and a dish this tasty deserves to be shared and enjoyed often.
Here’s to many crispy, cheesy, runny-yolk mornings ahead!
Frequently Asked Questions (FAQs)
Can I prepare the hash brown nests ahead of time?
Yes! You can shape and partially bake the nests up to a day ahead. Refrigerate them covered, then add the eggs and bake just before serving for the freshest result.
How do I get the egg yolks perfectly runny?
Bake the eggs for about 10-12 minutes at 400°F (205°C). Check around 10 minutes—the whites should be set but the yolks still jiggle slightly.
Can I make this recipe dairy-free?
Absolutely. Use a dairy-free cheese alternative and plant-based butter or oil. For eggs, you’d need a substitute like tofu scramble for a vegan version.
What’s the best type of potato to use?
Frozen shredded hash browns work great for convenience. If shredding fresh potatoes, Russet or Yukon Gold are ideal for their starchy texture.
Can I freeze the nests?
Yes, after baking the nests (without eggs), let them cool and freeze in an airtight container. Reheat in the oven before adding and baking the eggs fresh.
Pin This Recipe!

Crispy Cheddar Hash Brown Egg Nests Recipe with Perfect Runny Yolks
A quick and easy breakfast or brunch recipe featuring crispy hash brown nests mixed with sharp cheddar cheese and baked with eggs to achieve perfectly runny yolks.
- Total Time: 35 minutes
- Yield: 6 servings 1x
Ingredients
- 4 cups shredded potatoes (about 600 g), thawed if frozen
- 1 cup sharp cheddar cheese, shredded (about 100 g)
- 6 large eggs, room temperature
- 2 green onions, finely chopped (optional)
- 1 teaspoon salt, or to taste
- ½ teaspoon freshly ground black pepper
- ¼ teaspoon garlic powder
- 2 tablespoons butter or oil, for greasing the muffin tin
Instructions
- Preheat your oven to 400°F (205°C). Lightly grease a 12-cup muffin tin with butter or non-stick spray to prevent sticking.
- Combine the shredded potatoes, cheddar cheese, green onions, salt, pepper, and garlic powder in a large mixing bowl. Stir gently to mix everything evenly.
- Divide the potato mixture evenly among the muffin cups. Using the back of a spoon or your fingers, press the mixture firmly against the bottom and sides of each cup, creating a small “nest” with a hollow center for the egg.
- Bake the nests in the preheated oven for 15 minutes until the edges start to turn golden and crispy.
- Carefully crack one egg into the center of each nest, keeping the yolk intact.
- Return the muffin tin to the oven and bake for another 10-12 minutes until the egg whites are set but yolks remain soft. Check around 10 minutes to avoid overcooking.
- Remove from the oven and let the nests cool for a minute or two before gently running a knife around the edges to loosen them. Use a small spatula to transfer each nest to a plate.
- Serve immediately with a sprinkle of extra chopped green onions or fresh herbs if desired.
Notes
If shredded potatoes are wet, pat dry with paper towels to avoid sogginess. For crispier nests, broil for 1-2 minutes after baking but watch closely to prevent burning. You can prepare nests a day ahead by partially baking and refrigerating, then add eggs and bake before serving. Use dairy-free cheese and plant-based butter for a vegan twist (replace eggs with tofu scramble).
- Prep Time: 10 minutes
- Cook Time: 25 minutes
- Category: Breakfast, Brunch
- Cuisine: American
Nutrition
- Serving Size: 1 nest
- Calories: 220
- Fat: 14
- Carbohydrates: 12
- Fiber: 1.5
- Protein: 12
Keywords: hash browns, cheddar cheese, egg nests, runny yolks, breakfast, brunch, crispy, easy recipe


