
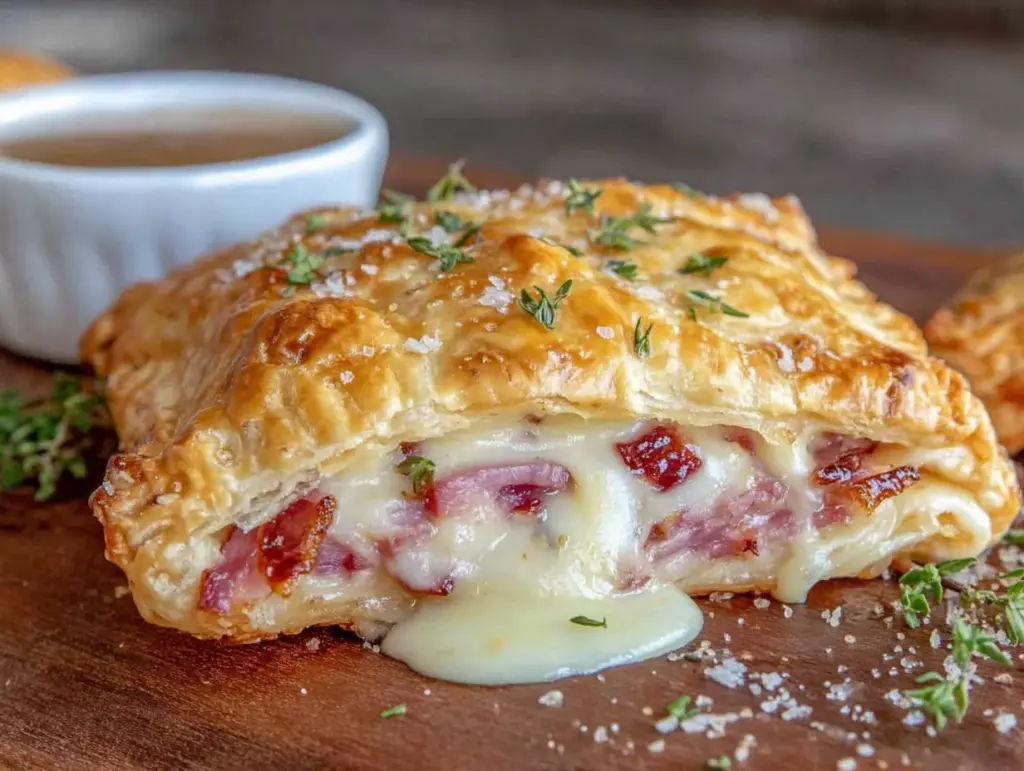
“Mom, I’m starving. What’s for lunch?” My kid said this while staring into the open fridge like it held the secrets to the universe. I sighed, because honestly, I had nothing ready. No leftovers. No quick fix. Just a block of cheese, some deli ham, and a bag of flour I’d been meaning to use. That’s when I grabbed the rolling pin and decided to just make something up on the spot. I wasn’t trying to be clever. I was just tired of hearing the fridge door open and close for the fifth time.
I rolled out some dough, layered ham and cheese, folded it over, and pressed the edges with a fork. Ten minutes later, I pulled golden pockets out of the oven and watched them disappear in about sixty seconds. My kid looked at me and said, “Can you make these every day?” And that’s how these Easy Freezer-Friendly Ham and Cheese Pocket Sandwiches were born. Not from a fancy cookbook or a cooking show. Just from a hungry kid and a mom who needed a win.
What I didn’t realize that afternoon was how much of a game-changer these little pockets would become. They’re not just a quick lunch. They’re a lifesaver on busy mornings, a solution for chaotic weeknights, and honestly, the best thing to pull out of the freezer when you have zero energy to cook. They taste like a warm hug wrapped in bread. And the best part? You can make a big batch, freeze them, and have homemade fast food ready whenever you need it.
Why You’ll Love This Recipe
I’ve tested this recipe more times than I care to admit. I’ve burned them, undercooked them, and once forgot the cheese entirely (don’t do that). But after all those trials, I can tell you with confidence that this version is the one. Here’s why these pockets are worth your time:
- Quick & Easy: From start to finish, these come together in about 30 minutes. If you’re making a big batch for the freezer, add maybe 15 more minutes for assembly. That’s it.
- Simple Ingredients: You probably already have most of these in your kitchen. Flour, butter, milk, ham, cheese. No fancy trips to specialty stores.
- Perfect for Meal Prep: Make a dozen on Sunday, freeze them, and you’ve got breakfast, lunch, or dinner sorted for weeks. They’re a staple in my freezer right next to my cozy hearty lentil stew.
- Crowd-Pleaser: Kids love them. Adults love them. Even picky eaters ask for seconds. I’ve seen it happen.
- Unbelievably Delicious: The outside gets golden and slightly crisp, while the inside stays warm and melty. It’s comfort food at its finest, and it’s way better than anything you’d buy frozen.
What makes this recipe different from all the other ham and cheese pockets out there? It’s the dough. I spent weeks tweaking it until I got a texture that’s soft but sturdy enough to hold up in the freezer without getting soggy. It’s not too bready, not too thin. It’s just right. And the filling? I use a mix of shredded cheddar and mozzarella for that perfect stretch. Trust me, you’ll close your eyes after the first bite. It’s that good.
What Ingredients You Will Need
This recipe uses simple, everyday ingredients to create something special. No complicated lists or hard-to-find items. Just pantry staples that work together beautifully. Let’s break it down.
For the Dough
- All-purpose flour – 3 cups (360g). This gives the pockets structure without making them tough. I prefer Gold Medal or King Arthur for consistent results.
- Unsalted butter – 1/2 cup (113g), cold and cubed. The cold butter creates flaky layers when baked. Don’t use margarine here; the texture won’t be the same.
- Milk – 3/4 cup (180ml), whole milk preferred. It adds richness to the dough. You can use 2% if that’s what you have, but avoid skim milk.
- Baking powder – 2 teaspoons. This helps the dough rise slightly and stay tender.
- Salt – 1 teaspoon. Don’t skip it. Salt balances the flavors and keeps the dough from tasting flat.
- Garlic powder – 1/2 teaspoon (optional but recommended). It adds a subtle savory note that complements the ham beautifully.
For the Filling

- Ham – 8 ounces (225g), thinly sliced. Deli ham works great. I like black forest ham for its smoky flavor, but any cooked ham will do. You can also use leftover holiday ham.
- Shredded cheddar cheese – 1 cup (120g). Sharp cheddar gives the best flavor. Avoid pre-shredded cheese if you can; it doesn’t melt as smoothly.
- Shredded mozzarella cheese – 1/2 cup (60g). This adds that gooey, stretchy texture we all love in a pocket sandwich.
- Dijon mustard – 2 tablespoons (optional). A thin layer adds a nice tangy kick. My family loves it, but if you’re feeding picky kids, you can leave it out.
For the Egg Wash
- Egg – 1 large. Beaten with a splash of water. This gives the pockets that beautiful golden-brown finish.
- Sesame seeds or everything bagel seasoning – For topping (optional). Adds a nice crunch and visual appeal.
That’s it. Seven main ingredients, plus a couple of optional extras. If you’re looking to switch things up, you can swap the ham for turkey or roast beef. Or use Swiss cheese instead of cheddar for a different flavor profile. The beauty of this recipe is how adaptable it is.
Equipment Needed
You don’t need a fancy kitchen to make these pockets. Here’s what you’ll need:
- Mixing bowls – One large for the dough, one small for the egg wash.
- Pastry cutter or two forks – For cutting the butter into the flour. If you don’t have a pastry cutter, your hands work too. Just work quickly so the butter doesn’t warm up.
- Rolling pin – For rolling out the dough. A wine bottle works in a pinch. I’ve done it.
- Baking sheet – Line it with parchment paper for easy cleanup.
- Parchment paper – Trust me on this. It prevents sticking and makes cleanup a breeze.
- Fork – For crimping the edges of the pockets. This seals them and creates that classic look.
- Pastry brush – For applying the egg wash. A silicone brush works best.
- Sharp knife or pizza cutter – For cutting the dough into rectangles.
- Freezer-safe bags or containers – For storing the unbaked or baked pockets.
If you’re making a big batch, having two baking sheets helps you bake more at once. But one sheet works fine if you bake in batches. I’ve been using the same beat-up baking sheet for years, and it still does the job perfectly.
Preparation Method
Let’s get to the fun part. Follow these steps, and you’ll have golden, cheesy pockets in no time.
Step 1: Make the Dough
In a large mixing bowl, whisk together the flour, baking powder, salt, and garlic powder. Add the cold, cubed butter. Using a pastry cutter or your fingertips, work the butter into the flour until the mixture looks like coarse crumbs with some pea-sized butter pieces remaining. This takes about 2-3 minutes. Don’t overwork it; those butter pieces create flakiness.
Pour in the milk and stir with a fork until the dough just comes together. It will look shaggy and a bit messy. That’s what you want. Turn the dough out onto a lightly floured surface and knead it gently, just 4-5 times, until it forms a cohesive ball. Wrap it in plastic wrap and refrigerate for 15 minutes. This resting time relaxes the gluten and makes the dough easier to roll.
Step 2: Prepare the Filling
While the dough chills, shred your cheeses if you bought blocks. Mix the cheddar and mozzarella together in a small bowl. Lay out your ham slices on a cutting board. If you’re using Dijon mustard, grab a butter knife for spreading.
Step 3: Roll and Cut the Dough
Preheat your oven to 375°F (190°C). Line a baking sheet with parchment paper.
On a lightly floured surface, roll the dough into a large rectangle, about 12×16 inches. It should be about 1/8-inch thick. Use a sharp knife or pizza cutter to cut the dough into 8 equal rectangles, roughly 4×6 inches each. Don’t worry if they’re not perfect; rustic is charming.
Step 4: Assemble the Pockets
Working with one rectangle at a time, place a thin layer of Dijon mustard on one half (if using). Add a slice or two of ham, folding it to fit. Sprinkle about 2-3 tablespoons of the cheese mixture on top of the ham. Be generous but don’t overfill, or the pockets will burst open during baking.
Fold the other half of the dough over the filling. Press the edges firmly with your fingers to seal. Then, use a fork to crimp the edges all around. This creates a decorative edge and ensures a tight seal. Place the pocket on the prepared baking sheet. Repeat with the remaining dough and filling.
Step 5: Apply the Egg Wash and Bake
In a small bowl, beat the egg with 1 tablespoon of water. Brush the tops of each pocket with the egg wash. This gives them that gorgeous golden color. Sprinkle sesame seeds or everything bagel seasoning on top if you like.
Bake for 18-22 minutes, until the pockets are deep golden brown and the filling is bubbly. You might see a little cheese escape from some pockets. That’s okay; it just means they’re extra cheesy. Let them cool on the baking sheet for 5 minutes before serving. The filling will be molten hot, so exercise caution.
Step 6: Freeze for Later (Optional)
If you’re making these for the freezer, you have two options. You can freeze them unbaked or baked. I prefer freezing them unbaked because they taste fresher when you cook them straight from frozen. To freeze unbaked, assemble the pockets, place them on a parchment-lined baking sheet, and freeze until solid (about 2 hours). Then transfer them to a freezer-safe bag. When you’re ready to bake, just add 5-7 minutes to the baking time. No need to thaw.
Cooking Tips & Techniques
I’ve made these pockets more times than I can count, and I’ve learned a few things along the way. Here are my best tips for perfect results every time.
Keep the butter cold. This is the most important rule for flaky dough. If your kitchen is warm, pop the dough back in the fridge for 10 minutes if it starts feeling sticky or soft. I once rushed through this step on a hot summer day, and the pockets turned out dense and flat. Lesson learned.
Don’t overfill the pockets. I know it’s tempting to pile on the ham and cheese, but too much filling leads to blowouts. The cheese will leak onto the baking sheet and burn, and you’ll end up with empty pockets. Stick to 2-3 tablespoons of cheese per pocket, and fold the ham so it fits neatly.
Seal the edges well. Use a fork to crimp the edges, and make sure there are no gaps. If you see a spot where the dough isn’t fully sealed, pinch it closed. A leaky pocket is a sad pocket.
Use parchment paper. I can’t stress this enough. Parchment paper prevents sticking and makes cleanup effortless. Plus, it helps the bottoms of the pockets brown evenly. If you use a silicone baking mat, reduce the baking time by a couple of minutes.
Let them rest after baking. The filling inside these pockets gets extremely hot. If you bite into one right out of the oven, you will burn your mouth. I speak from painful experience. Let them cool for at least 5 minutes. The cheese will still be melty and delicious, but you won’t need a glass of milk to recover.
Double the batch. The dough recipe makes 8 pockets, but it doubles beautifully. If you’re already dirtying your mixing bowl and rolling pin, make 16. You’ll thank yourself later when you’re tired and hungry and there’s a bag of homemade pockets waiting in the freezer.
Variations & Adaptations
This recipe is a blank canvas. Here are some of my favorite variations to keep things interesting.
Breakfast Pockets
Swap the ham for cooked breakfast sausage or bacon. Add a scrambled egg and some shredded cheddar. These are perfect for busy mornings when you need breakfast on the go. I make a batch every month and my kids grab them before school.
Vegetarian Version
Replace the ham with sautéed mushrooms, spinach, and roasted red peppers. Use a mix of mozzarella and feta for a Mediterranean twist. My vegetarian friend tried these and asked for the recipe immediately.
Spicy Jalapeño Cheddar Pockets
Add sliced pickled jalapeños and use pepper jack cheese instead of mozzarella. Brush the tops with melted butter and sprinkle with chili powder before baking. These are amazing alongside a bowl of cozy crockpot beef stew.
Gluten-Free Option
Use a gluten-free all-purpose flour blend that contains xanthan gum. The dough will be a bit more delicate, so handle it gently. You might need to add an extra tablespoon of milk if the dough feels too dry. They won’t be as flaky as the original, but they’re still delicious.
Different Cheese Combinations
Experiment with your cheese blends. Swiss and ham is a classic combo. Gouda adds a smoky richness. Provolone melts beautifully. I once made a batch with leftover brie and caramelized onions, and it was absolutely decadent.
Serving & Storage Suggestions
These pockets are incredibly versatile when it comes to serving and storing. Here’s everything you need to know.
Serving Temperature: Serve these warm, straight from the oven or reheated. The cheese should be melty and the outside golden. If you’re serving them at room temperature, they’re still good, but the texture is best when warm.
What to Serve With: These pockets are a meal on their own, but they pair beautifully with a simple side salad, some fresh fruit, or a cup of tomato soup. For a heartier meal, serve them alongside a bowl of creamy loaded baked potato soup. The combination is pure comfort.
Refrigerator Storage: Baked pockets will keep in the refrigerator for up to 4 days. Store them in an airtight container. To reheat, pop them in a 350°F oven for 8-10 minutes, or in an air fryer at 350°F for 5 minutes. The microwave works in a pinch, but the texture won’t be as crispy.
Freezer Storage: This is where these pockets really shine. Unbaked pockets can be frozen for up to 3 months. Arrange them on a baking sheet and freeze until solid, then transfer to a freezer bag. When you’re ready to bake, place them on a parchment-lined baking sheet and bake at 375°F for 25-27 minutes. No need to thaw. Baked pockets also freeze well; just reheat them in the oven or air fryer.
Flavor Development: Here’s a little secret: these pockets actually taste better the next day. The flavors meld together overnight, and the texture becomes even more cohesive. If you can resist eating them all fresh, save a few for tomorrow.
Nutritional Information & Benefits
Here’s the approximate nutritional breakdown for one pocket (based on 8 servings):
| Nutrient | Amount per Pocket |
|---|---|
| Calories | 320 |
| Total Fat | 18g |
| Saturated Fat | 10g |
| Cholesterol | 65mg |
| Sodium | 680mg |
| Total Carbohydrates | 28g |
| Dietary Fiber | 1g |
| Sugars | 2g |
| Protein | 15g |
These pockets provide a good balance of protein and carbohydrates, making them a satisfying meal option. The ham is a great source of lean protein, while the cheese adds calcium and vitamin D. If you’re watching your sodium intake, you can use low-sodium ham and reduce the salt in the dough. For a lower-fat version, use reduced-fat cheese and swap the butter for Greek yogurt in the dough (though the texture will be different).
I personally love that these pockets let me control what goes into my family’s food. No preservatives, no weird additives, just real ingredients. That’s a win in my book.
Conclusion
These Easy Freezer-Friendly Ham and Cheese Pocket Sandwiches have become a staple in my kitchen for good reason. They’re simple, delicious, and incredibly convenient. Whether you’re packing lunches for the week, looking for a quick dinner solution, or just want something warm and comforting, these pockets deliver every time.
I love that this recipe is forgiving enough for beginners but satisfying enough for experienced cooks. You can make it exactly as written, or you can customize it with your favorite fillings and flavors. That’s the beauty of a good base recipe. It’s yours to play with.
So go ahead. Make a batch this weekend. Freeze some for later. And the next time someone in your house says, “I’m hungry,” you’ll be ready. I’d love to hear how yours turn out. Leave a comment below and let me know what fillings you used, or tag me in your photos. Happy cooking, friend.
Frequently Asked Questions
Can I use store-bought pizza dough instead of making my own?
Absolutely. Store-bought pizza dough works great if you’re short on time. Just roll it out a bit thinner than you would for pizza, and follow the same assembly instructions. The texture will be a bit different, but the flavor is still fantastic.
How do I prevent the pockets from getting soggy when reheating?
The key is to reheat them in the oven or air fryer, not the microwave. The microwave creates steam, which makes the dough soggy. A 350°F oven for 8-10 minutes will restore the crispy exterior. If you’re in a rush, an air fryer works even faster.
Can I make these dairy-free?
Yes. Use a plant-based butter substitute for the dough and dairy-free cheese shreds for the filling. Coconut milk works as a milk substitute in the dough. Just note that dairy-free cheese doesn’t melt the same way, so the texture will be slightly different.
How long do these last in the freezer?
Unbaked pockets stay fresh in the freezer for up to 3 months. Baked pockets last about 2 months. Make sure to label your freezer bag with the date so you don’t forget. I write the baking instructions on the bag too, so I don’t have to look them up every time.
Can I use leftover ham from a holiday dinner?
Definitely. Leftover ham works perfectly. Just make sure it’s thinly sliced or chopped into small pieces so it fits neatly inside the pockets. This is a great way to use up leftover Easter or Christmas ham.
Pin This Recipe!


Easy Freezer-Friendly Ham and Cheese Pockets
Golden, flaky pockets filled with ham and melty cheese, perfect for meal prep and freezer storage. A quick and easy homemade alternative to store-bought frozen sandwiches.
- Total Time: 35 minutes
- Yield: 8 servings 1x
Ingredients
- 3 cups (360g) all-purpose flour
- 1/2 cup (113g) unsalted butter, cold and cubed
- 3/4 cup (180ml) whole milk
- 2 teaspoons baking powder
- 1 teaspoon salt
- 1/2 teaspoon garlic powder (optional)
- 8 ounces (225g) thinly sliced ham (e.g., black forest ham)
- 1 cup (120g) shredded cheddar cheese
- 1/2 cup (60g) shredded mozzarella cheese
- 2 tablespoons Dijon mustard (optional)
- 1 large egg (for egg wash)
- 1 tablespoon water (for egg wash)
- Sesame seeds or everything bagel seasoning (optional, for topping)
Instructions
- In a large mixing bowl, whisk together flour, baking powder, salt, and garlic powder. Add cold cubed butter. Using a pastry cutter or fingertips, work the butter into the flour until the mixture resembles coarse crumbs with some pea-sized butter pieces remaining (about 2-3 minutes).
- Pour in the milk and stir with a fork until the dough just comes together (it will look shaggy). Turn out onto a lightly floured surface and knead gently 4-5 times until it forms a cohesive ball. Wrap in plastic wrap and refrigerate for 15 minutes.
- While dough chills, shred cheeses and mix together in a small bowl. Lay out ham slices on a cutting board.
- Preheat oven to 375°F (190°C). Line a baking sheet with parchment paper.
- On a lightly floured surface, roll dough into a 12×16-inch rectangle, about 1/8-inch thick. Cut into 8 equal rectangles (roughly 4×6 inches each).
- Working with one rectangle at a time, spread a thin layer of Dijon mustard on one half (if using). Add a slice or two of ham, folding to fit. Sprinkle about 2-3 tablespoons of the cheese mixture on top.
- Fold the other half of the dough over the filling. Press edges firmly with fingers to seal, then crimp with a fork all around. Place on prepared baking sheet. Repeat with remaining dough and filling.
- In a small bowl, beat the egg with 1 tablespoon of water. Brush tops of each pocket with egg wash. Sprinkle sesame seeds or everything bagel seasoning on top if desired.
- Bake for 18-22 minutes, until deep golden brown and filling is bubbly. Let cool on baking sheet for 5 minutes before serving (filling will be very hot).
- For freezing: Assemble pockets, place on parchment-lined baking sheet, and freeze until solid (about 2 hours). Transfer to freezer-safe bag. To bake from frozen, add 5-7 minutes to baking time (no need to thaw).
Notes
Keep butter cold for flaky dough. Don’t overfill pockets to prevent blowouts. Seal edges well with a fork. Let pockets rest 5 minutes after baking to avoid burning mouth. Double the batch for extra freezer stock. For best reheating, use oven or air fryer (not microwave) to avoid sogginess.
- Prep Time: 15 minutes
- Cook Time: 20 minutes
- Category: Main Course
- Cuisine: American
Nutrition
- Serving Size: 1 pocket
- Calories: 320
- Sugar: 2
- Sodium: 680
- Fat: 18
- Saturated Fat: 10
- Carbohydrates: 28
- Fiber: 1
- Protein: 15
Keywords: ham and cheese pockets, freezer-friendly, meal prep, easy lunch, homemade pockets, kid-friendly


