

My sister had sworn off Halloween baking for a decade. Ten years. Ever since the year she tried to make those fancy decorated sugar cookies for her son’s preschool party—the ones that took three days and left her crying over a bowl of royal icing that wouldn’t cooperate. She’d declared Halloween desserts “a scam” and stuck to buying bags of candy every October. Then I showed up at her door last October with a plate of these spider web cookies, still warm, the chocolate chips gooey and the web pattern just messy enough to look intentional. I found her forty minutes later, standing over the kitchen island, eating her third one and staring at the plate like it had personally betrayed her. “These are stupid easy,” she said, mouth half full. “Why are these so stupid easy?” Honestly, I think she was mad she couldn’t stay mad at Halloween baking anymore.
That’s the thing about these spider web chocolate chip cookies. They look like you spent hours piping intricate designs, but the secret is you’re just dragging a toothpick through melted chocolate. That’s it. No special tips, no steady hand required. I’ve made these on a Tuesday night after work, during a power outage by candlelight (don’t recommend that one, but it worked), and with a toddler “helping” me in the kitchen. They turn out perfect every single time. Maybe you’ve been there—wanting to bring something festive to a party without losing your whole weekend to it. These cookies are your answer.
Why You’ll Love This Recipe
Let me tell you why these spider web cookies have become my most-requested Halloween recipe. I’ve tested this about six times to get the balance right between cookie texture and chocolate web stability, and honestly, it’s the kind of recipe that makes you look like a baking hero with almost zero effort.
- Quick & Easy: From start to finish, you’re looking at about 30 minutes. The dough comes together in one bowl, no chilling required, and the spider web design takes maybe two minutes per cookie.
- Simple Ingredients: Butter, sugar, eggs, flour, chocolate chips. You probably have everything already. No specialty baking supplies, no weird extracts you’ll never use again.
- Perfect for Halloween Parties: These look impressive on a dessert table but don’t require any piping bags or artistic talent. Kids love making them, too.
- Crowd-Pleaser: I’ve brought these to four different Halloween gatherings now, and every single time, someone asks for the recipe. They disappear faster than the store-bought candy.
- Unbelievably Delicious: The cookie itself is soft, chewy, and packed with chocolate chips. The chocolate web on top adds this satisfying snap when you bite into it. It’s comfort food with a spooky twist.
What makes this version different from every other spider web cookie out there? I spent a lot of time figuring out the right dough temperature so the chocolate web sets properly without melting into the cookie. Too warm and the web disappears. Too cold and the chocolate seizes up. This recipe nails that sweet spot. It’s the kind of cookie that makes you close your eyes after the first bite—indulgent, festive, and somehow still easy enough for a Tuesday night.
What Ingredients You Will Need
This recipe uses simple, pantry-friendly ingredients to create soft, chewy cookies with a dramatic Halloween makeover. Nothing fancy here—just good baking basics that work together beautifully.
- Unsalted butter, softened (1 cup / 2 sticks) — I use Land O’Lakes for consistent results. Make sure it’s truly softened to room temperature, not melted. Melted butter changes the cookie texture.
- Granulated sugar (¾ cup / 150g) — Adds sweetness and helps with that slight crisp edge.
- Light brown sugar, packed (¾ cup / 150g) — This is where the chewiness comes from. Dark brown sugar works too, but the cookies will be slightly softer.
- Large eggs (2, room temperature) — Cold eggs can make the dough stiff. Let them sit out for 15 minutes if you forgot to plan ahead.
- Vanilla extract (2 teaspoons) — Pure vanilla makes a difference here. I’ve used imitation in a pinch, and honestly, it works fine for this recipe.
- All-purpose flour (2 ¼ cups / 280g) — Spoon and level your flour. Scooping directly from the bag packs too much in and gives you dry cookies.
- Baking soda (1 teaspoon) — Make sure it’s fresh. If your baking soda is older than six months, it might not give enough lift.
- Salt (½ teaspoon) — Balances the sweetness. I prefer fine sea salt for baking.
- Semi-sweet chocolate chips (1 ½ cups / 260g) — I’m partial to Ghirardelli for their melt quality. Reserve ½ cup for melting into the web pattern.
- White chocolate chips or melting wafers (½ cup / 90g) — These create the white web contrast. White melting wafers are more stable than white chocolate chips, which can seize.
Substitution Notes: For a dairy-free version, use plant-based butter sticks (not tub margarine) and dairy-free chocolate chips. The texture will be slightly different but still delicious. If you don’t have white chocolate, you can use melted white candy melts or even a simple powdered sugar glaze tinted white.
Equipment Needed
You don’t need much for these spider web cookies. Here’s what you’ll want on hand:
- Electric mixer (hand or stand) — You can cream butter and sugar by hand, but it takes a solid 5 minutes of elbow grease. I’ve done it. Not my favorite.
- Large mixing bowl — One bowl for everything. Less cleanup.
- Baking sheets (2) — Light-colored metal sheets work best. Dark sheets can over-brown the bottoms.
- Parchment paper or silicone baking mats — Silicone mats are worth the investment. They prevent spread and make cleanup effortless.
- Cookie scoop (2-tablespoon size) — For uniform cookies. A regular spoon works, but the scoop saves time.
- Cooling rack — Essential for letting cookies cool completely before adding the web. Warm cookies will melt your chocolate.
- Small piping bag or zip-top bag — For drizzling the chocolate. A zip-top bag with a tiny corner snipped off works perfectly.
- Toothpick or wooden skewer — This is your spider web tool. A toothpick gives thinner lines; a skewer gives bolder ones.
If you don’t have a piping bag, don’t stress. I’ve used a fork to drizzle chocolate before. It’s messier but still works. The toothpick does the real magic anyway.
Preparation Method
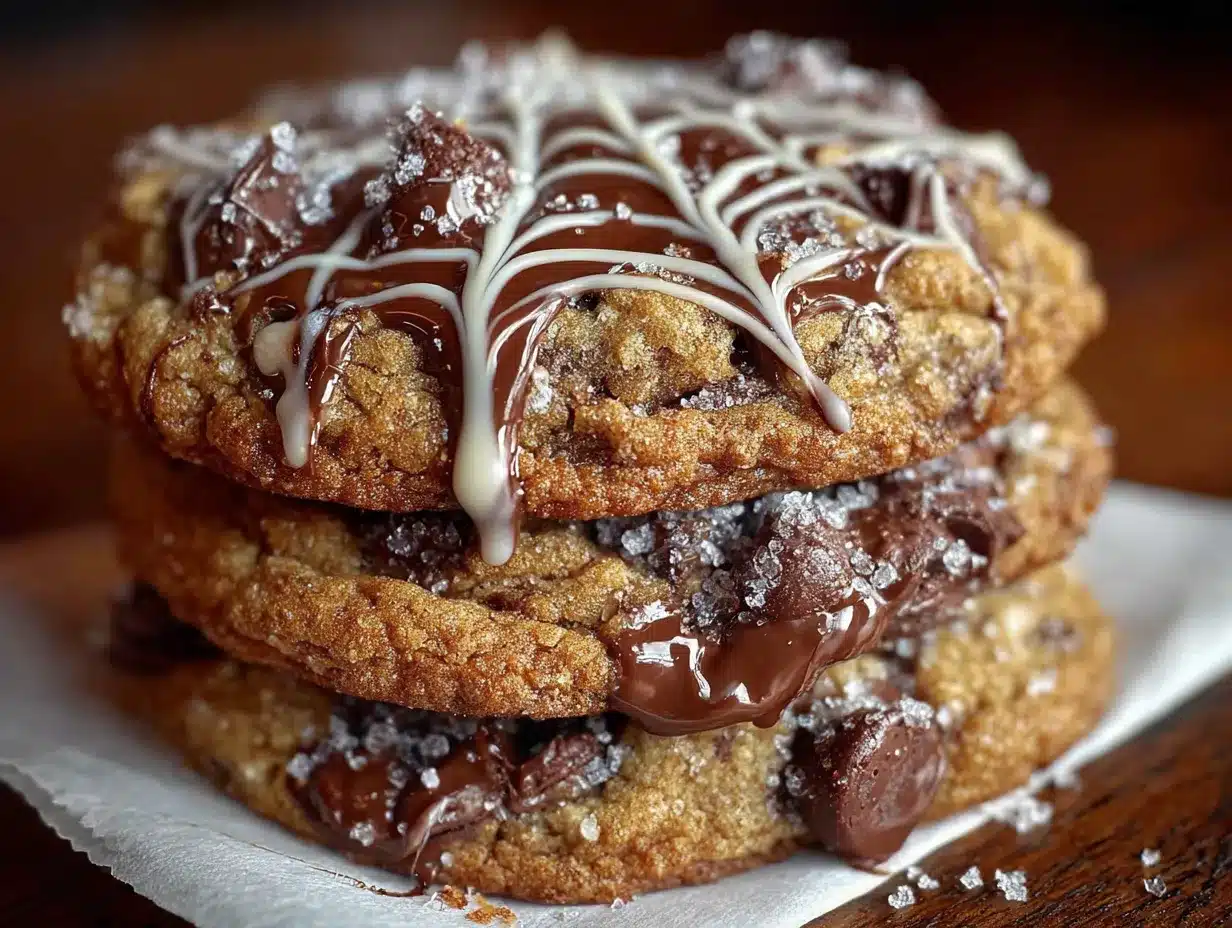
Let’s make these spider web cookies. I’ll walk you through every step, including the little things I learned from my failed attempts.
- Preheat your oven to 350°F (175°C). Line two baking sheets with parchment paper or silicone mats. Do not skip the lining—these cookies will stick otherwise.
- Cream the butter and sugars. In your large bowl, beat the softened butter, granulated sugar, and brown sugar together until light and fluffy. This takes about 3 minutes with an electric mixer on medium speed. You’ll know it’s ready when the mixture looks pale and feels airy. Scrape down the sides halfway through.
- Add eggs and vanilla. Beat in the eggs one at a time, mixing well after each. Add the vanilla extract. The mixture might look slightly curdled at this point—that’s normal, don’t panic. It comes together when you add the flour.
- Mix dry ingredients. In a separate small bowl, whisk together the flour, baking soda, and salt. Gradually add this to the wet mixture, mixing on low speed until just combined. Overmixing here makes tough cookies. Stop when you no longer see streaks of flour.
- Fold in chocolate chips. Stir in 1 cup of the semi-sweet chocolate chips by hand with a spatula. Save the remaining ½ cup for melting later. The dough will be thick and slightly sticky—that’s what you want.
- Scoop and bake. Drop rounded tablespoons of dough (about 2 tablespoons each) onto your prepared baking sheets, spacing them 2 inches apart. Bake for 10-12 minutes. The edges should be golden brown, but the centers will look slightly underdone and puffy. That’s how you get soft cookies. I pulled mine at 11 minutes exactly on my oven.
- Cool completely. Let the cookies rest on the baking sheet for 5 minutes, then transfer to a cooling rack. This is the hardest part—waiting. But trust me, if the cookies are even slightly warm when you add the chocolate web, it will slide right off. I learned this the hard way making a very sad, melted mess.
- Melt the chocolate. While cookies cool, melt the reserved ½ cup semi-sweet chocolate chips. You can do this in the microwave in 20-second bursts, stirring between each, or in a double boiler. Be careful—chocolate burns easily and seizes up if water gets in it.
- Melt the white chocolate. Do the same with your white chocolate chips or melting wafers. White chocolate is more temperamental, so go slow. If it seizes, add a teaspoon of coconut oil and stir.
- Create the web. Once cookies are completely cool, drizzle a small circle of dark chocolate in the center of each cookie. Then drizzle a smaller circle of white chocolate on top. Use your toothpick to drag lines from the center outward, like spokes on a wheel. Then drag lines from the outer edge toward the center, creating the web effect. Wipe your toothpick clean between cookies for sharp lines.
- Let the web set. Allow the chocolate to firm up completely, about 30 minutes at room temperature or 15 minutes in the fridge. The web should be firm to the touch before stacking or serving.
Cooking Tips & Techniques
I’ve made these spider web cookies probably a dozen times now, and I’ve messed up enough to know what works. Here’s what I wish someone had told me:
Don’t overbake the cookies. I cannot stress this enough. The cookies continue cooking on the hot baking sheet after you pull them out. If they look done in the oven, they’ll be overdone on the plate. Pull them when the edges are set but the centers still look soft and slightly puffy. They’ll settle into perfect chewy cookies as they cool.
Chill the dough if your kitchen is warm. If you’re baking on a hot day or your kitchen runs warm, pop the scooped dough in the fridge for 15 minutes before baking. This prevents excessive spreading. I forgot this once during a heatwave and ended up with giant flat cookies that looked more like pancakes than spider webs.
Work with one cookie at a time for the web. Don’t try to drizzle chocolate on all cookies first and then drag lines. The chocolate will start setting before you get to the last cookie. Drizzle one cookie, drag the web, then move to the next. It takes maybe 30 seconds per cookie.
Use a light hand with the toothpick. You don’t need to press hard. Just barely drag through the chocolate. Pressing too hard will dig into the cookie and mess up the pattern. Gentle, quick strokes work best.
If the chocolate starts thickening, reheat it. Chocolate cools fast. If your melted chocolate starts getting stiff, pop it back in the microwave for 10 seconds. Don’t let it get hot, just warm enough to flow again.
Variations & Adaptations
These spider web cookies are flexible. Here are some ways I’ve changed them up:
Gluten-Free Version: Substitute the all-purpose flour with a 1:1 gluten-free baking flour blend. I’ve used Bob’s Red Mill with good results. Add an extra tablespoon of milk to the dough since gluten-free flours absorb more liquid. The cookies will be slightly more delicate but still delicious.
Dark Chocolate Web: Instead of white chocolate, use all dark chocolate for a more dramatic look. The web will be harder to see, but the flavor is deeper. I did this for a Halloween party where the theme was “elegant spooky” and they were a hit.
Peanut Butter Spider Web Cookies: Replace ¼ cup of the butter with creamy peanut butter. Reduce the flour by 2 tablespoons. The cookies will be softer and have that peanut butter-chocolate combo everyone loves. Just note the web pattern might be slightly less defined on the softer surface.
Spider Decoration: Add a small candy spider on top of each cookie after the web sets. I’ve used black licorice legs with a chocolate candy body, or you can buy pre-made candy spiders at baking supply stores. My niece loves these—she calls them “the full spider experience.”
Mint Chocolate Version: Add ½ teaspoon peppermint extract to the dough along with the vanilla. Use dark chocolate for the web and white chocolate for the contrast. The minty freshness pairs surprisingly well with the chocolate. I made these for a Christmas-Halloweeen mashup party and they were gone in minutes.
Serving & Storage Suggestions
These spider web cookies are best served at room temperature. The chocolate web should be firm but still snappy when you bite into it. I like to arrange them on a black or orange platter for Halloween parties—the contrast makes the web pattern pop.
For serving at parties, I recommend placing them on a cake stand or flat tray in a single layer. Stacking can smudge the webs if the chocolate hasn’t fully set. If you must stack, place a piece of parchment paper between layers.
Storage: Keep these cookies in an airtight container at room temperature for up to 5 days. Do not refrigerate them—the cold can cause the chocolate to bloom (develop white streaks) and the cookies to dry out. If your kitchen is very warm, store them in a cool pantry instead.
Freezing: You can freeze the baked cookies without the chocolate web for up to 3 months. Wrap them individually in plastic wrap, then place in a freezer bag. When ready to serve, thaw at room temperature, then add the spider web design. The cookies will taste fresh. I’ve frozen the dough too—scoop it into balls, freeze on a baking sheet, then transfer to a bag. Bake from frozen, adding 2-3 minutes to the baking time.
One thing I love about these cookies is that the flavors actually meld together after a day. The chocolate web softens slightly and melds with the cookie. Day-old spider web cookies are honestly my favorite version.
Nutritional Information & Benefits
Here’s the approximate nutritional breakdown for one spider web cookie (based on 24 cookies):
- Calories: 210
- Total Fat: 11g
- Saturated Fat: 7g
- Cholesterol: 30mg
- Sodium: 95mg
- Total Carbohydrates: 28g
- Dietary Fiber: 1g
- Sugars: 18g
- Protein: 3g
These are indulgent cookies, no question. But I want to be honest about what you’re getting. The semi-sweet chocolate chips contain some antioxidants from the cocoa, and the eggs provide a bit of protein. If you’re watching sugar, you can reduce the granulated sugar to ½ cup—the cookies will be less sweet but still work with the chocolate web.
For those with dietary restrictions, note that this recipe contains gluten, dairy, and eggs. The gluten-free variation mentioned earlier works well, and using plant-based butter and dairy-free chocolate chips makes this vegan-friendly. Always check labels on chocolate chips, as some brands contain milk solids or soy lecithin.
I believe in enjoying treats in moderation. These spider web cookies are a celebration food—perfect for Halloween parties, fall gatherings, or just because it’s October. One cookie satisfies that sweet craving without going overboard.
Conclusion
These spider web chocolate chip cookies are the Halloween dessert you’ve been looking for. They look impressive, taste amazing, and come together in under an hour with ingredients you probably already have. No fancy piping skills, no stressful decorating—just good cookies with a fun, spooky twist.
What I love most about this recipe is how it brings people together. My sister, who swore off Halloween baking for a decade, now makes these every year for her son’s class party. She even started adding her own twist—green food coloring in the white chocolate for a more “creepy” web. That’s the beauty of this recipe. It’s a starting point, not a strict rulebook. Make it your own.
I’d love to hear how yours turn out. Drop a comment below and tell me about your spider web cookie adventure. Did you add spiders? Try a different chocolate? Forget to let the cookies cool and end up with a chocolate puddle? (Been there.) Share your wins and your messes—that’s how we all get better at this baking thing.
Happy Halloween baking, my friend. You’ve got this.
Frequently Asked Questions
Can I use store-bought cookie dough instead of making from scratch?
Yes, absolutely. If you’re short on time, use pre-made chocolate chip cookie dough from the refrigerated section. Just bake according to package directions, let cool completely, and add the spider web design. The cookies won’t be quite as chewy, but the web effect works the same way.
Why did my chocolate web melt into the cookie?
This happens when the cookies are still warm when you add the chocolate. The heat from the cookie melts the chocolate, causing it to spread and lose the web pattern. Make sure your cookies are completely cool to the touch before drizzling. I usually wait at least 30 minutes after they come out of the oven.
Can I make the spider web design ahead of time?
You can add the web up to 24 hours before serving. Store the decorated cookies in a single layer in an airtight container at room temperature. The chocolate will stay firm and the web pattern will remain crisp. Do not refrigerate, as condensation can ruin the design.
What if I don’t have white chocolate for the web?
No problem. You can use all dark chocolate for a more subtle web, or make a simple powdered sugar glaze (1 cup powdered sugar mixed with 2 tablespoons milk) and tint it white or any color you like. The glaze will be softer than chocolate but still creates a nice spider web effect.
How do I get clean, sharp spider web lines?
The key is using a clean toothpick for each cookie. Wipe it off between cookies to avoid dragging colors together. Also, work quickly—drizzle the chocolate, then immediately drag your lines before the chocolate starts setting. If the chocolate thickens, reheat it for 10 seconds in the microwave.
Pin This Recipe!


Easy Spider Web Cookies: Best Halloween Treat
These spider web chocolate chip cookies look like you spent hours piping intricate designs, but the secret is you’re just dragging a toothpick through melted chocolate. They’re soft, chewy, and packed with chocolate chips, with a dramatic Halloween makeover that comes together in under an hour.
- Total Time: 30 minutes
- Yield: 24 servings 1x
Ingredients
- 1 cup (2 sticks) unsalted butter, softened
- 3/4 cup (150g) granulated sugar
- 3/4 cup (150g) light brown sugar, packed
- 2 large eggs, room temperature
- 2 teaspoons vanilla extract
- 2 1/4 cups (280g) all-purpose flour
- 1 teaspoon baking soda
- 1/2 teaspoon salt
- 1 1/2 cups (260g) semi-sweet chocolate chips, divided (1 cup for dough, 1/2 cup for melting)
- 1/2 cup (90g) white chocolate chips or melting wafers
Instructions
- Preheat your oven to 350°F (175°C). Line two baking sheets with parchment paper or silicone mats.
- In a large bowl, beat the softened butter, granulated sugar, and brown sugar together until light and fluffy, about 3 minutes with an electric mixer on medium speed. Scrape down the sides halfway through.
- Beat in the eggs one at a time, mixing well after each. Add the vanilla extract. The mixture might look slightly curdled—this is normal.
- In a separate small bowl, whisk together the flour, baking soda, and salt. Gradually add this to the wet mixture, mixing on low speed until just combined. Do not overmix.
- Fold in 1 cup of the semi-sweet chocolate chips by hand with a spatula. Reserve the remaining 1/2 cup for melting later.
- Drop rounded tablespoons of dough (about 2 tablespoons each) onto the prepared baking sheets, spacing them 2 inches apart. Bake for 10-12 minutes. The edges should be golden brown, but the centers will look slightly underdone and puffy.
- Let the cookies rest on the baking sheet for 5 minutes, then transfer to a cooling rack to cool completely.
- While cookies cool, melt the reserved 1/2 cup semi-sweet chocolate chips in the microwave in 20-second bursts, stirring between each, or in a double boiler.
- Melt the white chocolate chips or melting wafers in the same way. White chocolate is more temperamental, so go slow. If it seizes, add a teaspoon of coconut oil and stir.
- Once cookies are completely cool, drizzle a small circle of dark chocolate in the center of each cookie. Then drizzle a smaller circle of white chocolate on top. Use a toothpick to drag lines from the center outward, like spokes on a wheel. Then drag lines from the outer edge toward the center, creating the web effect. Wipe your toothpick clean between cookies for sharp lines.
- Allow the chocolate to firm up completely, about 30 minutes at room temperature or 15 minutes in the fridge. The web should be firm to the touch before stacking or serving.
Notes
Don’t overbake the cookies; they continue cooking on the hot baking sheet after removal. If your kitchen is warm, chill the scooped dough for 15 minutes before baking to prevent excessive spreading. Work with one cookie at a time for the web to prevent the chocolate from setting before you drag the lines. Use a light hand with the toothpick—gentle, quick strokes work best. If the chocolate starts thickening, reheat it for 10 seconds in the microwave.
- Prep Time: 15 minutes
- Cook Time: 12 minutes
- Category: Dessert
- Cuisine: American
Nutrition
- Serving Size: 1 cookie
- Calories: 210
- Sugar: 18
- Sodium: 95
- Fat: 11
- Saturated Fat: 7
- Carbohydrates: 28
- Fiber: 1
- Protein: 3
Keywords: spider web cookies, Halloween cookies, chocolate chip cookies, easy Halloween dessert, no-chill cookie dough


