
“Can you grab something for dessert? Nothing fancy.” Those words came after a hectic afternoon juggling errands, and honestly, I was wiped out. I didn’t want to bake or fuss with an oven, but I also didn’t want to show up empty-handed at the backyard barbecue. So, I rifled through the pantry and fridge, spotting a pack of Oreos and some leftover cream cheese. Suddenly, the idea for this creamy no-bake berry flag cheesecake with Oreo crust took shape—quick, simple, and crowd-pleasing.
What I didn’t expect was how this no-bake cheesecake would become a highlight. It had that cool, velvety texture that just melts on your tongue, paired with a crunchy, chocolatey Oreo crust that made every bite feel like a mini celebration. The berry flag topping? Bright, fresh, and just the right pop of tartness to balance out the creamy filling. People kept asking for the recipe, and I found myself making it again and again, especially when time was tight.
It’s funny how some of the best recipes come from rushed moments and a little bit of improvisation. This cheesecake quickly turned from a “just get something” plan to a dessert I actually look forward to making. Plus, it feels playful—like a sweet nod to summer barbecues and patriotic holidays without the fuss of baking. That’s why this recipe stuck with me: it’s easy, delicious, and honestly, kind of fun to put together. I hope it finds a spot in your kitchen too, whenever you need a no-fuss dessert that still wows.
Why You’ll Love This Creamy No-Bake Berry Flag Cheesecake with Oreo Crust
After testing this recipe several times (and tweaking the berry arrangement multiple ways), I’m convinced it hits a sweet spot between simplicity and impressive presentation. Here’s what makes this no-bake berry flag cheesecake a go-to for me and my friends:
- Quick & Easy: Ready in about 30 minutes, plus chilling time, so it’s perfect for last-minute gatherings or a relaxed weekend treat.
- Simple Ingredients: No fancy or hard-to-find items — Oreos, cream cheese, fresh berries, a little sugar, and whipped cream. Most are pantry staples.
- Perfect for Summer Celebrations: The berry flag design feels festive for 4th of July, Memorial Day, or any sunny get-together.
- Crowd-Pleaser: Adults and kids alike love it — the creamy texture with the chocolate crust hits all the right notes.
- Unbelievably Delicious: The Oreo crust gives a rich chocolate crunch that contrasts with the light, fluffy cheesecake filling.
This isn’t your average no-bake cheesecake. I like to blend the cream cheese until silky smooth, which gives the filling that perfect melt-in-your-mouth feel. The berry flag topping is a simple twist that adds visual flair and a fresh burst of flavor. Honestly, it’s the kind of dessert that makes you pause and really savor the moment — a little celebration on a plate.
If you like desserts that are both easy and a bit show-stopping, this recipe fits the bill. It’s a relaxed yet thoughtful way to treat yourself or guests without turning on the oven or running to specialty stores. And if you’re a fan of berry desserts, you might enjoy how this cheesecake pairs beautifully with other fruity recipes like the creamy no-churn strawberry ice cream or the fresh strawberry galette with vanilla glaze, both perfect for warm days.
What Ingredients You Will Need for Creamy No-Bake Berry Flag Cheesecake with Oreo Crust
This recipe uses simple, wholesome ingredients to deliver bold flavor and satisfying texture without the fuss. Most of these are pantry staples or easy to find at your local grocery store, and the berries give a fresh, seasonal touch. Here’s what you’ll need:
- Oreo Cookies: 24 cookies (about 1 ½ cups crushed). I prefer using classic Oreos with the filling for extra sweetness and moisture in the crust.
- Unsalted Butter: 6 tbsp (85g), melted — binds the crust together and adds richness.
- Cream Cheese: 16 oz (450g), softened to room temperature — the base of the creamy filling. I use Philadelphia for consistent texture.
- Granulated Sugar: ¾ cup (150g) — sweetens the cheesecake filling just right.
- Heavy Whipping Cream: 1 cup (240ml), cold — whipped to soft peaks for a light, airy texture.
- Vanilla Extract: 1 tsp — adds warm depth to the filling.
- Fresh Strawberries: About 1 cup, sliced — for the red stripes in the berry flag.
- Fresh Blueberries: About 1 cup — for the blue star section of the flag.
- Fresh Raspberries: Optional, about ½ cup — can add extra red color or mix with strawberries if you like.
If you want a dairy-free option, you can swap cream cheese with a plant-based alternative and use coconut cream instead of heavy cream. Also, using gluten-free Oreos works well if you’re avoiding gluten. For a twist, I sometimes add a teaspoon of lemon zest to brighten the filling, but it’s completely optional.
Equipment Needed
- 9-inch Springform Pan: Essential for easy cheesecake removal. If you don’t have one, a regular pie dish works, but the presentation might be less neat.
- Food Processor or Rolling Pin: To crush Oreos finely. I like using a food processor for quick, even crumbs.
- Electric Mixer or Stand Mixer: For whipping cream and blending filling until smooth. Hand mixers can work but might take longer.
- Mixing Bowls: A few medium to large bowls for crust, filling, and whipping cream.
- Rubber Spatula: For folding whipped cream gently into cream cheese mixture.
- Measuring Cups and Spoons: To get ingredient amounts just right.
For budget-friendly kitchens, crushing Oreos by hand in a sealed bag with a rolling pin is a great alternative. I also keep a dedicated springform pan for cheesecakes — it makes life easier and cleanup faster. Make sure your butter is melted but not hot, or it can affect the crust texture.
Preparation Method
- Prepare the Oreo Crust: Crush 24 Oreos into fine crumbs using a food processor or place in a sealed plastic bag and crush with a rolling pin until evenly ground (about 1 ½ cups crumbs).
Tip: The crumbs should look like wet sand, not powdery. Melt 6 tablespoons (85g) of unsalted butter and mix it into the crumbs until combined.
Press this mixture evenly into the bottom of a 9-inch springform pan, using the back of a spoon or a flat bottom glass to compact it firmly.
Chill the crust in the refrigerator while you prepare the filling (about 10-15 minutes). - Make the Cream Cheese Filling: In a large bowl, beat 16 oz (450g) softened cream cheese with ¾ cup (150g) granulated sugar until smooth and creamy, about 3-4 minutes using an electric mixer.
Add 1 teaspoon vanilla extract and mix briefly to combine.
In a separate chilled bowl, whip 1 cup (240ml) heavy whipping cream until soft peaks form.
Gently fold the whipped cream into the cream cheese mixture in batches, using a rubber spatula, to keep the filling light and airy.
Note: Don’t overmix here — it should look fluffy and smooth. - Assemble the Cheesecake: Pour the cream cheese filling over the chilled Oreo crust and spread evenly with a spatula.
Refrigerate the cheesecake for at least 4 hours or overnight to set properly.
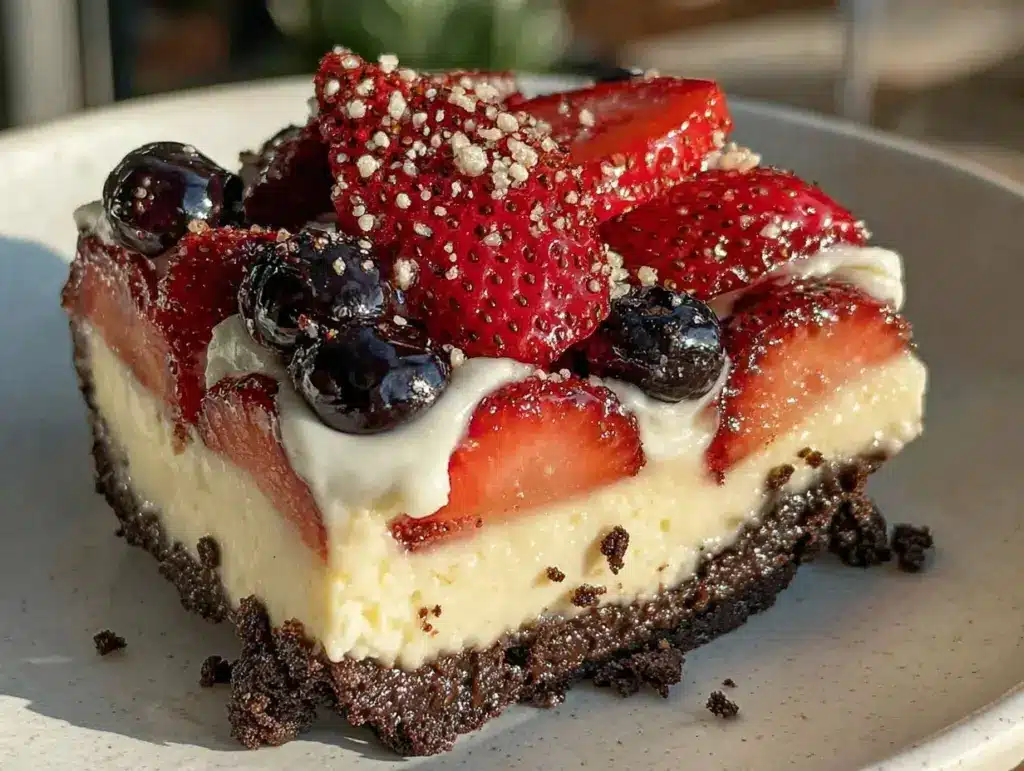
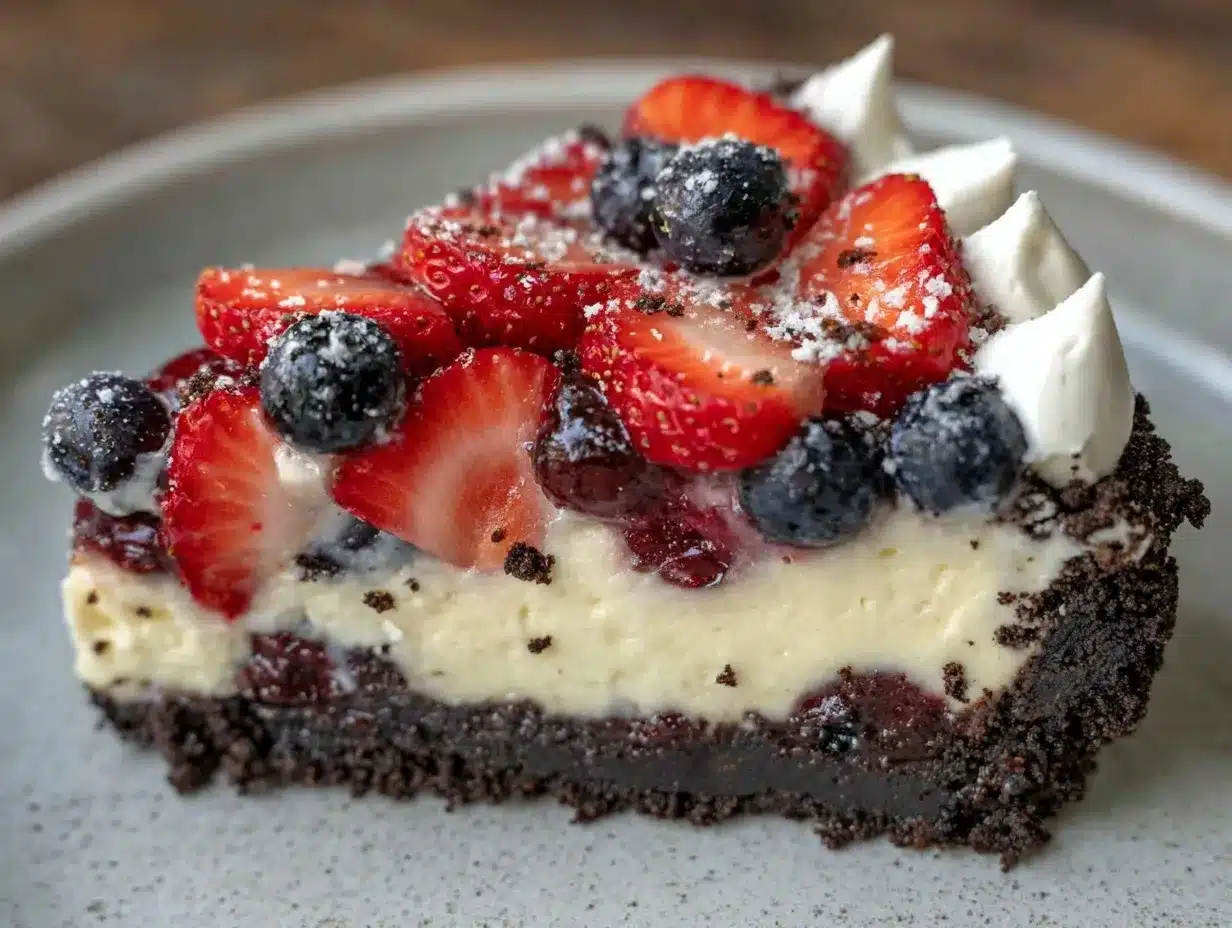
Patience is key here — the texture improves with time. - Create the Berry Flag Topping: Once set, arrange about 1 cup fresh blueberries in the upper left corner of the cheesecake to form the “blue star” section.
Use sliced strawberries (about 1 cup) to create the red stripes across the rest of the cheesecake surface.
You can add raspberries for extra red color or alternate with strawberries if you prefer.
Tip: Wash berries gently and pat dry to avoid moisture making the topping soggy. - Final Chill and Serve: Return the cheesecake to the refrigerator for 15-20 minutes after decorating so the berries settle in.
Run a hot knife around the springform edge before releasing to get clean slices.
Serve chilled and enjoy the creamy, chocolatey, fruity goodness!
Cooking Tips & Techniques for the Perfect No-Bake Cheesecake
One of the most common slip-ups is not softening the cream cheese enough. I learned the hard way that cold cream cheese leads to lumps and a gritty texture. Let it sit out for at least 30 minutes before mixing.
When crushing Oreos, aim for uniform crumbs. Too chunky and the crust won’t hold well; too fine and it can get mushy. Pressing the crust firmly into the pan helps prevent crumbling when slicing.
Whipping the cream to soft peaks—not stiff—is crucial. Overwhipped cream can deflate when folded, while underwhipped leaves the filling heavy. It should hold a gentle peak but still be flexible.
Folding whipped cream into the cream cheese mixture gently preserves the airy texture. Use a large spatula and a slow, sweeping motion. This trick keeps the cheesecake light instead of dense.
The berry flag design takes a little patience but no special skill. Take your time placing the berries, and don’t overcrowd—the berries should sit nicely on top without sinking. If berries are wet, pat them dry to avoid sogginess.
If you’re short on time, chilling the cheesecake in the freezer for 2 hours speeds up setting, but watch carefully to prevent freezing the edges.
Variations & Adaptations
- Fruit Swap: Use blackberries or cherries for a different color scheme or seasonal berries like mango and kiwi for a tropical twist.
- Crust Alternatives: Try a graham cracker crust for a lighter, more traditional base or gluten-free cookies if needed.
- Flavor Boost: Add lemon or orange zest to the filling for a citrusy zing, or mix in a tablespoon of almond extract for a subtle nutty note.
- Vegan Version: Use dairy-free cream cheese and coconut cream whipped to soft peaks. Swap Oreos for a vegan cookie brand to keep it plant-based.
- Mini Cheesecakes: Make individual servings using a muffin tin lined with cupcake liners for easy portion control and presentation.
Once, I tried swirling in some homemade strawberry preserves into the filling before chilling — it gave a beautiful marbled effect and an extra burst of berry flavor. It’s a fun way to mix things up without complicating the recipe.
Serving & Storage Suggestions
This cheesecake is best served chilled, straight from the fridge, so the creamy texture shines. Before serving, let it sit at room temperature for 10 minutes if it’s been very cold — it softens slightly and becomes even more luscious.
It pairs wonderfully with a glass of sparkling water with a twist of lemon or a light white wine like a Riesling for grown-up gatherings. To keep things casual, fresh iced tea or lemonade make great beverage companions.
Store leftovers tightly covered in the refrigerator for up to 4 days. You can also freeze the cheesecake in an airtight container for up to 1 month — thaw overnight in the fridge before serving.
When reheating, avoid the microwave (it melts the cream cheese filling). Instead, let slices warm gently at room temperature. Over time, the flavors meld beautifully, especially the berry topping, which gets juicier and more intense.
Nutritional Information & Benefits
A typical slice (1/12th of the cheesecake) has approximately 320 calories, 22g fat, 30g carbohydrates, and 5g protein. The Oreo crust contributes a bit of indulgence, but the fresh berries add fiber, antioxidants, and vitamins like C and K.
Cream cheese provides calcium and protein, while heavy cream adds richness. This dessert balances treat-worthy satisfaction with a dose of fresh fruit nutrients.
For those watching carbs, you can reduce sugar or substitute with a sugar alternative. Using gluten-free Oreos and dairy-free cream cheese can make it suitable for special diets too.
Personally, I appreciate how this cheesecake feels like a treat but also includes fresh berries that bring some brightness and wholesomeness. It’s a dessert you can feel good about sharing with family and friends.
Conclusion
This creamy no-bake berry flag cheesecake with Oreo crust is the kind of recipe that surprises you — simple ingredients, little effort, but big on flavor and presentation. Whether you’re scrambling to bring dessert to a summer party or just craving a cool, fruity cheesecake without turning on the oven, this recipe fits the bill.
Feel free to switch up the berries or add your own twist; it’s forgiving and fun to make. I love how it brings a festive, colorful vibe to any table while being wonderfully creamy and chocolaty at the same time.
If you try it, I’d love to hear how you customize it or what occasion you serve it for. Sharing these little kitchen wins is part of the joy, right? Here’s to simple pleasures and sweet moments made easy.
Frequently Asked Questions About Creamy No-Bake Berry Flag Cheesecake with Oreo Crust
Can I make this cheesecake ahead of time?
Absolutely! This cheesecake actually tastes better after chilling overnight, which helps the filling set fully and the flavors meld.
What can I substitute for Oreo cookies in the crust?
You can use graham crackers, digestive biscuits, or gluten-free cookies if needed. Just crush them finely and mix with melted butter as usual.
How do I prevent the crust from getting soggy?
Press the crust firmly and chill it well before adding the filling. Also, avoid letting the cheesecake sit out too long after assembling.
Can I use frozen berries for the topping?
Fresh berries are best for texture and presentation. If you use frozen, thaw and drain thoroughly to avoid extra moisture.
Is this cheesecake suitable for vegans?
With substitutions like dairy-free cream cheese, coconut cream, and vegan cookies, you can make a vegan-friendly version that’s just as tasty.
Print
Creamy No-Bake Berry Flag Cheesecake Easy Recipe with Oreo Crust
A quick and easy no-bake cheesecake featuring a crunchy Oreo crust and a festive berry flag topping, perfect for summer celebrations and last-minute desserts.
- Total Time: 4 hours 15 minutes
- Yield: 12 servings 1x
Ingredients
- 24 Oreo Cookies (about 1 ½ cups crushed)
- 6 tbsp (85g) unsalted butter, melted
- 16 oz (450g) cream cheese, softened to room temperature
- ¾ cup (150g) granulated sugar
- 1 cup (240ml) heavy whipping cream, cold
- 1 tsp vanilla extract
- About 1 cup fresh strawberries, sliced
- About 1 cup fresh blueberries
- Optional: ½ cup fresh raspberries
Instructions
- Crush 24 Oreos into fine crumbs using a food processor or place in a sealed plastic bag and crush with a rolling pin until evenly ground (about 1 ½ cups crumbs). Mix melted butter into the crumbs until combined.
- Press the Oreo crumb mixture evenly into the bottom of a 9-inch springform pan and chill in the refrigerator for 10-15 minutes.
- Beat softened cream cheese with granulated sugar until smooth and creamy. Add vanilla extract and mix briefly.
- Whip cold heavy cream in a separate chilled bowl until soft peaks form.
- Gently fold whipped cream into the cream cheese mixture in batches to keep the filling light and airy.
- Pour the cream cheese filling over the chilled Oreo crust and spread evenly. Refrigerate for at least 4 hours or overnight to set.
- Arrange fresh blueberries in the upper left corner of the cheesecake to form the blue star section of the flag.
- Create red stripes across the cheesecake surface using sliced strawberries and optionally raspberries.
- Return the cheesecake to the refrigerator for 15-20 minutes after decorating to let the berries settle.
- Run a hot knife around the springform edge before releasing to get clean slices. Serve chilled.
Notes
Let cream cheese soften to room temperature before mixing to avoid lumps. Crush Oreos to a wet sand texture for best crust. Whip cream to soft peaks and fold gently to keep filling airy. Chill cheesecake for at least 4 hours or overnight for best texture. Pat berries dry before topping to avoid sogginess. For faster setting, chill in freezer for 2 hours but watch to prevent freezing edges.
- Prep Time: 15 minutes
- Cook Time: 0 minutes
- Category: Dessert
- Cuisine: American
Nutrition
- Serving Size: 1 slice (1/12th of c
- Calories: 320
- Fat: 22
- Carbohydrates: 30
- Protein: 5
Keywords: no-bake cheesecake, Oreo crust, berry flag, summer dessert, easy cheesecake, patriotic dessert, no oven dessert


